9. UTILITY FUNCTION
9.3 Utility Display
9 - 9
9
UTILIT
Y
FUNCTION
10
C
O
MM
UNICA
TIO
N
IN
TE
RF
AC
E S
ETTING
(CO
M
MUN
ICA
TION
S
ETTIN
G
)
11
DI
SPL
A
Y
AN
D
OPERA
T
ION S
E
TTINGS
(G
OT SE
T UP)
12
C
LOC
K SET
TI
N
GS
AN
D
BA
TT
ER
Y ST
AT
U
S D
IS
PL
AY
(T
IM
E SET
TI
N
G
A
N
D
D
ISPL
AY)
13
FILE
D
ISP
LA
Y A
N
D
C
O
PY
(P
RO
GR
AM
/D
A
TA
CONTR
O
L
)
14
GO
T
SE
LF
CHE
CK
(DEB
UG AND
S
E
LF
CHECK)
15
CLEA
NING DISPL
A
Y
SE
CT
ION (CLE
AN)
16
INST
ALLA
TION OF
C
O
REOS, BOOT
OS
A
N
D
ST
AN
DA
RD
MO
NI
T
O
R
OS
9.3.3
Basic operation of settings change
Change of setting value
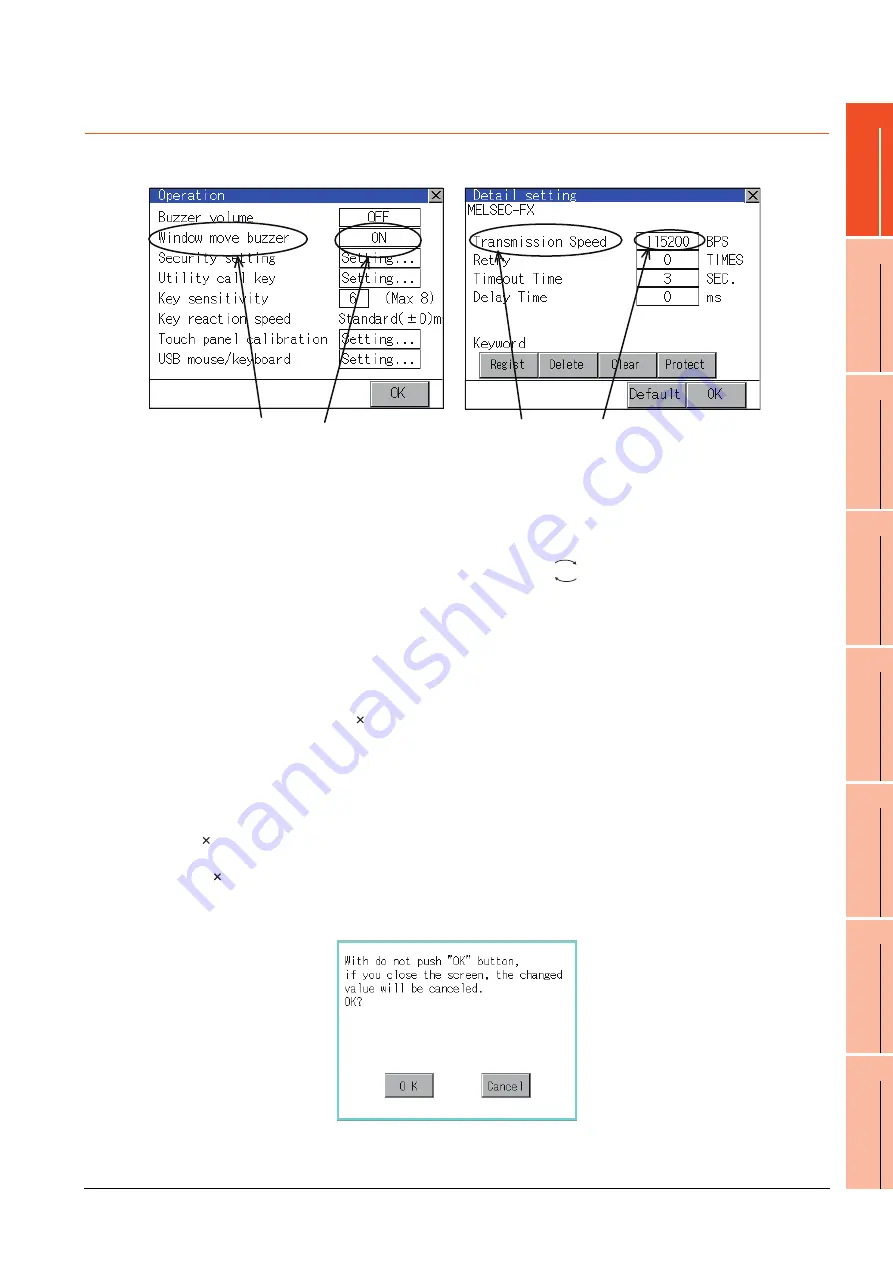
(1) Setting item, select button
Touch the select button to change the settings.
The setting methods differ depending on the setting items.
The following types of setting method are available.
(a) Switch the setting value.
Touch the button to switch the setting value as shown in
.
(b) Enter the setting value with a keyboard.
It is a key for inputting the numerical value. Touching this button displays a keyboard on the GOT screen.
For the operation of keyboard, refer to the next page.
(c) Move to another setting screen.
Touching this button moves to another setting screen.
For the setting method of each setting item, refer to the setting operation of each setting screen.
(2) [OK] button, [Cancel] button, [ ] (Close/Return) button
Reflect or cancel the changed settings.
(a) [OK] button
Touching this button reflects the changed settings.
(b) [Cancel] button
Touching this button cancels the changed settings and return to the previous screen.
(c) [ ] (Close/Return) button
Touching this button closes the screen. Depending on the setting item, the GOT restarts.
If [ ] button is touched without touching [OK] button, the following dialog box will be displayed.
(If the settings are not changed, the dialog box is not displayed.)
Operate following the message of the dialog box.
Setting item
Select button
Setting item
Select button
ON
OFF
Summary of Contents for Got 1000
Page 1: ......
Page 2: ......
Page 14: ...A 12 ...
Page 26: ...1 4 1 OVERVIEW 1 1 Features ...
Page 34: ...2 8 2 SYSTEM CONFIGURATION 2 2 System Equipment ...
Page 38: ...3 4 3 SPECIFICATIONS 3 3 Power Supply Specifications ...
Page 42: ...4 4 4 PARTS NAME 4 3 Rear Face ...
Page 54: ...6 6 6 INSTALLATION 6 5 Installation Procedure ...
Page 104: ...10 18 10 COMMUNICATION INTERFACE SETTING COMMUNICATION SETTING 10 3 Ethernet Setting ...
Page 226: ...13 92 13 FILE DISPLAY AND COPY PROGRAM DATA CONTROL 13 2 Various Data Control ...
Page 250: ...15 2 15 CLEANING DISPLAY SECTION CLEAN ...
Page 264: ...16 14 16 INSTALLATION OF COREOS BOOTOS AND STANDARD MONITOR OS 16 5 CoreOS ...
Page 272: ...17 8 17 MAINTENANCE AND INSPECTION 17 5 Backlight Shutoff Detection ...
Page 298: ...App 6 APPENDICES Appendix 1 External Dimensions ...
Page 302: ...App 10 APPENDICES Appendix 3 Transportation Precautions ...
Page 306: ...REVISIONS 2 ...
Page 309: ......
Page 310: ......