background image

Additional Features

173

SHARED CALL APPEARANCE (SCA) CALL BRIDGING

Shared Call Appearance (SCA) is when incoming calls are presented to multiple phones 
simultaneously. For example, it is the ability to assign the boss' extension to a key on the 
secretary's phone. Calls can be transferred between two phones with the same extension key 
by simply putting the call on hold at one phone and picking it up on the other. Status LEDs light 
and flash in unison, allowing all people sharing the extension to see the status at a glance. 

The phones include an enhanced SCA for the servers that support call bridging and allows two 
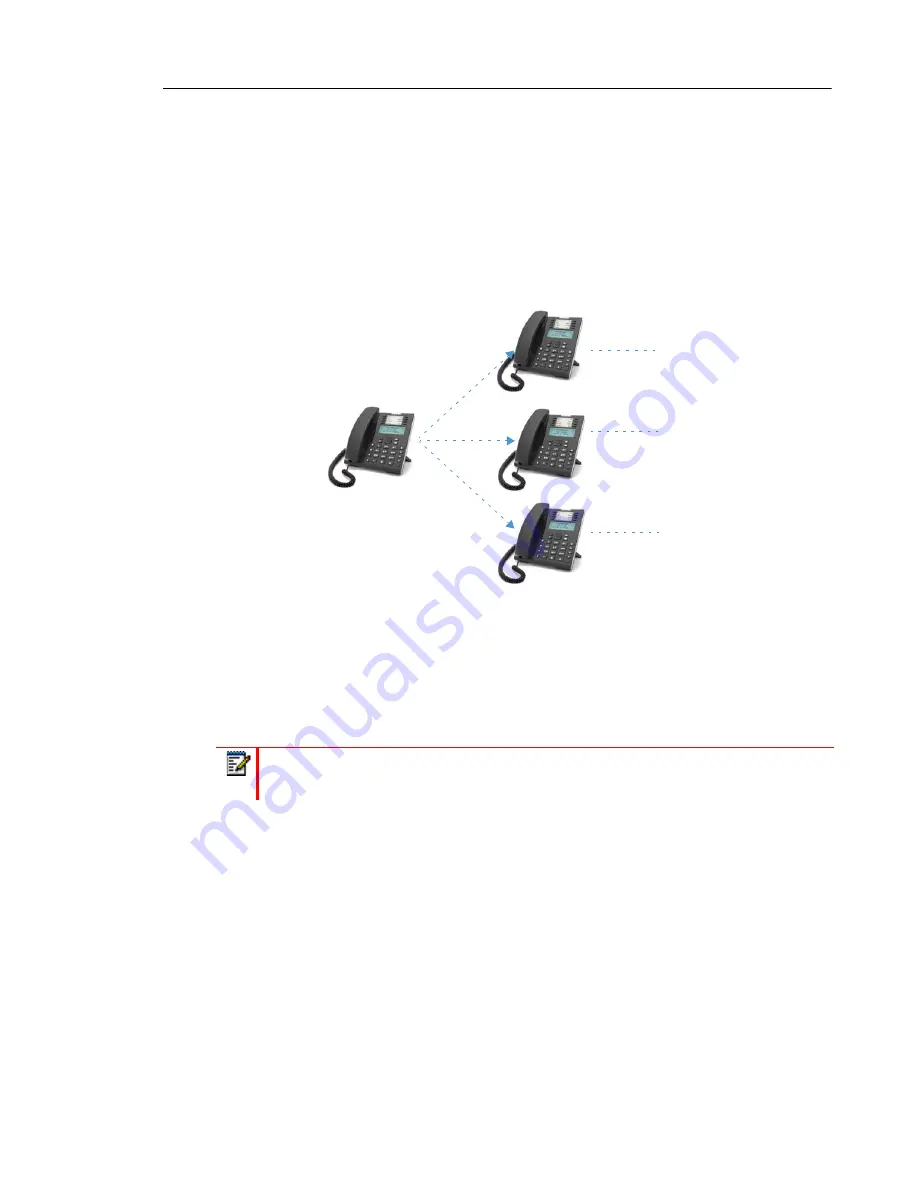
or more SCA users to be connected in a call with a third party. Refer to the following example:

Using the example above, when a call comes into Phone 1, Phone 2 and Phone 3 can pickup 
the same call by pressing the SCA line key. Phone 2 and 3 display the call they are bridging 
into on the LCD of the phones. Existing SCA parties in a bridge or one-to-one call hear an 
audible beep when another party has joined the call. 

If a phone is configured for SCA bridging and it attempts to join a call, but the account on the 
server does not have this functionality enabled, an error message displays to the LCD on the 
phone.

The SCA call bridging feature is disabled by default on all phones. Your Administrator can 
enable/disable this feature if required. Contact your System Administrator for more information.

Keys States and LED Behavior

There are two call states on the phones that support SCA bridging:

Bridge-active

 - A bridged call is in progress

Bridge-held

 - The 3rd-party (i.e., non-SCA party) in the bridge is on hold.

Note: 

Your Administrator must enable/disable the beep on the server-side.

SCA phone 1 answers.

SCA phone 2 joins by
pressing SCA line. When

When 2 and 3 pickup,
1 can hangup.

phone 1 hangs up, 2 is still
connected. Phone 2 can
press the line key to 

put SCA call on hold
leaving 3 still connected
to 1.

SCA phone 3 joins by
pressing SCA line. When
phone 1 hangs up, 3 is still
connected. Phone 3 can
press the line key to 

put SCA call on hold
leaving 2 still connected
to 1.

Phone A calls the SCA number and
all the phones in the SCA environment
ring.

Note

: A user can place a call on hold while in an SCA bridged call, 

by pressing the SCA line key.

Summary of Contents for 6865i

Page 1: ...Mitel 6865i SIP Phone 41 001566 05 REV00 RELEASE 4 1 0 USER GUIDE ...

Page 2: ... of this document or new editions of it may be issued to incorporate such changes No part of this document can be reproduced or transmitted in any form or by any means electronic or mechanical for any purpose without written permission from Mitel Networks Corporation Trademarks Mitel is a trademark of Mitel Networks Corporation Other product names mentioned in this document may be trademarks of th...

Page 3: ...late or reduce to electronic medium or machine readable form or language derive source code without the express written consent of the Seller and its Suppliers or disseminate or otherwise disclose the Software to third parties All Software furnished hereunder whether or not part of firmware including all copies thereof are and shall remain the property of Seller and its Suppliers and are subject t...

Page 4: ...hone 12 Idle Screens 14 Incomplete Configuration 15 No Service 15 Methods for Customizing Your Phone 16 Phone Options via the IP Phone UI 16 Phone Options via the Mitel Web UI 19 Phone Status 23 Phone Status via IP Phone UI 23 Finding Your Phone s IP Address 24 Phone Status via the Mitel Web UI 25 Customizing Your Phone 27 Ring Tones and Tone Sets 27 Display 32 Live Dialpad 33 Set Audio 34 Time an...

Page 5: ...ND Key 68 Busy Lamp Field BLF Key 69 BLF List Key 70 Automatic Call Distribution ACD Key for Sylantro Call Managers 73 XML Key 76 Flash Key 79 Sprecode Key 80 Park Pickup Keys 81 Last Call Return Key 84 Call Forward Key 85 BLF Xfer 86 Speeddial Xfer 88 Speeddial Conf 89 Speeddial MWI 91 Directory Key 93 Callers List Key 95 Redial Key 97 Conference Key 99 Transfer Key 101 Intercom Key 103 Services ...

Page 6: ...20 Conferencing Calls 122 Ending Calls 126 Managing Calls 127 Directory 127 Callers List 134 DND and Call Forward 138 Additional Features 157 Display DTMF Digits 157 Play Call Waiting Tone 158 Stuttered Dial Tone 159 XML Beep Support 160 Status Scroll Delay 161 Switch UI Focus to Ringing Line 162 Call Hold Reminder During Active Calls 163 Call Hold Reminder on single hold 164 Call Waiting Tone Per...

Page 7: ...he light not coming on with a new voicemail message 191 Why is my handset not working 191 How do I find the IP address of my phone 191 Why does my phone display the No Service message 191 How do I change my user password 191 Why does my phone display Bad Encrypted Config 192 How do I restart the IP phone 192 How do I lock my phone 192 Limited Warranty 193 Exclusions 193 Warranty Repair Services 19...

Page 8: ...ion on more advanced settings and configurations administrators should refer to the Mitel SIP IP Phones Administrator Guide DOCUMENTATION Mitel 6865i SIP IP Phone Installation Guide Contains installation and set up instruc tions general features and functions and a basic list of configuration options The Installation Guide can be downloaded from http www miteldocs com Mitel 6865i SIP IP Phone User...

Page 9: ... Power source For Ethernet networks that supply inline power to the phone IEEE 802 3af use an Ethernet cable to connect from the phone directly to the network for power no 48V AC power adapter required if using Power over Ethernet PoE For Ethernet networks that DO NOT supply power to the phone Use only the GlobTek Inc Limited Power Source LPS adapter model no GT 41080 1848 sold separately to conne...

Page 10: ...and caller information Images of the symbol keys and the symbol hardware platform are used throughout this document 6865i Handset Volume Control High Quality Speakerphone Mute Key Message Waiting Lamp Keypad Goodbye Key Callers List Key Hold Key Redial Key Navigation Select Keys Line Call Appearance Keys Transfer Key Speaker Headset Key Conference Key LCD Screen Options Key Programmable Keys ...

Page 11: ...u are editing entries on the display pressing the LEFT key erases the character on the left pressing the RIGHT key sets the option Alternatively pressing the center Select key sets the option as well on specific screens Transfer Key Transfers the active call to another number For more information see Transferring Calls on page 120 Conference Key Begins a conference call with the active call For mo...

Page 12: ...he phone For more information see Using Handsfree Speakerphone on page 114 and Using a Headset on page 115 Programmable Keys When programmed allows you to easily perform up to 8 specific functions e g Services Directory Callers List Intercom etc and access enhanced services provided by third parties e g XML applications For more information see Programmable Keys on page 58 KEYPAD KEY DESCRIPTION 0...

Page 13: ...letters in the IP phone user interface Programming a speed dial number see Creating a Speed Dial Key on page 61 Pressing a speed dial key see Creating a Speed Dial Key on page 61 Pressing the keys associated with a called Interactive Voice Response IVR system 6 MNO Dials 6 When entering text this key enters M with one press N with two presses and O with three presses 7 P QRS Dials 7 When entering ...

Page 14: ...he phone goes through this process the first time you plug in your phone and every time you restart your phone The phone displays the following startup screens During the first start up the 6865i phone attempts to contact the Redirection and Configuration Server for current server information No personal information is transmitted from the phone during this process Note Some start up screens only ...

Page 15: ...ting Configuration This may take a few moments while the phone downloads the latest updates If language packs were loaded to your phone by your System Administrator the following screen displays during startup Note New updates to your phone can be automatically scheduled from the server This is set up on the phone system by your System Administrator and should be scheduled during non business hour...

Page 16: ...per corner in the above example indicates the idle screen for the first line appearance You can use the left and right arrow keys to scroll through the idle screens for both line appearances on the 6865i The second display line shows the following temporary messages if the event occurs No Service DHCP Failed Restarting New IP Obtained Network Disconnected Connected The second line can also display...

Page 17: ... When the phone is not properly connected to the network or the account has not been configured by the Network Administrator the No Service or Network Disconnected prompt appears on the display and the telephone status light turns ON Check that the cables are tightly connected to the phone and to the wall jack The phone should automatically detect when the connection is reconnected and display the...

Page 18: ...mize the following phone settings OPTION NUMBER OPTION 1 Call Forward 1 All 2 Busy 3 No Answer 4 All Off 5 All On The menus that display for Call Forward are dependant on the Call Forward Mode set on the phone Default is Account mode If the BroadSoft BroadWorks Executive and Assistant Services feature is enabled and your phone is configured with the Assistant s role an additional Forward Filtering...

Page 19: ... Server 3 Set Time Set Date 7 Language Screen Language Input Language 3 Phone Status 1 IP MAC Addresses 2 LAN Port 3 PC Port 4 Firmware Info 5 Error Messages 6 Copyright 4 Password 5 Admin Menu Password Protected 6 Restart Phone 7 Credentials available only if certain features are configured by your Administrator 8 Directory 1 Display Name Order 2 Sorting Preferences 3 External Sources available o...

Page 20: ...On The menus that display for Call Forward are dependent on the Call Forward Mode set on the phone Default is Account mode If the BroadSoft BroadWorks Executive and Assistant Services feature is enabled and your phone is configured with the Assistant s role an additional Forward Filtering option may be available in the Call Foward menu For information on the BroadWorks Executive and Assistant Serv...

Page 21: ... exit without saving changes PHONE OPTIONS VIA THE MITEL WEB UI In addition to the IP phone UI options you can customize additional options on the IP phone using the Mitel Web UI In order to access your phone using the Mitel Web UI you need to know your phone s IP address To find your phone s IP address see Finding Your Phone s IP Address on page 24 4 Phone Lock IP PHONE UI Note For more informati...

Page 22: ...dress field and press Enter The following logon screen displays 2 At the prompt enter your username and password and click OK The Status window displays for the IP phone you are accessing 3 You can logout of the Mitel Web UI at any time by clicking Log Off MITEL WEB UI Note For a user the default username is user and the password field is left blank ...

Page 23: ...s identified in the list below Keypad Speed Dial Allows you to assign a speed dial number to a specific digit on the phone s keypad dialpad for speed dialing purposes Expansion Module Allows you to configure an additional 16 softkeys with an M680i Expansion Module or an additional 84 softkeys with an M685i Expansion Module if it is attached to the phone This option displays on the side menu of the...

Page 24: ...essage Waiting Indicator Line DND Key Mode Call Forward Key Mode This category also allows you to configure Incoming Intercom Call Settings Group Paging RTP Settings Ring Tones global and per line basis Time and Date Settings Language Settings Account Configuration Allows you to configure DND and Call Forward by account You can have multiple accounts on the 6865i Custom Ringtones Allows you to upl...

Page 25: ... phone s IP and MAC addresses Local Area Network LAN port information PC Port information if PC link exists Firmware information Error messages from the last reboot or startup Copyright information 1 Press on the phone to enter the Options List 2 Select Phone Status 3 Select the option you want to view IP MAC Address LAN Port PC Port Firmware Info Error Messages Copyright The option you select dis...

Page 26: ...n the Mitel Web UI Use the following procedure to find your phone s IP address 1 Press the key on the phone to enter the Option List 2 Select Phone Status and press the key or 4 Enter key 3 Select IP MAC Addresses and press the key or 4 Enter key The IP address of your 6865i IP phone displays in the IP Address field IP PHONE UI Phone Status Next Enter 3 IP MAC Addresses Next Enter 1 IP Address 10 ...

Page 27: ...ld and press Enter 2 In the Username Password window enter your username and password and click OK The Status window displays for the IP phone you are accessing This Status window displays the status of your phone which includes the following information Network Status Hardware Information Firmware Information SIP Status MITEL WEB UI Note The default username is user and the password field is left...

Page 28: ... with the SIP proxy server Example Line SIP Account Status Backup Registrar Used 1 650 proxy com 5060 Registered Yes where Account Number is 1 SIP Account is 650 proxy com on port 5060 Status is Registered Backup registrar is used Yes SIP Error Number Displays on accounts when registration fails with the SIP proxy server Example Line SIP Account Status Backup Registrar Used 4 653 proxy com 5060 40...

Page 29: ...ese ring tones on a global or per line basis The following table identifies the valid settings and default values for each type of configuration method Ring Tones Ring Tone Sets In addition to ring tones you can configure ring tone sets on a global basis on the IP phone Ring tone sets consist of tones customized for a specific country The ring tone sets you can configure on the IP phones are Austr...

Page 30: ...onfigure the country s tone set the country specific tone is heard on the phone for the following Dial tone Secondary dial tone Ring tone Busy tone Congestion tones Call waiting tone Ring cadence pattern You configure global ring tones and tone sets using the IP phone UI and Mitel Web UI Installing a custom ring tone can be performed using the Mitel Web UI only ...

Page 31: ...Tone 1 through Tone 15 Silent or any custom ring tones installed 6 Press the key or select 4Set 7 Select Tone Set 8 Select the country for which you want to apply the tone set Valid values are Australia Brazil Canada Europe France Germany Italy Italy2 Malaysia Mexico Brazil Russia Slovakia UK US default 9 Press the key or select 4Set The ring tone and tone set you select is immediately applied to ...

Page 32: ...ration 2 In the Ring Tones section select a country from the Tone Set field Valid values are Australia Brazil Canada Europe France Germany Italy Italy2 Malaysia Mexico Brazil Russia Slovakia UK US default 3 Select a value from the Global Ring Tone field MITEL WEB UI Note See the Ring Tones on page 27 for valid values ...

Page 33: ...mouse button and press the Open button The filename should now be displayed to the right of the respective Browse button 4 Press the Upload button to upload the file to the phone Note See the Ring Tones on page 27 for valid values MITEL WEB UI Notes 1 Access to the Custom Ringtones Web UI menu is only available if enabled by your System Administrator 2 Ringtones must be in wav format The IP phones...

Page 34: ...one allows you to set the amount of contrast on the LCD display You can set the contrast level using the IP phone UI only Setting the Contrast Level 1 Press on the phone to enter the Options List 2 Select Preferences 3 Select Display 4 Select Contrast Level 5 Use the 3 and 4 navigation keys to increase or decrease the amount of contrast on the screen 6 Press the key or 4Select to save your selecti...

Page 35: ...LPAD The Live Dialpad option on the IP phone turns the live dialpad mode on or off With the live dialpad feature enabled the 6865i IP phone automatically dials out and turns on handsfree mode as soon as a dialpad keypad key or programmable key is pressed With live dialpad disabled if you dial a number while the phone is on hook lifting the receiver or pressing the initiates a call to that number Y...

Page 36: ...r This is the default setting Calls can be made or received using the handset or handsfree speakerphone In handset audio mode pressing the button on the phone switches to handsfree speakerphone In Speaker audio mode lift the handset to switch to the handset Headset Choose this setting if you want to make or receive all calls using a handset or headset Calls can be switched from the handset to head...

Page 37: ...fault is Medium 6 Press the key or select 4Set to save your selection DHSG The DHSG option allows you to enable or disable DHSG headset support Enabling Disabling DHSG 1 Press on the phone to enter the Options List 2 Select Preferences 3 Select Set Audio 4 Select DHSG 5 Select the DHSG is OFF or DHSG is ON option Default is DHSG is OFF 6 Press the key or select 4Set to save your selection IP PHONE...

Page 38: ...y or select 2Done to save the time setting 7 Select Time Format 8 Using the 5 and 2 navigation keys set the Time Format to either a 12 hour format or a 24 hour format Default is 12 Hour 9 Press the key or select 4Set to save the Time Format you selected CONFIGURING DATE AND DATE FORMAT 1 Press on the phone to enter the Options List 2 Select Preferences 3 Select Time and Date 4 Select Set Date 5 Us...

Page 39: ...t Preferences 3 Select Time and Date 4 Select Time Zone A list of Time Zones display for different areas of the world 5 Select a Time Zone that applies to your area by using the navigation keys The default Time Zone is US Eastern 6 Press the key or select 4Set to save the Time Zone setting CONFIGURING DAYLIGHT SAVINGS TIME 1 Press on the phone to enter the Options List 2 Select Preferences 3 Selec...

Page 40: ...available in which case it will move on to Time Server 2 and if necessary Time Server 3 1 Press on the phone to enter the Options List 2 Select Preferences 3 Select Time and Date 4 Select from Time Server 1 Time Server 2 or Time Server 3 5 Enter an IP address or domain name for the time server 6 Press the key or select 4Set to save the time server setting 1 Click on Basic Settings Preferences Time...

Page 41: ...ield enable by checking the checkbox or disable by unchecking the box default is enabled 5 In the Time Server 1 Time Server 2 and Time Server 3 fields enter IP addresses or qualified domain names for the primary secondary and tertiary time servers 6 Click Save Settings Note The time and time format you configure display on the phone s idle screen Note The date and date format you configure display...

Page 42: ...rvices options configuration parameters etc display in that language The IP phones support the following languages English Czech Catalan Valencian Welsh German Danish Spanish Mexican Spanish Euskera Finnish French Galego Canadian French Hungarian Italian Dutch Dutch Netherlands Norwegian Polish Portuguese Portuguese Brazilian Romanian Russian Slovak Swedish Turkish You can also configure the langu...

Page 43: ... UI 3 Click Save Settings The change is dynamic The Mitel Web UI displays all screens in the language you selected Note All languages may not be available for selection The available languages are dependant on the language packs currently loaded to the IP phone IP PHONE UI Note All languages may not be available for selection The available languages are dependant on the language packs currently lo...

Page 44: ...I can be done using the keypad on the phone You can configure the Input Language feature using the Mitel Web UI or the IP phone UI The following tables identify the language characters that you can use to enter text and characters on the 6865i Keypad Input Alphabet Tables English default KEY UPPERCASE CHARACTERS LOWERCASE CHARACTERS 0 0 0 1 1 _ 1 _ 2 ABC2 abc2 3 DEF3 def3 4 GHI4 ghi4 5 JKL5 jkl5 6...

Page 45: ...åæ 3 DEF3ÉÈÊË def3éèêë 4 GHI4ÎÏ ghi4îï 5 JKL5 jkl5 6 MNO6ÑÓÒÔÖ mno6ñóòôö 7 PQRS7 pqrs7 8 TUV8 tuv8úùûü 9 WXYZ9 wxyz9 SPACE SPACE KEY UPPERCASE CHARACTERS LOWERCASE CHARACTERS 0 0 0 1 1 _ 1 _ 2 ABC2ÁÀÇ abc2áàç 3 DEF3ÉÈ def3éè 4 GHI4ÏÍ ghi4ïí 5 JKL5 jkl5 6 MNO6ÑÓÒ mno6ñóò 7 PQRS7 pqrs7 8 TUV8ÚÜ tuv8úü 9 WXYZ9 wxyz9 SPACE SPACE ...

Page 46: ... _ 1 _ 2 ABC2ÄÀ abc2äà 3 DEF3É def3é 4 GHI4 ghi4 5 JKL5 jkl5 6 MNO6Ö mno6ö 7 PQRS7ß pqrs7ß 8 TUV8Ü tuv8ü 9 WXYZ9 wxyz9 SPACE SPACE KEY UPPERCASE CHARACTERS LOWERCASE CHARACTERS 0 0 0 1 1 _ 1 _ 2 ABC2ÀCÇ abc2àcç 3 DEF3ÉÈË def3éèë 4 GHI4 ghi4 5 JKL5 jkl5 6 MNO6ÓÒ mno6óò 7 PQRS7 pqrs7 8 TUV8Ù tuv8ù 9 WXYZ9 wxyz9 SPACE SPACE ...

Page 47: ...éê 4 GHI4Í ghi4í 5 JKL5 jkl5 6 MNO6ÓÔÕ mno6óôõ 7 PQRS7 pqrs7 8 TUV8ÚÜ tuv8úü 9 WXYZ9 wxyz9 SPACE SPACE KEY UPPERCASE CHARACTERS LOWERCASE CHARACTERS 0 0 0 1 1 _ 1 _ 2 АБВГ2ABC aбвг2abc 3 ДЕЁЖЭ3DEF Дeëжз3def 4 ИЙКЛ4GHI ийкл4ghi 5 МНОП5JKL мноп5jkl 6 РСТУ6MNO рсту6mno 7 ФХЦЧ7PQRS7 фхЧч7pqrs 8 ШЩЪЫ8TUV шщъы8tuv 9 ЬЗЮЯ9WXYZ ьзюя9wxyz SPACE SPACE ...

Page 48: ...guage you want to use when inputting text and characters into the IP phone UI Valid values are English default Français French Español Spanish Deutsch German Italiano Italian Português Portuguese Русский Russian Nordic 5 Press the key or select 4Set to set an input language KEY UPPERCASE CHARACTERS LOWERCASE CHARACTERS 0 0 0 1 1 _ 1 _ 2 ABC2ÅÄÆÀ abc2åäæà 3 DEF3É def3é 4 GHI4 ghi4 5 JKL5 jkl5 6 MNO...

Page 49: ...Portuguese Русский Russian Nordic 3 Click Save Settings The change is dynamic The Mitel Web UI and IP phone UI allow you to enter text and characters in the language you selected LATIN 2 CHARACTER SET The 6865i includes support for ISO 8859 2 Latin2 of multi national languages when displaying and inputting in the IP phone UI and the Mitel Web UI UTF 8 is also compatible with XML encoding on the IP...

Page 50: ...Mitel 6865i SIP Phone Release 4 1 0 User Guide 48 The following table illustrates the Latin 2 character set used on the 6865i IP phone ...

Page 51: ...rd and press the key or select 2Done 5 At the Enter Again prompt re enter the new user password and press the key or select 2Done A message Password Changed displays on the screen 1 Click on Operation User Password 2 In the Current Password field enter the current user password 3 In the New Password field enter the new user password 4 In the Password Confirm field enter the new user password again...

Page 52: ...Click on Operation Phone Lock 2 CIick on the Reset User Password field click Reset The following screen displays 3 In the Current Password field leave this blank 4 In the New Password field enter a new password 5 In the Password Confirm field re enter your new user password 6 Click Save Settings Note Valid values when creating or changing a password are 0 to 4294967295 integers only symbols and al...

Page 53: ... been asked to do so by your System Administrator or should you experience any unexpected behavior 1 Press the key on the phone to enter the Options List 2 Select Restart Phone 3 Press Confirm to confirm the restart of the phone If you do not wish to restart your phone press the 3 Cancel key to cancel 1 Click on Operation Reset 2 Click Restart 3 Click OK at the confirmation prompt IP PHONE UI Note...

Page 54: ...en and select 4 Enter 7 Using the dialpad keys enter in your password and press the button or select 4 Set DIRECTORY You can configure directory entries to display using the contact s first name and then last name or vice versa Moreover the option to sort contacts using either their first name or last name is available If external Directory sources are configured you can enable disable the respect...

Page 55: ...ss on the phone to enter the Options List 2 Select Directory 3 Navigate to External Sources and select 4 Enter 4 Use the 5 and 2 keys to navigate through the list of Directory sources and select 4 Enter 5 Navigate to State and press the 4 Enter key 6 Use the 5 and 2 keys to and choose the desired state and press the button or select 4 Set The state you selected is immediately applied to the phone ...

Page 56: ... Set an emergency dial plan An emergency dial plan can be 911 999 112 110 or all of the above The default emergency dial plan is 911 999 112 110 The following procedures describe locking the phone setting an emergency dial plan and resetting the user password LOCKING UNLOCKING A PHONE Use the following procedures to lock an IP phone and prevent it from being used or configured Locking the Phone 1 ...

Page 57: ...ontact local emergency services for assistance when required The emergency telephone number may differ from country to country It is typically a three digit number so that it can be easily remembered and dialed quickly Some countries have a different emergency number for each of the different emergency services You can specify the digits to dial on the IP phone for contacting emergency services On...

Page 58: ...h emergency number For example 911 110 Default for this field is 911 999 112 110 3 Click Save Settings to save the emergency dial plan to your phone EMERGENCY NUMBER DESCRIPTION 911 A United States emergency number 999 A United Kingdom emergency number 112 An international emergency telephone number for GSM mobile phone networks In all European Union countries it is also the emergency telephone nu...

Page 59: ...nnect to the line or a call it represents The line call appearance light indicates the status of that line or call When the phone is taken off hook the phone automatically selects a line for you When you have more than one call you can use the left and right navigation keys 3 and 4 to scroll left and right to the different call screens The display shows which line the call information is referring...

Page 60: ... for BLF List functionality Auto Call Distribution ACD For Sylantro Call Managers Indicates the key is configured to allow the Sylantro call managers to distribute calls from a queue to registered IP phone users agents XML Indicates the key is configured to accept an XML application for accessing customized XML services Flash Indicates the key is set to generate a flash event when it is pressed Th...

Page 61: ...ured to initiate a call transfer Icom Indicates the key is configured to be used for intercom calls Services Indicates the key is set to access Services such as Directory Callers List Voicemail or any other XML applications set up by your System Administrator Phone Lock Indicates the key is configured as a phone lock key allowing you to press this key to lock unlock the phone Paging Indicates the ...

Page 62: ... 57 CONFIGURING A LINE KEY USING THE MITEL WEB UI 1 Click on Operation Programmable Keys or Click on Operation Expansion Module N Programmable Keys 2 Select from Key 1 through Key 8 3 In the Type field select Line to apply to the key 4 In the Line field select a line to apply to this key Valid values are 3 through 24 Expansion Module Keys 5 Select from Key 1 through Key 16 M680i or Key 84 M685i 6 ...

Page 63: ...bers followed by a that the phone dials automatically after pressing the speed dial key You can use this feature for numbers that contain long prefixes For example if you had the following speed dial configuration in the Mitel Web UI Key 1 Type Speeddial Value 1234567 Line 2 Then after you press key 1 on the phone the prefix number displays on the phone screen The phone proceeds to dial the prefix...

Page 64: ...le To select a different line use the 2 and 5 navigation keys 4 Press 4Save to save the speed dial key to the line specified CREATING A SPEED DIAL USING THE SPEED DIAL EDIT OPTION You can use the IP phone UI at the path Options Preferences Speed Dial Edit to create a speed dial key 1 Press on the phone to enter the Options List 2 Select Preferences 3 Select Speed Dial Edit The following prompt dis...

Page 65: ...t the phone automatically assigns the speed dial key to line 1 if available To select a different line use the 2 and 5 navigation keys 7 Press 4Save to save the speed dial key to the line specified CREATING A SPEED DIAL USING A PROGRAMMABLE KEY IN THE MITEL WEB UI 1 Click on Operation Programmable Keys or Click on Operation Expansion Module N Programmable Keys 2 Select from Key 1 through Key 8 MIT...

Page 66: ...e field enter the phone number extension or speed dial prefix to apply to this key If you enter a speed dial prefix you must enter the character at the end of the prefix number for example 123456 10 In the Line field select a line to apply to this key Valid values are 1 through 24 11 Click Save Settings CREATING SPEED DIAL KEY USING KEYPAD SPEED DIAL IN THE MITEL WEB UI 1 Click on Operation Keypad...

Page 67: ...PHONE UI Notes 1 If a number on the keypad is setup as a speed dial key pressing the applicable number in the speed dial editing process also displays the speed dial edit screen The edit screen allows you to change the Speed Dial Number and Line setting 2 If you press a key that is NOT setup as a speed dial key the phone displays an Invalid Key message However if you press an empty keypad key or p...

Page 68: ...e phone number extension or speed dial prefix to apply to this hard key If you enter a speed dial prefix you must enter the character at the end of the prefix number for example 123456 4 If required in the Line field select a line for which to apply the speed dial to Valid values are 1 through 24 5 Click Save Settings MITEL WEB UI Note You can delete a speed dial key by changing the Type field to ...

Page 69: ...y 1 through Key 9 3 In the input box edit the phone number extension or speed dial prefix for this Digit key If you enter a speed dial prefix you must enter the character at the end of the prefix number for example 123456 4 In the Line field select a line for which to apply the speed dial to Valid values are 1 through 24 5 Click Save Settings MITEL WEB UI ...

Page 70: ... shows when DND is set If the phone shares a line with other phones only the phone that has DND configured is affected For more information about DND and DND modes see DND Configuration on page 138 CONFIGURING A DND KEY 1 Click on Operation Programmable Keys or Click on Operation Expansion Module N Programmable Keys 2 Select from Key 1 through Key 8 3 In the Type field select Do Not Disturb 4 Clic...

Page 71: ...hone turns on and is solid indicating that the worker s phone is in use and busy CONFIGURING A BLF KEY USING THE MITEL WEB UI 1 Click on Operation Programmable Keys or Click on Operation Expansion Module N Programmable Keys 2 Select from Key 1 through Key 8 3 In the Type field select BLF to apply to the key 4 In the Value field enter the phone number or extension you want to monitor 5 In the Line ...

Page 72: ...the monitored user on an active call or is attempting to make a call the corresponding key s LED turns solid CONFIGURING A BLF LIST KEY USING THE MITEL WEB UI If you set a key to use BLF List you must also enter a BLF List URI at Operation Programmable Keys Services The BLF List URI is the name of the BLF list defined on the BroadSoft BroadWorks Busy Lamp field page for your particular user For ex...

Page 73: ...lobal 1 through 24 5 In the BLF List URI field enter the name of the BLF list defined on the BroadSoft Broad Works Busy Lamp field page for your particular user For example sip 9 192 168 104 13 Expansion Module Keys 6 Select from Key 1 through Key 16 M680i or Key 84 M685i 7 In the Line field select a line for which to apply this key Valid values are global MITEL WEB UI Note The Label and Value fie...

Page 74: ... list defined on the BroadSoft Broad Works Busy Lamp field page for your particular user For example sip 9 192 168 104 13 9 Click Save Settings Note The Value field is not required The BroadWorks BLF List name is configured in the BLF List URI field instead Note Contact your System Administrator for the BLF List URI ...

Page 75: ...atically changes the phone s status to unavailable The server updates its database with this new information and no longer distributes calls to the phone The phone remains in this unavailable state until You make yourself available again by pressing the Avail key An ACD timer expires set by your System Administrator You can also choose to manually change the phone status to unavailable by pressing...

Page 76: ...mmable Keys 2 Select from Key 1 through Key 8 3 In the Type field select Auto call distribution 4 In the Line field select a line to apply Automatic call distribution Valid values are 1 through 24 Expansion Module Keys 5 Select from Key 1 through Key 16 M680i or Key 84 M685i 6 In the Line field select a line to apply Automatic call distribution Valid values are 1 through 24 7 Click Save Settings M...

Page 77: ...able in order to start receiving calls 5 To temporarily stop receiving calls press the press 2 Unavail If you are on a call or miss a call that has been distributed to your phone your phone status automatically changes to Unavailable Your phone remains in the Unavailable state until one of the following occurs You use the IP Phone UI to manually switch the IP phone state back to available or The a...

Page 78: ...fter an XML key is configured you can use the IP phone UI to access the XML applications You can also specify an XML URI and a Services title using the following XML fields XML Application URI XML Application Title The XML Application URI is the URI loaded by your phone when accessing XML services through the Services menu Contact your System Administrator for the applicable XML URI to enter in th...

Page 79: ...Application URI field enter the XML application URI provided by your System Administrator 6 In the XML Application Title field enter the XML application title that you want to display as the Services menu title on your phone 7 Click Save Settings Expansion Module Keys 8 Select from Key 1 through Key 16 M680i or Key 84 M685i MITEL WEB UI Notes 1 Contact your System Administrator for the appropriate...

Page 80: ...configured for XML on the 6865i phone 2 Use the 5 and 2 to scroll through the XML applications 3 For menu and directory services select a service to display the information for that cus tomized service Message services display to the screen after pressing the key For user input services follow the prompts as appropriate 4 To exit from the XML screen press the key Notes 1 Contact your System Admini...

Page 81: ...cted and there is an active RTP stream for example when the call is not on hold CONFIGURING A FLASH KEY 1 Click on Operation Programmable Keys or Click on Operation Expansion Module N Programmable Keys 2 Select from Key 1 through Key 8 3 In the Type field select Flash 4 Click Save Settings Expansion Module Keys 5 Select from Key 1 through Key 16 M680i or Key 84 M685i 6 In the Type field select Fla...

Page 82: ...Keys or Click on Operation Expansion Module N Programmable Keys 2 Select from Key 1 through Key 8 3 In the Type field select Sprecode 4 In the Value field enter the appropriate value for accessing specific services from the server 5 Click Save Settings Expansion Module Keys 6 Select from Key 1 through Key 16 M680i or Key 84 M685i 7 In the Type field select Sprecode 8 In the Value field enter the a...

Page 83: ...fter the call is parked you can press the Pickup key followed by the applicable value to pickup the call Administrators can configure the Park and Pickup keys for any line using the configuration files or the Mitel Web UI CONFIGURING PARK PICKUP KEYS 1 Click on Operation Programmable Keys or Click on Operation Expansion Module N Programmable Keys 2 Select from Key 1 through Key 8 3 In the Type fie...

Page 84: ...e the following procedure on the IP phone to park a call and pick up a parked call Parking a Call 1 While on a live call press the Park key 2 Perform the following for your specific server If the call is parked successfully the response is either a greeting voice confirming that the call was parked or a hang up occurs The parked call party hears music on hold Note The Value and Line fields are con...

Page 85: ...using the next procedure and press the Park key again to retry Step 2 Picking Up a Parked Call 1 Pick up the handset on the phone 2 Enter the extension number where the call was parked 3 Press the Pickup key If the call pick up is successful you are connected with the parked call ...

Page 86: ...st it translates this request and routes the call to the last caller CONFIGURING A LAST CALL RETURN KEY 1 Click on Operation Programmable Keys or Click on Operation Expansion Module N Programmable Keys 2 Select from Key 1 through Key 8 3 In the Type field select Last Call Return 4 In the Line field select the line to apply this feature Valid values are 1 through 24 5 Click Save Settings Expansion ...

Page 87: ...us that display are dependant on the Call Forward mode Account default Phone or Custom configured for the phone For more information about call forwarding and call forwarding modes see Call Forward Configuration on page 143 CONFIGURING A CALL FORWARD 1 Click on Operation Programmable Keys or Click on Operation Expansion Module N Programmable Keys 2 Select from Key 1 through Key 8 3 In the Type fie...

Page 88: ...nd Transfer Calls When the focused line is in the connected state pressing the BLF Xfer key transfers the call to the extension unconditionally disregarding the status of the monitored extension If transferring a call to an extension fails a message Transfer Failed displays on the phone and you can reconnect the call get the call back by pressing the line key again BLF Xfer and Call Forward When t...

Page 89: ...sfer calls to for example 3500 5 In the Line field select the line for which you want to use the key functionality Valid values are global 1 through 24 Expansion Module Keys 6 Select from Key 1 through Key 16 M680i or Key 84 M685i 7 In the Type field select BLF Xfer 8 In the Value field enter the monitored extension or the extension to transfer calls to for example 3500 9 In the Line field select ...

Page 90: ...ion Speed Dial Xfer and Blind Transfer When the phone is connected to a call pressing the Speed Dial Xfer key blind transfers the call to the predefined target If transferring a call fails a message Transfer Failed displays and you can reconnect the call get the call back by pressing the line key again Speed Dial Xfer and Call Forward When the phone is in the ringing state pressing the Speed Dial ...

Page 91: ...Save Settings SPEEDDIAL CONF The 6865i allows you to configure a programmable key to be used as a speed dial conference key Speeddial Conf key while remaining in the current call This key allows a user on a call to conference another party at a predefined number while remaining in the call For example while on an active call a user can use the Speeddial Conf key to dial a recording service and hav...

Page 92: ...onference for example 5551212 5 In the Line field select the line for which you want to use the key functionality 6 Click Save Settings Expansion Module Keys 7 Select from Key 1 through Key 16 M680i or Key 84 M685i 8 In the Type field select Speed Dial Conf 9 In the Value field enter the speed dial extension or the extension to add to the conference for example 5551212 10 In the Line field select ...

Page 93: ...to pending messages on multiple voicemail accounts When new messages are pending on a monitored voicemail account the corresponding Speeddial MWI key s LED will illuminate When you press the configured key the phone will send an INVITE to the configured call URI whereby you will be able to listen to the new messages The Speeddial MWI key can be configured through the Mitel Web UI CONFIGURING A SPE...

Page 94: ...l URI For example 33123456 3456 0000 domain sip voicemail_peter domain 10 In the Line field select the line for which you want to use the key functionality Valid values are global 1 through 24 11 Click Save Settings Notes 1 As the example above illustrates pauses and DTMF are supported for the call URI 2 Ensure that no spaces are added between the call URI and the voicemail URI when defining the k...

Page 95: ...rectory entries from multiple sources and store frequently used names and numbers on the phone You can also dial directly from a Directory entry By default the Directory key is programmed on Key 7 However using the Mitel Web UI you can assign the Directory function to any programmable key Note For more information about the Directory see Directory on page 127 Default Directory Key ...

Page 96: ...le Keys or Click on Operation Expansion Module N Programmable Keys 2 Select from Key 1 through Key 8 3 In the Type field select Directory 4 Click Save Settings Expansion Module Keys 5 Select from Key 1 through Key 16 M680i or Key 84 M685i 6 In the Type field select Directory 7 Click Save Settings MITEL WEB UI ...

Page 97: ...ng the Mitel Web UI you can assign the Callers List function to any programmable key The Callers List is a stored log of your incoming calls You can use the Callers List key to access a list of callers that called your phone Note For more information about the Callers List see Callers List on page 134 Callers List Key ...

Page 98: ...e Keys or Click on Operation Expansion Module N Programmable Keys 2 Select from Key 1 through Key 8 3 In the Type field select Callers List 4 Click Save Settings Expansion Module Keys 5 Select from Key 1 through Key 16 M680i or Key 84 M685i 6 In the Type field select Callers List 7 Click Save Settings MITEL WEB UI ...

Page 99: ...g the Mitel Web UI you can assign the Redial List function to any programmable key The Redial List is a stored log of your outgoing calls You can use the Redial key to access a list of the most recent calls you placed Note For more information about the Redial functionality see Redial on page 116 Redial List Key ...

Page 100: ...able Keys or Click on Operation Expansion Module N Programmable Keys 2 Select from Key 1 through Key 8 3 In the Type field select Redial 4 Click Save Settings Expansion Module Keys 5 Select from Key 1 through Key 16 M680i or Key 84 M685i 6 In the Type field select Redial 7 Click Save Settings MITEL WEB UI ...

Page 101: ...ault the 6865i has a dedicated Conference key However using the Mitel Web UI you can assign the Conference function to any programmable key Note For more information with regards to creating conference calls see Conferencing Calls on page 122 Conference Key ...

Page 102: ...le Keys or Click on Operation Expansion Module N Programmable Keys 2 Select from Key 1 through Key 8 3 In the Type field select Conference 4 Click Save Settings Expansion Module Keys 5 Select from Key 1 through Key 16 M680i or Key 84 M685i 6 In the Type field select Conference 7 Click Save Settings MITEL WEB UI ...

Page 103: ... KEY By default the 6865i has a dedicated Transfer key However using the Mitel Web UI you can assign the Transfer function to any programmable key Note For more information about transferring calls see Transferring Calls on page 120 Transfer Key ...

Page 104: ...ble Keys or Click on Operation Expansion Module N Programmable Keys 2 Select from Key 1 through Key 8 3 In the Type field select Transfer 4 Click Save Settings Expansion Module Keys 5 Select from Key 1 through Key 16 M680i or Key 84 M685i 6 In the Type field select Transfer 7 Click Save Settings MITEL WEB UI ...

Page 105: ...on Operation Programmable Keys or Click on Operation Expansion Module N Programmable Keys 2 Select from Key 1 through Key 8 3 In the Type field select Icom 4 In the Value field enter the predefined number you wish to be dialed when the Intercom key is pressed 5 Click Save Settings Expansion Module Keys 6 Select from Key 1 through Key 16 M680i or Key 84 M685i 7 In the Type field select Icom Note Fo...

Page 106: ... intercom press or hang up the handset 5 When you are finished speaking hang up the phone by placing the handset back on hook or by pressing When you hang up the remote phone also hangs up SERVICES KEY The 6865i allows you to configure a Services key that when pressed displays the Services Menu The Services key can also access any XML applications setup by your System Administrator By default the ...

Page 107: ...k Save Settings Expansion Module Keys 5 Select from Key 1 through Key 16 M680i or Key 84 M685i 6 In the Type field select Services 7 Click Save Settings USING THE SERVICES KEY 1 Press the Services key 2 Select an option from the Services Menu 3 To cancel a Service press MITEL WEB UI IP PHONE UI Note Additional options may display in the Services Menu if setup by your System Administrator Contact y...

Page 108: ... Key 8 3 In the Type field select Phone Lock 4 Click Save Settings Expansion Module Keys 5 Select from Key 1 through Key 16 M680i or Key 84 M685i 6 In the Type field select Phone Lock from the list of options 7 Click Save Settings MITEL WEB UI Note ou can lock unlock the phone using the new key you just configured using the Mitel Web UI at the path Operation PhoneLock or using the Phone Lock optio...

Page 109: ...t Group Paging and how it works and to specify multicast addresses see Group RTP Paging on page 172 CONFIGURING A PAGING KEY 1 Click on Operation Programmable Keys or Click on Operation Expansion Module N Programmable Keys 2 Select from Key 1 through Key 8 3 In the Type field select Paging 4 In the Value field enter a multicast IP address and a port number for the Paging key When you press this ke...

Page 110: ...pens a multicast RTP session and an outgoing OR incoming phone screen displays 2 Press the Drop key to end the multicast RTP session and return to the idle screen Notes 1 When you select Paging for the Type field the Line field is disabled 2 The Value field allows for one multicast address entry only 3 To receive RTP steams for Group Paging you must also configure the Paging Listen Addresses param...

Page 111: ...ng the Mitel Web UI you can assign the Save function to any programmable key CONFIGURING A SAVE KEY 1 Click on Operation Programmable Keys or Click on Operation Expansion Module N Programmable Keys 2 Select from Key 1 through Key 8 Note Key 5 is locked to Save functionality To unlock the key so it can be reprogrammed contact your System Administrator MITEL WEB UI Default Save Key ...

Page 112: ...elect Save 7 Click Save Settings DELETE KEY The Delete key allows you to delete items in your Local Directory Callers List and Redial List By default the Delete key is programmed on Key 6 However using the Mitel Web UI you can assign the Delete function to any programmable key Note Key6 islockedto Deletefunctionality Tounlockthekeysoitcanbereprogrammed contact your System Administrator Default Del...

Page 113: ...ys or Click on Operation Expansion Module N Programmable Keys 2 Select from Key 1 through Key 8 3 In the Type field select Delete 4 Click Save Settings Expansion Module Keys 5 Select from Key 1 through Key 16 M680i or Key 84 M685i 6 In the Type field select Delete 7 Click Save Settings MITEL WEB UI ...

Page 114: ...lete a key s functionality on the 6865i IP phone SETTING A NONE KEY 1 Click on Operation Programmable Keys or Click on Operation Expansion Module N 2 Select the respective key 3 In the Type field select None 4 Click Save Settings The key function is deleted from the IP phone memory MITEL WEB UI ...

Page 115: ...r MWI etc will behave normally CONFIGURING A DISCREET RINGING KEY 1 Click on Operation Programmable Keys or Click on Operation Expansion Module N Programmable Keys 2 Select from Key 1 through Key 8 3 In the Type field select Discreet Ringing 4 Click Save Settings Expansion Module Keys 5 Select from Key 1 through Key 16 M680i or Key 84 M685i 6 In the Type field select Discreet Ringing 7 Click Save ...

Page 116: ...ess the first digit on the keypad the phone automatically selects the next available line go off hook and dial as digits are pressed USING HANDSFREE SPEAKERPHONE The handsfree feature allows you to speak to someone without using the handset or headset Your phone must be in either the Speaker or Speaker Headset audio mode For more information about setting the audio mode on your phone see Audio Mod...

Page 117: ...arked f If you have a headset with an RJ9 RJ22 4 pin connector insert the headset cord into the jack until it clicks into place If you have a DHSG EHS headset with an RJ45 6 pin or 8 pin connector remove the plastic headset jack adapter and then insert the cord into the jack until it clicks into place 3 Press the key to obtain a dial tone or to answer an incoming call Depending on the audio mode s...

Page 118: ...g a displayed entry in the Redial List On the 6865i you access the Redial List by the key ACCESSING THE REDIAL LIST 1 Press the key to access the Redial List The information for your most recent call is displayed 2 Use 2 and 5 to scroll through the list to view the other numbers 3 To dial the displayed number press or lift the handset or press any line keys 4 Press the key to cancel DELETING AN IT...

Page 119: ...ey to mute the handset headset or speakerphone When you use the key on your phone you cannot be heard on an active call or on a conference For muted calls the handsfree LED flashes and the key LED is on To switch mute on or off press IP PHONE UI Note If you place a muted call on hold the phone automatically takes the call off mute when you reconnect to the call DELETE again to erase this item Dele...

Page 120: ...earance key for that call If you cannot answer the call the caller goes to voicemail if configured for your extension SENDING AN INCOMING CALL TO VOICEMAIL You can send an incoming call directly to voicemail without answering the call To do this press without picking up the handset If you are already on the phone your incoming call should go directly to voicemail Your phone screen displays a voice...

Page 121: ... the phone beeps softly to remind you that you still have a call on hold The screen displays Call held with the line number the call is held at the phone WHEN ON HOLD To let your caller know that they are still on hold music plays softly if this has been set up for your system The call line appearance light for the line you are on flashes to indicate that you are still connected AUTOMATIC HOLD Whe...

Page 122: ...o this simply complete the transfer immediately after you have entered the number The call goes directly to the extension or outside line you transferred to If the party you are transferring the call to does not answer the transferred call rings back to your extension CONSULTATIVE TRANSFER You also have the option to consult with the person you are transferring the call to before you complete the ...

Page 123: ...Press the 3 or 4 navigation keys to scroll to the party to whom you wish to transfer the active call 3 Press the key The active call will be transferred COMPLETING A TRANSFER TO A CONTACT IN PHONE DIRECTORY Users can complete a blind transfer to a contact in their directory If a user is in a call and initiates a transfer they can navigate to the Directory screen and press the Transfer key again to...

Page 124: ...zed conferencing for Sylantro and BroadSoft call managers Administrator must enable this method LOCAL CONFERENCING The 6865i phone supports up to 3 parties including yourself in a conference call This is called Local Conferencing and is the default method of conferencing on the 6865i The following screen illustrates a connected local conference screen In a local conference call you use the up and ...

Page 125: ...the phone number of Party 3 6 Wait for Party 3 to answer When Party 3 answers you can consult with them before adding them to the conference 7 Press the key again to add Party 3 to the conference Party 1 which is yourself Party 2 and Party 3 are all connected to a single conference 8 To drop a party from the conference use the 5 or 2 navigation key to select the party and press the 4Drop key IP PH...

Page 126: ...g to work you must configure the lines with the applicable phone number Using Centralized Conferencing Use the following procedure to create a conference call using centralized conferencing Setting Up a Conference and Adding Multiple Parties for Sylantro and BroadSoft Call Managers 1 When you begin a conference you are the first party in the conference Party 1 Pickup the handset or press the key 2...

Page 127: ...r Sylantro Call Manager only 1 Start Conference 1 using the procedures in the previous section Setting Up a Conference and Adding Multiple Parties for Sylantro and BroadSoft Call Managers 2 When you are finished adding all required parties to Conference 1 press an available Line key to start Conference 2 You are Party 1 on Conference 2 Call Party 2 3 When Party 2 answers press the key 4 Press an a...

Page 128: ...erence 6 Press the key again to join the parties to the active conference ENDING A CONFERENCE AND TRANSFERRING REMAINING PARTIES The 6865i allows a host to drop from a 3 way conference and let the other two parties remain connected If you are the host of a conference and want to leave that conference press the 3 Leave key on the phone Your phone leaves the 3 way conference but the remaining partie...

Page 129: ...e Local Directory Corporate and Personal CSV directories LDAP Microsoft Exchange BroadSoft XSI Enterprise Directory and BroadSoft XSI Personal Contacts Notes 1 As stated above the 6865i IP phone supports enhanced Directory functionality Your Local Directory will always be available while the availability of all other Directory sources is dependant on what has been configured by your Administrator ...

Page 130: ...ch functionality is applied across all the available and enabled directories After entering the Search menu inputting the first few letters of the contact s name and then pressing 2 Search you can quickly select a contact and perform the desired action 1 Press the configured Directory key 2 Press the 2 key to view the All folder and press the 4 Search key 3 Use the dialpad keys to enter the name f...

Page 131: ...idual entries from the Local Directory Notes 1 To place a call to the entry press the button Line button button or simply pick up the handset 2 To copy the entry to the Local Directory if the entry is from an external Directory source press the Copy key 3 To edit the entry s details if the entry is from the Local Directory press the Edit key 4 Press the key at any time to exit WARNING WHEN UPGRADI...

Page 132: ... the contact s first name and select 2 Next 9 Using the dialpad keys enter in the contact s last name and select 2 Save The contact s details will be saved to your Local Directory EDITING AN EXISTING LOCAL DIRECTORY ENTRY 1 Press the programmed Directory key 2 Use the 2 key to navigate to the Local Directory folder and select 4 Enter 3 Optional Using the dialpad keys input the first letter of the ...

Page 133: ...n to delete all contacts from your Local Directory SAVING ENTRIES TO THE LOCAL DIRECTORY You can save entries names and numbers from other sources to your Directory using any of the following methods Saving from the Caller List Saving from the Redial List Saving from an external Directory Source see External Directory Source Features on page 132 Saving from the Callers List 1 Press the key 2 From ...

Page 134: ...er the location on your computer where you want to download the Directory and click Save The directorylist csv file downloads to your computer 5 Use a spreadsheet application to open and view the directorylist csv file EXTERNAL DIRECTORY SOURCE FEATURES The following external Directory sources may be configured on your phone Two CSV based directories Lightweight Directory Access Protocol LDAP Dire...

Page 135: ...Passwords and Connection Testing Using the IP Phone UI on page 52 Copying a Contact in an External Directory Source to the Local Directory 1 Press the programmed Directory key 2 Use the 5 and 2 keys to navigate to the respective Directory source folder and select 4 Enter 3 Optional Using the dialpad keys input the first letter of the contact s name to initialize the search function 4 Use the 5 and...

Page 136: ...ifies and describes the icons displayed in the Callers List ACCESSING THE CALLERS LIST 1 Press the key Press 2 and 5 to move through the Callers List Press 2 to see the most recent call or 5 to see the oldest call on your list 2 To dial the displayed number just press lift the handset or press any Line keys 3 Press the key to cancel Notes 1 When the Callers List is full the oldest call records are...

Page 137: ...press 4 To erase one digit to the left of the cursor press 3 5 To dial the displayed number press lift the handset or press any Line keys DELETING AN ENTRY IN THE CALLERS LIST 1 Press the key 2 Press 2 and 5 to find the item you want to delete 3 Press the programmed Delete key 4 Press the programmed Delete key again at the prompt to erase the item DELETING ALL ENTRIES IN THE CALLERS LIST 1 Press t...

Page 138: ...ement the phone numbers associated with the calls are stored in the Callers List The user can access the Callers List and clear the call from the list Once the user accesses the Callers List the Missed Calls on the idle screen is cleared Accessing and Clearing Missed Calls 1 Press programmed Callers List key on the phone 2 Use the 2 and 5 keys to scroll through the line items in the Callers List T...

Page 139: ...s file displays the phone number caller name and the line that the call came in on Download the Callers List Use the following procedure to download the Callers List to your PC using the Mitel Web UI 1 Click on Operation Directory 2 In the Callers List field click on Save As A download window displays 3 Click OK 4 Enter the location on your computer where you want to download the Callers List and ...

Page 140: ... set DND on the phone side for a specific account or for all accounts on the phone You can set three modes for DND using the Mitel Web UI at the path Basic Settings Preferences General DND Key Mode Account Phone default and Custom DND performs according to the mode you set You can then configure a DND key for the phone using the Mitel Web UI at the path Operation Programmable Keys You can enable a...

Page 141: ...Valid values are Account Phone default Custom Default is Phone Account Sets DND for a specific account DND key toggles the account in focus on the phone to on or off Phone default Sets DND on for all accounts on the phone DND key toggles all accounts on the phone to on or off Notes 1 If you make changes to the configuration for DND via the IP phone UI you must refresh the Mitel Web UI screen to se...

Page 142: ...ly without a reboot Notes 1 If there is only one account configured on the phone then the mode setting is ignored and the phone behaves as if the mode was set to Phone 2 Using the Mitel Web UI if you change the DND Key Mode to Phone all accounts synchronize to the current setting of Account 1 Notes 1 If you selected Account or Custom mode in Step 2 you can enable disable each account or all accoun...

Page 143: ...DND enabled while account 2 has DND disabled DND in Phone Mode Default 1 Press the DND key to turn on off DND for all accounts on the phone 2 Use the 3 and 4 navigation keys to scroll through each account In the above example enabling DND for account 1 also enables DND for account 2 Notes 1 If there is no DND key configured or if it is removed DND is disabled on the IP phone 2 If there is only one...

Page 144: ...d as indicated by a check mark Account 2 has DND disabled as indicated by an X Items 3 and 4 allow you to disable or enable DND on all accounts respectively 3 Use the 4 Change key to enable or disable DND for a specific account or to enable disable DND for all accounts After making the change press 3 Done and then Confirm to save the change Pressing 0 Cancel cancels the attempted change IP PHONE U...

Page 145: ...me CFWD configuration for all accounts All Busy and or No Answer When you configure the initial account the phone applies the configuration to all other accounts In the Mitel Web UI only the account you configured is enabled All other accounts are grayed out but set to the same configuration Using the Mitel Web UI if you make changes to that initial account the changes apply to all accounts on the...

Page 146: ...o all other accounts In the Mitel Web UI only the account you configured is enabled All other accounts are grayed out but set to the same configuration Using the Mitel Web UI if you make changes to that initial account the changes apply to all accounts on the phone Custom The Custom mode allows you to configure CFWD for a specific account or all accounts You can configure a specific state All Busy...

Page 147: ...of rings The call gets forwarded to the specified number 6 For each account in the Value field enter the phone number for which you want the incoming calls to forward to if the phone is in the specified state Note If the BroadSoft BroadWorks Executive and Assistant Services feature is enabled and your phone is configured with the Assistant s role an additional Forward Filtering option may be avail...

Page 148: ...ode you can enable disable each account or all accounts as applicable You can enter different phone numbers for each enabled state If you selected Phone mode all accounts are set to the same CFWD configuration All Busy and or No Answer as Account 1 on the phone In the Mitel Web UI only Account 1 is enabled All other accounts are grayed out but use the same configuration as Account 1 Using the Mite...

Page 149: ...there is only one account configured on the phone then the mode setting is ignored and the phone behaves as if the mode was set to Phone 3 Using the Mitel Web UI if you change the CFWD mode to Phone all accounts synchronize to the current setting of Account 1 4 If the BroadSoft BroadWorks Executive and Assistant Services feature is enabled and your phone is configured with the Assistant s role an ...

Page 150: ...for the specified number of rings You can also use the following keys if required All Off Disables all CFWD states for the current account in focus All On Enables all CFWD states for the current account in focus 4 Press the 4 Change navigation key for the state you selected in Step 3 Scroll to the CFWD State screen This displays the current state of the mode you selected In the following example t...

Page 151: ... CFWD No Answer state In the CFWD Number screen press the 2 navigation key to scroll to the CFWD No Rings screen and press 4Change 11 Press 2Next to select the number of rings to apply to the phone for call forwarding incoming calls Valid values are 1 to 20 Default is 3 CFWD Number Screen Cfwd All Use to view Cfwd State On Done Change 1 Cfwd Number 5555_ Cancel Set Cfwd Number 5555 Done Change 2 C...

Page 152: ...l through each account In the above example account 1 and account 2 are the accounts configured on the phone Both accounts have CFWD enabled as indicated by the CFWD All message 2 Press the Call Forward key The Call Forward menu displays Use the 2 and 5 navigation keys to scroll through each state type IP PHONE UI Note InPhonemode whenyouchangethecallforwardconfigurationforanaccount the change app...

Page 153: ...u can also use the following keys if required All Off Disables all CFWD states for the current account in focus All On Enables all CFWD states for the current account in focus 4 Press the 4Change key for the mode you selected in Step 2 Scroll to the CFWD State screen This screen displays the current state of the mode you selected In the following example the CFWD All state is ON 5 Press the 4Chang...

Page 154: ... 10 For the CFWD No Answer state in the CFWD Number screen press the 2 navigation key to scroll to the CFWD No Rings screen and press 4Change 11 Press the 2Next key to select the number of rings to apply to the phone for call forwarding incoming calls Valid values are 1 to 20 Default is 3 CFWD Number Screen Cfwd All Use to view Cfwd State On Done Change 1 Cfwd Number 5555_ Cancel Set Cfwd Number 5...

Page 155: ...he phone CFWD in Custom Mode 1 Use the 3 and 4 navigation keys to scroll through each account In the above example account 1 has CFWD All enabled and account 2 has CFWD Busy enabled 2 Press the Call Forward key The Call Forward menu displays Use the 2 and 5 navigation keys to scroll through each state type IP PHONE UI Apply Changes 0Cancel Confirm John Smith CFWD All Tue Aug 20 2 55pm L1 J Smith C...

Page 156: ...f the call has not been answered for the specified number of rings You can also use the following keys if required All Off Disables all CFWD states for the current account in focus All On Enables all CFWD states for the current account in focus 4 Press the 4Change key for the mode you selected in step 2 Scroll to the CFWD State screen This displays the current state of the mode you selected In the...

Page 157: ... No Answer state in the CFWD Number screen press the 2 navigation key to scroll to the CFWD No Rings screen and press 4Change 11 Press the 2Next key to select the number of rings to apply to the phone for call forwarding incoming calls Valid values are 1 to 20 Default is 3 CFWD Number Screen Cfwd All Use to view Cfwd State On Done Change 1 Cfwd Number 5555_ Cancel Set Cfwd Number 5555 Done Change ...

Page 158: ...f times you specify in the No Rings screen and then forwards the call 13 Press 4Set to save the change 14 Press 3Done to save all your changes 15 Each time you press3 Done the following screen displays 16 Press Confirm to confirm the change s each time the Apply Changes screen displays All changes are saved to the phone for all accounts Apply Changes 0Cancel Confirm ...

Page 159: ...ess on your phone generates two tones of specific frequencies One tone is generated from a high frequency group of tones and the other from a low frequency group If you enable the Display DTMF Digits parameter the digits you are dialing from the keypad or from a programmable key display to the IP phone s LCD display This parameter is disabled by default no digits display when dialing You can enabl...

Page 160: ...re on an active call and a new call comes into the phone You can configure this feature using the Mitel Web UI CONFIGURING CALL WAITING TONE 1 Click on Basic Settings Preferences General 2 A call waiting tone is enabled by default If required disable the Play Call Waiting Tone field by unchecking the check box 3 Click Save Settings MITEL WEB UI ...

Page 161: ...a message waiting on the IP phone You can configure this feature using the Mitel Web UI CONFIGURING STUTTERED DIAL TONE 1 Click on Basic Settings Preferences General 2 Stuttered dial tone is enabled by default If required disable the Stuttered Dial Tone field by unchecking the check box 3 Click Save Settings MITEL WEB UI ...

Page 162: ...cation arrives to the phone If your System Administrator has set a value for this feature in a custom XML application or in the configuration files the value you set in the Mitel Web UI overrides the Administrator s setting Setting and saving the value in the Mitel Web UI applies to the phone immediately CONFIGURING XML BEEP SUPPORT 1 Click on Basic Settings Preferences General 2 XML Beep Support ...

Page 163: ...the path Basic Settings Preferences General The default time is 5 seconds for each message to display before scrolling to the next message You can increase or decrease this time as required Setting and saving the value in the Mitel Web UI applies to the phone immediately CONFIGURING STATUS SCROLL DELAY 1 Click on Basic Settings Preferences General 2 Enter a value in the Status Scroll Delay seconds...

Page 164: ...d call the phone switches focus to the ringing line to enable the user to see who is calling them You can turn off this functionality so that the phone stays focused on the connected call You can do this using the Switch Focus to Ringing Line parameter in the Mitel Web UI CONFIGURINGSWITCHFOCUSTORINGINGLINEUSINGTHEMITELWEB UI 1 Click on Basic Settings Preferences General 2 The Switch Focus to Ring...

Page 165: ... When this feature is disabled a ring splash is heard when the active call hangs up and there is still a call on hold You can enable or disable this feature using the Call Hold Reminder During Active Calls parameter in the Mitel Web UI CONFIGURING CALL HOLD REMINDER DURING ACTIVE CALLS 1 Click on Basic Settings Preferences General 2 The Call Hold Reminder During Active Calls field is disabled by d...

Page 166: ... splash is audible You can enable or disable this feature using the Call Hold Reminder parameter in the Mitel Web UI CONFIGURING CALL HOLD REMINDER 1 Click on Basic Settings Preferences General 2 The Call Hold Reminder field is disabled by default To enabled this field check the box When this feature is enabled the reminder ring splash timer starts as soon as you put a call on hold even when no ot...

Page 167: ...n enable or disable this feature in the Mitel Web UI CONFIGURING CALL WAITING TONE PERIOD 1 Click on Basic Settings Preferences General 2 In the Call Waiting Tone Period field enter a time period in seconds that the call waiting tone will be audible on an active call when another call comes in Default is 0 seconds When enabled the call waiting tone plays at regular intervals for the amount of time...

Page 168: ...hone switches back immediately after the call ends Transfer For incoming or outgoing calls the current behavior is that the same line used to transfer the call does not change For incoming calls the phone switches back immediately after the call transfers Park The phone switches back immediately after the call ends Voicemail The phone switches back immediately after the call ends Redial The phone ...

Page 169: ...disables the preferred line focus feature 1 through 24 For example if you set the preferred line to 2 when a call incoming or outgoing ends on the phone on any line the phone switches focus back to Line 2 3 In the Preferred Line Timeout field enter the amount of time in seconds that the phone switches back to the preferred line after a call incoming or outgoing ends on the phone or after a duratio...

Page 170: ...ing the key rejects calls coming into the phone while you are on an active call When you disable this parameter pressing the key hangs up the active call If you disable this feature and the phone receives another call when an active call is already present the 6865i displays 2Ignore on the LCD For the 6865i you must use the 2 navigation key to ignore the call CONFIGURING GOODBYE KEY TO CANCEL INCO...

Page 171: ... the MWI LED for all lines the LED illuminates if a voicemail is pending on any line on the phone lines 1 through 24 You configure the MWI using the Mitel Web UI CONFIGURING MESSAGE WAITING INDICATOR 1 Click on Basic Settings Preferences General 2 The Message Waiting Indicator Line field is set to all lines by default If required change the setting to a specific line by selecting a line from the l...

Page 172: ... before answering the intercom call If Auto Answer is disabled the phone treats theincoming intercom call as a normal call Auto Answer and Play Warning Tone are enabled by default MICROPHONE MUTE You can mute or unmute the microphone on the IP phone for intercom calls made by the originating caller If you want to mute the intercom call you enable this feature If you want to unmute or hear the inte...

Page 173: ...calls made by the originating caller To disable this field uncheck the box 4 The Play Warning Tone field is enabled by default If Auto Answer is enabled the phone plays a warning tone when it receives in incoming intercom call To disable this field uncheck the box 5 The Allow Barge In field is enabled by default If Allow Barge In is enabled the phone puts an active call on hold and answers the inc...

Page 174: ...on to accept ignore the call If the Allow Barge In parameter is enabled the RTP multicast call barges in and any existing calls are put on hold If an RTP multicast session already exists on the phone and the phone receives another incoming RTP multicast session the priority is given to the first multicast session and the second multicast session is ignored The behavior for the incoming calls in th...

Page 175: ...all If a phone is configured for SCA bridging and it attempts to join a call but the account on the server does not have this functionality enabled an error message displays to the LCD on the phone The SCA call bridging feature is disabled by default on all phones Your Administrator can enable disable this feature if required Contact your System Administrator for more information Keys States and L...

Page 176: ...d Green Called Party Solid Red None Alerting incoming call Flashing Red N A N A N A Active Solid Green Far end Solid Red Far end Held Slow Flashing Green Far end Slow Flashing Red Far end Hold private Slow Flashing Green Far end Solid Red Far end Bridge active Solid Green Far end Solid Red Far end Bridge held Slow Flashing Green Far end Solid Red Far end STATE LOCAL LINE KEY PRESSED REMOTE LINE KE...

Page 177: ...tivation FAC For example if the key value is defined as 61 the Activation FAC the phone will automatically assume that the Deactivation FAC is 62 and will use that code to deactivate Executive Call Filtering Executive Call Filtering Activation FAC followed by a semi colon and then Executive Call Filtering Deactivation FAC e g 61 61 or 61 71 Used when the Activation and Deactivation FACs are not in...

Page 178: ...ield select Filter 4 Optional In the Value field enter the Executive Call Filtering Activation FAC e g 61 or both the Executive Call Filtering Activation and Deactivation FACs followed by a semi co lon e g 61 61 5 In the Line field select the line for which you want to use the key functionality 6 Click Save Settings to save your settings Filter Key for the Assistant s Phone As an Assistant can be ...

Page 179: ...ve Call Filtering is disabled for all associated Executives the key s corresponding LED will turn off Configuring the Filter Programmable Key on the Assistant s Phone Using the Mitel Web UI Use the following procedure to configure the Filter key on the Assistant s phone using the Mitel Web UI 1 Click on Operation Programmable Keys 2 Select a key that you want to use as a Filter activate deactivate...

Page 180: ...nd Destination Address manually using the keypad Executive Assistant Initiate Call FAC followed by the Executive s Address e g 644052 In such scenarios only the Destination Address will need to be manually entered using the keypad Executive Assistant Initiate Call FAC followed by the Executive s Address an asterisk and then the Destination Address e g 644052 4059 In such scenarios addresses will n...

Page 181: ... Initiate Call key 3 In the Type field select Speeddial 4 In the Value field enter the Initiate Call FAC e g 64 or In the Value field enter the Initiate Call FAC followed by the Executive s Address e g 644052 or In the Value field enter the Initiate Call FAC the Executive s Address followed by an asterisk and then the Destination Address e g 644052 4059 5 In the Line field select the line for whic...

Page 182: ...Executive s Phone 1 Press the configured Filter key Executive Call Filtering is now deactivated and the key s corresponding LED will be turned off To Intercept a Filtered Call Before it is Transferred to an Assistant Use the following procedure to intercept a filtered call before it is transferred to an Assistant 1 Lift the handset or press the Speaker Headset key if the phone has no active calls ...

Page 183: ...corresponding to the respective Executive Executive Call Filtering is now activated for that Executive and the key s corresponding LED will be lit To Activate Executive Call Filtering on an Assistant s Phone when the Filter Key s Value is Not Defined Use the following procedure to activate Executive Call Filtering on an Assistant s phone when the Filter key s value is not defined 1 Press the Filte...

Page 184: ...on an Assistant s Phone when the Filter Key s Value is Not Defined Use the following procedure to deactivate Executive Call Filtering on an Assistant s phone when the Filter key s value is not defined 1 Press the Filter key The list of associated Executives will appear on screen 2 Select the Executive for whom you want to deactivate Executive Call Filtering by pressing the 2 or 5 navigation keys a...

Page 185: ...n an active call and the Goodbye Key Cancels Incoming Call feature is enabled or Press and hold the Ignore key until the call is successfully ignored if on an active call and the Goodbye Key Cancels Incoming Call feature is disabled To Push a Filtered Call Back to the Executive Use the following procedure to push a filtered call back to the Executive 1 After answering a filtered call press the Tra...

Page 186: ... Call to the Executive Use the following procedure to perform a semi attended transfer of a filtered call to the Executive 1 After answering a filtered call press the Transfer key 2 Enter the Executive s phone or extension number and press the Dial key 3 When the call is in the ringing state press the Transfer key The phone will recognize the Executive s number and will change the transfer scenari...

Page 187: ...all is answered by the Executive press the Transfer key The call will be transferred normally and the filtered call will be released To Activate Call Forwarding of Filtered Calls Use the following procedure to activate call forwarding of filtered calls 1 Click on Basic Settings Account Configuration 2 Place a checkmark in the Enabled box beside the Divert option under Forward Filtering 3 Enter the...

Page 188: ...ight the Call Forward Number menu 9 Press the Change key to enter the Call Forward Number menu and enter a forwarding number 10 Press the Set key 11 Press the Done key 12 Press the Confirm key to apply the changes A checkmark will be displayed beside Fwd Filtering indicating call forwarding of all filtered calls is to be activated 13 Press the Done key again 14 Press the Confirm key again 15 Press...

Page 189: ...able key 2 Press the 2 navigation key three times to select Forward Filtering 3 Press the Change key to enter the Call Forward Mode Forward Filtering menu 4 Press the 2 navigation key to highlight the Call Forward State menu 5 Press the Change key to enter the Call Forward State menu 6 Press the Next key to toggle the Call Forward State option from ON to OFF 7 Press the Set key 8 Press the Done ke...

Page 190: ...r extension 3 When the call is answered if you would like to push the call to the Executive press the Transfer key twice The phone will enter in the FAC for the BroadSoft Executive Assistant Call Push feature and automatically dial the FAC call The FAC call will be answered and the filtered call will be released if the push is successful STAR CODES All of the main call handling and extension manag...

Page 191: ...le softkeys with each softkey providing an LED and graphical UI for call status indication The M685i features a 4 3 480x272 pixel color backlit LCD display The M680i and M685i Expansion Module keys support the following functions None Speeddial Conf Line Speeddial MWI Speeddial Directory Do Not Disturb DND Filter BLF Busy Lamp Field Callers List BLF List Redial Auto Call Distribution ACD Conferenc...

Page 192: ...o create a speed dial key and configure it the same way you configure a speed dial key on the phone For details on creating a speed dial key see Creating a Speed Dial Key on page 61 Note For more information about configuring the expansion module keys with these functions see the Programmable Keys on page 58 Note For more information about installing the M680i or M686i Expansion Modules on your ph...

Page 193: ...AIL MESSAGE Your phone system or service provider must provide the visual message waiting service for this function to work Check with your System Administrator for more information WHY IS MY HANDSET NOT WORKING Check to ensure that the handset cord is fully connected to both the phone and handset See the section Connecting a Handset in the Mitel 6865i Installation Guide for information HOW DO I F...

Page 194: ...the Mitel Web UI See Restarting Your Phone on page 51 for more information HOW DO I LOCK MY PHONE You can lock your phone to prevent the phone from being used or configured You can lock the phone using any of the following In the IP phone UI at the path Options Phone Lock See Phone Lock on page 49 for more information In the Mitel Web UI at the path Operations Phone Lock See Phone Lock on page 49 ...

Page 195: ...long distance charges which result from unauthorized and or unlawful use Mitel shall not be liable for any incidental or consequential damages including but not limited to loss damage or expense directly or indirectly arising from the customer s use of or inability to use this product either separately or in combination with other equipment This paragraph however shall not apply to consequential d...

Page 196: ...e date is to be provided with all products returned for warranty repairs EXCLUSIONS Mitel does not warrant its products to be compatible with the equipment of any particular telephone company This warranty does not extend to damage to products resulting from improper installation or operation alteration accident neglect abuse misuse fire or natural causes such as storms or floods after the product...

Page 197: ...y of equivalent goods or ii the repair of the goods or iii the payment of the cost of replacing the goods or of acquiring equivalent goods or iv the payment of the cost of having the goods repaired 1 2 Clause 1 1 is not intended to have the effect of excluding restricting or modifying a the application of all or any of the provisions of Part 5 4 of Schedule 2 to the Competition and Consumer Act 20...

Page 198: ...e Name Time Zone Code Table TIME ZONE NAME TIME ZONE CODE AD Andorra AE Dubai AG Antigua AI Anguilla AL Tirane AN Curacao AR Buenos Aires AS Pago Pago AT Vienna AU Lord Howe AU Tasmania AU Melbourne AU Sydney AU Broken Hill AU Brisbane AU Lindeman AU Adelaide AU Darwin AU Perth AW Aruba AZ Baku CET GST AST AST CET AST ART BST CET LHS EST EST EST CST EST EST CST CST WST AST AZT ...

Page 199: ...sau BY Minsk BZ Belize EET AST CET EET AST BOT FNT BRT BRT BRT BRS BRT BRS AMS AMT AMT AMT ACT ACT EST EET CST CA Newfoundland CA Atlantic CA Eastern CA Saskatchewan CA Central CA Mountain CA Pacific CA Yukon CH Zurich CK Rarotonga CL Santiago CL Easter CN Beijing CO Bogota CR Costa Rica CU Havana CY Nicosia CZ Prague NST AST EST EST CST MST PST PST CET CKS CLS EAS CST COS CST CST EES CET Time Zon...

Page 200: ...GE Tbilisi GF Cayenne GI Gibraltar GP Guadeloupe GR Athens GS South Georgia GT Guatemala GU Guam GY Guyana GMT GMT AST GET GFT CET AST EET GST CST CST GYT HK Hong Kong HN Tegucigalpa HR Zagreb HT Port au Prince HU Budapest HKS CST CET EST CET IE Dublin IS Reykjavik IT Rome GMT GMT CET JM Jamaica JP Tokyo EST JST KY Cayman EST LC St Lucia LI Vaduz LT Vilnius LU Luxembourg LV Riga AST CET EET CET EE...

Page 201: ...ua MX Hermosillo MX Tijuana CET EET CET AST AST CET MUT CST CST CST CST MST MST MST PST NI Managua NL Amsterdam NO Oslo NR Nauru NU Niue NZ Auckland NZ Chatham CST CET CET NRT NUT NZS CHA OM Muscat GST PA Panama PE Lima PL Warsaw PR Puerto Rico PT Lisbon PT Madeira PT Azores PY Asuncion EST PES CET AST WET WET AZO PYS Time Zone Name Time Zone Code Table TIME ZONE NAME TIME ZONE CODE ...

Page 202: ...M YEK OMS NOV KRA IRK YAK VLA SAK MAG PET ANA SE Stockholm SG Singapore SI Ljubljana SK Bratislava SM San Marino SR Paramaribo SV El Salvador CET SGT CET CET CET SRT CST TR Istanbul TT Port of Spain TW Taipei EET AST CST UA Kiev US Eastern US Central US Mountain US Pacific US Alaska US Aleutian US Hawaii UY Montevideo EET EST CST MST PST AKS HAS HST UYS VA Vatican CET YU Belgrade CET Time Zone Nam...

Page 203: ......

Reviews: