Interfaces and Daughterboards
120
1
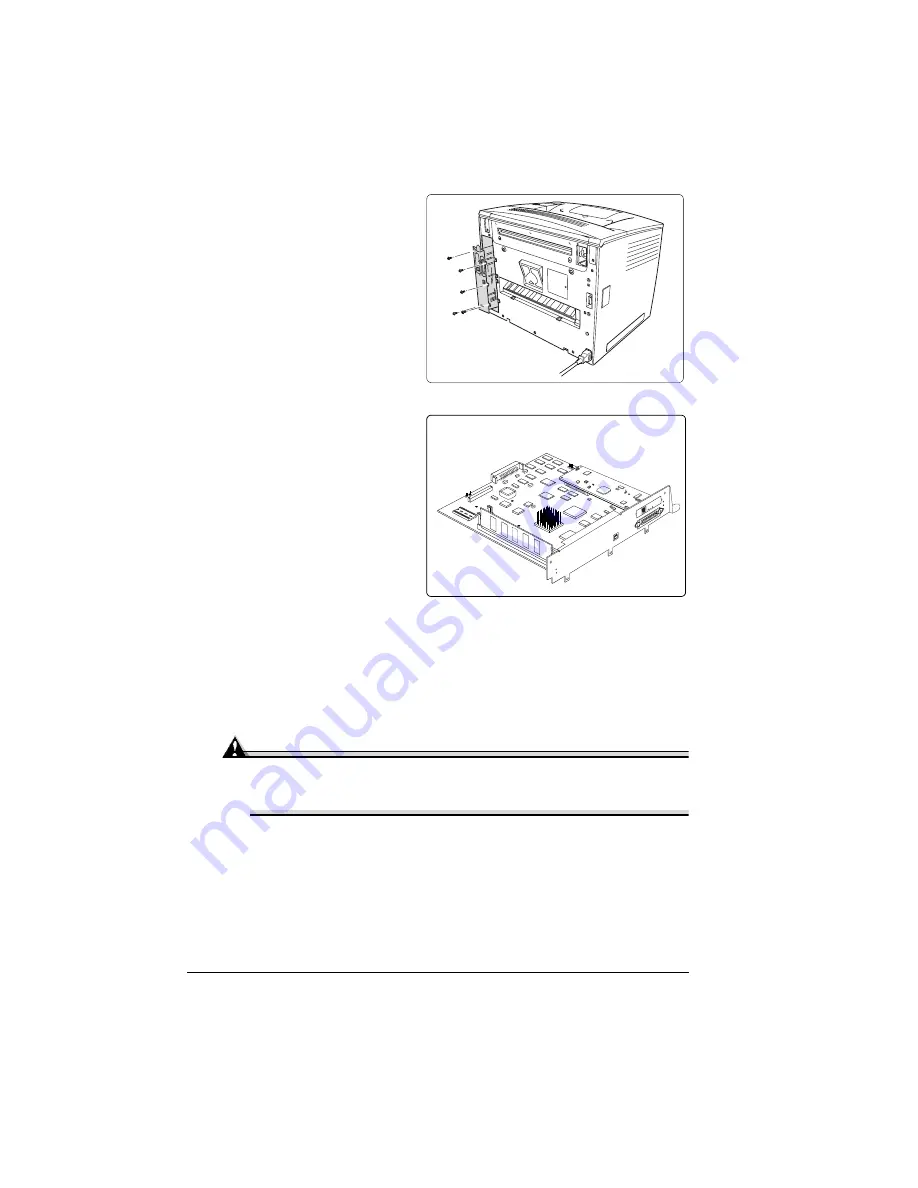
Turn off the printer, and
then disconnect the power
cord and all interface
cables from the printer.
2
Remove the
controller board.
Loosen four screws, and
pull the controller board
from the printer.
3
Position the controller
board on a flat surface
so it lies flat and the I/O
connector panel is facing
you.
The optional interface
opening is located next to
the “Parallel” port. Save the
two screws. (You’ll use
them when you install the
optional interface card.)
You can dispose of the
plate according to local
regulations.
4
Attach the interface card to
the controller board.
a
Position the interface card so that its I/O connector slides into its
opening in the interface panel and that its 80-pin connector aligns with
the 80-pin connector on the controller board.
b
Gently press the interface card down until its connector is fully seated
and the card is secured by the plastic support post(s).
Attention
Make sure that the connectors on the interface card and controller
board are properly aligned. Damage to the interface card and/or
controller board could result if the pins are misaligned.
5
Secure the interface card to the interface panel with the two screws you
removed earlier.
6
Reinstall the controller board.
Gently slide the controller board into the printer’s tracks until it is fully
seated, and then tighten the four screws.
7
Reconnect all interface cables.
IIIIIIIIIIIIIIIIIIIIIIIIIIIIIIIIIIIIIIIIIIIIIII IIIIIIIIIIIIIIIIIIIIIIIIIIIIIIIIIII IIIIIIIII
IIIIIIIIIIIIIIIIIIIIIIIIIIIIIIIIIIIIIIIIIIIIIII IIIIIIIIIIIIIIIIIIIIIIIIIIIIIIIIIII IIIIIIIII
Summary of Contents for PagePro 9100
Page 1: ...PagePro 9100 User s Guide 1800672 001B ...
Page 7: ...1 Replacing Consumables ...
Page 28: ...Replacing the Transfer Roller 22 10 Close the top cover 11 Turn on the printer ...
Page 29: ...2 Using Media ...
Page 53: ...3 Maintaining the Printer ...
Page 60: ...Cleaning 54 9 Turn on the printer ...
Page 61: ...4 Troubleshooting ...
Page 67: ...Understanding the Media Path 61 Printer Optional Tray s Duplexer and 4 bin Mailbox ...
Page 102: ......
Page 103: ...5 Installing Other Accessories ...
Page 138: ......
Page 139: ...6 Storing Deinstalling Relocating Repacking and Shipping ...
Page 151: ...A Technical Specifications ...
Page 186: ......


