© 2014 MIMAKI ENGINEERING CO.,LTD.
6.2.13
P.3
6.2.13 Changing Joint
1
2
3
4
5
6
7
8
Work procedures
Removing the joints:
1. Execute [#ADJUST] — [HEAD WASH / DISCHARGE] to dis-
charge the ink. (Refer to
4.2.8
)
2. Remove the
Cartridge rear cover
.
3. Remove the
Tube and Fiitings Assy.
4. Attach the
Stopper
(M700865) to the
Joint
(Fitting
Φ
2:
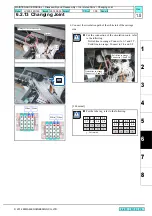
M603013-07, accessory parts), and attach it to the 3-way fitting.
Be sure to wear protective glasses and working gloves during the operation.
Ink may get into your eyes depending on the working condition, or hand skin may get rough if you touch
the ink.
Tube
3 way
fitting
Fitting
Make sure that O-ring (F seal rubber 300) is not
remaining in the joint screws.
Take care not to contaminate the surroundings with
ink.
F seal rubber 300
Stopper
Use accessory joints
Do not install the ink tube in the wrong position.
R.1.0
MAINTENANCE MANUAL > Disassembly and Reassembly > Ink-related Parts > Changing Joint
Model
JV300-130/160
Issued 2014.05.30 Revised
F/W ver
1.00
Remark
1.0
Rev.
Summary of Contents for JV300-130 A
Page 243: ......
Page 244: ...D500946 10 30052014 MIMAKI ENGINEERING CO LTD 2014 KF FW 1 1 ...


