background image

77

1

1921 Slauson 

A

ve.  Santa Fe Springs, CA.  90670  (800) 227-41

16  F

AX (888) 771-7713

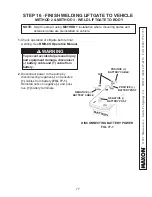
STEP 16 - FINISH WELDING LIFTGATE TO VEHICLE

METHOD 2 & METHOD 3 - WELD LIFTGATE TO BODY

NOTE:

  Skip this step if using 

METHOD 1

 installation where mounting plates and 

extension plate are preinstalled on vehicle.

POSITIVE (+)

 BATTERY POST


WARNING

!

To prevent accidental personal injury 
and equipment damage, disconnect 
(-) battery cable and (+) cable from 
battery.

2.

 Disconnect power to the pump by 

disconnecting negative 

(-)

 and positive 

(+) 

cables from battery 

(FIG. 77-1)

Reinstall nuts on negative 

(-)

 and posi-

tive 

(+) 

battery terminals.

NEGATIVE (-)

 BATTERY CABLE

NEGATIVE (-)

 BATTERY POST

NUT

POSITIVE (+)

 BATTERY CABLE

DISCONNECTING BATTERY POWER

FIG. 77-1

1.

 Check operation of Liftgate before 

fi

 nal 

welding. See 

BMR-CS Operation Manual

.

Summary of Contents for BMR-CS

Page 1: ...ling Instructions Decals Hydraulic Electrical System Diagrams Pre delivery Inspection Form Installation Manual Contains MAXON Lift Corp 2020 To find maintenance parts information for your BMR CS Liftgate go to www maxonlift com Click the PRODUCTS COLUMNLIFT BMR CS buttons Open the Maintenance Manual in the PRODUCT DOCUMENTATION window For parts click on the PARTS PORTAL COLUMNLIFT BMR CS buttons ...

Page 2: ... PRE INSTALL MOUNTING PLATES AND EXTENSION PLATE ON VEHICLE 22 METHOD 2 WELD BOLT ON LIFTGATE TO BODY 27 METHOD 3 WELD LIFTGATE TO BODY 30 STEP 4 BOLT LIFTGATE TO VEHICLE 33 STEP 5 REMOVE LOWER SUPPORT FIXTURES 38 STEP 6 POSITION PUMP BOX FRAME 39 STEP 7 ATTACH PUMP BATTERY BOX FRAME TO VEHICLE 41 STEP 8 RUN HYDRAULIC LINES ELECTRIC CABLES 47 RUN GRAVITY DOWN HYDRAULIC LINES 48 TORQUE VALUES FOR H...

Page 3: ...HOD 2 75 STEP 16 FINISH WELDING LIFTGATE TO VEHICLE 77 METHOD 2 METHOD 3 WELD LIFTGATE TO BODY 77 STEP 17 CHECK CLEARANCE OF CONNECTOR BAR SIDE BRACKETS STOP BLOCKS 81 STEP 18 CHECK CLEARANCE OF RUNNER PADS 83 STEP 19 PLATFORM CHAIN ADJUSTMENT 88 STEP 20 PLACE ALIGN ARROWS DECAL 89 DECALS PLATES 90 TOUCH UP GALVANIZED FINISH 92 HYDRAULIC SYSTEM DIAGRAMS 93 PUMP MOTOR SOLENOID OPERATION POWER DOWN ...

Page 4: ...OWN 97 GRAVITY DOWN SINGLE DUAL PUMP ELECTRICAL SCHEMATIC 98 INTERCONNECTING ELECTRICAL SCHEMATIC POWER DOWN 99 POWER DOWN SINGLE DUAL PUMP ELECTRICAL SCHEMATIC 100 BMR CS ELECTRICAL HYDRAULIC VALVES TORQUE VALUES 101 PRE DELIVERY INSPECTION FORM 102 TABLE OF CONTENTS Continued ...

Page 5: ...dated figure for LH RH column taillight connectors showing wiring connections 53 57 Updated Run Electrical Cables step to include instructions for properly connecting cables Added taillight connector details FIG 57 1 90 Added QR Code Decal P N 299351 01 to decal locations image 91 Updated decal sheet Decal F Operating Instructions to include QR Code Decal 102 Updated Pre Delivery Inspection Form t...

Page 6: ... create hazards for Liftgate operators and maintainers Correctly stow platform when not in use Extended platforms could create a hazard for people and vehicles passing by WARNING Recommended practices for welding on steel parts are contained in the current AWS American Welding Society D1 1 Structural Welding Code Steel Damage to Liftgate and or vehicle and personal injury can result from welds tha...

Page 7: ...ildren to operate the Liftgate Be careful working by an automotive type battery Make sure the work area is well ventilated and there are no flames or sparks near the battery Never lay objects on the battery that can short the terminals together If battery acid gets in your eyes immediately seek first aid If acid gets on your skin immediately wash it off with soap and water If an emergency situatio...

Page 8: ... size of platform and load capacity of your Liftgate X Tension on each sidewall Y Compression on each sidewall Z Shear on each sidewall X 77 BED HEIGHT Y Z Consult vehicle body manufacturer for vehicle body strength data Make sure the forces created by the Liftgate are within the limits prescribed by the vehicle body manufacturer WARNING FIG 8 1 BODY STRENGTH NOTE Maximum operating bed height for ...

Page 9: ... TABLE 9 1 TABLE 9 2 MODEL CAPACITY P F SIZE X Y LBS Z LBS BMR CS35 3500 LBS GALVANIZED PLATFORM 36 42 1043 3786 BMR CS44 4400 LBS GLAVANIZED PLATFORM 36 42 1262 4461 MODEL CAPACITY P F SIZE X Y LBS Z LBS BMR CS35 3500 LBS ALUMINUM STD KNURLED PLATFORM 36 42 964 3510 BMR CS44 4400 LBS ALUMINUM STD KNURLED PLATFORM 36 42 1183 4185 ...

Page 10: ...NTS Continued NOTE Maximum bed height is 56 unloaded Minimum bed height loaded varies with type and size of platform Refer to FIGS 10 1 10 2 WELD ON LIFTGATE FIG 10 1 BOLT ON LIFTGATE FIG 10 2 CLEARANCE DIMENSIONS 56 MAX BED HT 13 3 4 INCLUDES 3 4 BUMPER 56 MAX BED HT 13 1 4 INCLUDES 3 4 BUMPER ...

Page 11: ...AX 888 771 7713 VEHICLE REQUIREMENTS Continued CLEARANCE DIMENSIONS FIG 11 1 97 1 8 96 WIDE VEHICLE 102 1 8 102 WIDE VEHICLE 95 5 8 18 1 8 87 1 8 96 WIDE VEHICLE 92 1 8 102 WIDE VEHICLE CLEARANCE DIMENSIONS Continued 87 1 8 96 WIDE VEHICLE 92 1 8 102 WIDE VEHICLE ...

Page 12: ...perate correctly FIGS 12 1 and 12 2 VEHICLE REQUIREMENTS Continued 91 MAX LEVEL LIFTGATE INSTALLED ON FLAT BED COLUMNS SUP PORTS SHOWN PERPENDICULAR TO LEVEL GROUND FIG 12 2 NOTE If Liftgate columns exceed a 91 degree angle from level ground when installed on body or if columns cannot be mounted flush against rear of vehicle a steel filler may be used to bridge gap between vehicle body and Liftgat...

Page 13: ... assembly 4A Pump installation kit 3 10 15 20 or 28 4B Channel guard for 10 15 20 or 28 installation kits only 5 Frame for pump box with optional battery box is shown A shorter frame is also available for mounting single pump box or an optional battery box 6 Battery box optional 7 Optional equipment 8 Installation and operation manuals TABLE13 1 2 4A 5 6 3 4B 1 7 8 LIFTGATE INSTALLATION COMPONENTS...

Page 14: ...ON KIT STEEL BLACK STEEL BLACK ALL 296909 01 288875 111 96 WIDE VEHICLE 288875 112 102 WIDE VEHICLE 288875 111 150 96 WIDE VEHICLE 288875 112 150 102 WIDE VEHICLE 288875 101 96 WIDE VEHICLE 288875 102 102 WIDE VEHICLE 288875 131 96 WIDE VEHICLE 288875 132 102 WIDE VEHICLE 288875 131 150 96 WIDE VEHICLE 288875 132 150 102 WIDE VEHICLE BMR CS MODEL PART BOX 3 FT PUMP BOX INSTALL KIT 10 FT PUMP BOX I...

Page 15: ... GALVANIZED 287980 11G DUAL FRAME 2 BATT BOX GALVANIZED 288810 11G DUAL FRAME 3 BATT BOX GALVANIZED 289190 02 GALVANIZED 289188 11 GALVANIZED 96 WIDE VE HICLE 289188 12 GALVANIZED 102 WIDE VEHICLE BMR CS35 PD BMR CS44 PD 296180 12 BMR CS MODEL OPTIONS DOME LAMP RECESSED MOUNT DOME TIMER SWITCH AUXILIARY CONTROL HAND HELD CONTROL CYCLE COUNTER BMR CS35 GD BMR CS44 GD 906589 01 100 ONLY FOR HEADER K...

Page 16: ...01 2 BATTERIES INCLUDES DC DC CON VERTER 269950 01 3 BATTERIES 289988 02 BATTERIES INCLUDES DC DC CON VERTER 907086 287990 01G SINGLE GALVANIZED FRAME FOR 2 BATTERIES 287929 01G SINGLE GALVANIZED FRAME FOR 3 BATTERIES 280290 BMR CS MODEL OPTIONS POWER GROUND CABLES CONSPICUITY REFLECTIVE TAPE PUMP PRESSURE GAUGE STREET SIDE CONTROL KIT CAB CUTOFF SWITCH TRUCK ONLY BMR CS35 GD BMR CS44 GD 295263 01...

Page 17: ... DUAL POLE 280275 05 SINGLE DUAL POLE TABLE 17 2 BMR CS MODEL DIRECT TRAIL CHARGER OPTIONS DIRECT WITH DUAL POLE CON NECTIONS DIRECT DUAL COMBINATION CON NECTIONS DIRECT 7 WAY CONNEC TIONS DIRECT REFRIGERATED OR STRAIGHT TRUCK CONNECTIONS BMR CS35 BMR CS44 295219 01 DIRECT 01 295220 01 DIRECT 02 295211 01 DIRECT 03 295972 01 DIRECT 04 BMR CS MODEL SELECT TRAIL CHARGER OPTIONS SELECT WITH REFRIGERA...

Page 18: ...M CHARGING SYSTEM 286328 01 INSTALLS IN BAT TERY BOX 908171 01 100 INSTALLS ON BATTERY BOX BMR CS MODEL MISCELLANEOUS OPTIONS 200 AMP CIRCUIT BREAKER KIT 150 AMP CIRCUIT BREAKER KIT BATTERY BOX LOCK KIT SINGLE FRAME BATTERY BOX LOCK KIT DUAL FRAME BMR CS35 BMR CS44 296504 200 WITHOUT BATTERY BOX 296504 150 FOR TRUCK AP PLICATION AUX ILIARY BATTERY 295245 02G BATTERY BOX IN STALLED IN SINGLE FRAME ...

Page 19: ...ICLE BODY SIDE RAIL FLOOR PLATE 1 4 THICK ASTM A36 GENERAL PURPOSE STEEL 4 x 10 LG QTY 2 POSITIONING FLOOR PLATE FIG 19 1B LOWER SUPPORT GUSSET 1 4 THICK ASTM A36 GENERAL PURPOSE STEEL 8 x 8 LG SIDES QTY 2 LOWER SUPPORT GUSSET 1 4 THICK ASTM A36 GENERAL PURPOSE STEEL 8 x 16 LG SIDES QTY 2 LIFTGATE SUPPORT FRAMEWORK FOR FLATBED FIG 19 1A POSITIONING GUSSETS FIG 19 1C 12 MAX BELOW BED HEIGHT 32 NOTE...

Page 20: ... 36 Approx 1 8 1 8 2 8 2 WELDING THE FLOOR PLATES FIG 20 1A 1 8 WELDING LIFTGATE SUPPORTS FIG 20 1B WELDING THE GUSSETS FIG 20 1C TYP AT LH RH SUPPORTS 1 8 WELDING THE SUPPORTS FIG 20 1D 32 12 MAX BELOW BED HEIGHT VEHICLE BODY SIDE RAIL TYP LH RH FLOOR PLATES 1 8 1 8 TYP AT LH RH SUPPORT GUS SETS MOUNT EACH GUSSET FLUSH WITH OUTER EDGES OF BODY FRAME TYP AT LH RH VERTICAL SUPPORTS WELD HERE BEFORE...

Page 21: ... a vehicle body are covered in this manual FIG 21 1 FIG 21 3 FIG 21 2 METHOD 1 Column mounting plates and extension plate can be welded to vehicle body before bolting on the Liftgate FIG 21 1 Refer to the PRE INSTALL MOUNT ING PLATES AND EXTENSION PLATE ON VEHICLE instruc tions in STEP 3 METHOD 3 Liftgate equipped with exten sion plate can be welded to vehicle body FIG 21 3 Re fer to the WELD LIFT...

Page 22: ... of vehicle body and flush with top of the rear sill Then weld as shown in FIGS 22 1 22 2 and 22 3 CENTERING EXTENSION PLATE ON 96 WIDE VEHICLE BODY FIG 22 1 START AT CENTER BOTH ENDS MUST BE WELDED START AT CENTER BOTH ENDS MUST BE WELDED 1 4 1 4 1 4 1 4 2 5 2 5 2 5 2 5 EXTENSION PLATE FLUSH VEHICLE BODY TOP OF REAR SILL CENTER LINE CENTERING EXTENSION PLATE ON 102 WIDE VEHICLE BODY FIG 22 2 FLUS...

Page 23: ...ension plate and RH mounting plate is measured from the inside edge of mounting plate as shown in illustration 70 1 2 REF 3 3 16 1 16 0 77 3 8 1 16 RH MOUNTING PLATE FIG 23 1A RH MOUNTING PLATE TOP HANGER RH MOUNTING PLATE INSIDE WALL VEHICLE FLOOR INSIDE WALL EXTENSION PLATE EXTENSION PLATE REAR OF VEHICLE BODY FIG 23 1 METHOD 1 PRE INSTALL MOUNTING PLATES AND EXTENSION PLATE ON VEHICLE Continued...

Page 24: ...ger and the second set of dimensions is taken from the inner edge of the mounting plates METHOD 1 PRE INSTALL MOUNTING PLATES AND EXTENSION PLATE ON VEHICLE Continued 91 1 4 3 16 1 16 96 WIDE VEH 96 1 4 3 16 1 16 102 WIDE VEH IF MOUNTING JIG USED 87 1 4 3 16 1 16 96 WIDE VEH 92 1 4 3 16 1 16 102 WIDE VEH DIMENSIONS TAKEN FROM INNER EDGE OF MOUNTING BRACKETS LH MOUNTING PLATE FIG 24 1A FIG 24 1 RH ...

Page 25: ...H mounting plates are positioned within dimensions shown in FIGS 25 1A and 25 1B 4 Place a straight edge across LH and RH mounting plates FIG 25 1 Ensure that any gap between the mounting plates and straight edge FIGS 25 1A and 25 1B are less than 1 16 maximum TOP VIEW MOUNTING PLATES FIG 25 1 LH MOUNTING PLATE FIG 25 1A MOUNTING PLATE MOUNTING PLATE RH MOUNTING PLATE FIG 25 1B TOP HANGER TOP HANG...

Page 26: ...TEP 3 POSITION LIFTGATE Continued NOTE Before welding mounting plates to vehicle frame check squareness to make sure mounting plates are perpendicular to extension plate METHOD 1 PRE INSTALL MOUNTING PLATES AND EXTENSION PLATE ON VEHICLE Continued GO TO STEP 4 BOLT LIFTGATE TO VEHICLE REAR OF VEHICLE BODY FIG 26 1 A B 1 4 2 10 1 4 1 4 2 10 EXTENSION PLATE RH MOUNTING PLATE LH MOUNTING PLATE VEHICL...

Page 27: ... in FIG 27 1 Repeat for LH column The angle stock helps keep exten sion plate flush with top of vehicle bed while installing Liftgate Comply with welding CAUTION decal on the LH column CAUTION Recommended practices for welding on steel parts are contained in the current AWS American Welding Society D1 1 Structural Welding Code Steel Damage to Liftgate and or vehicle and personal injury can result ...

Page 28: ...able when dimensions A and B are within 1 4 of each other and top and bottom column dimensions are as shown in FIG 28 1 NOTE Before welding Liftgate to vehicle frame check squareness to make sure columns are perpendicular to extension plate RH MOUNTING PLATE LH MOUNTING PLATE CHECKING IF COLUMNS ARE SQUARE REAR OF LIFTGATE SHOWN FIG 28 1 FORKLIFT EXTENSION PLATE A B 96 1 8 3 16 1 16 96 WIDE VEH 10...

Page 29: ...esistant cover CAUTION 3 Use overhead hoist or fork lift to center Liftgate against the vehicle FIG 29 1 Let angle stock welded to extension plate rest on the top surface of the vehicle bed 4 Clamp top of each column to vehicle body to prevent gap FIG 29 1 5 Weld the RH and LH columns to vehicle body as shown in FIG 29 1 6 Remove clamp from each of the columns Then move fork lift away from work ar...

Page 30: ...teel parts are contained in the current AWS American Welding Society D1 1 Structural Welding Code Steel Damage to Liftgate and or vehicle and personal injury can result from welds that are done incorrectly EXTENSION PLATE 1 WELD FIG 30 1 ANGLE STOCK NOT PROVIDED WITH LIFTGATE 1 Weld 2 pieces of 10 X 2 angle stock to the top sur face of the extension plate near the RH column as shown in FIG 30 1 Re...

Page 31: ...s are square and perpendicular to the extension plate by measuring dimensions at the top and bottom of the columns and dimensions A and B as shown in FIG 31 1 Squareness is ac ceptable when dimensions A and B are within 1 4 of each other and top and bottom column dimensions are as shown in FIG 31 1 RH MOUNTING PLATE LH MOUNTING PLATE FORKLIFT EXTENSION PLATE A B 96 1 8 3 16 1 16 96 WIDE VEH 101 1 ...

Page 32: ... Let angle stock welded to extension plate rest on the top surface of the vehicle bed 4 Clamp top of each column to vehicle body to prevent gap FIG 32 1 5 Weld the RH and LH columns to vehicle body as shown in FIG 32 1 6 Remove clamp from each of the columns Then move forklift away from work area To prevent damage to Liftgate Connect welder ground to vehicle body Protect hydraulic hoses and electr...

Page 33: ...ON PLATE HARDWARE FIG 33 1B REMOVING LH TOP COVER HARDWARE FIG 33 1A 2 Remove 2 cap screws flat washers locknuts and spacers from LH column and extension plate FIGS 33 1 and 33 1B Repeat for RH column and extension plate 1 Remove screws lock washers flat washers and top column cover from LH column FIGS 33 1 and 33 1A Repeat for RH top column cover NOTE Save all hardware to re attach column cover a...

Page 34: ...ftgate mounting plates and rear of vehicle are galvanized FIG 34 1 If gal vanized remove 2 bolts from top hanger on the RH mounting plate FIG 34 1 Then remove screw and cover from hanger lock FIG 34 1 Repeat for LH mounting plate LIFTGATE MOUNTING PLATES FIG 34 1 COVER CAP SCREW BOLTS RH MOUNTING PLATE LH MOUNTING PLATE HANGER LOCK STEP 4 BOLT LIFTGATE TO VEHICLE Continued METHOD 1 PRE INSTALLED M...

Page 35: ...2 4 Hang liftgate on the mounting plates by inserting hangers into hanger slots FIGS 35 1 and 35 2 METHOD 1 PRE INSTALL MOUNTING PLATES AND EXTENSION PLATE ON VEHICLE Continued Tighten top hanger bolts on the columns while the Liftgate is sup ported by forklift Loose hanger bolts could allow the Liftgate to disengage from the hangers and fall off the vehicle when platform is lowered to the ground ...

Page 36: ...OSENING LH SUPPORT CHANNELS FIG 36 1A FIG 36 1 FIG 36 1B SUPPORT CHANNEL 5 Slightly loosen support channel cap screws on the LH column FIGS 36 1 and 36 1A to allow column slots to sit on top hangers and mounting pins FIG 36 1B Re peat for RH column TOP HANGER COLUMN SLOTS MOUNTING PIN METHOD 1 PRE INSTALL MOUNTING PLATES AND EXTENSION PLATE ON VEHICLE Continued ...

Page 37: ... top hanger METHOD 1 PRE INSTALL MOUNTING PLATES AND EXTENSION PLATE ON VEHICLE Continued TOP HANGER MOUNTING PLATE LH COLUMN LOCATING LH TOP HANGER FIG 37 1A 7 Insert 1 hanger bolt through top hanger in LH column FIGS 37 1 and 37 1B and tighten against bolt guide until mounting plate is flush with column Repeat for RH column 8 Remove forklift HANGER BOLT 5 8 11 X 4 1 2 LG TOP HANGER BOLT GUIDE MO...

Page 38: ...2 13 X 1 1 2 LG HEX SCREW 5 8 11 X 1 3 4 LG HEX SCREW 5 8 11 X 1 3 4 LG FLAT WASHER 1 2 LH LOWER SUPPORT FIXTURE LOCK WASHER 1 2 LOCK WASHER 1 2 LOCK NUT 1 2 13 RH LOWER SUPPORT FIXTURE NOTE Use short wrenches for unbolting lower support fixtures 1 Unbolt and remove lower sup port fixture from LH column FIG 38 1 Repeat for lower support fixture on RH column FIG 38 1 ...

Page 39: ...llations are shown in FIGS 39 1 39 2 40 1 40 2 and 40 3 TYPICAL 3 FT INSTALLATION FIG 39 1 12 12 36 Viewed from under truck NOTE Make sure pump box is closer to Liftgate than battery box if installed and pump box cover opens toward curb side of vehicle Also make sure hydraulic hoses are installed without straining hoses Distance from pump box to Liftgate is limited by lengths of hydraulic hoses an...

Page 40: ...7713 STEP 6 POSITION PUMP BOX FRAME Continued Viewed from under trailer PUMP BOX 12 Viewed from under truck 20 PUMP BOX 20 12 TYPICAL 20 FT INSTALLATION FIG 40 1 TYPICAL 20 FT INSTALLATION FIG 40 2 Viewed from under trailer PUMP BOX 28 12 TYPICAL 28 FT INSTALLATION FIG 40 3 ...

Page 41: ...sition on vehicle body cross members as shown in FIG 41 1 VEHICLE BODY CROSS MEMBERS PUMP BATTERY BOX FRAME NOTE There are 2 methods to mount pump and battery box frame to vehicle frame Bolt pump and battery box frame to hanger brackets welded to vehicle frame Weld pump and battery box frame to vehicle frame NOTE If pump and battery box frame is to be welded directly to cross members on vehicle bo...

Page 42: ...RY BOX FRAME BATTERY BOX FRAME MOUNTING BRACKETS MOUNTING BRACKETS FLUSH BRACKETS FOR TRAILERS 8 PLACES FIG 42 1A FLUSH BRACKETS FOR TRUCKS 8 PLACES FIG 42 2 2 Select holes on top of battery box frame to align mounting brackets flush to cross members Refer to FIGS 42 1 42 1A for trailers and FIG 42 2 for trucks Bolt mounting brackets to battery box frame as shown in FIG 42 1B Torque each bolt and ...

Page 43: ...BATTERY BOX FRAME FIG 43 2 BOLTING BRACKETS 8 PLACES FIG 43 2A CROSS MEMBER CAP SCREWS 2 PLACES WASHERS 4 PLACES LOCK NUTS 2 PLACES MOUNTING BRACKETS 3 Using mounting brackets as a tem plate mark and drill holes through cross members FIG 43 1 Bolt mounting brackets to cross mem bers as shown in FIGS 43 2 and 43 2A Torque bolts and lock nuts to 85 128 lb ft NOTE If welding mounting brackets to cros...

Page 44: ... CAUTION Recommended practices for welding on steel parts are contained in the current AWS American Welding Society D1 1 Structural Welding Code Steel Damage to Liftgate and or vehicle and personal injury can result from welds that are done incorrectly WARNING WELDING PUMP BATTERY BOX FRAME FIG 44 1 CROSS MEMBERS CROSS MEMBER BRACKET WELDING BRACKETS 8 PLACES FIG 44 1A 3 16 3 16 3 16 IF ACCESSIBLE...

Page 45: ...LIGNING PUMP BATTERY BOX FRAME TO WELD ON CROSS MEMBERS FIG 45 1 3 16 3 16 WELD PUMP BATTERY FRAME ALONG WIDTH OF FRAME ANGLE TO EVERY CROSS MEMBER IN CONTACT WITH FRAME ANGLE CROSS MEMBERS CROSS MEMBERS NOTE Any methods not shown in this section for welding mounting brackets to cross members must be approved by body or trailer manufacturer Explosive hydrogen gas from charging batteries can accumu...

Page 46: ...46 11921 Slauson Ave Santa Fe Springs CA 90670 800 227 4116 FAX 888 771 7713 STEP 7 ATTACH PUMP BATTERY BOX FRAME TO VEHICLE Continued BATTERY BOX ASSEMBLY REAR VIEW SHOWN FIG 46 1 VENTILATION HOLES ...

Page 47: ...sary first check behind the drilling surface so you do not damage any fuel lines vent lines brake lines or wires CAUTION 1 Get hydraulic hoses hydraulic tee channel guard if required and plastic ties from parts box and pump box installation kit Run hydraulic hoses from LH and RH columns to pump box Connect hydraulic hoses as shown in FIG 48 1 and TABLES 49 1 and 49 2 for Gravity Down Liftgate or F...

Page 48: ...LINE RETURN LINE RETURN LINE 3 LIFTING LINE LIFTING LINE RETURN LINE TO PUMP RESERVOIR Before connecting hoses ensure face seal o rings are in place CAUTION NOTE Lifting folding hoses run up from column connectors as shown to bottom of vehicle floor LH COLUMN RH COLUMN VEHICLE BOTTOM VIEW CHANNEL GUARD RH LH 4 NOTE See TABLES 49 1 49 2 for information on the numbered hoses in this illustration ...

Page 49: ...3 8 X 72 LG HP 3 8 X 196 LG HP 3 8 X 256 LG 2 HP 3 8 X 150 LG HP 3 8 X 274 LG HP 3 8 X 334 LG 3 HP 1 4 X 64 LG HP 1 4 X 188 LG HP 1 4 X 248 LG 4 PLASTIC 3 8 OD X 84 LG PLASTIC 3 8 OD X 192 LG PLASTIC 3 8 OD X 264 LG TABLE 49 2 NOTE Each pump extension kit contains 2 hoses of the same length item 3 One hose is for the Platform Fold Line and the second hose is for the Platform Unfold Line One hose h...

Page 50: ...QUE LB FT TORQUE NEWTON METER 4 13 15 17 6 20 3 6 22 24 29 8 32 5 8 40 43 54 2 58 3 TABLE 50 1 SAE O RING CONNECTORS SIZE TORQUE LB FT TORQUE NEWTON METER 4 11 12 14 9 16 3 6 18 20 24 4 27 1 8 36 39 48 8 52 8 TABLE 50 2 SAE 37 DEGREE FLARE CONNECTORS SIZE TORQUE LB FT TORQUE NEWTON METER 4 17 18 23 25 4 6 25 27 33 9 37 3 8 38 41 51 5 56 7 TABLE 50 3 O RING FACE SEAL CONNECTORS ...

Page 51: ...1 52 2 for information on the numbered hoses in this illustration Before connecting hoses ensure face seal o rings are in place CAUTION TEE 1 3 4 2 1 LIFTING LINE RETURN LINE RETURN LINE 2 LIFTING LINE LIFTING LINE RETURN LINE TO PUMP RESERVOIR NOTE Lifting folding hoses run up from column connectors as shown to bottom of vehicle floor LH COLUMN RH COLUMN VEHICLE BOTTOM VIEW CHANNEL GUARD RH LH 1 ...

Page 52: ...BOX INSTALLATION REQUIRED HOSES 20 FT 28 FT 1 HP 1 4 X 286 LG HP 1 4 X 382 LG 2 HP 1 4 X 308 LG HP 1 4 X 404 LG 3 HP 3 8 X 316 LG HP 3 8 X 412 LG 4 HP 3 8 X 394 LG HP 3 8 X 490 LG TABLE 52 2 NOTE Each pump extension kit contains 2 hoses of the same length item 1 One hose is for the Platform Fold Line and the second hose is for the Platform Unfold Line One hose has a yellow band on each connector t...

Page 53: ...ARNESS VEHICLE BOTTOM VIEW CHANNEL GUARD RH LH LH COLUMN RH COLUMN D VALVE CABLE CONNECTOR CONTROL SWITCH CABLE GREEN CONNECTOR INTERCONNECT HARNESS D VALVE CABLE CONNECTOR GREEN CONNECTOR NOTE Liftgates with auxiliary or street side controls have a tee assembly with three green connectors Use the following procedure on all green connectors 1 Locate GREEN connector at the base of RH column that co...

Page 54: ... connector with sockets FIG 54 1 CHECKING CONNECTOR O RING FIG 54 1 GREEN CONNECTOR 4 Apply a thin coating of dielectric grease around the outer face of the connector with pins as shown in FIG 54 2 APPLYING DIELECTRIC GREASE TO CONNECTOR FIG 54 2 CAUTION Do NOT apply any dielectric grease to the pins or inside the connectors DIELECTRIC GREASE 3 Slide a 2 long piece of 1 diameter heat shrink sleevi...

Page 55: ...ing over connection and apply heat until sleeving is fully sealed around the connectors 7 Secure harness under trailer with plastic ties as needed Ensure cables exiting the connectors are stress relieved Cables should exit connector with 1 of straight cable before bending to maximum 1 radius FIG 55 2 CAUTION Bending connectors will result in damaged connectors Tie connector housings to cable bundl...

Page 56: ...nnector contacts CAUTION ALIGN CONNECT FIG 56 2 TWIST COUPLING RING TO UNLOCK FIG 56 4 ALIGN MARKS PULL CONNECTORS TO DISCONNECT FIG 56 6 TWIST TO LOCK FIG 56 3 PULL COUPLING RING TO DISENGAGE FIG 56 5 DIELECTRIC GREASE ON RECEPTACLE FIG 56 1 ENSURE THERE IS A THIN COATING OF DIELECTRIC GREASE ON THIS SHADED AREA 8 Refer to illustrations below for checking for dielectric grease connecting and disc...

Page 57: ...IGHT HARNESS AMP SUPERSEAL 1 5 SERIES CAP 3 POSITION MALE PIN 2 PLACES CONNECTING TAILIGHT HARNESS TO TAILIGHT CONNECTORS LH COLUMN SHOWN FIG 57 1 LH TAILLIGHT CONNECTORS TO VEHICLE WIRING HARNESS LH COLUMN RUN ELECTRIC CABLES STEP 8 RUN HYDRAULIC LINES ELECTRIC CABLES Continued 10 Connect taillight harness to LH taillight connectors at bottom of LH column FIG 57 1 11 Repeat for RH column ...

Page 58: ... frame as shown in FIG 58 1B 3 If necessary drill a 11 32 0 343 hole in vehicle frame for bolting the ground cable terminal lug FIG 58 1B NUT FIG 58 1B TERMINAL LUG GROUND CABLE 5 16 FLAT WASHER VEHICLE CHASSIS TRUCK FRAME SHOWN 5 16 18 X 1 LG CAP SCREW BARE METAL 1 Bolt ground cable to the ground stud on pump box FIG 58 1 NOTE If there is an existing grounding point on truck frame use it to conne...

Page 59: ...orrectly to a common chassis ground LIFTGATE BATTERY BOX TYPICAL LOCATION PUMP BOX 150 AMP CIRCUIT BREAKER 200 AMP CIRCUIT BREAKER GROUND CABLE POWER CABLE TRACTOR REF MASTER DISCONNECT SWITCH STEP 10 RUN CHARGE LINES CAUTION Never route an energized wire Make sure battery is disconnected Always route electrical wires clear of moving parts brake lines sharp edges and exhaust systems Avoid making s...

Page 60: ...ICAL LOCATION OPTIONAL BATTERY BOX TYPICAL LOCATION 150 AMP CIRCUIT BREAKER 200 AMP CIRCUIT BREAKER PUMP BOX MASTER DISCONNECT SWITCH 150 AMP CIRCUIT BREAKER POWER CABLE 2 Liftgate pump box and optional battery box are typically installed on trucks as shown in FIG 60 1 and FIG 60 2 See the following page for battery and cable connections GROUND CABLE LIFTGATE TRUCK BATTERIES TYPICAL LOCATION PUMP ...

Page 61: ...or nose of trailer to one of the following devices Master disconnect switch on pump box FIG 61 2 The 150 amp circuit breaker in optional battery box FIG 61 3 Use frame clips Parts Box item FIG 61 1 and plastic ties as required from charge line kit to secure cable to vehicle NOTE Make sure cable is long enough to reach master disconnect switch on Lift gate pump box or circuit breaker in optional ba...

Page 62: ...inal Prevent injury and equipment damage Before connecting charge lines or power cables ensure negative battery cable is disconnected at vehicle bat tery or battery box if equipped Ensure master disconnect switch is turned OFF on the pump box WARNING NOTE Ensure batteries are fully charged before operating Liftgate before deliv ery to customer POSITIVE BATTERY TERMINAL NEGATIVE BATTERY CABLE NEGAT...

Page 63: ...o pump box are connected at the factory Go to instruction Pump box and battery box are mounted separately in 2 single frames FIG 63 2 The red and black cables connecting battery box to pump box need to be connected by the installer Go to instruction 5 NOTE Skip instruction 4 below if vehicle battery is connected to master discon nect switch on the pump box RED CABLE GROUND STUD REF PUMP BOX BATTER...

Page 64: ...m back of the pump box FIG 64 1 Next run cable along vehicle frame through grommet on bat tery box and to the 200 amp circuit breaker inside battery box FIG 64 2 STEP 11 CONNECT BATTERIES TO LIFTGATE Cont d PUMP BOX BATTERY BOX IN SINGLE FRAMES FIG 64 1 PUMP BOX BATTERY BOX RED CABLE GROMMETS RED CABLE GROUND STUD REF BLACK CABLE BLACK CABLE RED CABLE TO PUMP BOX NEGATIVE BATTERY TERMINAL BLACK CA...

Page 65: ...black cable to negative battery terminal Reinstall and tighten nut STEP 11 CONNECT BATTERIES TO LIFTGATE Cont d RED CABLE TO PUMP BOX CHARGE LINE FROM VEHICLE BATTERY BLACK CABLE TO PUMP BOX 150 AMP CIRCUIT BREAKER NEGATIVE TERMINAL BLACK CABLE BATTERY NUT CONNECTING RED BLACK CABLES AND CHARGE LINE FIG 65 1 RED CABLE 200 AMP CIRCUIT BREAKER 9 Remove nut and washer from unused terminal on 150 amp ...

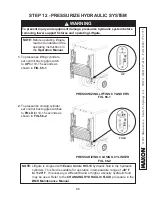
Page 66: ...S FIG 66 1 1 To pressurize lifting cylinders set control box toggle switch to UP for 10 15 seconds as shown in FIG 66 1 PRESSURIZING CLOSING CYLINDER FIG 66 2 NOTE Liftgate is shipped with Exxon Univis HVI 13 hydraulic fluid in the hydraulic cylinders This fluid is suitable for operation in temperature range of 40 F to 120 F If necessary a different brand or higher viscosity hydraulic fluid may be...

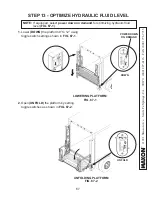
Page 67: ...DOWN the platform 9 to 12 using toggle switch settings shown in FIG 67 1 2 Open UNFOLD the platform by setting toggle switches as shown in FIG 67 2 LOWERING PLATFORM FIG 67 1 UNFOLDING PLATFORM FIG 67 2 DOWN UNFOLD NOTE If equipped select power down on demand for optimizing hydraulic fluid level FIG 67 1 POWER DOWN ON DEMAND ...

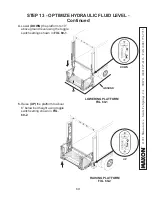
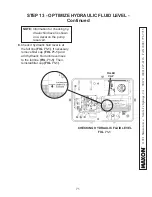
Page 68: ... 7713 3 Close FOLD the platform by setting toggle switches as shown in FIG 68 1 Then open UNFOLD the platform by setting toggle switches as shown in FIG 68 2 UNFOLDING PLATFORM FIG 68 2 FOLDING PLATFORM FIG 68 1 FOLD STEP 13 OPTIMIZE HYDRAULIC FLUID LEVEL Continued UNFOLD ...

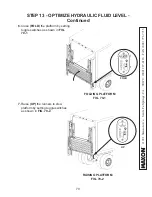
Page 69: ...tform to 10 above ground level using the toggle switch settings shown in FIG 69 1 LOWERING PLATFORM FIG 69 1 STEP 13 OPTIMIZE HYDRAULIC FLUID LEVEL Continued DOWN 5 Raise UP the platform to about 6 below bed height using toggle switch setting shown in FIG 69 2 RAISING PLATFORM FIG 69 2 UP GROUND 10 ...

Page 70: ...713 STEP 13 OPTIMIZE HYDRAULIC FLUID LEVEL Continued 6 Close FOLD the platform by setting toggle switches as shown in FIG 70 1 7 Raise UP the runners to stow platform by setting toggle switches as shown in FIG 70 2 FOLDING PLATFORM FIG 70 1 RAISING PLATFORM FIG 70 2 UP FOLD ...

Page 71: ...1 If necessary remove filler cap FIG 71 1 and add hydraulic fluid until level rises to the full line FIG 71 1 Then reinstall filler cap FIG 71 1 CHECKING HYDRAULIC FLUID LEVEL FIG 71 1 NOTE Information for checking hy draulic fluid level is shown on a decal on the pump reservoir STEP 13 OPTIMIZE HYDRAULIC FLUID LEVEL Continued FILLER CAP ...

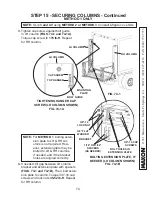
Page 72: ...Unbolt the 2 upper support fix tures from the LH column FIGS 72 1 and 72 1A Repeat for RH column Use forklift to remove upper support fixtures from work area Upper support fixtures are heavy To prevent injury to installer and damage to Liftgate use forklift or hoist to hold support fixtures during removal CAUTION 1 Stow the platform as shown in FIG 72 1 LH COLUMN STEP 14 REMOVE UPPER SUPPORT FIXTU...

Page 73: ... top rear guide on the mounting plate on the LH column FIGS 73 1 and 73 1A Torque lock nut to 200 lb ft Repeat for RH column 1 Slightly lower and open platform for access to mounting pin FIG 73 1 INSTALLING LOCK PLATE FIG 73 1A MOUNTING PLATE LOCK PLATE LH COLUMN MOUNTING PIN LOCK NUT METHOD 1 METHOD 2 NOTE Skip this step if using the METHOD 3 weld on version of installation with no mounting plate...

Page 74: ...column LH COLUMN RH COLUMN LH COLUMN BOLTING EXTENSION PLATE IF NEEDED LH COLUMN SHOWN FIG 74 1B 4 If needed fill gap between LH column bracket and extension plate with spacers FIGS 74 1 and 74 1B Then bolt exten sion plate to column Torque 3 8 16 cap screws and lock nuts 35 52 lb ft Repeat for RH column 3 8 16 LOCK NUT 3 8 FLAT WASHER 1 16 OR 1 32 SPACERS AS NEEDED 3 8 16 CAP SCREWS NOTE For METH...

Page 75: ... ed from parts bag Then install 1 bolt 1 nut if needed and 1 flat washer if needed through mounting plate and RH column FIGS 75 1 75 1A and 75 1B Re peat for LH column LOWER BOLT HOLE FIG 75 1B NOTE MAXON recommends using the upper bolt hole FIG 75 1A to attach mounting plate Howev er if the upper hole will be covered by vehicle corner post then use the lower bolt hole FIG 75 1B FLANGE HEX BOLT 5 ...

Page 76: ...mn cover screws lock washers and flat washers FIGS 76 1 and 76 1A Tighten screws then repeat for LH top column cover FIG 76 1 NOTE Skip this step if using the METHOD 3 weld on installation with no mounting plates LH COLUMN RH COLUMN REINSTALLING RH COLUMN COVER FIG 76 1A RH COLUMN SCREW 4 PLACES LOCK WASHER 4 PLACES FLAT WASHER 4 PLACES RH COLUMN COVER ...

Page 77: ...POSITIVE BATTERY POST WARNING To prevent accidental personal injury and equipment damage disconnect battery cable and cable from battery 2 Disconnect power to the pump by disconnecting negative and positive cables from battery FIG 77 1 Reinstall nuts on negative and posi tive battery terminals NEGATIVE BATTERY CABLE NEGATIVE BATTERY POST NUT POSITIVE BATTERY CABLE DISCONNECTING BATTERY POWER FIG 7...

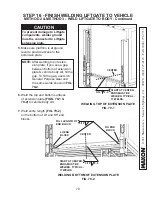
Page 78: ...EQUIREMENTS indicated in this manual 3 Cover platform as shown in FIG 78 1 FIG 78 1 Recommended practices for welding on steel parts are contained in the cur rent AWS American Welding Society D1 1 Structural Welding Code Steel Damage to Liftgate and or vehicle and personal injury can result from welds that are done incorrectly WARNING To prevent damage to Liftgate Connect welder ground to vehicle ...

Page 79: ...e if you see a gap between bottom of extension plate vehicle body sill fill the gap To fill the gap use A 36 General Purpose steel and the same welds shown in FIG 79 2 6 Weld the top and bottom surfaces of extension plate FIGS 79 1 79 2 to vehicle body sill 7 Weld entire length FIG 79 2 on the bottom of LH and RH end blocks START AT CENTER ENDS MUST BE WELDED TYPICAL 17 WELDS 3 16 WELDING TOP OF E...

Page 80: ... METHOD 3 WELD LIFTGATE TO BODY Continued 8 Reconnect power to the pump by reconnecting positive and nega tive cables to battery FIG 80 1 Reinstall and tighten nut when each battery cable is reconnected POSTIVE BATTERY POST BATTERY POWER RECONNECTED FIG 80 1 NEGATIVE BATTERY CABLE NEGATIVE BATTERY POST NUT POSITIVE BATTERY CABLE ...

Page 81: ...columns to approximately 10 above the ground then begin to unfold platform FIG 81 1 FIG 81 1 APPROX 10 STEP 17 CHECK CLEARANCE OF CONNECTOR BAR SIDE BRACKETS STOP BLOCKS 2 As platform is unfolding check for interference from the connector bar side bracket as it slides into the stop block FIG 81 1A REAR VIEW OF LH RUNNER FIG 81 1A CONNECTOR BAR SIDE BRACKET STOP BLOCK INTERFERENCE ...

Page 82: ...ding operation is not smooth or there is interference 3 If LH side bracket fits too tight against either side of stop block operation is not smooth or if there is interference FIG 82 1A adjust with spacers as shown in FIG 82 1A 4 To adjust stop block make sure platform is lowered to the ground FIG 82 1 Then loosen 4 bolts FIGS 82 1A and 82 1B and check gap FIG 82 1A Add or remove shims parts box t...

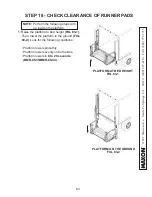
Page 83: ...bed height FIG 83 1 Then lower the platform to the ground FIG 83 2 Look for the following conditions Platform lowers smoothly Platform lowers evenly on both sides Platform lowers in 8 to 20 seconds BMR CS35 BMR CS44 NOTE Perform the following steps with no load on the platform PLATFORM ON THE GROUND FIG 83 2 PLATFORM AT BED HEIGHT FIG 83 1 ...

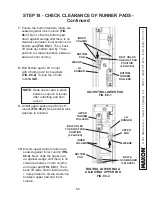
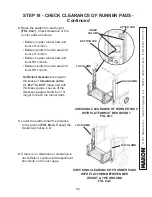
Page 84: ... clearance is equal to thickness of 2 business cards or 012 to 025 measured with thickness gauge Leaves of the thickness gauge should be 3 or longer to reach the runner pads CHECKING CLEARANCE OF RUNNER PADS WITH PLATFORM AT BED HEIGHT FIG 84 1 UPPER PAD BOTTOM PAD INNER COLUMN LH COLUMN RH COLUMN 3 Lower the platform half the distance to the ground FIG 84 2 Repeat the clearance checks in 2 CHECKI...

Page 85: ...ER COVERS FIG 85 1 LH COLUMN RH COLUMN LH RUNNER COVER FLAT WASHER 6 PLACES HEX BOLT 6 PLACES LOCK WASHER 2 PLACES 6 Unbolt bottom spacer pad from LH runner FIG 85 2 Keep bolts and lock washers to reinstall UNBOLTING PADS LH COLUMN RUNNER SHOWN FIG 85 2 BOTTOM PAD BOLT LOCK WASHER 2 PLACES NOTE Keep spacer pad in place between column runner after unbolting pad from runner ...

Page 86: ... and 2 lock washers FIG 86 2 Torque the 2 bolts to 9 14 lb ft BOLTING LOWER PAD ADJUSTING UPPER PAD FIG 86 2 UPPER PAD LH RUNNER WEDGE INNER COLUMN UPPER TANDEM ROLLERS BOLT LOCK WASHER 2 PLACES BOLT HOLES TO ADJUST PAD POSITION 8 PLACES BOLT HOLES TO ADJUST PAD POSITION 8 PLACES 9 Unbolt upper spacer pad from LH runner FIG 86 2 Keep bolts lock washers to reinstall NOTE Keep spacer pad in place be...

Page 87: ...ions 5 to 11 for RH column 13 Raise the platform to bed height FIG 87 2 Then lower the platform to the ground FIG 87 2 Look for the following conditions Platform lowers smoothly Platform lowers evenly on both sides Platform lowers in 8 to 20 seconds BMR CS35 BMR CS44 CHECKING CLEARANCE OF RUNNER PADS WITH PLATFORM BETWEEN BED HEIGHT THE GROUND FIG 87 2 14 When platform raises and lowers correctly ...

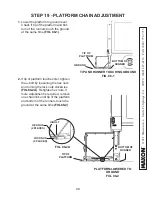
Page 88: ... TIP AND RUNNER TOUCHING GROUND FIG 88 1 FIG 88 2A 2 If tip of platform touches first tighten the u bolt by loosening the hex nuts and turning the lock nuts clockwise FIG 88 2A Retighten hex nuts If more adjustment is required remove one chain link until tip of the platform and bottom of the runners touch the ground at the same time FIG 88 2 PLATFORM LOWERED TO GROUND FIG 88 2 LOCK NUT 2 PLACES U ...

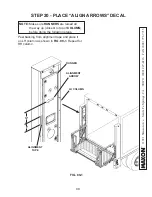
Page 89: ...PE LH COLUMN ALIGNMENT ARROW RUNNER 12 3 FIG 89 1 STEP 20 PLACE ALIGN ARROWS DECAL Peel backing from alignment tape and place it on LH column as shown in FIG 89 1 Repeat for RH column NOTE Make sure RUNNERS are raised all the way up closest to top of COLUMN before doing the following steps ...

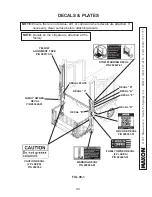
Page 90: ... clean surface before attaching decals FAMILY OWNED DECAL 2 PLACES P N 283445 01 SERIAL PLATE FAMILY OWNED DECAL P N 283445 01 DECAL C DECAL B DECAL F DECAL A YELLOW ALIGNMENT TAPE P N 090175 14 DECAL D CAUTION DECAL 2 PLACES P N 260552 WARNING DECAL P N 288966 01 DECAL E NOTE Decals on the Liftgate are attached at the factory STOW WARNING DECAL P N 282847 01 QR CODE DECAL P N 299351 01 ...

Page 91: ...rings CA 90670 800 227 4116 FAX 888 771 7713 DECALS Continued DECAL SHEET FIG 91 1 MODEL ORDER P N DECAL C BMR CS35 289163 01 3500 LBS 1600 KG BMR CS44 289163 02 4400 LBS 2000 KG DECAL SHEET PART NUMBERS TABLE 91 1 REFER TO TABLE 91 1 ...

Page 92: ...spray to the polished portion of the cylinder rod To prevent damage protect the exposed polished portion of the cylinder rod while spraying CAUTION TOUCH UP GALVANIZED FINISH If bare metal is exposed on galvanized portions of the Liftgate touch up the galvanized finish To maintain the protection provided by the original galvanized finish MAXON recommends cold galvanize spray ...

Page 93: ...ATION MEANS ENERGIZED SWITCH RELAY MOTOR VALVE B VALVE C VALVE D VALVE E VALVE H LIFT B PD LOWER C OPEN J CLOSE A REFER TO VALVES SHOWN ON HYDRAULIC SCHEMATIC TABLE 93 1 M SOLENOID E VALVE B VALVE H VALVE D VALVES TOP OF EACH COLUMN FIG 93 3 D VALVE FIG 93 1 BUCHER PUMP B VALVE FIG 93 2 C VALVE PUMP MOTOR SOLENOID OPERATION POWER DOWN HYDRAULIC SYSTEM DIAGRAMS ...

Page 94: ...OWER UNIT MOTOR SOLENOID OPERATION GRAVITY DOWN LIFTGATE FUNCTION PORT SOLENOID OPERATION MEANS ENERGIZED SWITCH RELAY MOTOR VALVE B VALVE D VALVE E VALVE H LIFT B GD LOWER C OPEN J CLOSE A REFER TO VALVES SHOWN ON HYDRAULIC SCHEMATIC D VALVES TOP OF EACH COLUMN FIG 94 3 M SOLENOID E VALVE H VALVE FIG 94 1 D VALVE BUCHER PUMP B VALVE FIG 94 2 B VALVE B VALVE ...

Page 95: ...95 11921 Slauson Ave Santa Fe Springs CA 90670 800 227 4116 FAX 888 771 7713 GRAVITY DOWN HYDRAULIC SCHEMATIC HYDRAULIC SYSTEM DIAGRAMS FIG 95 1 ...

Page 96: ...96 11921 Slauson Ave Santa Fe Springs CA 90670 800 227 4116 FAX 888 771 7713 POWER DOWN HYDRAULIC SCHEMATIC HYDRAULIC SYSTEM DIAGRAMS FIG 96 1 ...

Page 97: ...97 11921 Slauson Ave Santa Fe Springs CA 90670 800 227 4116 FAX 888 771 7713 INTERCONNECTING ELECTRICAL SCHEMATIC GRAVITY DOWN ELECTRICAL SYSTEM DIAGRAMS FIG 97 1 ...

Page 98: ...11921 Slauson Ave Santa Fe Springs CA 90670 800 227 4116 FAX 888 771 7713 FIG 98 1 ELECTRICAL SYSTEM DIAGRAMS GRAVITY DOWN SINGLE DUAL PUMP ELECTRICAL SCHEMATIC NOTE Refer to BMR CS ELECTRICAL VALUES page ...

Page 99: ...99 11921 Slauson Ave Santa Fe Springs CA 90670 800 227 4116 FAX 888 771 7713 INTERCONNECTING ELECTRICAL SCHEMATIC POWER DOWN FIG 99 1 ELECTRICAL SYSTEM DIAGRAMS Continued ...

Page 100: ... 11921 Slauson Ave Santa Fe Springs CA 90670 800 227 4116 FAX 888 771 7713 ELECTRICAL SYSTEM DIAGRAMS POWER DOWN SINGLE DUAL PUMP ELECTRICAL SCHEMATIC FIG 100 1 NOTE Refer to BMR CS ELECTRICAL VALUES page ...

Page 101: ...ºF 15 Ampere 1 6A 12V Coil nut torque 15 45 lb in Solenoid Valve B Coil 4 0Ω 70ºF 15 Ampere 2 5A 10V Coil nut torque 15 45 lb in H E C B Valve Cartridge Torque 25 30 lb ft maximum Coil nut torque 15 45 lb in H E C B Valve Cartridge Torque 25 30 lb ft maximum Coil nut torque 15 45 lb in Solenoid Valve D Coil 8 0Ω 70ºF 15 Ampere 1 5A 12V Coil nut torque 3 4 5 lb ft Valve cartridge torque 18 5 22 lb ...

Page 102: ... body are tight Ensure platform ramp touches ground when runner is 1 above ground The main platform flipover surfaces should be level to one another and rest evenly when touching the ground Verify runner slide pads are in adjustment per STEP 18 in this manual Hydraulic Inspection Fluid is at correct level See OPTIMIZE HY DRAULIC FLUID LEVEL step in this manual No leaks from hydraulic fittings in p...

Page 103: ......
Reviews: