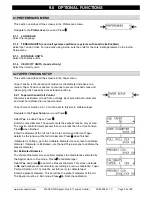
7.0 DANCER CONTROL
www.maxcessintl.com
MAGPOWR Spyder-Plus-S1 Tension Control
MI 850A351 1 C
Page 26 of 68
7.2.2.6
HOLD LEVEL CHANGE WITH
Allows the output during Hold to vary by last running Output, Diameter, Tension, or Diameter and Tension. Load
cells must be enabled to read tension. See section 9.6.14 to enter hold level multiplier when choice is Output. See
section 9.6.13 for calibrating Hold level when the choice is Diameter, Tension, or Diameter and Tension.
7.2.2.7
USE LOAD CELLS
Enables reading of the load cells while in Dancer mode. See Section 6.3 to calibrate load cells.
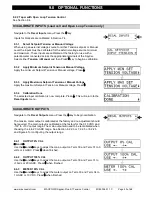
7.2.2.8
OUTPUT RANGE
Select the main output range. For a main output range of either 0-10 VDC or 4-20 mADC select NORMAL. For the
-10 to +10 VDC
range select
-10V to +10V
. The software is factory calibrated for the
0-10 VDC
and the
-10 to +10 VDC
output ranges. See Section 9.4 for recalibrating the output when using the 4-20 mADC range. See
Figure 4 for jumper settings.
7.2.2.9
SETPOINT SOURCE
Select the source for the dancer setpoint. When set to ANALOG the Spyder will use the voltage on terminal 16 as
the dancer position setpoint. When set to ETHERNET the Spyder will use the software value of setpoint position.
This value may be changed either at the keypad, the web page, or by Modbus/TCP. Use the
Setpoint Position
screen in the
Operator Loop
to change the software setpoint.
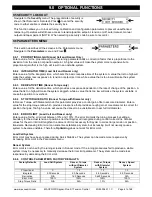
7.2.2.10
DIGITAL INPUT ACTIVE LEVEL
The digital control inputs may be either
Active Low
or
Active High
. The software is factory configured for Active
Low inputs. See Section 5.2 and Figure 4.
7.2.2.11
INITIAL SCREEN
The first screen after power-up is the
Operator Loop
screen. This parameter allows the initial power-up screen to
be changed to either the
Position
screen, Section 7.2.1.1 or the
Output Level
screen, Section 7.2.1.3 or the
Diameter Display
screen.
7.2.2.12
NUMERIC UPDATE RATE
This parameter controls filtering for the numeric actual position and the actual output displays. Default values work
well in most applications.
7.2.2.13
BAR GRAPH UPDATE RATE
This parameter controls filtering for the bar graph actual position and the actual output displays. Default values
work well in most applications.
7.2.2.14
SCREEN CONTRAST
This screen allows adjustment of the screen contrast. See Section 10.1, General Problems, when screen shows no
characters.
7.3 DANCER INPUT SETUP (REQUIRED)
7.3.1
Setup DFP or DFP-2
7.3.1.1
DFP
Install the DFP sensor so that its keyway is pointing towards the top cover when the dancer is half way through its
travel. This is an approximate adjustment, and is intended to center the sensor position to allow maximum rotation
in both directions during operation.
7.3.1.2
DFP-2
To find the electrical center point of pot rotation, use a digital multimeter type ohm meter to measure from the white
wire (wiper), to the red or black wire. Turn the potentiometer shaft until the meter reads 500 ohm. Install the DFP-2
sensor so that at the 500 ohm meter reading, the dancer is halfway through its travel.
7.3.1.3
Check DFP or DFP-2 voltage
Verify the dancer voltage between Term. 38 and Term. 39 matches the voltage change with dancer movement as
shown in Figure 12. If the dancer voltage is opposite that shown in the figure, simply swap the wires on Term. 39
and Term. 26. This will reverse the dancer voltage change.
Summary of Contents for MAGPOWR Spyder-Plus-S1
Page 2: ......


