background image

Page 6-4

200 ENGINE ASSEMBLY

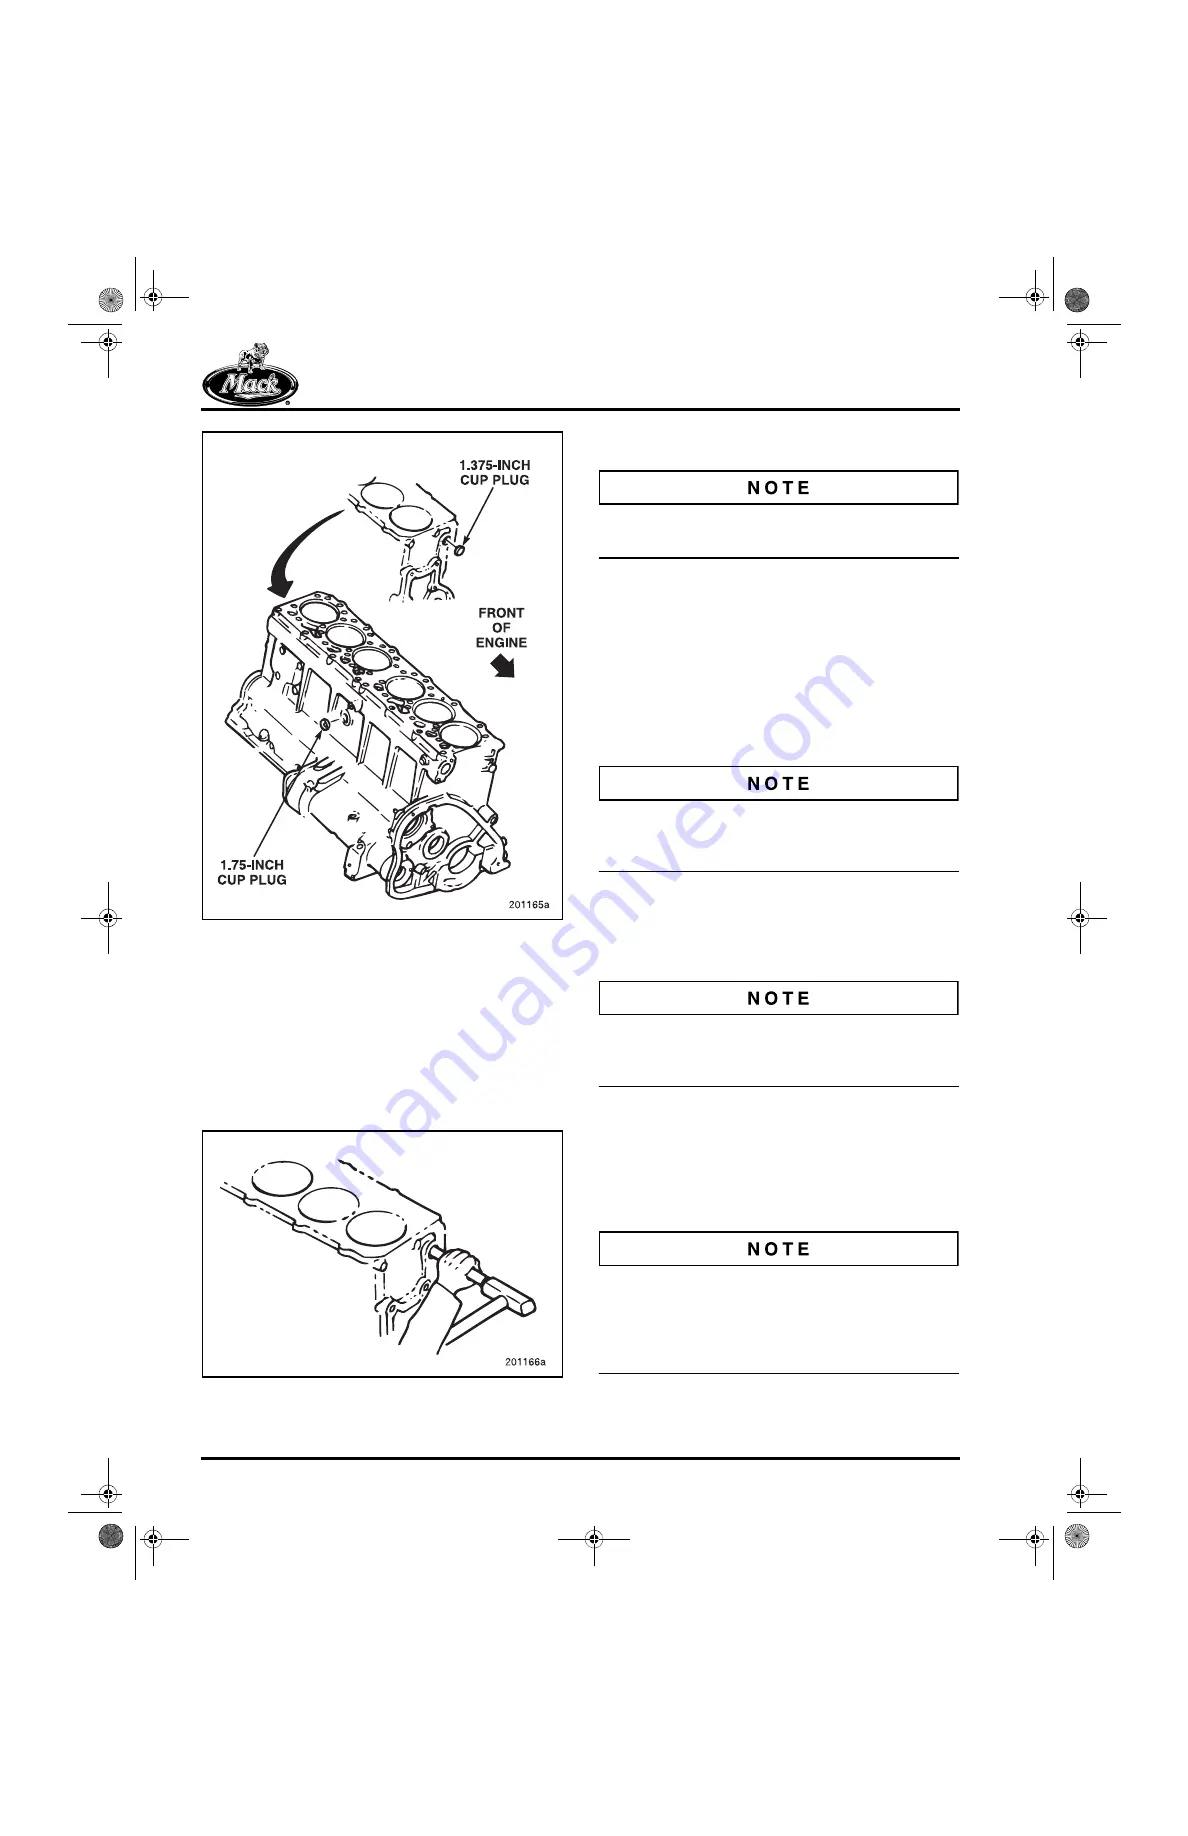
Figure 6-2 — Cylinder Block Cup Plugs

INSTALLATION

1. After cleaning the plug hole, apply a thin 

coat of Loctite

®

 277 to both the surface of 

the hole and the outer edge of the plug. 

2. Using a proper driver, align the plug in the 

hole and drive it inward until the outer lip of 

the plug is flush with the cylinder block. 

Refer to Figure 6-3.

Figure 6-3 — Cylinder Block Cup Plug Installation

Pipe Plug Replacement

Any rust around a pipe plug is an indication of a 

leak and the plug should be replaced.

REMOVAL

1. Using an appropriate wrench, remove the 

plug.

2. Clean the threads in the block by running a 

tap into the hole, just far enough to remove 

any rust on the threads without expanding 

the diameter of the hole. Use compressed 

air to remove any chips from the block.

It is best to replace a leaking pipe plug. However, 

if reusing the same plug, clean thoroughly, paying 

special attention to the threads.

3. Using a wire wheel, clean the threads of the 

plug. Visually check the thread surfaces for 

burrs or damage. Then clean and check the 

remaining surfaces.

New plugs already have a sealer applied to the 

threads. Applying a Teflon sealer to the threads 

will not adversely affect the precoating. 

INSTALLATION

Apply appropriate Teflon thread sealant to the 

threads and install the plug. Torque to 

specification. Refer to Torque Chart in the 

SPECIFICATIONS section of this manual. 

When checking or assembling engine 

components, refer to the Fits and Limits Chart 

and Torque Chart in the SPECIFICATIONS 

section of this manual for specified dimensions 

and torque settings.

5-101.bk  Page 4  Friday, March 17, 2006  11:05 AM

Summary of Contents for E7

Page 1: ...E7 ENGINE OVERHAUL AUGUST 1997 ENGINE 5 101...

Page 2: ...Page 0 front fr5 Page 0 Friday March 17 2006 11 04 AM...

Page 3: ...please describe _____________________________________________ _______________________________________________________________ _______________________________________________________________ Did you f...

Page 4: ...IN THE UNITED STATES BUSINESS REPLY MAIL FIRST CLASS MAIL PERMIT NO 1602 ALLENTOWN PA POSTAGE WILL BE PAID BY ADDRESSEE SERVICE PUBLICATIONS RTS 6S3 MACK TRUCKS INC WORLD HEADQUARTERS PO BOX M ALLENT...

Page 5: ...E7ENGINE OVERHAUL MARCH 2006 2 5M REP AUGUST 1997 10M MACK TRUCKS INC 1997 ENGINE 5 101...

Page 6: ...pecific chassis The information specifications and illustrations in this publication are based on information that was current at the time of publication No part of this publication may be reproduced...

Page 7: ...SAFETY INFORMATION Page iii SAFETY INFORMATION front fr5 Page iii Friday March 17 2006 11 04 AM...

Page 8: ...ese advisory labels as they appear throughout the manual Directs attention to unsafe practices which could result in damage to equipment and possible subsequent personal injury or death if proper prec...

Page 9: ...se of a special tool s designed for a specific purpose These special tools must be used in the manner described whenever specified in the instructions 1 Before starting a vehicle always be seated in t...

Page 10: ...NOT wear loose fitting or torn clothing Remove any jewelry before servicing vehicle ALWAYS wear safety glasses and protective shoes Avoid injury by being aware of sharp corners and jagged edges Use h...

Page 11: ...EXPLANATION OF NUMERICAL CODE Page vii EXPLANATION OF NUMERICAL CODE front fr5 Page vii Friday March 17 2006 11 04 AM...

Page 12: ...ES WHEELS AND TIRES DRIVELINE GROUP 500 BRAKES AUXILIARY SYSTEMS GROUP 600 CAB TRUCK BODY GROUP 700 ELECTRICAL The second two digits of the 3 digit code are used to identify the system assembly or sub...

Page 13: ...ABOUT THIS MANUAL Page ix ABOUT THIS MANUAL front fr5 Page ix Friday March 17 2006 11 04 AM...

Page 14: ...ser to component upgrades and helps the technician to decide whether to use the latest available parts or reinstall existing parts Precise descriptions aid in component identification The ENGINE ASSEM...

Page 15: ...TABLE OF CONTENTS Page xi TABLE OF CONTENTS front fr5 Page xi Friday March 17 2006 11 04 AM...

Page 16: ...CATIONS 2 7 Torque Specifications for Critical Fasteners 2 7 Torque Specifications for Hose Clamps 2 10 Torque Specifications for Pipe Plugs 2 11 Torque Specifications for Non Critical Fasteners 2 11...

Page 17: ...ECONOVANCE 4 20 V MAC Equipped Engines 4 20 211 NB OIL PAN 4 20 219 MU OIL PUMP 4 22 211 RP TIMING GEAR COVER 4 23 212 CV AUXILIARY DRIVESHAFT 4 24 213 CH CAMSHAFT 4 24 212 NP LQ PISTON AND CONNECTING...

Page 18: ...213 FH Valve Yoke Guide Pins 5 39 213 FP Cylinder Head Cup Plugs 5 41 Cylinder Head Pipe Plugs 5 42 213 NB INLET AND EXHAUST VALVES 5 43 Inspection 5 43 Valve Identification 5 43 Inlet and Exhaust Va...

Page 19: ...eaning 5 67 200 ENGINE ASSEMBLY 6 1 GENERAL 6 2 211 DB CYLINDER BLOCK 6 2 Special Tools Required 6 2 Cleaning and Inspection 6 2 Cup Plug Replacement 6 3 Pipe Plug Replacement 6 4 213 CC Camshaft Bush...

Page 20: ...scription 6 35 Installation 6 36 213 CH CAMSHAFT 6 37 Description 6 37 Special Tools Required 6 37 Inspection 6 37 Installation Engine in Stand 6 38 Installation Engine in Chassis 6 39 212 CV AUXILIAR...

Page 21: ...EG EXHAUST MANIFOLD 6 62 Description 6 62 Installation 6 62 215 NK COOLANT MANIFOLD 6 64 Inspection 6 64 Installation 6 64 261 CK AIR COMPRESSOR 6 65 Installation 6 65 221 CD ECONOVANCE 6 66 Installa...

Page 22: ...djustment 7 10 Continuation of Adjustments 7 11 221 GP INJECTION PUMP FIXED TIMING PROCEDURES 7 11 Description 7 11 Special Tools Required 7 13 Setting Static Fuel Injection Pump Timing 7 13 Fuel Inje...

Page 23: ...T TIMING CHECK 9 10 CAMSHAFT LOBE LIFT CHECK 9 10 PROPER FIRE RING CYLINDER SLEEVE TOP COMBINATIONS 9 11 General Information 9 11 Engines Built Prior to 1993 9 11 Engines Built from June 1993 to Prese...

Page 24: ...Page xx NOTES front fr5 Page xx Friday March 17 2006 11 04 AM...

Page 25: ...200 GENERAL INFORMATION Page 1 1 GENERAL INFORMATION 5 101 bk Page 1 Friday March 17 2006 11 05 AM...

Page 26: ...but also gives instructions for removing the engine from a nonspecified chassis The new E7 is the most fuel efficient diesel engine MACK has ever produced This engine provides higher horsepower ratin...

Page 27: ...CALIF FAMILY block the engine does not meet California regulations Figure 3 Engine Information Plates New Engine Information Plate The following explanations are provided to aid in interpreting some o...

Page 28: ...in block five Block 6 California Family If the engine meets California emissions regulations the same two digit numeral stamped in the Federal Family block is stamped in the California block If the e...

Page 29: ...steners sides and threads and washers Clean engine oil Cylinder sleeve upper crevice seal on sleeve Ethylene glycol or propylene glycol Cylinder sleeve seat MACK Silastic RTV Silicone Adhesive Sealant...

Page 30: ...and seals Bearings and bushings Pistons aluminum and piston rings Cylinder sleeves Cylinder block cup plugs and cylinder head cup plugs Connecting rod capscrews Steel top pistons should not be replace...

Page 31: ...200 SPECIFICATIONS Page 2 1 SPECIFICATIONS 5 101 bk Page 1 Friday March 17 2006 11 05 AM...

Page 32: ...nt Flywheel housing Standard Aluminum standard SAE No 1 precision doweled Optional Ductile iron Cylinder sleeves Wet dry replaceable centrifugally cast alloyed cast iron Cylinder sleeve seal Teflon co...

Page 33: ...sor turbocharger unloader and tandem air compressor 240GB5240M3 Same as 240GB5240M2 except it is for a rear sump 240GB5420M4 Used as either front or rear sump includes five bosses to accept all variat...

Page 34: ...manent damage to the engine components Metric fasteners are used on the E7 engine with a few exceptions The exceptions are fasteners with English threads as noted in the charts that follow Patchlock H...

Page 35: ...ected by the vehicle manufacturer for its suitability for that job Proper installation is as important as the selection of the correct fastener Improperly installing a correct fastener is just as bad...

Page 36: ...tch of metric fasteners is measured by determining the millimeters per thread For example a bolt with 0 8 pitch would have 125 complete threads in a 100 millimeter section 100 mm divided by 125 thread...

Page 37: ...45 61 Oil supply screw 5 7 Rocker arm adjusting screw jam nut 40 54 Rocker arm bracket hold down capscrew 40 54 Slave piston adjusting screw nut 17 23 Throttle switch actuating arm 55 lb in 6 Yoke le...

Page 38: ...40b 54b Injection pump driven gear to Econovance outer shaft 40b 54b Injection pump mounting stud nut mechanical pumps 40 54 Inlet manifold to cylinder head screw 40 54 Injection pump access cover ca...

Page 39: ...ear cover to cylinder block screw 40 54 Timing hole cover screw 40 54 Timing indicator screw 15 20 Torque drive hub retaining capscrew 15 20 Transmission to flywheel housing screw 40 54 Turbo oil inle...

Page 40: ...injection pump actuator connector 15 20 Electrical equipment panel mounting leg hardware 6 8 Electrical equipment panel accessory studs 2 3 Timing solenoid to Econovance four bolts 15 20 Water manifo...

Page 41: ...h Teflon or equivalent Torque Specifications for Non Critical Fasteners PROPERTY CLASS 8 8 Size mm Pitch Tightening Torques Lb Ft N m 6 0 75 6 8 6 1 00 6 8 8 1 00 15 20 8 1 25 14 19 10 1 25 30 41 10 1...

Page 42: ...0 94 127 14 2 00 87 118 16 1 50 144 195 16 2 00 135 183 18 1 50 210 285 18 2 50 187 254 20 1 50 293 397 20 2 50 264 358 22 1 50 395 536 22 2 50 360 488 24 2 00 498 675 24 3 00 456 618 27 2 00 722 979...

Page 43: ...40 54 12 1 25 76 103 12 1 75 69 94 14 1 50 120 163 14 2 00 111 151 16 1 50 184 250 16 2 00 172 233 18 1 50 268 363 18 2 50 239 324 20 1 50 374 507 20 2 50 337 457 22 1 50 505 685 22 2 50 460 624 24 2...

Page 44: ...8 6207 mm CAMSHAFT Bushing presized ID No 1 through No 7 2 693 2 692 in 68 402 68 377 mm free OD No 1 through No 7 2 8785 2 8765 in 73 1139 73 0631 mm bore in block No 1 through No 7 2 874 2 873 in 73...

Page 45: ...upper pilot diameter 5 5040 5 5030 in 139 8016 139 7762 mm Sleeve bead for fire ring protrusion above sleeve channel 0 0067 0 010 in 0 1702 0 2540 mm Sleeve in bore upper press fit 0 004 0 002 in 0 10...

Page 46: ...bore press fit 0 0011 0 0026 in 0 0279 0 0660 mm Valve guide extension fire deck to top of guide 5 24 0 03 in 113 096 0 762 mm Yoke guide pin OD 0 4389 0 4392 in 11 1481 11 1557 mm Yoke guide pin ins...

Page 47: ...524 mm Gear to cavity side clearance 0 0030 0 0045 in 0 0762 0 1143 mm Gear backlash in pump 0 0235 0 0295 in 0 5969 0 7493 mm Oil pump drive gear to oil pump driven gear backlash 0 0072 0 0138 in 0 1...

Page 48: ...401 650 mm Push rod overall length exhaust w Dynatard flat to flat 16 353 16 388 in 415 366 416 255 mm TIMING GEAR COVER Dowel Pins Holes in cylinder block both 0 4987 0 4997 in 12 6670 12 6924 mm Ho...

Page 49: ...lash cold static inlet 0 016 in 0 4064 mm exhaust prior to May 1996 0 024 in 0 6096 mm exhaust May 1996 and later 0 028 in 0 7112 mm Cam part No 454GC5205 Face runout inlet and exhaust 0 0015 in 0 03...

Page 50: ...nger started at least two full turns but will strip if fully assembled Inch Screws Metric Nuts 4 40 M3 x 0 5 5 16 18 M8 x 1 25 5 16 24 M8 x 1 25 3 8 16 M10 x 1 25 3 8 24 M10 x 1 25 M10 x 1 5 M10 x 1 0...

Page 51: ...4 16 M20 x 1 5 7 8 9 M24 x 3 Fine thread Inch Nuts Metric Screws 5 44 M3 x 0 5 6 40 M3 5 x 0 6 8 32 M4 x 0 7 8 36 M4 x 0 7 10 32 M5 x 0 8 12 24 M5 x 0 8 12 28 M5 x 0 8 1 2 20 M12 x 1 25 3 4 10 M18 x...

Page 52: ...29109 Engine Stand J 29294 B Valve Spring Keeper Remover J 29296 Valve Yoke Guide Pin Installer J 29297 Nozzle Sleeve Installer J 29510 Keystone Piston Ring Groove Gauge J 29539 15 Top Dead Center In...

Page 53: ...n Set J 38587 A Engine Barring Socket J 38880 Wear Ring Installer J 39045 Two Piece Piston Cooling Nozzle Aimer for 1991 and later production J 41071 Air Compressor Coupling Holding Wrench J 41461 Cam...

Page 54: ...apter Assembly J 38480 Portable Printer use with J 38500 1 J 38500 1 Pro Link Diagnostic Scan Tool J 38500 60A Pro Link Cable to vehicle 6 Pin Deutsch J 38500 61 PC Interface Cable J 38500 603A Pro Li...

Page 55: ...200 ENGINE REMOVAL Page 3 1 ENGINE REMOVAL 5 101 bk Page 1 Friday March 17 2006 11 05 AM...

Page 56: ...tioner 4 Loosen clamps that secure the air intake tube to the turbocharger and air filter Remove the intake tube 5 If vehicle is equipped with air conditioning a Using A C refrigerant recovery and rec...

Page 57: ...riate transmission jack 25 Remove the retaining bolts that secure the transmission bell housing to the flywheel housing 26 Remove the hood rest crossmember s if applicable 27 Obtain the appropriate li...

Page 58: ...Page 3 4 NOTES 5 101 bk Page 4 Friday March 17 2006 11 05 AM...

Page 59: ...200 ENGINE DISASSEMBLY Page 4 1 ENGINE DISASSEMBLY 5 101 bk Page 1 Friday March 17 2006 11 05 AM...

Page 60: ...ntri Max filter housing or damage to the Centri Max housing will result 2 Using a suitable filter wrench remove the fuel and oil filter elements Do not reuse filter elements Discard used elements in a...

Page 61: ...sassembly and assembly procedures When servicing an E7 engine with an isolating oil pan arrangement avoid using an engine stand that supports the engine on the oil pan rail while the oil pan is still...

Page 62: ...Page 4 4 200 ENGINE DISASSEMBLY Figure 4 2 Mount Engine in Stand 200348a 3 4 1 2 2 1 Adapter plate J 38048 2 Capscrews 3 Engine stand J 29109 4 Capscrew 5 101 bk Page 4 Friday March 17 2006 11 05 AM...

Page 63: ...e supporting fan assembly 3 remove nuts 2 from capscrews 1 and remove fan assembly Figure 4 4 Fan Assembly Removal Refer to Figure 4 5 3 If the fan assembly is equipped with a viscous drive be sure to...

Page 64: ...es 2 Remove three capscrews 4 from the top of the fuel filter adapter assembly 3 Remove fuel filter adapter assembly from the air inlet manifold 7 Figure 4 6 Fuel Filter Adapter Assembly Removal 1 Fue...

Page 65: ...illed coolant 4 Using a suitable filter wrench J 29927 or equivalent remove the coolant conditioner filter element 13 Discard element 5 Remove coolant conditioner head assembly 2 from thermostat housi...

Page 66: ...1 to the thermostat housing 3 Taking care to prevent the thermostat 7 from falling remove the thermostat housing 5 and thermostat Discard gasket 8 Figure 4 8 Coolant Conditioner Removal 1 Capscrew 2 C...

Page 67: ...9 1 Support the coolant manifold sections and remove 12 capscrews 5 retaining the manifold sections 1 and 4 to the cylinder heads 2 Remove manifold assembly It may be necessary to pry or tap lightly...

Page 68: ...to repair any portion of the oil cooler or oil filter housing remove the units as an assembly The assembly can be disassembled later if necessary Refer to Oil Cooler Disassembly in the BENCH PROCEDUR...

Page 69: ...drain tube 4 3 Remove turbocharger lubrication feed hose 2 Beginning with May 1996 production Schwitzer turbocharger models S300 and S400 replace models S3B and S4B Service old with old and new with...

Page 70: ...and remove front 4 and rear 2 tube assemblies Cap all lines and fittings to prevent contaminants from entering the system Figure 4 13 Fuel Inlet Tube Assembly Removal 200353a 11 1 2 1 3 2 1 3 1 4 5 6...

Page 71: ...eads 5 Remove exhaust manifold 6 Discard gaskets 213 JB VALVE COVER AND RISER If engine is equipped with a Jake Brake a riser is installed under the valve cover Longer capscrews are used to secure the...

Page 72: ...g capscrews 13 and washers 12 from rocker arm shaft brackets 7 Remove rocker arm assembly 11 from each head 4 Remove valve yokes 8 from each pair of valves by lifting straight up on each yoke Tag yoke...

Page 73: ...ompressed 3 With tool in position turn nut 12 clockwise to draw nozzle holder from cylinder head nozzle mounting hole 8 4 Continue turning nut until nozzle holder is free of insert Remove nozzle holde...

Page 74: ...n Cylinder Head Installation for location of bolts if necessary Cylinder head assemblies are heavy Lifting a cylinder head requires the help of an assistant or suitable lifting device Attempting to li...

Page 75: ...SOR Refer to Figure 4 20 Disconnect two coolant lines 1 and 4 from the air compressor head 2 at the fittings Tag and cap lines Figure 4 20 Air Compressor Connections The air compressor is heavy Liftin...

Page 76: ...2 Taking care not to damage or lose the lubrication oil supply tube 2 remove the air compressor by pulling it rearward out of the mounting flange Discard gasket Figure 4 21 Air Compressor Removal 2003...

Page 77: ...Injection Pump Fixed Timing Procedure 3 Remove rear support link assembly by removing mounting hardware 7 and 8 V MAC engines only 4 Mechanically governed engines Working from the front of the engine...

Page 78: ...replace the drive coupling with the updated two piece style Older style shown 4 Remove the Econovance 5 by removing four mounting capscrews 4 Rotate shaft to clear the camshaft gear Figure 4 24 Econov...

Page 79: ...ISASSEMBLY Page 4 21 Figure 4 25 Oil Pan Bolt Locations 1 Studs and nuts at timing gear cover 2 Studs and nuts at flywheel housing 3 Shouldered bolts along pan rails 5 101 bk Page 21 Friday March 17 2...

Page 80: ...apscrews 9 and the relief valve cap 8 while the pump is still secured in position Do so before loosening the three retaining capscrews 1 Remove the oil pump as a unit by removing three retaining capsc...

Page 81: ...cover 14 by removing the mounting capscrews 1 and 13 Discard O ring 2 5 Remove remaining mounting capscrews 13 from timing gear cover 3 Do not damage the timing indicator 5 if equipped when removing t...

Page 82: ...shaft Removal 213 CH CAMSHAFT Make sure all loose components are secured to or removed from the engine before rotating engine on the stand Failure to do so may result in damage to components or severe...

Page 83: ...EMBLY The crankshaft and related components are heavy have sharp edges and many possible pinch points Always be careful while working in this area to avoid serious personal injury Before removing pist...

Page 84: ...33 4 Rotate crankshaft so that pistons 1 and 6 are at bottom dead center Remove connecting rod capscrews and rod bearing caps Figure 4 33 Piston and Connecting Rod Assembly Removal 5 Using a hammer h...

Page 85: ...alternating from side to side to work it off the aligning dowel pins The flywheel is heavy Lifting the flywheel will require the help of an assistant or the use of a suitable lifting device J 25026 A...

Page 86: ...urnals Keep the bearings with the same cap and tag or mark them to identify the cam side of the bearings Refer to Figure 4 36 1 Remove eight buttress capscrews 2 and 3 2 Remove main bearing capscrews...

Page 87: ...e 4 29 Figure 4 36 Buttress Capscrew Installation 1 Main bearing cap capscrews 2 Buttress capscrews 80 mm 3 Buttress capscrews 110 mm 4 Main bearing caps 5 Center main bearing cap 5 101 bk Page 29 Fri...

Page 88: ...TON COOLING SPRAY NOZZLE To avoid damaging spray nozzles remove them before removing sleeves It is best to use a 10 mm 6 point socket on a 12 inch extension to remove the nozzle retaining capscrews Re...

Page 89: ...o prevent damage to the block 4 Position puller shoe so that it catches the lower lip of the sleeve Ensure that it does not extend beyond outside edges of the sleeve so it will not come into contact w...

Page 90: ...Page 4 32 NOTES 5 101 bk Page 32 Friday March 17 2006 11 05 AM...

Page 91: ...200 BENCH PROCEDURES Page 5 1 BENCH PROCEDURES 5 101 bk Page 1 Friday March 17 2006 11 05 AM...

Page 92: ...mill file and crocus cloth if necessary to create a smooth flat surface for positioning the tool 2 Using compressed air thoroughly remove all debris Universal dial depth gauge PT5025 with a 3 inch sty...

Page 93: ...on the ledge 9 Rotate the lower depth set collar down until the collar contacts the main housing 10 Rotate the collar an additional five increments 0 005 inch 0 127 mm Each graduation of the collar is...

Page 94: ...r 2 T handle 3 Capscrews M16 x 2 x 90 4 Special washers 5 Upper depth set collar 6 Lower thumbscrew 7 Oil fill tube 8 Main housing 9 Hold down capscrews 10 Cutter bit adjuster 11 Cutter bit 12 Hold do...

Page 95: ...d down bolts 3 and special washers 4 c Remove the tool from the cylinder bore 6 Follow steps 1 through 5 for the remaining cylinders 212 CV AUXILIARY DRIVESHAFT Description All current production engi...

Page 96: ...hole of the rod cap 1 to locate and align the cap and rod thrust faces These sleeves provide the best alignment when sleeve gaps are positioned at a location approximately 90 degrees to the tongue or...

Page 97: ...hen installing a single rod or less than a full set examine removed rod for part number and M number Installing parts with the same weight class is preferred Connecting rods can be weighed to ensure u...

Page 98: ...illed hole in rod Make certain that bushing is fully expanded in the connecting rod bore or it will loosen in service Refer to Figure 5 5 3 Position rod assembly in press with piston pin burnishing br...

Page 99: ...le and each has a number stamped on it which signifies its correct location and alignment in the crankcase The caps are numbered 1 through 7 with No 1 main bearing cap in front of engine The bearing i...

Page 100: ...rsize bearing is required and will be stamped P10 Some crankshafts may have journals which are 0 002 inch 0 0508 mm undersize They are marked by a streak of white paint adjacent to the journal Always...

Page 101: ...566C5127M did not have a dowel pin or dowel pin hole It is acceptable to use this early non pinned crankshaft design in any mechanically governed engine even when the original installation may have ha...

Page 102: ...ing key 3 Insert key 4 into key slot 3 Lightly tap key into slot with a soft metal hammer 4 Heat replacement gear 1 to approximately 250 F 121 C in a temperature controlled oven or on a hot plate Wear...

Page 103: ...empting to resurface as close to the clutch locating pilot as possible keep in mind that the pilot must not be altered The pilot controls location of the clutch if the locating pilot is altered imbala...

Page 104: ...The relief is machined into the lower half of the third ring land face 360 degrees around the piston circumference Current E7 pistons are NOT interchangeable with 1989 1990 E7 pistons Special Tools Re...

Page 105: ...on for end gap specifications All rings to be used should be checked in this manner Do not file or grind chrome plated piston rings This may cause chrome to flake resulting in ring failure Keystone Ri...

Page 106: ...with Fits and Limits chart to see if it is within tolerance For a new ring and piston oil ring side clearance is 0 0016 0 0030 inch 0 0406 0 0762 mm For an old ring and piston the clearance should no...

Page 107: ...no ring gap is directly over wrist pin bore and no ring end gaps are aligned over each other Figure 5 16 Ring Gap Locations 212 LP NP CONNECTING ROD ASSEMBLY TO PISTON Refer to Figure 5 17 1 Install a...

Page 108: ...ne camshaft gears are pressed onto the camshaft Disassembly An extremely tight interference fit holds the cam gears onto the camshaft Ten tons of force are required to remove the gears When cam gear i...

Page 109: ...t let camshaft fall or strike the floor when pressed from the gears The camshaft can be bent easily and the bend may go unnoticed Installing a bent camshaft in the engine could result in cam bushing f...

Page 110: ...ears on a camshaft Use the heat method to install new gears on a new camshaft Use the press method if reusing any service parts Do not use heat method on used parts HEAT METHOD CAMSHAFT INJECTION PUMP...

Page 111: ...7 Install injection pump driving gear 5 by applying a quick even pressure until gear bottoms onto camshaft gear Make sure camshaft thrust washer holes are accessible through injection pump driving ge...

Page 112: ...15 Position gear onto camshaft 16 Using a suitable press cup press the gear onto the shaft until it is fully seated The pressure gauge on the press should read approximately 5 tons 4 54 MT as the gear...

Page 113: ...s three cylinders and has two inlet and two exhaust valves per cylinder Circular grooves correspond with the fire ring bead on cylinder sleeves This design sets the fire ring over the liner the lip an...

Page 114: ...ller Set J 38586 Driver Handle J 8092 Prussian Blue Model MST 50 Universal Spring Tester J 22738 02 Injection Nozzle Sleeve Extractor J 29880 Basic Heavy Duty Dowelout Kit PT6575 Dowelout Extractor 7...

Page 115: ...Figure 5 26 A new valve stem seal was introduced into E7 engine production on 11 1 96 beginning with engine serial number 6S2657 The older valve stem seal has a single sealing lip while the new style...

Page 116: ...ved remove upper washer 2 valve spring 3 oil seal 4 lower washer Roto Coil 5 and valve 6 After removing the valve springs removal of the existing valve stem seals can be accomplished easily and quickl...

Page 117: ...6 381 inches 162 077 mm When the deck is resurfaced fire ring groove and valve seat insert dimensions must be reestablished Correct dimensions are shown in this section 213 EH Fire Ring Groove DESCRIP...

Page 118: ...tom out in mounting holes Figure 5 29 Cutter Base Alignment Refer to Figure 5 30 2 Position cylinder head so threaded section of hold down capscrews can be reached Install spacer 3 washer 2 and wing n...

Page 119: ...26948 The difference between 0 008 inch and the actual remaining depth of fire ring groove is the amount to cut Insert two appropriate thickness gauges 2 between cutter head 1 and cutter base 4 b If...

Page 120: ...To ensure proper groove depth always adjust cutting tool height when cutting next groove 213 EP Valve Guides INLET AND EXHAUST VALVE GUIDE DIMENSIONS Refer to Figure 5 34 Valve guide ID 3 3 8 inch 9 5...

Page 121: ...Figure 5 36 3 Use a depth gauge to check valve guide extension Figure 5 36 Checking Valve Guide Extension When reconditioning the cylinder head it is recommended that all valve guides be replaced VAL...

Page 122: ...ew guide before installation 3 Press new valve guide into top of cylinder head using tool J 37809 Refer to Figure 5 38 4 Using depth gauge check extension of valve guide from valve spring seat to top...

Page 123: ...T INSERT DIMENSIONS Refer to Figure 5 40 Valve seat 3 insert face angle 1 Inlet 30 0 30 before November 1996 20 30 15 November 1996 and later Exhaust 30 s0 30 Valve seat insert diameter 2 Inlet 1 832...

Page 124: ...5 41 Valve seat extractor kit PT6391 and collet PT6390 4 are used to remove inlet and exhaust seat inserts Collet PT6390 4 is not included in basic kit PT6391 Figure 5 41 Valve Seat Extractor Kit PT6...

Page 125: ...de circumference of valve seat insert This groove should be approximately 0 030 inch 0 762 mm deep Use care not to damage any machined surface of the cylinder head 5 Attach collet to T handle and shaf...

Page 126: ...back to specifications listed in Figure 5 45 Figure 5 46 Checking Counterbore Dimensions VALVE SEAT INSERT INSTALLATION Oversize inlet and exhaust valve seat inserts are available in 0 005 0 015 0 031...

Page 127: ...ermine concentricity of each valve seat insert relative to valve guide Valve seat runout is to be held within 0 001 0 025 mm FIM Full Indicator Movement with finished valve guide ID measurements made...

Page 128: ...kg at 38 1 mm If spring force does not meet specification discard and install new spring Figure 5 49 Checking Valve Spring Tension 213 GB Injection Nozzle Holder Insert The injection nozzle holder ins...

Page 129: ...ng nozzle sleeve installer J 29297 2 drive insert 1 into cylinder head until it bottoms in lower counterbore face Figure 5 51 Injection Nozzle Holder Insert Installation 213 FH Valve Yoke Guide Pins T...

Page 130: ...3 Using slide hammer remove pin Figure 5 52 Valve Yoke Guide Pin Removal VALVE YOKE GUIDE PIN INSTALLATION Refer to Figure 5 53 If new pin is required use valve guide pin installer J 37809 to drive pi...

Page 131: ...and apply to cup plug and cup plug bore in head Refer to Figure 5 54 3 Install cup plugs in cylinder head using cylinder head core plug installer J 34684 for 13 16 inch cup plugs and cylinder head cor...

Page 132: ...efer to Figure 5 55 2 Install a 1 8 inch pipe plug in top of rear cylinder head 3 Install two 3 4 inch core hole pipe plugs in cylinder head Torque to 28 lb ft 38 N m Figure 5 55 Cylinder Head Pipe Pl...

Page 133: ...cannot be used on E7 engines equipped with a Dynatard engine brake The Pyromet exhaust valve head is 0 020 inch 0 508 mm thicker than a conventional exhaust valve therefore valve to piston contact may...

Page 134: ...gree seat with 30 degree valve Remanufactured assemblies will use either 20 degree or 30 degree valves and seats on certain applications never mixed in one head See the following chart and figures to...

Page 135: ...nt when both the valves and the valve guides are new With an on engine seal replacement pre lube the valve stems with engine oil while moving the valve up and down prior to installation of the valve s...

Page 136: ...eepers Use tool J 29294 B to install keepers Refer to Figures 5 59 and 5 60 7 After valves are assembled check each inlet valve for head height above cylinder deck The protrusion dimension for inlet v...

Page 137: ...le Rocker Arm Valve Rocker Arm Shaft Assembly Except Jacobs Engine Brake Refer to Figure 5 62 The assembly procedure for rocker arm shaft includes Dynatard without Jacobs engine brake is described bel...

Page 138: ...er bracket alignment and to ensure mounting surfaces of each bracket are parallel 11 Lubricate inlet rocker arm 3 and install on shaft 12 Assemble rocker arm retaining coil spring 6 on shaft 13 Lubric...

Page 139: ...ft with engine brake is described below The engine brake arrangement includes exhaust valve rocker arms with lash adjusters and a solenoid mounted in the rocker arm shaft 1 Position shaft 11 so that t...

Page 140: ...not have a threaded hole on top or an oil hole at bottom surface Align mounting surface and offset of bracket with bracket that is already installed 11 Press shaft into rocker arm bracket until center...

Page 141: ...m in place Some rocker arm shafts are equipped with threaded plugs and aluminum washers instead of flat springs and snap rings 21 Check all rocker arms to make sure they rotate freely Dynatard Engine...

Page 142: ...crew 5 Lubricate and install cylinder head capscrew with a drilled hole in No 16 location 6 Torque cylinder head capscrew to 205 lb ft 278 N m using torque wrench J 24407 or equivalent 7 Remove front...

Page 143: ...service manual 266 ENGINE BRAKE SWITCH AND BRACKET ASSEMBLY Description Beginning in 1991 a cylinder block mounted engine brake switch and mounting bracket assembly was released for E7 mechanically go...

Page 144: ...through the inlet port of the oil cooler into the cooling chamber Heat from the engine oil is transferred through the chamber walls to engine coolant Cooled oil exits the oil cooler through the oil o...

Page 145: ...f housing 5 Clean gasket material from all surfaces 200556a 24 23 22 21 20 19 25 26 27 1 2 3 4 5 7 6 8 9 10 11 12 13 14 15 17 18 16 1 Gasket 2 Coolant outlet end cap 3 O ring 4 Mounting flange 5 Clamp...

Page 146: ...gasket sealer on top of gasket 21 before installing inlet cap 20 8 Install coolant inlet end cap and secure with six capscrews 19 9 Torque coolant inlet end cap capscrews to 20 lb ft 27 N m using tor...

Page 147: ...water pump service other than replacement refer to the COOLING 7 0 manual 219 MU OIL PUMP The shaft and pumping gear on oil pumps manufactured after February 1996 are a one piece design Earlier models...

Page 148: ...s If seating surface contains burrs or nicks repair seat as follows a Place valve lapping compound on plunger seat b Insert plunger in relief valve housing and rotate plunger against seat to smooth se...

Page 149: ...raightedge across face of gears and run a 0 001 inch 0 025 mm thickness gauge under straightedge Gauge should move freely without binding If binding occurs check gears for nicks or burrs Replace as ne...

Page 150: ...H CHECK Refer to Figure 5 73 1 Check backlash between driving gear 3 and driven gear 2 with thickness gauge 1 a Low Limit Insert a 0 013 inch 0 33 mm thickness gauge 1 between pump driven gear 2 and p...

Page 151: ...tching oil pump also be fitted with a 1 5 fast ratio oil pump driveshaft gear A noncurrent 1 3 standard ratio E7 oil pump can be reused in combination with a 1 5 fast ratio auxiliary driveshaft assemb...

Page 152: ...io Auxiliary Driveshaft in this section Apply Loctite 271 to all capscrews used to assemble the oil pump 7 Install cover 7 on pump and secure with capscrews Torque to 15 lb ft 20 N m 8 Install key 5 i...

Page 153: ...ng 1 from rear of Econovance housing 8 3 Remove inner shaft assembly from rear of Econovance housing by manually guiding gear assembly outward 4 Remove inner sleeve 4 from inner shaft assembly 5 Remov...

Page 154: ...drive hub into Econovance outer housing 8 using new seal if needed 5 Reinstall retainer ring 1 in rear of Econovance assembly 6 Apply Loctite 242 to drive hub retaining capscrew 10 threads Grooved sid...

Page 155: ...th fixture bracket Figure 5 77 Positioning Drive Hub and Pump in Fixture MACK E7 engines equipped with Bosch P7100 Series close coupled injection pumps require a longer drive pump hub Do not install a...

Page 156: ...ve the inner hub from the injection pump camshaft Figure 5 81 Removing Inner Hub DRIVE COUPLING INSTALLATION 1 Install inner hub on injection pump camshaft Do not install a key in injection pump camsh...

Page 157: ...990 5 303 1991 5 304 1992 5 305 1993 5 306 1994 5 307 1995 5 308 1996 1997 Nozzle Cleaning When servicing nozzle holder assemblies cleaning of nozzle tips may be necessary Special care must be taken w...

Page 158: ...Page 5 68 NOTES 5 101 bk Page 68 Friday March 17 2006 11 05 AM...

Page 159: ...200 ENGINE ASSEMBLY Page 6 1 ENGINE ASSEMBLY 5 101 bk Page 1 Friday March 17 2006 11 05 AM...

Page 160: ...o clean with solvents Cleaning solvent is flammable and toxic to the eyes skin and respiratory tract Skin and eye protection is required Avoid repeated or prolonged contact Use only in well ventilated...

Page 161: ...ting surface on a service block should be flat within 0 004 inch 0 102 mm Figure 6 1 Checking Flatness of Cylinder Block Deck If the cylinder block is determined to be serviceable after thorough clean...

Page 162: ...diameter of the hole Use compressed air to remove any chips from the block It is best to replace a leaking pipe plug However if reusing the same plug clean thoroughly paying special attention to the...

Page 163: ...erhauling out of chassis replace camshaft bushings 1 Using a telescope gauge or suitable inside micrometer measure the ID of each camshaft bushing in the cylinder block Record the dimensions Refer to...

Page 164: ...ct installation of each camshaft bushing is very important If a bushing is not properly aligned with both its oil supply and oil feed passages in the cylinder block either the camshaft bushing will fa...

Page 165: ...200 ENGINE ASSEMBLY Page 6 7 Figure 6 7 Camshaft and Auxiliary Shaft Bushing Alignment 5 101 bk Page 7 Friday March 17 2006 11 05 AM...

Page 166: ...ushing Figure 6 8 Camshaft Bushing Installation 5 Check the surface of the bushing for burrs caused by installation Refer to Fits and Limits chart for correct bushing ID dimensions Refer to Figure 6 9...

Page 167: ...gned lubrication oil will not be allowed to lubricate the auxiliary driveshaft journal This will also cause the component lubricated through that journal to run without lubrication and prematurely fai...

Page 168: ...e the auxiliary driveshaft to seize in the bushing during installation The front auxiliary driveshaft bushing must be flush or recessed within 0 020 inch 0 508 mm of the front of the cylinder block In...

Page 169: ...equired to achieve the proper cylinder sleeve flange height Always place the thickest shim on the bottom The crevice seal groove 1 must be clean and free of any oil residue Under no circumstances shou...

Page 170: ...nge height above deck dimension is 0 022 0 027 inch 0 559 0 686 mm The measurement should be taken in the channel between the sleeve top lip fire dam and the coining bead Refer to the TROUBLESHOOTING...

Page 171: ...123 825 mm cylinder sleeve ID may be minimum 4 872 inches 123 749 mm due to close in from press fit Figure 6 13 Checking Cylinder Sleeve for Out of Round or Taper HONING THE CYLINDER SLEEVE BORE Engi...

Page 172: ...fills the four oil reservoirs located in the top of the piston skirt The piston cooling nozzle bracket is thicker on the piston cooling nozzles beginning on 1991 E7 production engines Also 310 is etch...

Page 173: ...strike the nozzles Always replace a badly deformed spray nozzle Do not attempt to realign it Precise targeting is necessary to adequately cool the piston crown For ease of installation and to reduce t...

Page 174: ...get area 5 If rod is at edge of target area two methods may be tried to center the rod into the target area a Preferred Loosen nozzle set screw A slight adjustment can then be made to center the rod w...

Page 175: ...iming cover or flywheel housing locating dowel pins do so as follows 1 Securely clamp the pin with a pair of vise grip pliers 2 While exerting an outward force rotate pin back and forth until the pin...

Page 176: ...ove the diamond dowel aligner and the two alignment studs The dowel pin will be at the correct height above the block Figure 6 19 Diamond Shaped Dowel Pin Installation BLADE TYPE DOWEL PIN INSTALLATIO...

Page 177: ...h provided 4 Repeat above step to install the remaining upper inserts Refer to Figure 6 20 for the part number and location of each bearing insert A bearing insert installed at the wrong location can...

Page 178: ...in the threads 5 Using a plastic faced mallet tap bearing cap down until it contacts the machined mounting surface 6 Tighten the screws until they contact the bearing cap At this time tighten them onl...

Page 179: ...f the thrust washers in the block Be sure to put the bearing surface of the thrust washer against the crankshaft when installing thrust washers 16 Install the center main bearing cap with bearing inse...

Page 180: ...the bearing running clearance 6 Check width of the Plastigage using a Plastigage width chart After measuring width remove Plastigage from bearing 7 If clearance is not within specification correct as...

Page 181: ...amped FRONT and must face the front of the engine These production parts are not interchangeable with 1989 1990 production The piston design incorporates two compression ring grooves and one oil contr...

Page 182: ...he load carrying capacity of the upper bearing and provides longer bearing life The hole in the upper connecting rod bearing must be aligned with the oil passage in the connecting rod Otherwise damage...

Page 183: ...nstall the No 6 piston 16 Rotate crankshaft so that the journals for the No 2 and No 5 cylinders are at bottom dead center Follow above installation procedures to install the No 2 and No 5 pistons Rep...

Page 184: ...flange for any cracks surface damage or presence of foreign particles This type of damage could ruin the sealing capabilities of the new seal and lead to oil leakage Dowel Pins The diamond locating d...

Page 185: ...e E7 engine Production phase in began mid October 1996 Along with the new flywheel housing a standardization of the flywheel housing mounting hardware also took place For all new style housings used o...

Page 186: ...Page 6 28 200 ENGINE ASSEMBLY Figure 6 26 Flywheel Housing Bolts 5 101 bk Page 28 Friday March 17 2006 11 05 AM...

Page 187: ...o Figure 6 27 Figure 6 27 Flywheel Housing Installation The flywheel housing dowels maintain the alignment of the flywheel housing on the engine This is necessary to center the transmission with respe...

Page 188: ...ft rear flange or the flywheel results may exceed 0 010 inch 0 254 mm due to factors such as crankshaft movement within the bearing clearances and other variables Flywheel housing runout specification...

Page 189: ...not to damage the crankshaft flange Place chisel face squarely on wear ring Use careful blows to cut wear ring only and not damage crankshaft flange The wear ring will become loose enough to remove wi...

Page 190: ...ng to cool completely Then remove the installation tool Figure 6 35 Crankshaft Wear Ring Installation Wear Ring with Double Lip Teflon Seal Automatic Transmission The oversize inside diameter lip seal...

Page 191: ...crankshaft flange Crankshaft design allows the single lip seal to be installed at the production depth of 0 344 inch 0 005 inch 8 74 mm 0 127 mm or a service depth of 0 250 inch 0 005 inch 6 35 mm 0...

Page 192: ...to Figure 6 39 Figure 6 39 Crankshaft Rear Oil Seal 5 The two installation depths are stamped above two of the guide pin bores of the installation tool press plate To install the seal to the desired d...

Page 193: ...ription The flywheel has a stamped timing scale of TDC to 45 degrees of engine travel for setting and checking injection pump to engine timing It also has three stamped locations 120 degrees apart for...

Page 194: ...l flywheel mounting capscrews in the exposed mounting holes At this time tighten the capscrews finger tight only 3 Remove the two alignment studs and insert the remaining mounting capscrews Do not tor...

Page 195: ...racking pitting or scoring To provide increased duration for the exhaust valve opening the exhaust lobe profile for cam part No 5205 is flatter across the nose portion compared to traditional MACK cam...

Page 196: ...to be sure that the two camshaft gears and the captured thrust washer are in place on the shaft 4 Lubricate the camshaft journals and the camshaft bearing surfaces with clean engine oil Refer to Figu...

Page 197: ...tool holds the lifter in position Check to see if the tool has captured the valve lifter by drawing upward on the tool A resistance will be felt that cannot be felt if the magnet has contacted somethi...

Page 198: ...ming mark on the main crankshaft drive gear Refer back to Figure 6 45 The use of the installation tool will make it easy to slide the camshaft into the block while protecting the cam and bushings from...

Page 199: ...tion Fast Ratio 1 5 1 part No 453GC381M 18 teeth Standard Ratio 1 3 1 part No 453GC379AM 17 teeth Refer to Figure 6 49 Purchase the auxiliary driveshaft as an assembly only Do not try to dismantle or...

Page 200: ...rge port into a drilled passage in the cylinder block which leads to the oil filter and cooler The oil is then distributed to all main parts of the engine If the oil filter is excessively contaminated...

Page 201: ...2 Secure the pump in position using the mounting capscrews 2 Torque the mounting capscrews to 40 lb ft 54 N m using torque wrench J 24407 or equivalent Figure 6 51 Oil Pump Installation 200653a 2 1 3...

Page 202: ...ng cover to allow access to the injection pump drive gear during injection pump installation For all E7 engines that do not use the front timing boss a new timing gear cover No 333GB5123M2 is availabl...

Page 203: ...scoring and condition of flange threaded holes and keyway Replace the hub if the seal shows signs of wear Mack Trucks Inc does not recommend the use of a service sleeve to repair the crankshaft hub w...

Page 204: ...the damper housing and its internal flywheel dents or nicks may cause contact between the two components Fluid loss will deteriorate the dampening effect of the damper Installation 1 Position the vibr...

Page 205: ...nificantly reducing the amount of engine vibration transmitted to the pan The illustration below Figure 6 54 shows both the fiber oil pan gasket arrangement and the new isolating gasket arrangement Fi...

Page 206: ...an be used on engines with either 8 mm or 10 mm tapped mounting holes The isolating oil pan gasket may only be used on cylinder blocks with 8 mm tapped holes Figure 6 55 Oil Pan Stud Identification 20...

Page 207: ...sket on the oil pan rail When servicing an E7 engine with an isolating oil pan arrangement avoid using an engine stand that supports the engine on the oil pan rail while the oil pan is still installed...

Page 208: ...cating cones 5 After all cones have been installed recheck to ensure they are all properly seated During removal of the isolating oil pan from the engine the studs may have backed out while loosening...

Page 209: ...torque wrench J 24406 or equivalent When servicing any engine with the fiber oil pan gasket 8 mm or 10 mm tapped holes in the cylinder block oil pan rail and installing a new timing gear cover and or...

Page 210: ...the cylinder block deck 2 Place a fire ring carefully in position on top of each cylinder sleeve Check that the design of the fire ring used is the correct match for the cylinder sleeves installed Re...

Page 211: ...screws in the mounting holes Tighten all cylinder head capscrews finger tight Do not install painted capscrews at locations that are under the valve cover Refer to Figure 6 59 5 Check the alignment of...

Page 212: ...e wrench J 24407 or equivalent c Torque all head mounting capscrews in sequence to final torque value of 205 lb ft 278 N m using torque wrench J 24407 or equivalent 7 Perform the engine run in procedu...

Page 213: ...eve nut Special Tool Required Injection Nozzle Puller J 37093 Installation 1 Insert a nozzle holder gasket in the bottom of the nozzle holder hole Refer to Figure 6 61 Make sure the washer type gasket...

Page 214: ...ozzle holder hole The gauge block should be flush with the top of the cylinder head surface Refer to Figure 6 65 If the gauge block is below level it may indicate that the gasket was omitted If the ga...

Page 215: ...ve lifter which has no center hole it may create an undesirable wear pattern in the lifter socket Mixing current and non current valve lifters is permissible when using the correct lifter push rod com...

Page 216: ...er Installation Used yokes have established wear patterns Yokes being returned to service should be installed in the same position from which they were removed Refer to Figure 6 68 1 Lubricate the yok...

Page 217: ...rews with clean engine oil Install the capscrews and torque to 40 lb ft 54 N m using torque wrench J 24407 or equivalent 4 Adjust valve and engine brake slave piston lash settings as applicable Refer...

Page 218: ...rest flat against the rocker arm shaft brackets 3 Lubricate all six Jacobs hold down capscrews with clean engine oil and install them through the housings and into the rocker shaft brackets 4 Start w...

Page 219: ...seal grooves 3 of the risers a Thoroughly clean the gasket contact surface b Install one end of riser gasket into seal groove inboard side approximately 1 4 inch 6 4 mm from the end of the groove c Gu...

Page 220: ...previously used armored exhaust manifold gasket If replacing an existing manifold on engines manufactured before March 1995 with a low boss exhaust manifold and reusing the long studs 103 mm long eac...

Page 221: ...200 ENGINE ASSEMBLY Page 6 63 Figure 6 73 Typical Exhaust Manifold Installation 5 101 bk Page 63 Friday March 17 2006 11 05 AM...

Page 222: ...manifold section 4 in the couple 5 Place a gasket between the mounting surfaces of the rear manifold section and the cylinder head 6 Lubricate threads of the mounting capscrews 5 and secure the rear m...

Page 223: ...unting flange If the oil supply tube is lost the air compressor will fail from lack of oil 3 Install the three mounting capscrews 5 and torque to 70 lb ft 95 N m using torque wrench J 24407 or equival...

Page 224: ...on of the fuel injection pump drive gear refer to Injection Pump Fixed Timing procedure found in the SETUP AND ADJUSTMENTS section Figure 6 76 Econovance Housing Installation Pre 1992 Style Shown 221...

Page 225: ...ould move freely from side to side Figure 6 79 Lower Support Bracket Adjustment 3 Loosen the two upper support bracket to fuel injection pump capscrews Figure 6 80 Outer Upper Support Capscrew Figure...

Page 226: ...lower pump adapter mounting capscrew and then remove the alignment dowels Figure 6 84 Securing Fuel Injection Pump 7 Install and torque the remaining fuel injection pump adapter mounting capscrews to...

Page 227: ...ing torque wrench J 24407 or equivalent Loosen and then retorque the capscrews to 40 lb ft 54 N m Figure 6 87 Torquing Upper Support Bracket to Fuel Injection Pump Capscrews 11 Loosen the two link to...

Page 228: ...e insulators and clamp plates and brackets are required to prevent cavitation erosion and vibration failure of the tubes 5 Tighten all fuel inlet tube assembly clamping screws to 35 lb ft 48 N m torqu...

Page 229: ...0 5 1 Nozzle fuel inlet tube and sleeve nut 2 Rear fuel inlet tube assembly 3 Bracket insulator tube clamp 4 Front fuel inlet tube assembly 5 Bracket insulator tube clamp 6 Sleeve nut 7 Oil filler fee...

Page 230: ...for angular orientation of the compressor cover or turbine housing be certain that the mating flanges are tightly seated and that the fasteners are snug but will still allow cover orientation Complete...

Page 231: ...e seal from being installed too far Wherever possible an arbor press should be used to apply assembly pressure Do not apply hammer blows or uneven pressure directly to seal surfaces Precautions should...

Page 232: ...Coolant conditioner head assembly 3 Check valve 4 O ring 5 Thermostat housing 6 Thermostat seal 7 Thermostat 8 Gasket 9 Coolant manifold 10 Clamps 11 Oil cooler supply tube 12 Coupling hose 13 Capscre...

Page 233: ...4 N m using torque wrench J 24407 or equivalent 5 Tighten the clamps on the coupling and torque to 38 lb in 4 3 N m 231 PB FUEL FILTER ADAPTER ASSEMBLY Installation Refer to Figure 6 91 1 Install fuel...

Page 234: ...ing pump outlet to block capscrews 1 Position a gasket on the water pump mounting flange 2 Secure pump with three mounting capscrews 3 3 Position refrigerant compressor support bracket if required on...

Page 235: ...staked by using a small punch to make a small indentation between the threads of the spud and the adapter 3 Apply a continuous bead of Loctite 609 around the circumference of the fitting between the...

Page 236: ...ter pump mounting flange 2 7 Lubricate threads of capscrews 1 and insert the two mounting capscrews to secure flange 2 to the water pump Torque capscrews to 40 lb ft 54 N m using torque wrench J 24407...

Page 237: ...ump mounting flange 3 Clamps 4 Coupling 5 Oil cooler supply tube water bypass tube 6 Centri Max filter breather hose 7 Breather hose fitting MR chassis with Jake Brake use breather assembly 8 Oil hose...

Page 238: ...to give a gauge reading of 130 150 lbs 578 667 N Chalk mark the point checked Run the engine for approximately 5 10 minutes Allow the belt s to cool and recheck at the chalk mark If the tension is le...

Page 239: ...ge 6 81 Figure 6 96 Engine Belt Arrangement 205234a UPPER MOUNTING TENSION BOLT TORQUE TO 60 70 LB FT 81 95 N m LOWER MOUNTING BOLTS TORQUE TO 60 70 LB FT 81 95 N m ENGINE C L 5 101 bk Page 81 Friday...

Page 240: ...Page 6 82 NOTES 5 101 bk Page 82 Friday March 17 2006 11 05 AM...

Page 241: ...200 SETUP AND ADJUSTMENTS Page 7 1 SETUP AND ADJUSTMENTS 5 101 bk Page 1 Friday March 17 2006 11 05 AM...

Page 242: ...n early 1995 may be equipped with flywheels that have missing or illegible valve adjustment markings If this problem is encountered a typical flywheel can be marked while the engine is in the chassis...

Page 243: ...chisel mark directly in line with the clutch mounting bolt bolt hole Then stamp or electric etch the cylinder numbers on either side of the chisel mark 6 Rotate the engine to the remaining locations a...

Page 244: ...s solid contact with the outboard valve stem tip as sensed by a light drag on the adjusting screw 5 Turn adjusting screw an additional 1 6 turn 60 degrees clockwise A 1 6 turn is equal to one flat on...

Page 245: ...alve lash clearance Readjust as necessary Figure 7 5 Inlet Valve Adjustment Exhaust Valve Adjustment Refer to Figure 7 6 Exhaust valve clearance is 0 024 inch 0 610 mm for engines produced through eng...

Page 246: ...tlined for the No 1 cylinder E7 engine firing order is 1 5 3 6 2 4 3 Continue adjusting yoke and valve lash for the remaining cylinders in firing order Rotate crankshaft to place each piston 30 degree...

Page 247: ...t is tightened When the locknut is tightened the crests of yoke adjusting screw threads are pulled tightly against the wedge ramp of screw threads Because of this feature when the locknut is loosened...

Page 248: ...tboard valve stem tip as sensed by a light drag on the adjusting screw 3 Turn adjusting screw an additional 1 6 turn 60 degrees clockwise A 1 6 turn is equal to one flat on the adjusting screw locknut...

Page 249: ...rocker arm and yoke 2 Turn adjusting screw until a light drag is felt on the thickness gauge 3 After adjustment is complete hold screw to keep from turning and tighten locknut Torque locknut to 40 lb...

Page 250: ...ew locknut is properly torqued to 40 lb ft 54 N m recheck the clearance with the Jacobs feeler gauge Readjust as necessary 1 Loosen the No 1 cylinder slave piston adjusting screw until the slave pisto...

Page 251: ...ers in firing order placing each piston 30 degrees past TDC by rotating the crankshaft and aligning marks on the flywheel with pointer marked VALVE and appropriate mark on vibration damper if equipped...

Page 252: ...n V MAC engines however different capscrew head sizes can affect the use of V MAC hub rotation tool J 38740 used to rotate the injection pump when setting injection pump to engine timing J 38740 actua...

Page 253: ...tting Static Fuel Injection Pump Timing To set the static fuel injection pump timing prior to pump removal proceed as follows 1 Remove the TEM sensor on mechanically governed engines remove plug from...

Page 254: ...Figure 7 17 Installing J 37077 Tool 5 Slowly turn the knurled surface clockwise to lock the tool into place Check to make sure tool is seated by applying pressure to the end of the tool and checking f...

Page 255: ...mm capscrews to access the flywheel housing timing window 2 Remove the plastic plug in the cast machined opening in the forward face of the housing 3 Insert engine barring socket tool J 38587 into the...

Page 256: ...remove clearance but allow relative motion between hub and gear Figure 7 23 Installing Driven Gear Capscrews 6 Remove the alignment dowels and install remaining capscrews in the same manner 7 Using hu...

Page 257: ...9 Torque all fuel injection pump driven gear capscrews to 40 lb ft 54 N m using torque wrench J 24407 or equivalent Figure 7 26 Torquing Driven Gear Capscrews Lamp A or B may go out during torquing pr...

Page 258: ...ck timing 3 After achieving correct timing remove timing tools a Turn tester power off b Disconnect tester ground c Remove fixed timing probe 4 Install fixed timing port plug or TEM sensor 5 Check tor...

Page 259: ...in the governor housing Add 12 ounces 355 ml of clean engine oil This will fill both the governor and fuel injection pump Reinstall the timing sensor fixing plate plug Figure 7 31 P7100 Injection Pump...

Page 260: ...alling TEM Sensor 5 Tighten the jam nut running it over the Silastic 6 Torque the jam nut to 22 lb ft 30 N m using torque wrench J 24406 or equivalent Figure 7 35 Torquing TEM Sensor Jam Nut 7 Wipe th...

Page 261: ...ngine in normal rotation direction until No 1 piston is approximately at TDC on compression stroke 2 Remove injection nozzle holder assembly from the No 1 cylinder front cylinder on E6 and E7 engines...

Page 262: ...ce between the two marks just made on the masking tape and place a third mark exactly at the midpoint between the first two marks 13 Rotate engine in direction opposite to normal rotation until engine...

Page 263: ...200 ENGINE INSTALLATION TESTING Page 8 1 ENGINE INSTALLATION TESTING 5 101 bk Page 1 Friday March 17 2006 11 05 AM...

Page 264: ...ine hoist to lifting device place tension on the device by operating hoist 3 With lifting device supporting the engine weight remove mounting capscrews from engine stand Engine Installation into Vehic...

Page 265: ...ower radiator hose to coolant inlet of oil cooler assembly 24 Connect upper radiator hose to engine coolant outlet fitting 25 If vehicle is equipped with air conditioning a Connect electrical connecto...

Page 266: ...ication system with sufficient oil 3 Remove oil level dipstick and check crankcase level Add sufficient oil if necessary to bring it to the FULL mark on dipstick Do not overfill TURBOCHARGER 1 Disconn...

Page 267: ...lease for service Run in procedures vary depending on method used i e engine dynamometer chassis dynamometer or highway run in Regardless of method however always properly prepare engine before starti...

Page 268: ...sure Fixture J 41473 CMCAC Troubleshooting 205217 Symptom Probable Cause Remedy Normal Boost High Pyrometer 1 Core fin obstructions 1 Clean core fins Low Boost High Pyrometer 1 Restriction in ducting...

Page 269: ...adapter in core outlet opening 6 Pressurize system to 30 psi 207 kPa 7 Shut off air source Pressure should not drop more than 5 psi 35 kPa within 15 seconds Repair or replace core if pressure drop exc...

Page 270: ...ot use caustic cleaners Be extremely careful when handling cooler so as not to damage core The clamp springs must always be located on underside of tube to avoid damaging hood when closed 4 Reinstall...

Page 271: ...f flow 4 Carefully inspect cooler to ensure cleanliness Do not use caustic cleaners Damage Core Failures Recommended Repair Procedure System Check Repairable All header tank to core separations Tungst...

Page 272: ...Page 8 10 NOTES 5 101 bk Page 10 Friday March 17 2006 11 05 AM...

Page 273: ...200 TROUBLESHOOTING Page 9 1 TROUBLESHOOTING 5 101 bk Page 1 Friday March 17 2006 11 05 AM...

Page 274: ...system Make necessary repairs 3 No fuel to engine 3 Check for fuel in the fuel tank Also check for plugged fuel tank connections restricted or kinked fuel suction lines fuel transfer pump failure or c...

Page 275: ...is cut to a cylinder it indicates that the cylinder is not firing Remove the injection nozzle and check Repair or replace as necessary If nozzle is OK check cylinder for low compression If no fuel is...

Page 276: ...ure 4 Check fuel supply lines for kinks or restrictions Check for air in system Check fuel pressure If low replace fuel filters If still low replace or repair fuel transfer pump Also check for stickin...

Page 277: ...nor wear 7 Remove the injection pump Send the pump to an authorized MACK Fuel Injection System Repair facility for repair and recalibration Then reinstall the pump Possible Cause Correction 1 Loose vi...

Page 278: ...m leakage 2 Check external piping on fuel system for signs of fuel leakage Repair as required 3 Incorrect fuel injection pump to engine timing 3 Check fuel injection pump to engine timing Reset as req...

Page 279: ...k temperature gauge Replace if defective 6 Fan improperly positioned or viscous drive fan not operating properly 6 Check fan operation Repair as required 7 Shutters not opening properly for chassis eq...

Page 280: ...valve lash setting to specified clearance 8 Defective fuel injection nozzle assembly 8 Isolate defective nozzle assembly Remove repair and or replace and reinstall 9 Incorrect fuel injection pump cal...

Page 281: ...l pressure Make any necessary repairs or install a new relief valve 7 Oil pump gears not meshing properly 7 Check mounting arrangement If the engine has been rebuilt check that the gear ratio of the o...

Page 282: ...es direction full open position is passed Repeat procedure 7 Check timing indicator Pointer should be within three degrees retard or advance of timing indicator specification given in table that follo...

Page 283: ...insufficient sealing and damage to the engine To identify the fire ring sleeve top configuration look at the sleeve top outboard of the coining bead If the surface between the coining bead and the sl...

Page 284: ...xamine all six sleeves to determine which sleeve top configuration applies If replacing head gaskets with original parts use the sleeve top configuration shown in Figure 9 1 and the cylinder gasket ki...

Page 285: ...g system and possible cylinder head gasket failure Air bubbles may also indicate leakage from the cylinder head or oil passage 7 Apply a soap and water solution between two cylinder heads to check for...

Page 286: ...e cylinder block temperature to 150 F 66 C Loosen one of the pipe plugs near the top of the cylinder block to bleed air from the water jacket while filling Also open the block drain to allow water to...

Page 287: ...200 TROUBLESHOOTING Page 9 15 Figure 9 4 Cylinder Block Cylinder Head Leak Check In Chassis 5 101 bk Page 15 Friday March 17 2006 11 05 AM...

Page 288: ...with an oil feed passage Cut the bracket through the rocker arm shaft bore parallel to the mounting surface Drill and tap the oil supply passage to accept an air fitting 4 Bolt the modified bracket wi...

Page 289: ...of head and secure with C clamps 3 Use suitable plate and gasket to seal water manifold openings Install an air fitting onto the plate 4 Immerse cylinder head in water Heat water and head to 150 F 66...

Page 290: ...ternative a water manifold with the outlet end sealed can be used to seal off the cylinder head coolant ports Fittings can be installed on the water manifold to introduce the heated water and air pres...

Page 291: ...200 TROUBLESHOOTING Page 9 19 Figure 9 7 Cylinder Block Coolant Passage Leak Check Out of Chassis 5 101 bk Page 19 Friday March 17 2006 11 05 AM...

Page 292: ...Page 9 20 NOTES 5 101 bk Page 20 Friday March 17 2006 11 05 AM...

Page 293: ...200 APPENDIX Page 10 1 APPENDIX 5 101 bk Page 1 Friday March 17 2006 11 05 AM...

Page 294: ...0164 OZ0166 OZ0167 OZ0192 OZ0193 OZ0194 OZ0205 OZ0206 OZ0207 OZ0208 OZ0227 OZ0228 OZ0229 OZ0230 OZ0231 OZ0244 OZ0284 OZ0286 OZ0351 OZ0352 OZ0353 OZ0357 OZ0358 OZ0359 OZ0360 OZ0361 OZ0391 OZ0392 OZ0393...

Page 295: ...200 APPENDIX Page 10 3 E7 LUBRICATION SYSTEM 5 101 bk Page 3 Friday March 17 2006 11 05 AM...

Page 296: ...Page 10 4 200 APPENDIX E7 COOLING SYSTEM 5 101 bk Page 4 Friday March 17 2006 11 05 AM...

Page 297: ...INDEX Page 11 1 INDEX INDEX FR5 Page 1 Friday March 17 2006 11 04 AM...

Page 298: ...D ASSEMBLY TO PISTON 5 17 CONNECTING RODS SERVICE 5 5 CONVERSION FACTORS 2 21 COOLANT CONDITIONER ELEMENT 4 7 COOLANT MANIFOLD INSTALLATION 6 64 COOLANT MANIFOLD REMOVAL 4 9 CORE REPAIR 8 8 CRANKSHAFT...

Page 299: ...LT S 6 80 FASTENER SELECTION AND INSTALLATION 2 5 FASTENER SIZES AND TYPES 2 6 FASTENER TORQUE 2 5 FILTER ELEMENT INSTALLATION 8 3 FINAL PREPARATION 8 4 FITS AND LIMITS 2 14 FIRE RING GROOVE 5 27 FLYW...

Page 300: ...ICATION FINAL PREPARATION 8 4 M MAIN BEARING CAP INSTALLATION 6 20 MAIN BEARING CAP REMOVAL 4 28 METRIC MISMATCH FASTENERS 2 20 MOUNTING ENGINE IN STAND 4 3 N NOZZLE CLEANING 5 67 NOZZLE HOLDER REMOVA...

Page 301: ...IPE PLUGS 2 11 TROUBLESHOOTING 9 1 TURBOCHARGER INSTALLATION 6 72 TURBOCHARGER REMOVAL 4 11 V VALVE COVER 6 61 VALVE COVER AND RISER 4 13 VALVE GUIDES 5 30 VALVE IDENTIFICATION 5 43 VALVE LIFTER PUSH...

Page 302: ...Page 11 6 NOTES INDEX FR5 Page 6 Friday March 17 2006 11 04 AM...

Page 303: ...E7 ENGINE OVERHAUL PRINTED IN U S A ENGINE 5 101 MACK TRUCKS INC 1997...

Reviews: