background image

Programmer


Clarity 


Operator Manual 


Page 130 

21.6.2


Sort 

Clicking on the 

Sort

 tab shows the currently selected fixtures and automatically opens the 

“Sorting/Grouping:” pane. 


Clicking on one of the following buttons allows you to re-order the selected fixtures to suit the 
following criteria: 


By ID

 – by Unit ID order. 


By Name

 – Name in alphanumeric order. 


Selection order

 – by original selection order. 


Random 


in random order.


Mirror 

– in mirror order. Re-orders the current selection as first, last, second, second 

last, etcetera. 


For 

ID

Name

 and 

Selection order

, clicking the button a second time will reverse the sort 

order. 
Clicking the 

Mirror

 button again will mirror the mirror. 

Clicking the 

Random

 button again will re-randomize the sequence. 


Hint: For a quick symmetrical effect, select some fixtures in the order that they are rigged on 
stage. 

Mir

 (mirror) the selection. Set buddying to 2. Right click on an attribute control and 

select Full Fan. 

21.6.3


Subgroups 

In the 

Sort

 tab, entering a number in the 

Subgroups

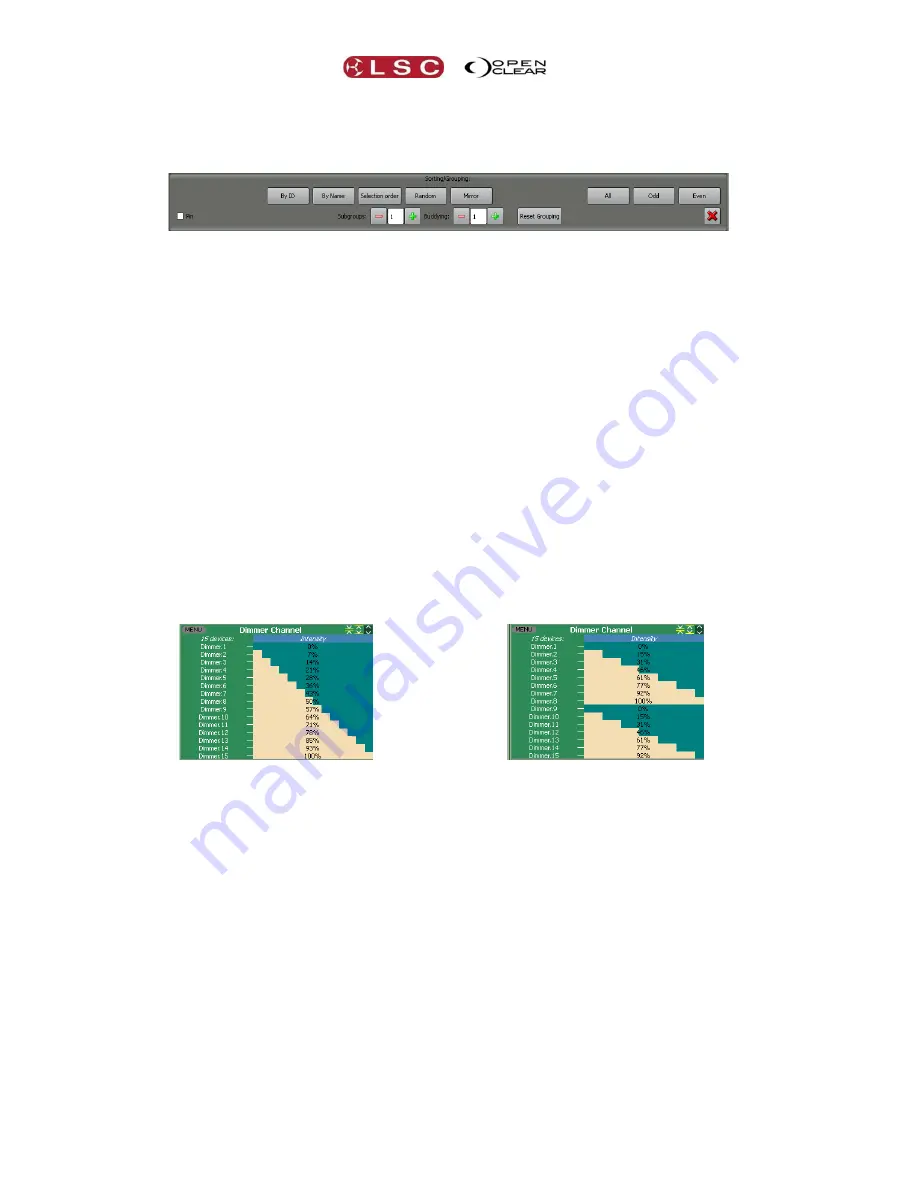
 box will split the fixture selection into 

multiple parts. These subgroup parts can be used when performing fans and applying dynamics 
(real time effects). 

See Fanning and Dynamics for more details

.  


In this example subgroups is set to 1, so 
when the intensity is fanned, the intensity 

fanning is performed across all of the fixture 
selection. 

In this example subgroups is set to 2, so 
when the intensity is fanned, the fixtures are 

split into 2 subgroups and the fanning is 
performed separately on each subgroup. 


21.6.4


Buddying 

In the 

Sort

 tab, entering a number in 

Buddying

 will group the fixture selection into buddies of 

2, 3 or 4 etc.  Buddy groups are used when performing fans and applying dynamics (real time 
effects). 

See Fanning and Dynamics for more details


Summary of Contents for CLARITY LX300

Page 1: ...00 LX900 Covering software Version 2 May 2013 Document number LX T01U A2 LSC Lighting Systems Aust Pty Ltd ABN 21 090 801 675 Building 3 66 74 Micro Circuit Dandenong South Victoria 3175 Australia Tel...

Page 2: ...cidental or consequential damages or loss whatsoever including without limitation damages for loss of profits business interruption or other pecuniary loss arising out the use or the inability to use...

Page 3: ...__ 19 3 16 1 Control Booth _____________________ 19 3 16 2 Adding a Virtual VX Wing ____________ 19 3 16 3 Selecting a Virtual VX Wing __________ 19 3 17 Adding a Cue list to a VX Wing _______ 20 3 18...

Page 4: ..._ 68 10 Customizing Clarity 69 10 1 Overview_________________________69 10 2 LX Tools _________________________69 10 3 Touch Screen Operation _____________69 10 4 Dockable Windows _________________69...

Page 5: ...0 8 2 Scaling Freesets ___________________ 116 20 9 Dynamic Presets __________________ 117 20 10 Recording a Preset or Freeset________ 117 20 11 Palette Icons _____________________ 118 20 11 1 Group I...

Page 6: ...24 8 Simple SCRIPT language Macros ____160 24 9 Learn new cue list_________________161 24 10 Bookmark _______________________162 25 Editing Cues and Cue lists 163 25 1 Overview_______________________...

Page 7: ...4 Attribute Default Values ____________ 202 39 5 Programmer Control _______________ 202 39 6 Playback Control __________________ 203 39 7 Recording and Playback Concepts ____ 203 39 7 1 Tracking Play...

Page 8: ...ed by underlining 4 Notes or Hints are displayed in italic font Copyright Notices Clarity application software is developed by OpenClear Pty Ltd www openclear com au Copyright 2009 OpenClear Pty Ltd A...

Page 9: ...tion 31 for more details 1 2 3 Page Bookmarks Page bookmarks allow instant recall of pages on all connected control surfaces LX console or VX wings See sections 8 7 10 for details 1 2 4 User Definable...

Page 10: ...ks otherwise HTP takes precedence over LTP Run lamp on macros in parallel Normally the Lamp on command is executed sequentially for each fixture to avoid overloading the rig but in some cases this is...

Page 11: ...o the About dialogue Redesigned sort controls so they pop in at the bottom of the programmer window Palette window s Remove menu item now called De activate Solo can trigger Button playbacks that have...

Page 12: ...00 There might be slight variations in the screen layout in other modes of operation The Desktop version can be configured to run in desktop mode or to emulate any of the console platforms Emulating a...

Page 13: ...nd Live Time Busking interface Unlimited Groups Presets Freesets Cues and Chases Audio playback and time code synchronization Full tracking cue lists with Macro scripts and Undo Redo of cue record del...

Page 14: ...le against loss theft or damage as LSC cannot supply a replacement in these circumstances 3 1 1 Software The Clarity software contained on the Clarity CD is also available as a download from the LSC w...

Page 15: ...rs however you may be asked to confirm their installation Installation of the Aladdin HASP SRM software can take several minutes You can check the operation as described in HASP Diagnostics below When...

Page 16: ...installed the HASP SRM Runtime possibly from a previous version of Clarity then you might see an error message telling you that the software cannot be installed This only means that the version alrea...

Page 17: ...ork See section 11 12 for details 3 7 DESKTOP ARTNET OUTPUT ArtNet is a protocol that is transmitted over Ethernet LAN Local Area Network or WAN Wide Area Network and supports up to 255 DMX Universes...

Page 18: ...status Green DMX data is OK 3 9 3 Desklamp The Desklamp socket provides 12volts power for a LED Pins 1 and 2 are ground and pin 3 is 12 Volts The brightness control is accessed by holding down Functi...

Page 19: ...the show file that is loaded For example if you load a show saved on a LX600 then Clarity will start up in LX600 emulation mode Clicking the dropdown box allows you to make a selection Selecting a con...

Page 20: ...e main window to remain at the original size it would be on the console to preserve graphical layouts and positions LX300 emulation Mode LX600 emulation Mode LX900 emulation Mode The wrapper window s...

Page 21: ...Auto If the main window size is normal 1280x1024 then the playback display is positioned at the bottom as usual If the Resizable option is enabled then the playback display is only displayed if the m...

Page 22: ...ted to hold the Function modifier or one of the wheel modifier buttons you latch it by holding it for one second Press it again to un latch it The playbacks on the LX600 and LX900 do not have dedicate...

Page 23: ...xtures and control their attributes to create record and edit looks effects cue lists and palettes 3 Control Booth and Performance provide extensive methods of playback 4 Levels shows you what is happ...

Page 24: ...the fixture name and drop it into the desired DMX slot in the Patch Field or double click the fixture name to patch it to the next available slot Enter the quantity of fixtures in the pop up Add Devi...

Page 25: ...any of its windows to control the values of fixture attributes dynamic effects and timing controls Specific Attribute Controls automatically appear when required for the fixtures or objects that you s...

Page 26: ...r The Universal controller at the bottom of the Programmer window can also be used to control the attributes of all selected fixtures These controls work with any type of fixture that has been selecte...

Page 27: ...ooth window by drag and drop onto a virtual copy of the selected wing on the Clarity screen When a wing is plugged into the computer running Clarity the real and virtual wings both operate simultaneou...

Page 28: ...layback hold Ctrl PC or Cmd Mac whilst dragging on the virtual wing 3 18 WING PLAYBACK PAGES The playbacks on the Clarity VX10 and VX20 wings can have up to 99 pages of cue lists On the VX10 wing the...

Page 29: ...10 3 18 1 Locking a Playback A playback on a VX wing can be locked so it is unaffected by page changes On the virtual wing right click on the playback and select Lock this playback The letter L is dis...

Page 30: ...The cue list name of the currently selected cue is displayed in reverse video black text on white background Master Go Plays the next cue or restarts a paused fade of the selected playback See Select...

Page 31: ...ld be at 12 5 25 and 37 5 Limiting The intensity level of each fixture is capped to the fader level For example if the fader is at 50 fixtures at 25 50 and 75 would be at 25 50 and 50 If the actual wi...

Page 32: ...to the right controls that cue lists Playback Rate If you choose 4 columns then the next playback to the right controls that cue lists FX Effects Rate If you choose 5 columns then the next playback to...

Page 33: ...Highlight Blind Clear All Release All Perform identical functions to the same buttons on the Programmer window s toolbar in the GUI Graphical User Interface See section 21 for details o The Clr All bu...

Page 34: ...ons right click on the VX20 s virtual wing display and select Toggle soft menus There is only a single row of functions and both buttons above each label will trigger the same function as shown on the...

Page 35: ...closure short circuit from its control pin to the common pin 3 24 VX20 MIDI A MIDI signal connected to a VX20 wing can be used to remotely control the playback of the selected playback that wing A pla...

Page 36: ...llowing restrictions are applied to the free mode of Clarity Limited to a single universe output of 32 fixtures and 128 channels The VX10 and VX20 wings have the front panel controls LCDs faders and b...

Page 37: ...platforms however there are small differences that are particular to each platform due to the different hardware controls of each platform The common operating system is described in detail with sepa...

Page 38: ...memory split into left and right pages Individual full color screens for each playback Four DMX512 A output connectors XLR5 DMX capacity up to 2 048 DMX slots Accepts external USB alphanumeric keyboa...

Page 39: ...ails 5 2 4 DVI Video Out An external monitor with a minimum resolution of 1280x1024 is required to operate the LX300 The monitor must be connected before switching on the console Connect the monitor o...

Page 40: ...15 9 Common To remotely operate a Go button provide a contact closure short circuit from its control pin to the common pin 5 2 10 Reset The Reset button should only be used if instructed by LSC techn...

Page 41: ...d Command centre and the Grand Master 5 4 1 LX300 Playbacks The LX300 has 15 fader playbacks and 15 button playbacks that are used for playing back cuelists Between the fader playbacks and button play...

Page 42: ...sity of all fixtures on the playback to full level The Flash button can also be used to Solo the playback See section 24 2 for details on Solo and Solo Safe Each Button playback has a Go and a II I Pa...

Page 43: ...ight pages 60 Action Buttons for Group Palette Preset Cue each with LCD touch screen for labelling and advanced control Four pages of memory Any pair of faders can be assigned into Split mode for cros...

Page 44: ...13 for details Hint When using ArtNet you can connect both Ethernets and use them as main and back up into two independent dual redundant networks The two networks can be connected into an LSC Nexus...

Page 45: ...adphone socket is located inside the keyboard drawer See section 24 7 for details on Audio playback 6 2 10 LED Desk Lamps Two 3 pin XLR connectors are provided for LED desk lamps Each connector provid...

Page 46: ...Select button above the fader A coloured contents function indicator surrounds the fader and the playback status contents is shown on the touch screen above it There are 99 pages of Playbacks availabl...

Page 47: ...ossfade motorised fader pair with 2 4 full colour LCD display Select Go and Pause Back buttons Six DMX512 A output connectors XLR5 Two DMX512 A input connectors XLR5 DMX capacity up to 8 192 DMX slots...

Page 48: ...net connectors can also be used to connect the LX900 to a network or wireless access point for remote control See section 31 for details 7 2 6 DVI Video Out Two external monitors can be connected to t...

Page 49: ...p to 6 external push buttons that act the same way as the Go buttons on the playbacks The connector is wired to accept 6 inputs in the form of contact closures The pin assignments on the 9 pin D SUB c...

Page 50: ...creen above it Each bank of 15 playbacks has 99 pages of Playbacks available split into left and right banks with an adjustable bank divider See section 8 7 for descriptions of the Playbacks There are...

Page 51: ...nce to the next cue when the in fade and out fade both reach 100 Auto loop When the cuelist reaches the last cue it will start again at the first cue Clear Clears the current cuelist from the split pl...

Page 52: ...intensity of your fixtures The DBO is a momentary action and the button lights when active or flashes if the Grand Master is set to any level below 100 The LX600 and LX900 both have motorized Grand M...

Page 53: ...wheels You can also touch the fixture unit number on the left of the screen to select that row The buttons on the right are used for trackpad operations as described below The operation of left and ri...

Page 54: ...tes being controlled The centre is fanned symmetrically about the ends Turn the wheel in the opposite direction to reverse the fan Double press Fan Centre to latch it on Press again to un latch Fan En...

Page 55: ...ox are selected When selecting fixtures every fixture or group that you select is added to the current selection This allows you to build up complex selections of fixtures Re selecting a currently sel...

Page 56: ...ur labels that show the current functions of the four encoder wheels These functions change as different modes or attribute rows are selected When you have selected a fixture s universal mode provides...

Page 57: ...you to control any unusual attributes that a fixture might have that aren t covered by the controls in Universal mode See section 14 for more details on Direct Mode 8 5 5 Expand When either Universal...

Page 58: ...res touch on the intensity bargarph and drag or use the intensity wheel See section 15 for more details on Intensity mode 8 5 8 Graphical When you have selected a fixture s graphical mode provides a v...

Page 59: ...ans of altering its fade times Times can be individually set at the bottom of the screen for the attribute groups of Intensity Position Colour and Beam or All times can be selected Attribute times can...

Page 60: ...ike any another lighting fixture See section 18 for details 8 5 12 Media Media mode allows you to control media servers that provide video and graphics playback for visual projection on video screens...

Page 61: ...entre The Command Centre has a touch screen divided into 8 virtual buttons with dynamic labels These 8 buttons are duplicated by the 8 real buttons on either side of the screen You can use either the...

Page 62: ...ion 21 8 8 Group When pressed after the Record button it records a Group Used in conjunction with a group number to select a group For example pressing Group 2 selects group 2 GoTo When followed by a...

Page 63: ...l 24 fixtures are now set to matching colours Clarity s fixture translation engine is very comprehensive and will attempt to convert all programming for all attribute types The Esc button flashes when...

Page 64: ...that they are not motorized and do not have dedicated Select buttons You select a playback by touching on its dedicated small touch screens above it 8 7 3 Playback Controls Plays the next cue II I Pau...

Page 65: ...me displayed in italics The vertical yellow line shows the division between left green bar and right blue bar pages see below 8 7 5 Assign or Clear a Playback To assign a cue list or chase to a playba...

Page 66: ...reen bar above the left section and a blue bar above the right section Pages are changed using either the virtual page buttons on the playback s touch screen or the real buttons below the playback s t...

Page 67: ...Configure Paging window above tap Re order rename pages Tapping in the Name field allows you to enter a name for each page To change the order of a page tap and drag the page to a new position in the...

Page 68: ...enerally referred to as pairs A B or C Here s how they map to the different variants of Clarity A LHS RHS B LHS RHS C LHS RHS Desktop N A N A N A LX300 Fader bottom row N A Button top row LX600 LHS RH...

Page 69: ...w perform the following functions Pressing Go or Pause steps the values up or down respectively If you hold the button it will auto repeat after a delay Holding the Flash button when pressing Go or Pa...

Page 70: ...any button of the playback to be edited See section 23 3 for details on editing a cue 8 7 17 Group Masters Playback faders can also be configured as either Inhibitive Additive Scale or Limiting group...

Page 71: ...yback has been programmed as a Group master it s Go and II I buttons now act as Group select and Group deselect buttons respectively For example pressing the button of that Group Master will select al...

Page 72: ...selecting groups another to select positions another for colours another for effects or freesets etc Hint When a cuelist containing a single cue is assigned to an Action button setting the Action butt...

Page 73: ...lect the page A B C or D then select the Palettes window or the Control Booth window Select Clear Action Button The borders around all Action button touch screens flash red Touch an Action touch scree...

Page 74: ...ctions for more details on Clearing and Releasing DBO Dead Black Out instantaneously blacks out all fixtures and dimmers This is a momentary action When the button is released all output is instantly...

Page 75: ...e list Playback of the Cues Chases etc 9 2 PATCHING Clicking on the Patch tab of the monitor reveals the patch window To patch a fixture In the Library click on the fixture manufacturers name to show...

Page 76: ...utes to set the next look To record this look as the next cue in the Cue list on the same playback press any button on that playback To record it to the cue list in memory press Append Last in the Pro...

Page 77: ...hidden and the logical position is not changed This also makes it easier to make larger changes without having to scoot the mouse because you can flick any parameter control and the value will contin...

Page 78: ...he Attribute Controls of the fixture that you are currently controlling Individual Fixture Attribute Controls Display Selector The symbols on these size buttons match those used on the All Attribute C...

Page 79: ...Keyboard shortcuts allow you to perform certain functions on Clarity by simply pressing a keyboard key or combination of keys Clarity comes with some pre programmed shortcuts but you can change the r...

Page 80: ...Clarity Operator Manual Page 72 Select a function from the list and press OK Now press your new key or combination of keys for the shortcut for this function To delete a shortcut select it by clickin...

Page 81: ...The right side shows the 512 patch slots for each internal universe as selected by the Universe tabs The Connections pane allows you to connect Clarity s internal universes to the DMX universes on th...

Page 82: ...in the first letter of the required manufacturer s name or type their name in the search field Recently patched fixtures can also be found at the top of the Library Click on a fixture name then drag a...

Page 83: ...iverse or a new empty universe will be created 11 4 CLONE FROM OTHER FIXTURE S Cloning is an advanced feature of Clarity If you are reading this manual for the first time or just want to patch some fi...

Page 84: ...ade to the current universe as selected by the tab at the top of the Patch window Additional patching commands are listed below 11 5 1 Patching Commands The patching commands are unit number slot numb...

Page 85: ...on them Selected fixtures have a black border Multiple fixtures can be selected You can select all fixtures of the same type by right clicking on any one of the type and choosing Select all of this t...

Page 86: ...other possible combination of values that achieves the same position on stage 11 9 INTENSITY FADE PROFILES Intensity Fade Profiles are the relationship or transfer characteristic between input control...

Page 87: ...dim the fixture to 50 its intensity will be 40 A Minimum value is often used with incandescent lamps to pre heat the filament This can increase lamp life by reducing the surge of current that flows th...

Page 88: ...fx and click Open 11 12 CONNECTING OUTPUT DEVICES Clarity s internal DMX universes are labelled A B C etc When patches have been made you use the Connections pane to connect these internal universes t...

Page 89: ...this 11 14 2 Editing a Fixtures Name or Number Select a single fixture and right click on it and then select Properties In the dialog box that opens you can alter its unit number and name Fixture unit...

Page 90: ...views can be created using the toolbar at the top Each view can be configured with various options Icon style detailed separate areas for intensity position and gobo colour or combined Whether or not...

Page 91: ...he menu that appears You can align them to the top to the left snap them to a grid of either 5 10 20 or 50 pixels The Arrange selected option opens the Arrange Items dialogue box which allows you to a...

Page 92: ...ht show a plan of the stage with the stage fixtures positioned on the lighting battens A FOH View might show a plan of the auditorium with of the Front Of House fixtures in their positions around the...

Page 93: ...nd image over which your fixtures will be displayed Click on the button and navigate to your image The Background zoom controls allow you to scale your image to suite you screen size on the rig view T...

Page 94: ...ich you select the fixtures is used for certain effects such as fans and dynamics and can be also utilized by the Programmers sort function Your fixture selection including its order can be saved to a...

Page 95: ...does not exist on any of the selected fixtures then that attribute control is still visible but disabled 13 2 UNIVERSAL MODE PAGES Universal controls are arranged in 4 main pages that are selected by...

Page 96: ...tion 1 Animation Wheel 2 Animation 2 Beam Framing Frame Depth 1 Zoom Frost Iris Frame Depth 2 Animation 1 Animation Wheel 2 Animation 2 Frame 1A Frame 1B Frame 3A Frame 3A Frame 2A Frame 2B Frame 4A F...

Page 97: ...oth attributes to the appropriate values This is different to Universal mode where you only need to set a single control and Clarity sends the appropriate values to both attributes Direct mode also al...

Page 98: ...nd button to display the colour code Select channels by clicking on them A range of channels can be selected by touching and dragging on the unit numbers The intensity level of the selected fixtures c...

Page 99: ...preference is not essential for Channel Control mode but it aids its operation because it shows the unit number of the selected fixtures name in the programmer attributes tab The unit number is used w...

Page 100: ...ither Halt The cue is manually played by its GO button Follow The cue is automatically played after the previous cue finishes In the Control Booth select the cue then click on Halt to reveal the drop...

Page 101: ...ty Position Colour or Beam You can select them individually or they are multi selectable by holding Function when you select Attribute groups can be further filtered to individual attributes by select...

Page 102: ...lines in the Timing Control As you move over each time box the cursor changes to indicate how the timing will be affected if you drag in each section Touching or clicking and dragging in one the rele...

Page 103: ...6 7 FILTERING TIMES Every attribute of every fixture can have its own individual set of times It is common practice to set different times for different attribute groups For example When a cue is play...

Page 104: ...ing Control to change the time will lock in the timing The right Timing Control now only controls ICB and the left Timing Control has taken control of P Position timing You can now set the Position ti...

Page 105: ...s 16 9 RECORDING TIMES The times that you set are included when you record a cue See Record in section 23 for details 16 10 RESET TIMING To reset the times for all attributes to the default values of...

Page 106: ...t fixture in the selection All of the other selected fixtures gets an intermediate value that is graduated between the start and end values IPCB Choose either Common or Separate IPCB This determines w...

Page 107: ...New The Add New Effect dialog box appears The Channel Sets pane on the left provides quick access to some predefined attribute combinations Touch on a channel set to select it The channel set selected...

Page 108: ...can have its own phase offset from the others The 25 and 25 buttons provide rapid phase shift alterations For example if a sine wave is used to modulate Pan and Tilt selecting only the Pan and setting...

Page 109: ...with Amplitude so that the centre value is modulated with an amount controlled by the amplitude Ranged uses the Top and Bottom values together with Amplitude so that the attribute moves between the to...

Page 110: ...ync is useful if different waveforms are being used and you have adjusted the rate of one of them causing it to get out of sync If you then set it back to the original rate it will possibly still be o...

Page 111: ...ou can add Pixel Sources to a Pixel Matrix by clicking New Source Media Each Pixel Source can contain one or more media files You can add media to each Pixel Source by selecting that Pixel Source and...

Page 112: ...in monochrome When multiple fixtures are selected and dragged onto the matrix the Assign multiple fixtures to matrix dialog will appear and allow you to specify in what order you would like the select...

Page 113: ...e playback Click and drag anywhere within each slider box to vary the setting Source Area Adjusts the size of the source area window allowing you to select all or only some of the source image Source...

Page 114: ...other movement on the LED with higher values but at the expense of some computer processing speed This is automatically set to an appropriate value when the matrix size is set Reset sets all source im...

Page 115: ...lick Activate the relevant channels of the actual LED fixtures that make up your matrix are grabbed into the current programmer session so they can be recorded to the desired cue The transformed image...

Page 116: ...d Note The background calculation is only performed one level deep it is not possible to cascade backgrounds through more that one level 18 15 PIXELSOURCE TRANSITIONS You can transition between differ...

Page 117: ...tails 18 17 RECORDING MATRIX SETTINGS Matrix Settings are recorded as a cue in a cue list just like recording cues for regular lighting fixtures The values that you set are grabbed in the current prog...

Page 118: ...uration including their number of available layers and patch status Once thumbnails are downloaded they are saved to a cache file so that they are available for off line programming without the physic...

Page 119: ...2 Controls The Controls tab shows all of the attributes of the selected layer including the media selection and Level attributes controlled from the Browser tab Media Server Controls tab Click on a la...

Page 120: ...on the red Record button See section 23 Record for details 19 7 SUPPORTED MEDIA SERVERS Clarity currently supports the open standard CITP MSEX protocol as well as the Hippotizer HMAP protocol for thu...

Page 121: ...and also on the on the encoder wheel touch screen s Palettes mode Both displays show the same palettes but they vary slightly in their presentation and features The displays can be viewed in the foll...

Page 122: ...e all presets favourites and groups become inactive This allows you to re arrange and organize the individual presets or group icons by dragging and dropping them without activating them To re activat...

Page 123: ...cus values When a preset is applied to selected fixtures they will change to the attribute values recorded in that preset If a cue is then recorded a reference to the preset is included in the cue not...

Page 124: ...attribute groups Record a blue Freeset and apply it to any fixture that has colour ability and it will output blue Record a chase Freeset and apply it to any type and quantity of fixtures and they wi...

Page 125: ...reen it is included A name for the preset can be entered in the name box Note that Intensity is excluded by default unless you are recording an intensity only preset Selected Fixtures only When this c...

Page 126: ...eset and its number free indicates a freeset otherwise it is a preset The bottom right shows the attribute group s contained in the preset or freeset I Intensity P Position C Colour and B Beam If the...

Page 127: ...played back 20 12 APPLYING PRESETS AND FREESETS Preset and freeset can be applied from the Palettes Programmer or Performance windows or directly by keyboard command See section 25 Performance Window...

Page 128: ...ode In the Palettes window Build allows you to select combinations of groups preset freesets with individual live timing as described below and then trigger them all in one go When you click Build a c...

Page 129: ...the dialog will close once a Preset or Freeset is triggered You can keep it open by ticking the Keep open when undocked checkbox You can also keep it open by docking it on the left or right edge of th...

Page 130: ...Palettes window allow you to activate only the selected IPCB aspect of the effect When an IPCB button is green the dynamic will be applied to that attribute group Click either I P C or B to select onl...

Page 131: ...a value click the up and down arrows or move the spin box roller which provides smooth variable control Just click then drag with the mouse to activate a virtual spin roller wheel that adjusts the bo...

Page 132: ...en Universal and Direct and on the Programmer tab If you adjust the attributes and want to update the preset to use these new values then either Right click on the preset and select Update item Press...

Page 133: ...Clarity Palettes Operator Manual Page 125 Click Update and the changes will be tracked back to the preset See section 21 8 8 Update in the Programmer for more details...

Page 134: ...t you want to control Attributes Timing or Favorites When the Attributes tab is selected the Attribute Controls that appear for the selected fixtures allow all attributes of those fixtures to be contr...

Page 135: ...by clicking on the first fixture then using Shift clicking to select the last fixture in the range Ctrl A selects all fixtures in the current tab 21 4 1 Selection phase vs Programming phase When sele...

Page 136: ...he Attribute Control Quick Menus These menus provide rapid access to common settings Each individual Attribute Control has its own specific quick menu offering functions relevant to that attribute For...

Page 137: ...when combined with the Highlight function See Highlight in the Programmer Toolbar later in this section for details Pressing All will restore control to all selected fixtures Hint You can also use the...

Page 138: ...fixtures in the order that they are rigged on stage Mir mirror the selection Set buddying to 2 Right click on an attribute control and select Full Fan 21 6 3 Subgroups In the Sort tab entering a numb...

Page 139: ...uration of these commands can be set in the user preferences 21 6 6 Intensity and Colour Icons Each fixture has an icon showing its current intensity and colour at the output The icon s area varies fr...

Page 140: ...ity over all other controls except for the GM Grand Master DBO Dead Black Out and Highlight buttons you can set the priority of cue lists to be higher than the programmer in the Configure playbacks di...

Page 141: ...ng Clear All a second time clears the fixture selection 21 7 4 Clearing a Fixture from a Programmer To clear a fixture from a programmer in the programmers Attribute tab click the Menu button beside t...

Page 142: ...n click Reset then Go Click Close to finish If the new look or the timing is not satisfactory adjust the attributes or timing then preview the move again See section 16 Timing for more details If the...

Page 143: ...r cue list deselect its tick box Each cue list has a Trackback option ticked by default This means that if this is a tracking cue list Clarity will if necessary trackback through the cues and update t...

Page 144: ...ht on or off Use cursor up or down arrows to select individual fixtures within your selection You can also load the current highlight lowlight values into the programmer by clicking either the Menu Bu...

Page 145: ...Command Line Programming for more details 21 9 6 Grab DMX Grab DMX opens a dialog box allowing you to grab DMX values from an external universe and apply them to the selected fixtures in Clarity s cur...

Page 146: ...elect an available DMX input At the time of writing only ArtNet input is supported In the Clarity universes pane on the right select the Clarity universe to which the input DMX is to be applied In the...

Page 147: ...an drag to vary pan and tilt In the Colour box you can drag to vary the colour If the fixture only has limited colour selections not full colour mixing available these will be indicated by small dotte...

Page 148: ...for all selected fixtures of the same type For example 21 13 3 Attribute Control Size The Attribute Controls can be re sized to allow you to trade off between screen area and detail by clicking eithe...

Page 149: ...a vertical bar with three nubs appears on each Attribute Control Whilst holding Ctrl move the mouse cursor over the top or bottom nub it changes to a double headed arrow then click and drag whilst ho...

Page 150: ...21 14 3 Fanning in the Universal Control Panel Selected fixtures can also have their attributes fanned by holding Ctrl and dragging in the Universal Control Panel Universal Control Panel showing Inte...

Page 151: ...gh 19 The order of number entry is respected so that 5 Thru 1 6 Thru 10 Enter will get a fixture selection order of 5 4 3 2 1 6 7 8 9 10 If you omit the end of the range then Clarity defaults to the h...

Page 152: ...ad entry uses the fixture unit number to select fixtures The unit number is allocated in the patch and shown beside each fixture in the programmer s Selection sidebar The attributes tab shows the fixt...

Page 153: ...that you have created for Matrices LED arrays or Media Servers Times Dynamics Matrices and Media Servers are all described in their relevant sections 23 2 RECORDING A CUE There are many options to con...

Page 154: ...fter the previous cue finishes Delay Time The time from when the cue starts until the selected attribute s begin to change The default delay time is 0 seconds Fade Time The time taken for the attribut...

Page 155: ...n the settings of 4 Radio Buttons listed below It doesn t matter if the fixtures are still selected in the current programmer session or not However by placing a tick in the check box you can further...

Page 156: ...orded values will clear the programmer every time that a new cue is recorded When cues are to be played back in tracking mode clearing the programmer after every recording can give unexpected results...

Page 157: ...st has had any of its cues edited then the cue list name turns yellow and so does the name of the individual cue s that have been edited When finished editing either right click on the cue list and se...

Page 158: ...ually hidden You can drag this column into view to see the contents of a cue Clicking on a cue list in the first column shows the cues of that cue list in the second column Clicking on a cue in the se...

Page 159: ...00 because it has no new value in cue 2 Fixture 2 levels have tracked through A random jump in Tracking mode from one cue to a later cue will collect all the intervening value changes so that the dest...

Page 160: ...to the third and then 100 to the fourth Release fade out time Default time 2 seconds This the time taken for the Cue list to fade out when released from a Playback The Activate and Release settings c...

Page 161: ...all of its channels fixture attributes have been overridden by another playback Ignore release all The cue list is not released by the Release All button Ignore grand master The cue will not be affec...

Page 162: ...chase snaps from step to step When set to any other value the chase Xfades Cross fades from step to step The duration of the Xfade is a percentage of the step time For example BPM 60 1 step per sec X...

Page 163: ...nsity of the fixtures in the cue list The Mnl Manual fader controls the overall level of all attribute values in the cue list It is normally set at full but can be used to manually fade the entire cue...

Page 164: ...and select Add to folder to move the selected cue list s into a new or existing folder If the selected lists are already in a folder you can also remove them this way Alternatively if there is an exi...

Page 165: ...s hard values for all attributes of all fixtures in the cue list Blocking all fixtures The cue contains hard values for all attributes of all patched fixtures 24 4 3 Copy Full State If you have a cue...

Page 166: ...30 30 30 30 15 24 6 MARK CUES MOVE IN BLACK To insert a Mark cue in a cue list right click on the cue that needs the mark cue to precede it and select Insert mark cue A Mark cue is a special type of...

Page 167: ...rom elsewhere audio files images movies rig backgrounds Clarity automatically adds it to the Clarity media folder See section 29 for more details Each audio file that is added is automatically given a...

Page 168: ...etcetera as if it was a normal fixture It has two parameters Audio Volume Media Run Stop You can create cues using these attributes and record them in cuelists 24 8 SIMPLE SCRIPT LANGUAGE MACROS Scrip...

Page 169: ...latest LTP priority Multiple instructions can be included in the one script by separating them with a semi colon For example play audio 2 go band When the cue containing this script is played it will...

Page 170: ...manually played them If your original playback timing was not correct you can select any cue in the master cue list and edit the timing to suit 24 10 BOOKMARK Bookmark allows you to record a page book...

Page 171: ...Edit Cue Editing a cue or a cue list will load the cue list into a new edit session at the bottom of the programmer window and pre select the relevant cue in the list Clicking Auto Select will automa...

Page 172: ...is will move the cue with respect to its predecessor as shown on the timeline If Ripple is selected then when a cue is dragged all following cues up to the next halt will also move by the same amount...

Page 173: ...e to track into later cues in the cue list This is achieved by changing the status of the required channels to cue only When a cue containing cue only channels is played back in tracking mode the cue...

Page 174: ...n the cue and select Block cue All Block cues in a cue list can be unblocked When you unblock a cue list Clarity compares each cue to the cue that preceded it and removes any duplicated values Therefo...

Page 175: ...ilst another row might contain different colours for the same fixtures Unlimited rows and columns with copy drag and drop allow you to create extremely versatile playback variations Clicking in a play...

Page 176: ...he real power and creative potential of the performance window comes from the arrangement of Row Masters and the ability to quickly adapt and re use existing cue lists without duplicating them When an...

Page 177: ...ted row see below To move a row click and drag the left cell of the row Dropping a cue list anywhere in the bottom row of the grid will automatically add a new row 26 5 1 Copying Active Cells to a Com...

Page 178: ...iggered on the second beat of the bar then the cell will trigger immediately but will jump forward to the point that corresponds to the second beat as if it had been triggered at the start of the bar...

Page 179: ...d then select Pan only Restrict when enabled allows you to restrict playback to a specified group of fixtures Clicking the drop down arrow allows you to select any fixture group so that playback will...

Page 180: ...ction with the cell s Trigger options Immediate Next Boundary or Immediate Adjusted to synchronize stepping of multiple cells For example if quantize is set to 1 bar then the next boundary is when the...

Page 181: ...any cue list 27 2 DMX VALUES The DMX tab at the top left allows you to select any of Clarity s DMX Universes via the drop down box and to view the levels in Percent Decimal or in Hexadecimal 27 3 OUTP...

Page 182: ...k box to automatically see the contents of the active cue in the selected cue list 27 6 CUSTOMIZING THE DISPLAY Clicking the icons in the top right corner of each type of fixture type allows a trade o...

Page 183: ...ty view on the Intensity Levels tool bar click Settings or right click on a view and click Configure The options for each view are View Mode If you are configuring a new window you can set it to displ...

Page 184: ...rce Cue Graphical Level The font size can also be set 28 3 CONSOLE VIEW The Console view in the Intensity Levels window shows all intensity levels on the output of the console The channel displays can...

Page 185: ...ackground images Media servers thumbnail cache Extracted fixture personalities The extracted fixture personalities will generate a standalone fixture library sfl file that contains just the personalit...

Page 186: ...r When you import the show back on the original machine you will end up with a copy in the Clarity media folder as well as the original file but the show will now be referencing the Clarity media fold...

Page 187: ...that will be triggered by the next Note on message to be received that is assigned to the Jump function 30 2 1 MIDI Settings To enable and setup Simple MIDI select Show Settings MIDI The Simple MIDI...

Page 188: ...rmines the resolution of the values it receives If the Display jump cue popup hint is ticked then when a Control change message is received a popup hint box will appear showing the cue list name and t...

Page 189: ...d When finished click Learn to de select it If necessary you can edit any of the events and their times as described below 30 3 2 Manual Entry of Events To create a new Playlist click on the symbol in...

Page 190: ...enabled for it to recede When Recede is enabled default events will follow the absolute value of the MIDI Timecode in both directions of time If the Timecode jumps back in time the events will follow...

Page 191: ...red Timecode format from the drop down box 24 Frames For film projection rate 25 Frames For PAL video rate 30 Frames non drop Non drop Timecode for NTSC video rate 30 Frames drop frame Drop frame Time...

Page 192: ...ditor to your iPhone On your computer in the TouchOSC editor press Sync On your iPhone run the TouchOSC app and from the Layout page select Add On the Add Layout page you should see your computers nam...

Page 193: ...k Enable OSC server Setup the Outgoing port to match the Incoming port on the iPhone Setup the Incoming port to match Outgoing the port on the iPhone New Clients This can be set to either Reject Ask o...

Page 194: ...ues See section 24 8 for information on the script field When the cue containing the script is played the message is sent to the device For example The script osc 192 168 1 7 audio volume 50 sends the...

Page 195: ...te and time for the action to occur The action can be repeated by ticking the Repeat box and selecting how often the action will repeat The drop down box allows you to choose from seconds minutes hour...

Page 196: ...interruption to the operation of Clarity This allows you to choose an appropriate moment that does not affect your show 33 2 SETTING UP TRACKING BACKUP Both master and slave must exist on the same net...

Page 197: ...tems listed above are automatically tracked by the slave show which is also automatically saved whenever the master show is saved As mentioned above anything that modifies the master show that is not...

Page 198: ...ces and new cue list defaults in the show file are loaded When a NEW show is loaded If Store Preferences Globally is ticked the user preferences as set in the dialog box and the new cue list defaults...

Page 199: ...ple cue lists are being edited at the same time you can automatically switch the programmer to any playbacks edit session by selecting that playback Press Select and then press any of the required pla...

Page 200: ...lash to adjust the value then if you reach the fader end stop hold flash to reposition the fader Enable logging to file Default un ticked When ticked many of Clarity s actions are logged to a file cal...

Page 201: ...mmand that is sent when using the Ctrl button on the Programmers Selection window Number of audio streams Default 16 The maximum number of audio streams that can be running at one time HTP override pr...

Page 202: ...larity Operator Manual Page 194 34 2 ABOUT CLARITY Selecting Show About LSC Clarity displays the About LSC Clarity dialog box Here you can find information about your version of the Clarity software V...

Page 203: ...Fine at the same time To start LX Tools from the keyboard press Ctrl Alt L at the same time The LX Tools utility appears on the encoder wheel touch screen There are two pages of options Press More to...

Page 204: ...re Upgrade 35 2 3 Help The LX Tools Help button pprovides a copy of this manual and video tutorials 35 2 4 Configure Monitors The LX Tools Configure Monitors button allows you to optimise the displays...

Page 205: ...197 35 2 6 Networking The LX Tools Networking button allows you to setup the network connection of the two Ethernet ports See also section 37 for details on how to allow LSC to connect to your console...

Page 206: ...ks 35 2 9 Diagnostics The LX Tools Diagnostics should only be run when instructed by LSC technical support It requires a password 35 2 10 System Information The LX Tools System Information button prov...

Page 207: ...for the LX consoles in one package The downloaded file can be used to update an LX300 LX600 or LX900 console Before carrying out an update Don t attempt an update if your show is about to start Do mak...

Page 208: ...led on LX consoles To use this facility Connect a network cable from your network with internet access to the console s Ethernet 2 connector Start LX Tools by pressing Function Fine Fine at the same t...

Page 209: ...details of the fixture including the brand model version number operating modes and a DMX chart or list Submit your request including this information at http www lsclighting com help centre clarity...

Page 210: ...an attribute When multiple sources are attempting to control an attribute Clarity uses a priority system to determine which source has control A higher priority source will override a lower priority o...

Page 211: ...pear on the output of the playback When the next cue is played back its recorded values appear and any values from previous cues that were not changed by this latest cue will remain on the output of t...

Page 212: ...ssarily give you a what you see is what you get result The cues that you record only contain changes and not the entire look For example the look on stage when you record a cue might not be coming ent...

Page 213: ...ues in that cue Note Cue Only playback should not be confused with Cue Only recording A cue that is recorded as Cue only is intended to be used as a one off cue in a cue list set for tracking playback...

Page 214: ...cludes all grabbed values in the current programmer session the entire look in the programmer When this cue is played back in a cue list set for cue only playback the values in this cue will totally r...

Page 215: ...is often recorded part way through a tracking cue list at the end of a theatrical scene or the end of a musical item so that subsequent edits to earlier cues will not track through into the next scen...

Page 216: ...set This address is set to the first slot number to which the equipment is to respond The end of the DMX line is terminated 120 to prevent the signal reflecting back up the line and causing possible e...

Page 217: ...and how many hours since the lamp was last changed But RDM can do more than that It isn t limited to just reporting back it can change things as well As its name suggests it can remotely manage your d...

Page 218: ...ts then you can do this by Recording a Cue list with the channels you want set at 100 intensity Set the Priority of the Cue list to be higher than the programmer use 150 Set the Ignore Release All box...

Page 219: ...is records a snapshot of the lights on stage just like a maXim does complete with the proportional levels 40 9 PROGRAMMER OVERRIDE If you are not familiar with a Programmer type of lighting controller...

Page 220: ...ately cue you follow spot operators Record your voice with the cue as an audio file then load it onto Clarity Then for each upcoming follow spot cue place a script command in the cue list and Clarity...

Page 221: ...pattern every 2 3 4 or more fixtures Even more creativity can be quickly achieved with the combinations of these controls as well as the Odd Even selection buttons 40 17 UNIVERSAL CONTROL One of the...

Page 222: ...t is ideal for parking some work lights Just switch to the next programmer adjust the Pan Tilt and intensity then switch back to the default programmer The lights will stay where they are and any cues...

Page 223: ...ure s 75 Colour Presets 114 Command Line Programming 143 Common 141 Compact 70 140 Console Emulation 13 Control Booth 150 Copy 55 137 213 Copy Full State 157 Copying and Merging Cues 156 Ctrl Tab 131...

Page 224: ...s 195 Wing Desklamps 28 Intensity Fade Out times 92 Intensity Fade Profiles 78 Intensity Levels 175 Inverting Swapping Attributes 77 IPhone 184 Jump 155 Keyboard 198 Keyboard Shortcuts 71 Keypad and C...

Page 225: ...ter 62 Scaling 116 Scheduler 187 Selected Fixtures only 147 Selecting Fixtures 127 Selection Order 128 Session Control 132 Setting Times 94 Shortcuts 71 Show Files and Packages 177 Simple Cue Playback...

Page 226: ...not cause harmful interference and 2 This device must accept any interference received including interference that may cause undesired operation This equipment has been tested and found to comply wit...

Reviews: