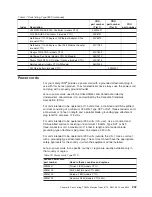
Table 22. Server configurations and applications for configuring and managing RAID
arrays (continued)
Server configuration
RAID array configuration
(before operating system is
installed)
RAID array management
(after operating system is
installed)
ServeRAID-MR10i SAS/SATA
Controller (LSI 1078)
installed
MegaRAID BIOS
Configuration Utility (press C
to start)
Using the Setup Utility
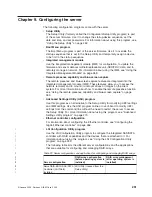
Use the Setup Utility, formerly called the Configuration/Setup Utility program, to
perform the following tasks:
v
View configuration information
v
View and change assignments for devices and I/O ports
v
Set the date and time
v
Set the startup characteristics of the server and the order of startup devices
v
Set and change settings for advanced hardware features
v
View, set, and change settings for power-management features
v
View and clear error logs
v
Resolve configuration conflicts
Starting the Setup Utility
To start the Setup Utility, do the following:
1. Turn on the server.
Note:
Approximately 3 minutes after the server is connected to ac power, the
power-control button becomes active.
2. When the prompt
<F1> Setup
is displayed, press F1. If you have set an
administrator password, you must type the administrator password to access the
full Setup Utility menu. If you do not type the administrator password, a limited
Setup Utility menu is available.
3. Select the settings to view or change.
Setup Utility menu choices
The following choices are on the Setup Utility main menu. Depending on the
version of the firmware, some menu choices might differ slightly from these
descriptions.
v
System Information
Select this choice to view information about the server. When you make changes
through other choices in the Setup Utility, some of those changes are reflected in
the system information; you cannot change settings directly in the system
information.
This choice is on the full Setup Utility menu only.
–
System Summary
Select this choice to view configuration information, including the ID, speed,
and cache size of the microprocessors, machine type and model of the server,
the serial number, the system UUID, and the amount of installed memory.
When you make configuration changes through other choices in the Setup
252
ThinkServer TD200x Types 3719, 3821, 3822, and 3823: Hardware Maintenance Manual
|
|
|
|
|
|
|
|
|
|
|
|
|
|
|
|
|
|
Summary of Contents for THINKSERVER 3719
Page 1: ...ThinkServer TD200x Machine Types 3719 3821 3822 and 3823 Hardware Maintenance Manual ...
Page 2: ......
Page 3: ...ThinkServer TD200x Types 3719 3821 3822 and 3823 Hardware Maintenance Manual ...
Page 12: ...4 ThinkServer TD200x Types 3719 3821 3822 and 3823 Hardware Maintenance Manual ...
Page 22: ...14 ThinkServer TD200x Types 3719 3821 3822 and 3823 Hardware Maintenance Manual ...
Page 28: ...20 ThinkServer TD200x Types 3719 3821 3822 and 3823 Hardware Maintenance Manual ...
Page 34: ...26 ThinkServer TD200x Types 3719 3821 3822 and 3823 Hardware Maintenance Manual ...
Page 244: ...236 ThinkServer TD200x Types 3719 3821 3822 and 3823 Hardware Maintenance Manual ...
Page 258: ...250 ThinkServer TD200x Types 3719 3821 3822 and 3823 Hardware Maintenance Manual ...
Page 282: ...274 ThinkServer TD200x Types 3719 3821 3822 and 3823 Hardware Maintenance Manual ...
Page 286: ...278 ThinkServer TD200x Types 3719 3821 3822 and 3823 Hardware Maintenance Manual ...
Page 296: ...288 ThinkServer TD200x Types 3719 3821 3822 and 3823 Hardware Maintenance Manual ...
Page 303: ......
Page 304: ...Part Number XXXXXX Printed in USA 1P P N XXXXXX ...

