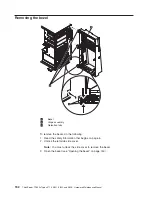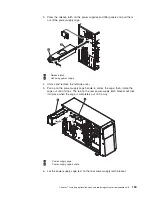
2. Carefully rotate the power-supply cage into the server chassis. The locating tabs
on the power-supply cage must fit over the corresponding tabs on the front latch
bracket.
1
Power-supply cage handle
2
Power-supply cage
3
Power-supply cage front latch bracket
4
Locating tabs
5
Notch
6
Locating tabs
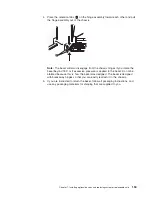
3. Rotate the power-supply cage handle down until the handle tip engages the
notch in the front latch bracket; then, lower the handle until it locks in place
(power supply cage closed
1
).
Chapter 7. Installing optional devices and replacing customer replaceable units
161
Summary of Contents for THINKSERVER 3719
Page 1: ...ThinkServer TD200x Machine Types 3719 3821 3822 and 3823 Hardware Maintenance Manual ...
Page 2: ......
Page 3: ...ThinkServer TD200x Types 3719 3821 3822 and 3823 Hardware Maintenance Manual ...
Page 12: ...4 ThinkServer TD200x Types 3719 3821 3822 and 3823 Hardware Maintenance Manual ...
Page 22: ...14 ThinkServer TD200x Types 3719 3821 3822 and 3823 Hardware Maintenance Manual ...
Page 28: ...20 ThinkServer TD200x Types 3719 3821 3822 and 3823 Hardware Maintenance Manual ...
Page 34: ...26 ThinkServer TD200x Types 3719 3821 3822 and 3823 Hardware Maintenance Manual ...
Page 244: ...236 ThinkServer TD200x Types 3719 3821 3822 and 3823 Hardware Maintenance Manual ...
Page 258: ...250 ThinkServer TD200x Types 3719 3821 3822 and 3823 Hardware Maintenance Manual ...
Page 282: ...274 ThinkServer TD200x Types 3719 3821 3822 and 3823 Hardware Maintenance Manual ...
Page 286: ...278 ThinkServer TD200x Types 3719 3821 3822 and 3823 Hardware Maintenance Manual ...
Page 296: ...288 ThinkServer TD200x Types 3719 3821 3822 and 3823 Hardware Maintenance Manual ...
Page 303: ......
Page 304: ...Part Number XXXXXX Printed in USA 1P P N XXXXXX ...


