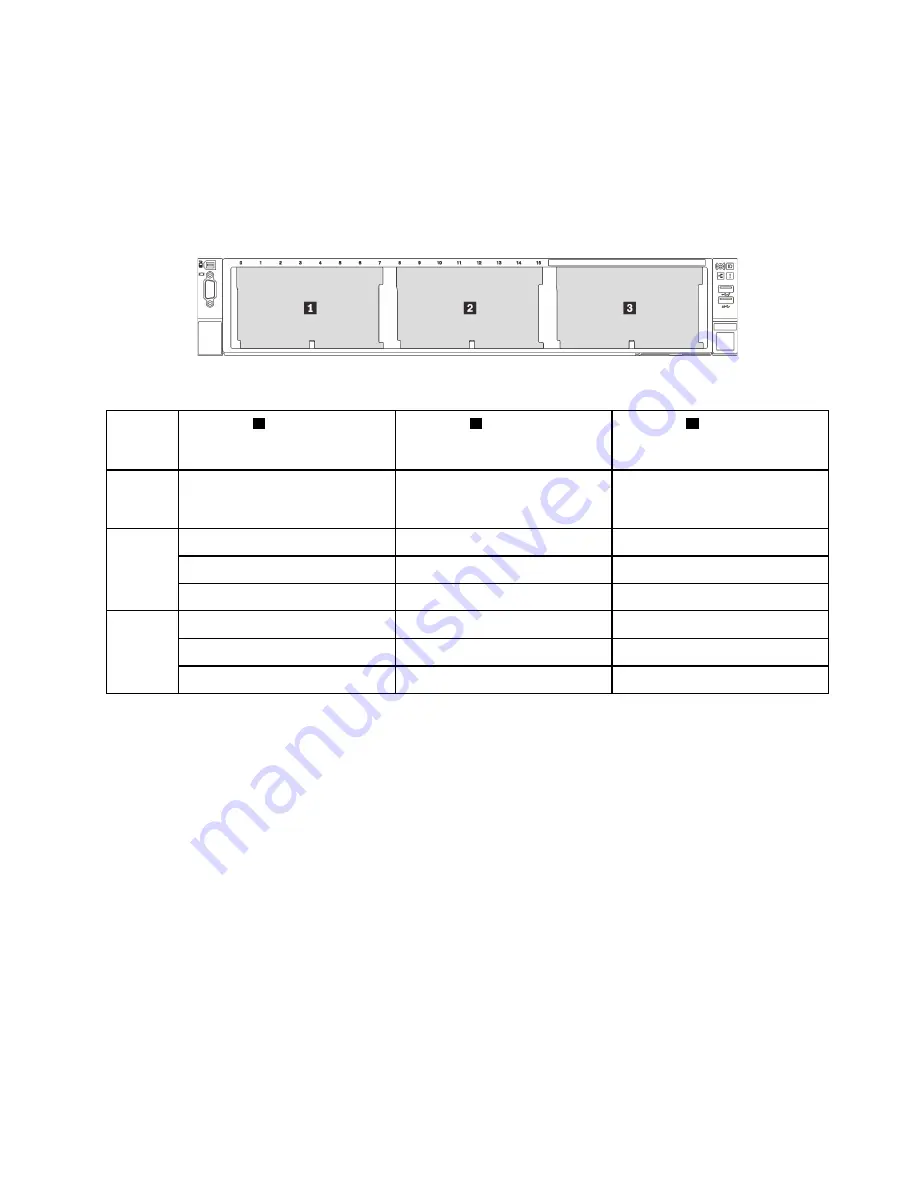
The server supports up to three 2.5-inch drive backplanes of below types. Depending on the backplane type
and quantity, the installation location of the backplanes varies.
• 2.5-inch SAS/SATA 8-bay backplane
• 2.5-inch Anybay 8-bay backplane
The following table lists the supported backplane combinations. Install the backplane according to your
server configuration.
Figure 33. Drive backplane numbering
Back-
plane
quantity
Backplane
1
Backplane
2
Backplane
3
1
• SAS/SATA 8-bay
• AnyBay 8-bay
2
SAS/SATA 8-bay
SAS/SATA 8-bay
SAS/SATA 8-bay
AnyBay 8-bay
AnyBay 8-bay
AnyBay 8-bay
3
SAS/SATA 8-bay
SAS/SATA 8-bay
SAS/SATA 8-bay
SAS/SATA 8-bay
SAS/SATA 8-bay
AnyBay 8-bay
SAS/SATA 8-bay
AnyBay 8-bay
AnyBay 8-bay
Attention:
• Read “Installation Guidelines” on page 25 to ensure that you work safely.
• Power off the server and disconnect all power cords for this task.
• Prevent exposure to static electricity, which might lead to system halt and loss of data, by keeping static-
sensitive components in their static-protective packages until installation, and handling these devices with
an electrostatic-discharge wrist strap or other grounding system.
Procedure
Step 1. Touch the static-protective package that contains the new backplane to any unpainted surface on
the outside of the server. Then, take the new backplane out of the package and place it on a static-
protective surface.
Step 2. Connect the cables to the backplane.
.
Hardware replacement procedures
55
Summary of Contents for HR650X V2
Page 1: ...HR650X V2 User Guide Machine Types 7D4D ...
Page 8: ......
Page 14: ...6 HR650X V2 User Guide ...
Page 30: ...22 HR650X V2 User Guide ...
Page 122: ...114 HR650X V2 User Guide ...
Page 152: ...144 HR650X V2 User Guide ...
Page 176: ...168 HR650X V2 User Guide ...
Page 182: ...174 HR650X V2 User Guide ...
Page 186: ...178 HR650X V2 User Guide ...
Page 190: ...182 HR650X V2 User Guide ...
Page 191: ......
Page 192: ......


