background image

Processor identification label

11 

Processor ejector handle

Nut and wire bail retainer

12 

Processor heat spreader

Torx T30 nut

13 

Thermal grease

Anti-tilt wire bail

14 

Processor contacts

Processor carrier

15 

Processor triangular mark

Clips to secure carrier to heat sink

Procedure

Step 1.  If you are replacing a processor and reusing the heat sink. 

a.  Remove the processor identification label from the heat sink and replace it with the new label 

that comes with the replacement processor.

b.  If there is any old thermal grease on the heat sink, wipe the thermal grease from the bottom of 

the heat sink with an alcohol cleaning pad.

Step 2.  If you are replacing a heat sink and reusing the processor. 

a.  Remove the processor identification label from the old heat sink and place it on the new heat 

sink in the same location. The label is on the side of the heat sink closest to the triangular 
alignment mark. 

Note:

If you are unable to remove the label and place it on the new heat sink, or if the label is 

damaged during transfer, write the processor serial number from the processor identification 
label on the new heat sink in the same location as the label would be placed using a permanent 
marker.

b.  Install processor in new carrier. 

Note:

Replacement heat sinks come with both gray and black processor carriers. Make sure 

to use the carrier with the same color as the one you discarded earlier.

Figure 69. Installing a processor carrier

1.  Make sure the handle on the carrier is in the closed position.

Chapter 4

.

Hardware replacement procedures

105

Summary of Contents for HR650X V2

Page 1: ...HR650X V2 User Guide Machine Types 7D4D ...

Page 2: ...n addition be sure that you are familiar with the terms and conditions of the Lenovo warranty for your server which can be found at http datacentersupport lenovo com warrantylookup First Edition June 2021 Copyright Lenovo 2021 LIMITED AND RESTRICTED RIGHTS NOTICE If data or software is delivered pursuant to a General Services Administration GSA contract use reproduction or disclosure is subject to...

Page 3: ...ch drive backplane 53 Install the front 2 5 inch drive backplane 54 Remove the front 3 5 inch drive backplane 57 Install the front 3 5 inch drive backplane 58 Rear 2 5 inch drive backplane and drive cage replacement 59 Remove the rear 2 5 inch drive cage 60 Remove the rear 2 5 inch drive backplane 61 Install the rear 2 5 inch drive backplane 62 Install the rear 2 5 inch drive cage 62 Rear 3 5 inch...

Page 4: ...og 135 BMC user settings 136 Security 136 Supervisor password 138 User password 138 Password rule and policy 139 Lenovo security 140 Secure boot 140 Secure flash update 140 Boot 140 Exit 142 Chapter 6 BMC Setup 145 Features of the Remote Management Module 145 Configuration of the Remote Management Module 145 Remote Management Module Quick Start 146 Prestart 146 Log on 146 Navigation 147 Log out 14...

Page 5: ...es voordat u dit product installeert eerst de veiligheidsvoorschriften Ennen kuin asennat tämän tuotteen lue turvaohjeet kohdasta Safety Information Avant d installer ce produit lisez les consignes de sécurité Vor der Installation dieses Produkts die Sicherheitshinweise lesen Prima di installare questo prodotto leggere le Informazioni sulla Sicurezza Les sikkerhetsinformasjonen Safety Information ...

Page 6: ... 60950 1 the standard for Safety of Electronic Equipment within the Field of Audio Video Information Technology and Communication Technology Lenovo assumes you are qualified in the servicing of equipment and trained in recognizing hazards energy levels in products Access to the equipment is by the use of a tool lock and key or other means of security and is controlled by the authority responsible ...

Page 7: ...id or signs of fire or smoke damage 5 Check for worn frayed or pinched cables 6 Make sure that the power supply cover fasteners screws or rivets have not been removed or tampered with Security advisories Lenovo is committed to developing products and services that adhere to the highest security standards in order to protect our customers and their data When potential vulnerabilities are reported i...

Page 8: ......

Page 9: ...antylookup Specifications The following information is a summary of specifications of the server Depending on the model some specifications might not apply Table 1 Server specifications Specification Description Dimension 2U Height 86 5 mm 3 4 inches Width With rack latches 482 0 mm 19 0 inches Without rack latches 434 4 mm 17 1 inches Depth 749 8 mm 29 5 inches Note The depth is measured with rac...

Page 10: ...ule installation rules and order on page 87 Operating systems Supported and certified operating systems Microsoft Windows Server Red Hat Enterprise Linux SUSE Linux Enterprise Server VMware ESXi Internal drives Front drive bays Up to 12 x 3 5 inch SAS SATA NVME hot swap drives Up to 24 x 2 5 inch SAS SATA NVME hot swap drives including 12 x 2 5 inch NVME hot swap drives Rear drive bays Up to 4 x 2...

Page 11: ...i RAID 9460 8i RAID Graphics processing unit GPU Support NVIDIA Tesla V100S T4 GPU Input Output I O features Front One VGA connector One USB 3 0 connector One USB 2 0 connector for BMC One diagnostics panel Rear Three USB 3 0 connectors One VGA connector One COM connector optional One network management interface Two or four Ethernet connectors on the OCP 3 0 Ethernet adapter Optional For detailed...

Page 12: ...nput Platinum 100 240 VAC 500 W 750 W 1100 W Platinum 200 240 VAC 1800 W Titanium 200 240 VAC 750 W DC input 240 HVDC 500 W 750 W 1100 W 1800 W Chinese Mainland ONLY CAUTION Use Lenovo Capacity Planner to calculate the required power capacity for what is configured for your server More information about Lenovo Capacity Planner is available at Lenovo Capacity Planner website Ensure that the power s...

Page 13: ...data center environment and recommended to be placed in industrial data center Air temperature Operating ASHRAE class A2 10 35 C 50 95 F when the altitude exceeds 900 m 2953 ft the maximum ambient temperature value decreases by 1 C 1 8 F with every 300 m 984 ft of altitude increase ASHRAE class A3 5 40 C 41 104 F when the altitude exceeds 900 m 2953 ft the maximum ambient temperature value decreas...

Page 14: ...6 HR650X V2 User Guide ...

Page 15: ... twelve 3 5 inch front drive bays on page 7 Server models with twenty four 2 5 inch front drive bays The following illustration shows the front view of server models with twenty four 2 5 inch front drive bays Table 2 Components on the front of server models Callout Callout 1 VGA connector optional 2 Drive activity LED 3 Drive status LED 4 Front I O assembly with diagnostics panel on page 8 5 Rack ...

Page 16: ... Rack latch left Front IO assembly The front IO assembly provides controls connectors and LEDs Figure 1 Front I O assembly with diagnostics panel on rack latch Table 4 Components on the front I O assembly Callout Callout 1 USB 3 0 connector 2 USB 2 0 connector with BMC management 3 Power button with power status LED 4 Network activity LED for OCP 3 0 Ethernet adapter 5 System ID button with system...

Page 17: ...power button this button to turn the server on and off manually The power status LED helps you to determine the current power status Status Color Description Off None Power is not present or the power supply has failed Fast blinking about four flashes per second Green The server is off but the BMC is initializing and the server is not ready to be powered on Slow blinking about one flash per second...

Page 18: ... LED provides basic diagnostic functions for your server If the system error LED is lit one or more LEDs elsewhere in the server might also be lit to direct you to the source of the error Status Color Description Action On Yellow An error has been detected on the server Causes might include but not limited to the following errors A fan failure A memory error A storage failure A PCIe device failure...

Page 19: ...r model with seven PCIe slots Table 5 Components on the rear of the server Callout Callout 1 PCIe slot LP 2 PCIe slot LP 3 PCIe slot on riser 0 assembly FH FL 4 PCIe slot on riser 0 assembly FH FL 5 PCIe slot on riser 0 assembly FH HL 6 PCIe slot on riser 1 assembly FH FL 7 PCIe slot on riser 1 assembly FH FL 8 Power supply 1 9 Power supply 2 optional 10 NMI button 11 USB 3 0 connector 12 VGA conn...

Page 20: ...ponents overview on page 13 Server model with four 3 5 inch rear drive bays and three PCIe slots Table 7 Components on the rear of the server Callout Callout 1 3 5 inch rear drive bays 4 2 PCIe slot on riser 0 assembly PCIe4 16 LP 3 PCIe slot on riser 0 assembly PCIe4 16 LP 4 PCIe slot on riser 1 assembly PCIe4 16 LP 5 Power supply 1 6 Power supply 2 optional 7 NMI button 8 USB 3 0 connector 9 VGA...

Page 21: ...e The following illustration shows the LEDs on a Hard disk drive or solid state drive Figure 2 Drive LEDs Drive LED Status Description 1 Drive status LED right Solid yellow The drive has an error Blinking yellow blinking slowly about one flash per second The drive is being rebuilt Blinking yellow blinking rapidly about four flashes per second The RAID adapter is locating the drive 2 Drive activity...

Page 22: ...AID HBA adapters Network adapters NVMe switch adapter PCIe SSDs Power supplies The hot swap redundant power supply helps you avoid significant interruption to the operation of the system when a power supply fails You can purchase a power supply option from Lenovo and install the power supply to provide power redundancy without turning off the server On each power supply there are three status LEDs...

Page 23: ...tion see Front IO assembly on page 8 2 3 Ethernet status LEDs The BMC management connector has two status LEDs Ethernet status LED Color Status Description 2 Ethernet link LED Green On Network link is established None Off Network link is disconnected 3 Ethernet activity LED Green Blinking Network link is connected and active None Off The server is disconnected from a LAN 4 System ID LED The blue s...

Page 24: ...enters into the standby state while the other one delivers entire load When the power load increases the standby power supply will switch to active state to provide sufficient power to the server To disable zero output mode start the Setup utility go to Advanced Power Zero Output and select Disable If you disable zero output mode both power supplies will be in the active state Off The server is po...

Page 25: ...board 1 Clear Password Jumper 2 System Board Release Pin 3 Clear CMOS Jumper 4 Riser 0 Slot 5 Rear Backplane Power Connector 6 Serial Port Module Connector 7 M 2 MISC Connector 8 Smart NIC UART Connector 9 OCP 3 0 Network Card Connector 10 TPM Module Connector Chapter 2 Server components 17 ...

Page 26: ...ents that are available for your server The parts are identified as one of the following Tier 1 customer replaceable unit CRU Replacement of Tier 1 CRUs is your responsibility If Lenovo installs a Tier 1 CRU at your request with no service agreement you will be charged for the installation Tier 2 CRU You may install a Tier 2 CRU yourself or request Lenovo to install it at no additional charge unde...

Page 27: ...ist Index Description Tier 1 CRU Tier 2 CRU FRU Consumable and Structural parts 1 Top cover 2 Rear 4 x 2 5 drive cage 3 Riser assembly LP LP 4 Riser assembly LP FH HL 5 Riser assembly LP Chapter 2 Server components 19 ...

Page 28: ...CP 3 0 Ethernet adapter 15 M 2 drive backplane 16 M 2 drive 17 M 2 retainer clip 18 CMOS battery CR2032 19 RAID super capacitor 20 TPM adapter for Chinese Mainland only 21 Front I O assembly 22 Standard left rack latch 23 8 x 2 5 inch drive filler 24 2 5 inch drive 25 2 5 inch drive filler 26 3 5 inch drive 27 3 5 inch drive filler 28 4 x 3 5 inch drive filler 29 Rear 4 x 2 5 drive backplane 30 Fr...

Page 29: ...escription Tier 1 CRU Tier 2 CRU FRU Consumable and Structural parts 34 Rear 4 x 3 5 drive cage 35 Fan cage 36 Fan module 37 Standard air baffle 38 GPU air baffle filler 39 Rear wall brackets 40 System board Chapter 2 Server components 21 ...

Page 30: ...22 HR650X V2 User Guide ...

Page 31: ...ate the connectors 5 Power on the server See Power on the server on page 23 6 Validate that the server hardware was set up successfully Make sure that all LEDs are in normal states 7 Configure the system Power on the server After the server performs a short self test power status LED flashes quickly when connected to input power it enters a standby state power status LED flashes once per second Th...

Page 32: ...r more than 4 seconds to force a shutdown When in a standby state the server can respond to remote power on requests sent to the BMC For information about powering on the server see Power on the server on page 23 24 HR650X V2 User Guide ...

Page 33: ... is part of a cluster solution verify that the latest level of code is supported for the cluster solution before you update the code It is good practice to make sure that the server is working correctly before you install an optional component Keep the working area clean and place removed components on a flat and smooth surface that does not shake or tilt Do not attempt to lift an object that migh...

Page 34: ...30 seconds after removal A removed hot swap drive must be replaced within two minutes after removal A removed hot swap power supply must be replaced within two minutes after removal Every air baffle that comes with the server must be installed when the server starts some servers might come with more than one air baffle Operating the server with a missing air baffle might damage the processor All p...

Page 35: ...down put it back into the static protective package Never place the device on the server or on any metal surface When handling a device carefully hold it by the edges or the frame Do not touch solder joints pins or exposed circuitry Keep the device from others reach to prevent possible damages Chapter 4 Hardware replacement procedures 27 ...

Page 36: ...a hot swap drive About this task Attention Read Installation Guidelines on page 25 to ensure that you work safely Prevent exposure to static electricity which might lead to system halt and loss of data by keeping static sensitive components in their static protective packages until installation and handling these devices with an electrostatic discharge wrist strap or other grounding system To ensu...

Page 37: ...ter you finish 1 Install a new drive or drive filler to cover the drive bay See Install a hot swap drive on page 29 2 If you are instructed to return the defective component follow all packaging instructions and use any packaging materials that are provided Install a hot swap drive Use this information to install a hot swap drive About this task Attention Read Installation Guidelines on page 25 to...

Page 38: ...e drive into the drive bay until it snaps into position b Close the drive tray handle to lock the drive in place Figure 8 2 5 inch hot swap drive Figure 9 3 5 inch hot swap drive Step 3 Check the drive status LED to verify that the drive is operating correctly a If the yellow drive status LED is lit continuously that drive is faulty and must be replaced b If the green drive activity LED is flashin...

Page 39: ... to ensure that you work safely Power off the server and disconnect all power cords for this task Prevent exposure to static electricity which might lead to system halt and loss of data by keeping static sensitive components in their static protective packages until installation and handling these devices with an electrostatic discharge wrist strap or other grounding system Procedure Step 1 If the...

Page 40: ...e the top cover to the rear until it is disengaged from the chassis Then lift the top cover off the chassis and place the top cover on a flat clean surface After you finish Replace any options as required or install a new top cover See Install the top cover on page 32 Install the top cover Use this information to install the top cover About this task S033 CAUTION Hazardous energy present Voltages ...

Page 41: ...se devices with an electrostatic discharge wrist strap or other grounding system Operating the server with the top cover removed might damage server components For proper cooling and airflow install the top cover before you turn on the server Note A new top cover comes without a service label attached If you need a service label order it together with the new top cover and attach the service label...

Page 42: ...the chassis correctly b Press down the cover latch and ensure that the cover latch is completely closed c Use a screwdriver to turn the cover lock to the locked position After you finish After installing the top cover complete the parts replacement See Complete the parts replacement on page 113 RAID super capacitor module replacement The RAID super capacitor module protects the cache memory on the...

Page 43: ... clip on the holder of the RAID super capacitor module b Take the RAID super capacitor module out of the holder After you finish If you are instructed to return the old RAID super capacitor module follow all packaging instructions and use any packaging materials that are provided Install the RAID super capacitor module Use this information to install the RAID super capacitor module on the air baff...

Page 44: ...omes with the super capacitor module 2 Complete the parts replacement See Complete the parts replacement on page 113 M 2 adapter and M 2 drive replacement Use this information to remove and install the M 2 adapter and M 2 drive This topic uses the M 2 module on the standard air baffle as an example for replacement illustration The replacement procedure is the same for the others Remove the M 2 ada...

Page 45: ...the M 2 drive from the M 2 adapter Figure 14 M 2 drive removal a Press both sides of the retainer b Slide the retainer backward to loosen the M 2 drive from the M 2 adapter c Rotate the M 2 drive away from the M 2 adapter d Pull the M 2 drive away from the connector at an angle of approximately 30 degrees Step 4 Remove the M 2 adapter Figure 15 M 2 adapter removal a Loosen the screw that secures t...

Page 46: ...heir static protective packages until installation and handling these devices with an electrostatic discharge wrist strap or other grounding system Procedure Figure 16 M 2 retainer adjustment Step 1 Press both sides of the retainer Step 2 Move the retainer forward until it is in the large opening of the keyhole Step 3 Take the retainer out of the keyhole Step 4 Insert the retainer into the correct...

Page 47: ...erver Then take the new M 2 adapter and M 2 drive out of the package and place them on a static protective surface Note Your M 2 adapter might look different from the following illustrations but the installation method is the same Step 2 Adjust the retainer on the M 2 adapter to accommodate the particular size of the M 2 drive you wish to install See Adjust the retainer on the M 2 adapter on page ...

Page 48: ...onnect the cables to the M 2 adapter 6 Tighten the screw that secures the M 2 signal cable to the M 2 adapter Step 5 Install the M 2 drive on the M 2 adapter Figure 19 M 2 drive installation 1 Press both sides of the retainer 2 Slide the retainer backward 3 Insert the M 2 drive at an angle of approximately 30 degrees into the connector 4 Rotate the M 2 drive down until the notch catches on the lip...

Page 49: ...d with metal which might result in spattered metal burns or both S017 CAUTION Hazardous moving fan blades nearby Attention Read Installation Guidelines on page 25 to ensure that you work safely Power off the server and disconnect all power cords for this task Procedure Step 1 Prepare your server 1 Remove the top cover See Remove the top cover on page 30 2 Disconnect the RAID super capacitor module...

Page 50: ...ion For proper cooling and airflow install the air baffle before you turn on the server Operating the server without the air baffle might damage server components Install the air baffle Use this information to install the air baffle About this task S033 CAUTION Hazardous energy present Voltages with hazardous energy might cause heating when shorted with metal which might result in spattered metal ...

Page 51: ...your server Step 2 Align the tabs on both sides of the air baffle with the corresponding slots on both sides of the chassis Then lower the air baffle into the chassis and press the air baffle down until it is securely seated Note The illustrated air baffle is a standard air baffle The installation method is the same for the GPU air baffle Figure 21 Installation of the standard air baffle After you...

Page 52: ...Voltages with hazardous energy might cause heating when shorted with metal which might result in spattered metal burns or both S017 CAUTION Hazardous moving fan blades nearby Attention Read Installation Guidelines on page 25 to ensure that you work safely When removing a hot swap fan without powering off the server do not touch the system fan cage With power on complete the replacement within 30 s...

Page 53: ...ystem fan on page 45 2 If you are instructed to return the defective component follow all packaging instructions and use any packaging materials that are provided Install a system fan Use this information to install a system fan About this task S033 CAUTION Hazardous energy present Voltages with hazardous energy might cause heating when shorted with metal which might result in spattered metal burn...

Page 54: ...static protective packages until installation and handling these devices with an electrostatic discharge wrist strap or other grounding system Procedure Step 1 Touch the static protective package that contains the new system fan to any unpainted surface on the outside of the server Then take the new system fan out of the package and place it on a static protective surface Step 2 Position the syste...

Page 55: ...ng static sensitive components in their static protective packages until installation and handling these devices with an electrostatic discharge wrist strap or other grounding system Procedure Step 1 Remove the top cover See Remove the top cover on page 30 Step 2 Optional If you are replacing the system fan cage remove all system fans first See Remove a system fan on page 44 If you are removing th...

Page 56: ...atic protective packages until installation and handling these devices with an electrostatic discharge wrist strap or other grounding system Procedure Figure 25 System fan cage installation Step 1 Align the system fan cage with the mounting guides on both sides of chassis and lower it into the chassis Step 2 Install the screws on both sides of the system fan cage Note If there are system fans inst...

Page 57: ...erver and disconnect all power cords for this task Prevent exposure to static electricity which might lead to system halt and loss of data by keeping static sensitive components in their static protective packages until installation and handling these devices with an electrostatic discharge wrist strap or other grounding system Procedure Step 1 If the server is installed with the security bezel re...

Page 58: ...re the front I O assembly Figure 27 Front I O assembly screws removal Step 5 Slide the front I O assembly forward slightly and then remove it from the chassis Figure 28 Front I O assembly removal After you finish 50 HR650X V2 User Guide ...

Page 59: ...s task Prevent exposure to static electricity which might lead to system halt and loss of data by keeping static sensitive components in their static protective packages until installation and handling these devices with an electrostatic discharge wrist strap or other grounding system Procedure Step 1 Touch the static protective package that contains the front I O assembly to any unpainted surface...

Page 60: ...stem board Then reinstall the top cover of the hard disk drive tray Figure 31 Installation of the top cover of the hard disk drive tray After you finish Complete the parts replacement See Complete the parts replacement on page 113 Front drive backplane replacement Use this information to remove and install a front drive backplane 52 HR650X V2 User Guide ...

Page 61: ...task Prevent exposure to static electricity which might lead to system halt and loss of data by keeping static sensitive components in their static protective packages until installation and handling these devices with an electrostatic discharge wrist strap or other grounding system Procedure Step 1 Prepare your server a Remove the top cover See Remove the top cover on page 30 b Remove the air baf...

Page 62: ...gage it from the two pins on the chassis Step 3 Record the cable connections on the backplane and then disconnect all cables from the backplane After you finish If you are instructed to return the defective component follow all packaging instructions and use any packaging materials that are provided Install the front 2 5 inch drive backplane Use this information to install the front 2 5 inch drive...

Page 63: ...TA 8 bay SAS SATA 8 bay AnyBay 8 bay SAS SATA 8 bay AnyBay 8 bay AnyBay 8 bay Attention Read Installation Guidelines on page 25 to ensure that you work safely Power off the server and disconnect all power cords for this task Prevent exposure to static electricity which might lead to system halt and loss of data by keeping static sensitive components in their static protective packages until instal...

Page 64: ...e the backplane to the vertical position and align the holes in the backplane with the pins on the chassis and press the backplane into position The release tabs will secure the backplane in place Step 4 Connect the cables to the system board After you finish 1 Reinstall all the drives and fillers if any into the drive bays See Install a hot swap drive on page 29 2 Complete the parts replacement S...

Page 65: ...e air baffle See Remove the air baffle on page 41 c Remove the system fan cage for easier operation See Remove a system fan on page 44 d Remove all the installed drives and fillers if any from the drive bays See Remove a hot swap drive on page 28 Step 2 Lift the release tabs and rotate the backplane backward slightly to release it from the two pins on the chassis Note Depending on the specific typ...

Page 66: ...ines on page 25 to ensure that you work safely Power off the server and disconnect all power cords for this task Prevent exposure to static electricity which might lead to system halt and loss of data by keeping static sensitive components in their static protective packages until installation and handling these devices with an electrostatic discharge wrist strap or other grounding system Procedur...

Page 67: ...l it is secured into place Step 4 Connect the cables to the system board After you finish 1 Reinstall all the drives and fillers if any into the drive bays See Install a hot swap drive on page 29 2 Complete the parts replacement See Complete the parts replacement on page 113 Rear 2 5 inch drive backplane and drive cage replacement Use this information to remove and install rear 2 5 inch drive back...

Page 68: ...l installation and handling these devices with an electrostatic discharge wrist strap or other grounding system Procedure Step 1 Prepare your server a Remove the top cover See Remove the top cover on page 30 b Disconnect the cables of the rear drive backplane from the system board or RAID HBA adapter c Remove all the installed drives and fillers if any from the drive bays See Remove a hot swap dri...

Page 69: ...g these devices with an electrostatic discharge wrist strap or other grounding system Procedure Step 1 Remove the middle drive backplane a Open the release latches in the direction as shown b Rotate the backplane from the top to disengage it from the pins on the drive cage c Carefully lift the backplane out of the drive cage Figure 38 Removing the rear 4 x 2 5 inch drive backplane After you finish...

Page 70: ...rge wrist strap or other grounding system Procedure Step 1 Install the rear drive backplane a Align the bottom of the backplane with the studs at the bottom of the drive cage and lower the backplane into the drive cage b Push the top of the backplane forward until it clicks in place Ensure that the holes in the backplane pass through the pins on the drive cage and the release latches secure the ba...

Page 71: ...l bracket replacement on page 68 b Install the required performance system fans See System fan replacement on page 44 c Install the required riser brackets See Install a riser card on page 83 d Install the backplane to the drive cage See Install the rear 2 5 inch drive backplane on page 62 Step 2 Install the rear drive cage a Align the rear drive cage with the chassis and lower the drive cage into...

Page 72: ...s on page 25 to ensure that you work safely Power off the server and disconnect all power cords for this task Prevent exposure to static electricity which might lead to system halt and loss of data by keeping static sensitive components in their static protective packages until installation and handling these devices with an electrostatic discharge wrist strap or other grounding system Procedure S...

Page 73: ...s on page 25 to ensure that you work safely Power off the server and disconnect all power cords for this task Prevent exposure to static electricity which might lead to system halt and loss of data by keeping static sensitive components in their static protective packages until installation and handling these devices with an electrostatic discharge wrist strap or other grounding system Procedure S...

Page 74: ... to ensure that you work safely Power off the server and disconnect all power cords for this task Prevent exposure to static electricity which might lead to system halt and loss of data by keeping static sensitive components in their static protective packages until installation and handling these devices with an electrostatic discharge wrist strap or other grounding system Procedure Step 1 Instal...

Page 75: ...ords for this task Prevent exposure to static electricity which might lead to system halt and loss of data by keeping static sensitive components in their static protective packages until installation and handling these devices with an electrostatic discharge wrist strap or other grounding system Procedure Step 1 Prepare your server a Optional If existing rearwall brackets are not for the rear dri...

Page 76: ... cage After you finish 1 Reinstall the drives or drive fillers into the rear drive cage See Install a hot swap drive on page 29 2 Connect cables to the rear drive backplane 3 Complete the parts replacement See Complete the parts replacement on page 113 Rearwall bracket replacement Use this information to remove and install a rearwall bracket The rearwall brackets vary by server rear configurations...

Page 77: ... requires two rearwall brackets Rearwall bracket on the left Rearwall bracket on the right Configuration with 4 x 3 5 inch rear drives and 3 PCIe slots or 2 PCIe slots The server requires two rearwall brackets Rearwall bracket on the left Rearwall bracket on the right Remove a rearwall bracket Use this information to remove a rearwall bracket About this task Attention Read Installation Guidelines ...

Page 78: ...the configuration with 7 PCIe slots The procedure is the same for removing other rearwall brackets Figure 45 Rearwall bracket removal on the right of the configuration with 7 PCIe slots After you finish 1 Install required rearwall brackets back to the rear chassis 2 If you are instructed to return the defective component follow all packaging instructions and use any packaging materials that are pr...

Page 79: ...ing other rearwall brackets Figure 46 Rearwall bracket installation on the right of the configuration with 7 PCIe slots After you finish 1 Install a rear drive cage or riser assemblies Install a riser card on page 83 Install the rear 2 5 inch drive cage on page 62 Install the rear 3 5 inch drive cage on page 67 2 Complete the parts replacement See Complete the parts replacement on page 113 Hot swa...

Page 80: ...ceable parts inside these components If you suspect a problem with one of these parts contact a service technician S002 CAUTION The power control button on the device and the power switch on the power supply do not turn off the electrical current supplied to the device The device also might have more than one power cord To remove all electrical current from the device ensure that all power cords a...

Page 81: ...nnect cables as described in the following table when installing moving or opening covers on this product or attached devices To Connect To Disconnect 1 Turn everything OFF 2 Attach all cables to devices 3 Attach signal cables to connectors 4 Attach power cords to outlet 5 Turn device ON 1 Turn everything OFF 2 Remove power cords from outlet 3 Remove signal cables from connectors 4 Remove all cabl...

Page 82: ...some server models there s only one power supply unit and before removing it you must turn off the server first Attention Read Installation Guidelines on page 25 to ensure that you work safely Prevent exposure to static electricity which might lead to system halt and loss of data by keeping static sensitive components in their static protective packages until installation and handling these device...

Page 83: ...nstalled and the other has a power supply filler installed 2 If you are instructed to return the old hot swap power supply follow all packaging instructions and use any packaging materials that are provided Install a hot swap power supply unit Use this information to install a hot swap power supply About this task The following describes the information that you must consider when installing a pow...

Page 84: ...tem Procedure Step 1 Touch the static protective package that contains the hot swap power supply to any unpainted surface on the outside of the server Then take the hot swap power supply out of the package and place it on a static protective surface Step 2 If there is a power supply filler installed remove it Figure 49 Hot swap power supply filler removal Step 3 Slide the new hot swap power supply...

Page 85: ...erating properly OCP 3 0 Ethernet adapter replacement Use this information to remove and install the OCP 3 0 Ethernet adapter Remove the OCP 3 0 Ethernet adapter Use this information to remove the OCP 3 0 Ethernet adapter About this task CAUTION Power off the server and disconnect all power cords from their power sources before performing this procedure Attention Read Installation Guidelines on pa...

Page 86: ... the server and disconnect all power cords from their power sources before performing this procedure Attention Read Installation Guidelines on page 25 to ensure that you work safely Prevent exposure to static electricity which might lead to system halt and loss of data by keeping static sensitive components in their static protective packages until installation and handling these devices with an e...

Page 87: ...ed b Tighten the thumbscrew to secure the card After you finish 1 Attach the OCP label to the rear of the server 2 Complete the parts replacement See Complete the parts replacement on page 113 PCIe adapter replacement Use this information to remove and install a PCIe adapter The PCIe adapter can be an Ethernet adapter a host bus adapter HBA a PCIe RAID adapter a PCIe interposer adapter a PCIe soli...

Page 88: ...e PCIe adapter from the riser assembly Figure 53 PCIe adapter removal from the LP FH riser assembly a Rotate the latch on the riser bracket to the open position b Grasp the PCIe adapter by its edges and carefully pull it out of the PCIe adapter slot on the riser card Note The procedure for removing a PCIe adapter is similar for different types of riser assembly In this topic the LP FH riser assemb...

Page 89: ... supported PCIe adapters see Rear view on page 11 Step 3 Install the PCIe adapter and secure it to the riser assembly Figure 54 PCIe adapter installation into the LP FH riser assembly a Align the PCIe adapter with the PCIe slot on the riser card Then carefully press the PCIe adapter straight into the slot until it is securely seated and its bracket also is secured b Rotate the latch on the riser b...

Page 90: ...wer off the server and disconnect all power cords for this task Prevent exposure to static electricity which might lead to system halt and loss of data by keeping static sensitive components in their static protective packages until installation and handling these devices with an electrostatic discharge wrist strap or other grounding system Procedure Step 1 Remove the top cover See Remove the top ...

Page 91: ...information to install a riser card About this task The riser assembly you want to install might be different from the following illustrations but the installation method is the same The following takes the LPFH riser assembly as an example Attention Read Installation Guidelines on page 25 to ensure that you work safely Power off the server and disconnect all power cords for this task Prevent expo...

Page 92: ...he riser card and secure it to the bracket Figure 57 Riser card installation 1 Align the screw holes in the riser card with the corresponding ones in the bracket 2 Install the two screws to secure the riser card to the bracket Step 3 If necessary reinstall the PCIe adapters on the riser card See Install a PCIe adapter on page 80 Then refer to your note to reconnect any cables of the PCIe adapters ...

Page 93: ...odule replacement Use this information to remove and install a memory module Remove a memory module Use this information to remove a memory module About this task Attention Read Installation Guidelines on page 25 to ensure that you work safely Power off the server and disconnect all power cords for this task Memory modules are sensitive to static discharge and require special handling Refer to the...

Page 94: ...nts by the high insertion force Procedure Step 1 Remove the top cover See Remove the top cover on page 30 Step 2 If your server comes with an air baffle remove it See Remove the air baffle on page 41 Step 3 Remove the memory module from the slot mm Figure 59 Memory module removal a Open the retaining clip on each end of the memory module slot Attention To avoid breaking the retaining clips or dama...

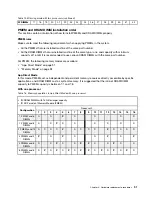
Page 95: ...end on the processor model and UEFI settings The following illustration helps you to locate the memory module slots on the system board Note It is recommended to install memory modules with the same rank in each channel Figure 60 Memory module slots on the system board Table 11 Memory slot and channel identification Channel F1 E1 H1 G1 C1 D1 A1 B1 F0 E0 H0 G0 C0 D0 A0 B0 Slot number 32 150 30 140 ...

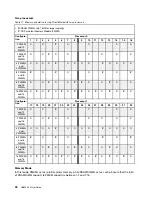
Page 96: ...hest level of memory performance but lacks failover protection The DIMM installation order for independent memory mode varies based on the number of processors and memory modules installed in the server Follow the rules below when installing memory modules in independent mode All memory modules to be installed must be of the same type x4 and x8 DIMMs can be mixed in the same channel Memory modules...

Page 97: ...10 14 16 16 DIMMs 1 3 5 7 10 12 14 16 24 DIMMs 1 3 4 5 7 8 9 10 12 13 14 16 32 DIMMs 1 2 3 4 5 6 7 8 9 10 11 12 13 14 15 16 Configura tion Processor 1 17 18 19 20 21 22 23 24 25 26 27 28 29 30 31 32 2 DIMMs 19 4 DIMMs 19 30 8 DIMMs 19 23 26 30 12 DIMMs 17 19 23 26 30 32 16 DIMMs 17 19 21 23 26 28 30 32 24 DIMMs 17 19 20 21 23 24 25 26 28 29 30 32 32 DIMMs 17 18 19 20 21 22 23 24 25 26 27 28 29 30 ...

Page 98: ... Mirroring mode with one processor Configura tion Processor 0 1 2 3 4 5 6 7 8 9 10 11 12 13 14 15 16 2 DIMMs 1 3 4 DIMMs 1 3 14 16 8 DIMMs 1 3 5 7 10 12 14 16 12 DIMMs 1 2 3 4 5 7 10 12 13 14 15 16 16 DIMMs 1 2 3 4 5 6 7 8 9 10 11 12 13 14 15 16 With two processors The following table shows the memory module population sequence for mirroring mode when two processors Processor 1 and Processor 2 are...

Page 99: ...ect Mode on page 91 Memory Mode on page 92 App Direct Mode In this mode PMEMs act as independent and persistent memory resources directly accessible by specific applications and DRAM DIMMs act as system memory It is suggested that the ratio of DRAM DIMM capacity to PMEM capacity is between 1 1 and 1 8 With one processor Table 16 Memory population in App Direct Mode with one processor D DRAM DIMMs ...

Page 100: ...D P D D P P D D P D D 16 PMEMs and 16 DIMMs D P D P D P D P P D P D P D P D Configura tion Processor 1 17 18 19 20 21 22 23 24 25 26 27 28 29 30 31 32 2 PMEM and 12 DIMMs D D P D D D D 2 PMEM and 16 DIMMs D D P D D D D D D 4 PMEMs and 24DIMMs D D D D P D D D D P D D D D 8 PMEMs and 8 DIMMs P D P D D P D P 8 PMEMs and 16 DIMMs D D P D D P P D D P D D 16 PMEMs and 16 DIMMs D P D P D P D P P D P D P ...

Page 101: ... 16 GB or larger capacity P DC Persistent Memory Module PMEM Configura tion Processor 0 1 2 3 4 5 6 7 8 9 10 11 12 13 14 15 16 8 PMEMs and 8 DIMMs P D P D D P D P 8 PMEMs and 16 DIMMs D D P D D P P D D P D D 16 PMEMs and 16 DIMMs D P D P D P D P P D P D P D P D Configura tion Processor 1 17 18 19 20 21 22 23 24 25 26 27 28 29 30 31 32 8 PMEMs and 8 DIMMs P D P D D P D P 8 PMEMs and 16 DIMMs D D P ...

Page 102: ...touch the outside of the memory module connector housing Handle memory modules with care never bend twist or drop a memory module Do not use any metal tools such as jigs or clamps to handle the memory modules because the rigid metals may damage the memory modules Do not insert memory modules while holding packages or passive components which can cause package cracks or detachment of passive compon...

Page 103: ...nds c Firmly press both ends of the memory module straight down into the slot until the retaining clips snap into the locked position Note If there is a gap between the memory module and the retaining clips the memory module has not been correctly inserted In this case open the retaining clips remove the memory module and then reinsert it After you finish Complete the parts replacement See Complet...

Page 104: ...he server and reset the system date and time S004 CAUTION When replacing the lithium battery use only Lenovo specified part number or an equivalent type battery recommended by the manufacturer If your system has a module containing a lithium battery replace it only with the same module type made by the same manufacturer The battery contains lithium and can explode if not properly used handled or d...

Page 105: ... Install a new one See Install the CMOS battery on page 97 2 Dispose the CMOS battery as local ordinances or regulations required Install the CMOS battery Use this information to install the CMOS battery About this task The following tips describe information that you must consider when installing the CMOS battery Lenovo has designed this product with your safety in mind The lithium battery must b...

Page 106: ...he device also might have more than one power cord To remove all electrical current from the device ensure that all power cords are disconnected from the power source Attention Read Installation Guidelines on page 25 to ensure that you work safely Power off the server and disconnect all power cords for this task Prevent exposure to static electricity which might lead to system halt and loss of dat...

Page 107: ... not turn off the electrical current supplied to the device The device also might have more than one power cord To remove all electrical current from the device ensure that all power cords are disconnected from the power source Attention Read Installation Guidelines on page 25 to ensure that you work safely Power off the server and disconnect all power cords for this task Prevent exposure to stati...

Page 108: ...me If the system board supports multiple processors install the PHMs starting with the first processor socket Note The heat sink processor and processor carrier for your system might be different from those shown in the illustrations The following illustration shows the components of the PHM Figure 64 PHM components 1 Heat sink 9 Clips to secure processor in carrier 2 Heat sink triangular mark 10 ...

Page 109: ...ate the anti tilt wire bails inward c Carefully lift the PHM from the processor socket If the PHM cannot be fully lifted out of the socket further loosen the Torx T30 nuts and try lifting the PHM again Notes Do not touch the contacts on the bottom of the processor Keep the processor socket clean from any object to prevent possible damages After you finish Each processor socket must always contain ...

Page 110: ...ead to system halt and loss of data by keeping static sensitive components in their static protective packages until installation and handling these devices with an electrostatic discharge wrist strap or other grounding system Do not touch the processor contacts Contaminants on the processor contacts such as oil from your skin can cause connection failures Do not allow the thermal grease on the pr...

Page 111: ...any shipping damage Reuse the packaging the new part arrived in and follow all packaging instructions Install a processor and heat sink This task has instructions for installing an assembled processor and heat sink known as a processor heat sink module PHM This task requires a Torx T30 driver This procedure must be executed by a trained technician About this task Attention Read Installation Guidel...

Page 112: ... new heat sink and make sure it does not exceed 2 years Otherwise wipe off the existing thermal grease and apply the new grease onto it for optimal thermal performance Notes PHMs are keyed for the socket where they can be installed and for their orientation in the socket See https static lenovo com us en serverproven index shtml for a list of processors supported for your server All processors on ...

Page 113: ...t sink and reusing the processor a Remove the processor identification label from the old heat sink and place it on the new heat sink in the same location The label is on the side of the heat sink closest to the triangular alignment mark Note If you are unable to remove the label and place it on the new heat sink or if the label is damaged during transfer write the processor serial number from the...

Page 114: ...ld the processor carrier assembly by the sides of the carrier Step 3 Apply thermal grease a Carefully place the processor and carrier in the shipping tray with the processor contact side down Make sure the triangular mark on the carrier is aligned with the triangular mark in the shipping tray b If there is any old thermal grease on the processor gently wipe the top of the processor with an alcohol...

Page 115: ...l with the triangular mark on the processor carrier and processor b Install the heat sink onto the processor carrier c Press the carrier into place until the clips at all four corners engage Step 5 Install the processor heat sink module into the system board socket Chapter 4 Hardware replacement procedures 107 ...

Page 116: ... gap between the screw shoulder beneath the heat sink and the processor socket For reference the torque required for the fasteners to fully tighten is 1 1 newton meters 10 inch pounds After you finish Complete the parts replacement See Complete the parts replacement on page 113 System board replacement trained technician only Use this information to remove and install the system board Remove the s...

Page 117: ...discharge wrist strap or other grounding system Procedure Step 1 Prepare your server a Remove the top cover See Remove the top cover on page 30 b If your server comes with an air baffle or a rear cage remove it first Remove the air baffle on page 41 Remove the rear 2 5 inch drive cage on page 60 Remove the rear 3 5 inch drive cage on page 64 c Record where the cables are connected to the system bo...

Page 118: ...out of the chassis Figure 73 System board removal After you finish If you are instructed to return the defective component follow all packaging instructions and use any packaging materials that are provided Important Before you return the system board make sure that the CPU socket is covered Install the processor socket dust covers from the new system board on the removed system board If you are p...

Page 119: ...ight lead to system halt and loss of data by keeping static sensitive components in their static protective packages until installation and handling these devices with an electrostatic discharge wrist strap or other grounding system Procedure Step 1 Touch the static protective package that contains the new system board to any unpainted surface on the outside of the server Then take the new system ...

Page 120: ...corresponding holes in the rear panel The release pin 2 secures the system board in place Step 3 A new system board comes with half height cable holders by default If the old system board is installed with full height cable holders remove them from the old system board and install them to the new system board After you finish 1 Install any components that you have removed Install a processor and h...

Page 121: ...nd turn on the server 7 Update the server with the latest RAID firmware 8 Optionally enable Secure Boot Complete the parts replacement Use this information to complete the parts replacement To complete the parts replacement do the following 1 Ensure that all components have been reassembled correctly and that no tools or loose screws are left inside your server 2 Properly route and secure the cabl...

Page 122: ...114 HR650X V2 User Guide ...

Page 123: ...hen the following window is displayed The table below describes the Main screen Table 20 Main details Item Option Description System Information N A List information about BIOS Build ID Product Name BIOS Version Build Date and Time SPS Version SPS Current State Intel RC Revison BMC Version BMC Self Test Status BMC IP Address and FPGA Version Usable Memory N A Describe the memory capacity that can ...

Page 124: ...h as usable memory current memory speed current memory mode and other memory details System Language N A English is the default language System Date N A WEEK MM DD YYYY e g Wed 05 06 2020 System Time N A HH MM SS e g 16 40 00 Access Level N A Administrator Advanced This section details Advanced screen Select Advanced then the following window is displayed The table below describes the options in A...

Page 125: ...k Configuration Specify network stack settings CSM Configuration NVMe Configuration Specify NVMe device options settings Lenovo advanced See the table below for the descriptions of options in Lenovo Advanced screen Table 22 Lenovo advanced details Item Sub item Option Description Processor Settings Processor Settings KTI Link Speed N A CPU0 Configuration N A Core Disable Number N A Memory Settings...

Page 126: ... physical port Once disabled any USB device plugged into the connectors will not be detected by BIOS or OS Network Settings PXE Retry Count N A PXE retry count can be set from 0 to 50 and 50 means the server will always retry PXE Ports Retry Count N A PXE ports retry count can be set between 0 to 3 Boot Retry Count N A PXE retry count can be set from 0 to 50 and 50 means the server will always ret...

Page 127: ...sabled Enabled SHA384 PCR Bank Disabled Enabled Pending Operation None TPM Clear Platform Hierarchy Disabled Enabled Storage Hierarchy Disabled Enabled Endorsement Hierarchy Disabled Enabled TPM2 0 UEFI Spec Version N A Physical Presence Spec Version N A TPM 2 0 Interface Type N A Device Select TPM 1 2 TPM 2 0 AUTO Redfish host interface settings See the table below for the descriptions of options...

Page 128: ...OM0 N A Console Redirection Disabled Enabled Enable or disable console redirection Console Redirection Settings N A Specify how the host computer and the remote computer which the user is using exchange data Both computers should have the same or compatible settings Note This option is for COM0 Legacy Console Redirection Settings N A Specify legacy console redirection settings Serial Port for Out ...

Page 129: ...oot support If disabled IPv4 HTTP boot support will not be available Ipv6 PXE Support Enabled Disabled Enable Disable IPv6 PXE boot support If disabled IPv6 PXE boot support will not be available Ipv6 HTTP Support Enabled Disabled Enable Disable IPv6 HTTP boot support If disabled IPv6 HTTP boot support will not be available PXE boot wait time N A Wait time in seconds to press ESC key to abort the ...

Page 130: ...y Control the execution of UEFI and legacy network OpROM Storage Do not launch UEFI Legacy Control the execution of UEFI and legacy network OpROM Video Do not launch UEFI Legacy Control the execution of UEFI and legacy network OpROM Other PCI Devices Do not launch UEFI Legacy Determine OpROM execution policy for devices other than network storage or video NVMe configuration See the table below for...

Page 131: ...Configuration Specify server ME debug configuration Runtime Error Logging View or change the runtime error log configuration Reserve Memory Set options of reserve memory Note If the values of options in this screen are set incorrectly a system malfunction may occur PCH configuration See the table below for the descriptions of options in PCH Configurationn screen Table 32 PCH configuration details ...

Page 132: ...aneous configuration details Item Option Description Wake On Lan Support Disable Enable Enable or disable Wake On Lan Support RTC Wake System From S4 S5 Disable Enable Enable or disable system wake on alarm event When enabled system will wake on the day you specified The format is as follows hr min sec Server ME debug configuration See the table below for the descriptions of options in Server ME D...

Page 133: ...e the IIO errors enabling options PCIe Error Enabling N A Press Enter to view or change the PCIe error enabling options Error Control Setting N A Press Enter to view or change the error control setting options Reserve memory See the table below for the descriptions of options in Reserve Memory screen Table 36 Reserve memory details Item Option Description Reserve Memory Range Disabled Enabled Set ...

Page 134: ...isplay and provide options to change the UnCore settings Memory Configuration Display and provide options to change the memory settings IIO Configuration Display and provide options to change the IIO settings Advanced Power Management Configuration Display and provide options to change the power management settings Processor configuration See the table below for the descriptions of options in Proc...

Page 135: ...data cache prefetcher MSR 1A4h Bit 2 DCU IP Prefetcher Disable Enable DCU IP prefetcher is an L1 data cache prefetcher LLC Prefetch Disable Enable Enable Disable LLC Prefetch on all threads Extended APIC Disable Enable Enable Disable extended APIC support Note This will enable VT d automatically if x2APIC is enabled Enable Intel TXT Disable Enable VMX Disable Enable Enable the Vanderpool Technolog...

Page 136: ...ns of options in Memory Configuration screen Table 41 Memory configuration details Item Option Description Integrated Memory Controller iMC N A STEP DRAM Test Disable Enable Enable or disable STEP Samsung TestBIOS Enhanced PPR function Operation Mode Test Only Test and Repair Set operation mode SmartTest Disable Enable Enable or disable SmartTest function Default is enable Enabling means run Smart...

Page 137: ...rovide options to change the Memory RAS Settings Memory RAS Configuration Setup N A Pmem Configuration N A Display and provide options to change the PMem settings Memory Dfx Configuration N A Display and provide options to change the memory Dfx settings BSSA Configuration Menu N A Set configuration options for the BSSA tool CMI Init Configuration N A Help to configure CMI Init IIO configuration Se...

Page 138: ...on N A Set frequency prioritization control Overclocking N A Enable Disable Overclocking CPU C State Control N A Set CPU C State Package C State Control N A Set Package C State CPU Thermal Management N A Set CPU thermal options CPU Advanced PM Tuning N A Set Energy Per Bias Pwr_Ctl PP0 Current SWLTD SAPM and so on Package Current Config N A Display program PRI_PLANE_CURT_CFG_CTRL_MSR 0x601 sub men...

Page 139: ...Select Server Management then the following window is displayed The table below describes the options in Server Management screen Chapter 5 BIOS setup 131 ...

Page 140: ... Helps determine that the OS successfully loaded or follows the OS Boot Watchdog Timer policy OS Wtd Timer Timeout N A Enter the value between 1 to 30 min for OS Boot Watchdog Timer Expiration Not available if OS Boot Watchdog Timer is disabled OS Wtd Timer Policy Do Nothing Reset Power Down Power Cycle Configure how the system responds if the OS Boot Watchdog Timer expires Not available if OS Boo...

Page 141: ...l Do Nothing Erase Immediately Delete Oldest Record Choose options for reactions to a full SEL Custom EFI Logging Options N A Log EFI Status Codes Disabled Both Error code Progress code Disable the logging of EFI Status Codes or log only error code or only progress code or both Note All values changed here do not take effect until computer is restarted View FRU information See the table below for ...

Page 142: ...or the descriptions of options in BMC Network Configuration screen Table 48 BMC network configuration details Item Option Description BMC Network Configuration Configure IPV4 Support N A NCSI Support Disable Enable Auto NCSI Support Lan Channel 8 Share NIC N A Configuration Address Source Don t change Static DynamicBmcDhcp Select to configure LAN channel parameters statically or dynamically by BIO...

Page 143: ... Dedicated NIC N A IPV6 Support Disabled Enabled Enable or disable LAN2 IPV6 support Configuration Address Source Don t change Static DynamicBmcDhcp Select to configure LAN channel parameters statically or dynamically by BIOS or BMC Unspecified option will not modify any BMC network parameters during BIOS phase Current Configuration Address Source N A Station IPV6 Address N A Prefix Length N A IPV...

Page 144: ...e the table below for the descriptions of options in BMC User Settings screen Table 50 BMC user settings details Item Option Description Add User N A Press Enter to add a user Delete User N A Press Enter to delete a user Change User Settings N A Press Enter to change user settings Security This section details Security screen 136 HR650X V2 User Guide ...

Page 145: ...Select Security then the following window is displayed The table below describes the options in Security screen Chapter 5 BIOS setup 137 ...

Page 146: ...Boot Set secure boot configuration Secure Flash Update Set secure flash update support Supervisor password See the table below for the descriptions of options in Supervisor Password screen Table 52 Supervisor password details Item Description Supervisor Password Set the administrator password The rules are as follows The password can only contain the following characters no white space characters ...

Page 147: ... days before receiving a warning about the expiration of the password If set to 0 the warning will never be sent Minimum Password Change Interval N A The number of hours that must elapse before changing a password The value specified for this setting cannot exceed the value specified for the Password expiration period If set to 0 the password may be changed immediately Minimum Password Reuse Cycle...

Page 148: ...ariables can be configured by a physically present user without full authentication Restore Factory Keys N A Force system to user mode Install factory default secure boot key databases Restore to Setup Mode N A Key Management N A Enables expert users to modify Secure Boot variables without full authentication Secure flash update See the table below for the descriptions of options in Secure Flash U...

Page 149: ...Select boot mode LEGACY UEFI Boot Order Setting N A Set boot order Hard Disk Drive Boot Option Priorities N A Specify the boot device priority sequence from available hard disk drives NETWORK Drive Boot Option Priorities N A Specify the boot device priority sequence from available network drives CD DVD Drive Boot Option Priorities N A Specify the boot device priority sequence from available CD DVD...

Page 150: ...m setup without saving any changes Esc key can be used for this operation Save Changes and Reset Reset the system after saving the changes Discard Changes and Reset Reset system setup without saving any changes Save Changes Save changes done so far to any of the setup options Discard Changes Discard changes done so far to any of the setup options F3 key can be used for this operation Default Optio...

Page 151: ...er Defaults Restore the user defaults to all the setup options Launch EFI Shell from filesystem device Attempt to launch EFI shell application Shell efi from one of the available filesystem devices Boot Override Attempt to launch one selected boot option from available boot option list Chapter 5 BIOS setup 143 ...

Page 152: ...144 HR650X V2 User Guide ...

Page 153: ...or 1 3 support Compatible with IPMI V2 0 KVM allow remote viewing and configuring in the POST and BIOS setup utility FRU Field Replaceable Unit accessible IPMI watchdog timer ACPI state synchronization BMC built in self test SDRs Sensor Data Record that describe the population of sensors and guide software in presenting sensor information SDRs repository device stores SDRs and provides access of s...

Page 154: ...le and options available while browsing and how to log out Prestart The Remote Management Module has an embedded Web server and an application with multiple standard interfaces This topic describes these interfaces and their usages You can use the TCP IP protocol to access these interfaces For default account setting that is depend on customer s requirement The default user name and password are a...

Page 155: ...s It must start with an alphabetical character It is case sensitive Special character hyphen _ underscore at sign are allowed Enter a strong password consisting of at least one upper case letter alpha numeric characters and special characters Note Password field is mandatory and should have a minimum of 8 characters when SNMP status is enabled Navigation When the Remote Management Module is succes...

Page 156: ...ollowing submenus IPMI Event Log System Log Audit Log Video Log Settings This tab contains the following submenus Date Time External User Services KVM Mouse Setting Log Settings Manage Licenses Media Redirection Settings Network settings PAM Order Settings Platform Event Filter RAID Management Services SMTP Settings SSL Settings System Firewall User Management Video Recording Web Server Instances ...

Page 157: ... Display the notification received BIOS BIOS setup Sync On Off to Sync with latest sensor and eventlog updates Refresh Reloads the current page Username Display the current log in user name Log out To log out the Remote Management Module and turn back to the log on page click Sign out on the left down of the toolbar Note Automatic Timeout If the Web console detects no user activity within 5 minute...

Page 158: ...oard page shows the summary of the general information as table 4 Dashboard Category Description Power On Hours Display the time of power on Pending Deassertions Display the total number of event logs Access Logs Display the total number of audit logs Sensor Monitoring Critical Sensors Display critical sensors alert list Sensor The tab Sensor lists all sensors monitoring status and divides into di...

Page 159: ... MaxSpeed etc Memory Controller Display memory information ex Serial Number Manufacturer etc BaseBoard Display BMC information ex network address FW version etc Power Display PSU Power information ex AvgConsumedWatt SYS_12V etc Thermal Display thermal information ex Fan speed cpu temperature etc PCIE Device Display PCIE information ex Manufacturer Description etc PCIE Function Display PCIE functio...

Page 160: ...dable The BMC firmware also supports to show other FRU of devices in Web UI The FRU Information page displays the BMC FRU file information When selecting any available FRU Device ID its corresponding FRU information will be displayed It displays the FRU device name for the selected FRU device ID Also on FRU default page it displays the Chassis Board and Product details if available for the items s...

Page 161: ...n a record to see the details of that entry Also use the sensor type or sensor name filter options to view those specific events logged in the device System Log This page displays logs of system events for this device Audit Log This page displays logs of audit events for this device Chapter 6 BMC Setup 153 ...

Page 162: ...ed video files Setting This page offers lots of BMC configuration setting You can change these setting depend on demand Date Time This page shows the current time zone setting and allows you to sync NTP server or change time zone 154 HR650X V2 User Guide ...

Page 163: ...rnal User Services This field is used to set LDAP Active Directory and RADIUS KVM Mouse Setting This page is used to set KVM mouse positioning mode from local window to remote screen Chapter 6 BMC Setup 155 ...

Page 164: ...ings This field is used to configure the log policy for the event log advanced log settings Media Redirection Settings This page is used to configure the media into BMC for redirection 156 HR650X V2 User Guide ...

Page 165: ...tings This page is used to configure the network settings for the available LAN channels PAM Order Settings This page is used to configure the PAM order for user authentication into the BMC Chapter 6 BMC Setup 157 ...

Page 166: ...C to take selected actions on event messages that it receives or has internally generated RAID Management This field allows you to view the Storage Summary RAID Controller information Physical Device Information Logical Device Information BBU Information and Event Log 158 HR650X V2 User Guide ...

Page 167: ...e lists all services running on the BMC You can click icon on the right side of service to view and modify the service configuration SMTP Settings This page is used to configure the SMTP settings Chapter 6 BMC Setup 159 ...

Page 168: ...SSL Settings This page is used to configure SSL certificate into the BMC System Firewall This field is used to configure firewall setting 160 HR650X V2 User Guide ...

Page 169: ...to manage users By clicking user icon you can add a new user and modify or delete the existing users Video Recording This field is used to configure the video recording function of the KVM server and SOL setting Chapter 6 BMC Setup 161 ...

Page 170: ...s This page allows user to change TLS level and cryptographic mode Save Server Data This page allows you to download FFDC data from BMC including SEL CPU crash dump log or BIOS hidden log 162 HR650X V2 User Guide ...

Page 171: ...kout policy This page allows you to change the account lockout policy Remote Control The Remote Control page provides KVM feature access Using H5Viewer or JViewer depends on your preference Chapter 6 BMC Setup 163 ...

Page 172: ...Redirection page offers the remote image by emulating CD DVD HDD images within the BMC to host as media But currently the function is disabled by default according customer s requirement Disable Virtual Media Power Control The Power Control page offers the remote system power control you can click the perform action with power control operation which as same as the IPMI chassis power command 164 H...

Page 173: ...ance features That belongs to advanced operation it may make system restore to default setting or upgrade to another FW image Backup Configuration This feature allows you download the configuration of BMC information as below figure options Chapter 6 BMC Setup 165 ...

Page 174: ...uding BMC BIOS BP FPGA and PSU Firmware Update This page offers the firmware update for all device including BMC BIOS BP FPGA and PSU Additional it also offer further update option such as BMC BIOS dual rom firmware update Preserve Configuration This page offers BMC preserve options to select before updating BMC firmware If you want to update BMC with preserve data complete this page and then do B...

Page 175: ...System Administrator This page allows you change the BMC root user sysadmin password The root account is used for Linux console Chapter 6 BMC Setup 167 ...

Page 176: ...168 HR650X V2 User Guide ...

Page 177: ...PCI cards are fully and securely inserted into their respective slots on the system board 6 Verify that there are no resource conflicts between any newly added card and the standard cards e g two cards sharing the same interrupt 7 Verify that all external devices if any are working properly 8 If the system contains a hard disk drive verify that it has been properly formatted or configured 9 Verify...

Page 178: ...ended they can cause the system errors 3 If the program is run from a USB flash drive ensure that the program on the drive is a complete copy 4 If the program is run from a compact disc ensure that the disc is free from damage 5 If the program is run from a hard disk drive ensure that the program and all its related files are properly installed on the drive 6 Verify that all device drivers for the...

Page 179: ... Resolving other problems Monitor display problems If your monitor does not display properly do the following 1 Verify that the monitor s power switch is turned on Solution Turn on the monitor s power switch 2 Verify that the power cords of the server and monitor are securely and correctly connected to the power outlets Solution Plug the one end of the power cord securely into the connector at the...

Page 180: ...e server Error in system configuration due to sudden power outage Contact your local Lenovo service center to have the above procedures performed at your site Replacing the system board battery The server battery should be replaced if missing server configuration error occurs frequently system startup is unstable or the error message CMOS Battery Fails is displayed on the screen during the startup...

Page 181: ...ed Check the power switches to make sure that the system and any optional devices are turned on Check for updated software firmware and operating system device drivers for your Lenovo product The Lenovo Warranty terms and conditions state that you the owner of the Lenovo product are responsible for maintaining and updating all software and firmware for the product unless it is covered by an additi...

Page 182: ...174 HR650X V2 User Guide ...

Page 183: ...n new editions of the publication Lenovo may make improvements and or changes in the product s and or the program s described in this publication at any time without notice The products described in this document are not intended for use in implantation or other life support applications where malfunction may result in injury or death to persons The information contained in this document does not ...

Page 184: ...ent with the protection of human health and safety If Lenovo determines that the levels of particulates or gases in your environment have caused damage to the device Lenovo may condition provision of repair or replacement of devices or parts on implementation of appropriate remedial measures to mitigate such environmental contamination Implementation of such remedial measures is a customer respons...

Page 185: ...y law prior to making any such connection Contact a Lenovo representative or reseller for any questions Electronic emission notices When you attach a monitor to the equipment you must use the designated monitor cable and any interference suppression devices that are supplied with the monitor Additional electronic emissions notices are available at http thinksystem lenovofiles com help index jsp Ap...

Page 186: ...178 HR650X V2 User Guide ...

Page 187: ...cing 44 front 2 5 inch drive backplane installing 54 front 2 5 inch drive backplane removing 53 front 3 5 inch drive backplane installing 58 removing 57 front I O assembly installing 51 removing 49 replacing 49 G gaseous contamination 176 Getting help 173 guidelines options installation 25 system reliability 26 H handling static sensitive devices 26 hard disk drive installing 29 replacing 28 hard ...

Page 188: ...5 removing 34 rear 2 5 inch 4 bay drive backplane removing 61 62 rear 2 5 inch drive backplane and drive cage removing 59 rear 3 5 inch 4 bay drive backplane removing 65 66 rear 3 5 inch drive backplane and drive cage removing 64 Rear view 11 rear view LED 14 rearwall bracket installing 68 removing 68 remove CMOS battery 96 M 2 adapter and M 2 drive 36 OCP 3 0 Ethernet adapter 77 removing 2 5 inch...

Page 189: ...at sink module 102 PHM 102 server setup 23 server setup procedure 23 service and support before you call 173 software 7 static sensitive devices handling 26 support web page custom 173 system board installing 111 removing 108 replacing 108 system board components 17 system fan installing 45 removing 44 replacing 44 system fan cage installing 48 removing 47 replacing 47 system reliability guideline...

Page 190: ...182 HR650X V2 User Guide ...

Page 191: ......

Page 192: ......

Reviews: