Group 7
Data entry/Programming
Page 165
JET2 neo
Release R1.12 en
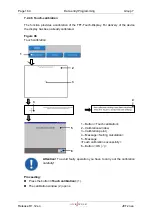
Now press carefully on the middle of the calibration point (3). Repeat the process as
long as the calibration point moves on the display.
If the settings are calculated an according message (4) is displayed on the upper area
of the calibration window. Now press any point on the Touch-Display to accept the
settings.
The message
<Touch calibration successfully>
(5) is faded in.
Finally press the button
<OK
(
)
>
(6) ) to finish the process.
7.2.4.6 Test print
With the function
<Test print>
a defined default job with set internal PrintGo-source is
loaded.
This job can be used by the operator as basis to create a new job or to control the print
function of the JET2neo.
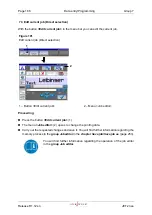
The default job is loaded as following:
Attention!
If the test print is activated when a print start release did already
happen for the previous loaded job, the JET2neo, starts immediately with
the print process because all signals are generated internally and no
sensor or encoder are required.
Attention! Ink escapes immediately from the print head!
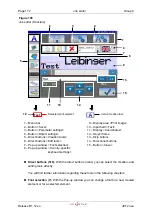
Press the button
<Test print>
(1).
A
safety query
(2), if the test print should be really started is faded in.
Confirm the loading of the job by pressing the button
<OK (
)>
(3) or cancel the
process with the button
<Cancel>
(4).
A
message
(5), that the test print-job is loaded is faded in.
Confirm the message with the button
<OK (
)>
(6). The job is now loaded and can be
started for printing.
Summary of Contents for JET2 neo
Page 1: ...Manual LEIBINGER JET2NEO Release 1 12en ...
Page 2: ......
Page 11: ...Group 1 Table of contents Page 9 JET2 neo Release R1 12 en ...
Page 12: ......
Page 21: ...Group 2 Safety Page 19 JET2 neo Release R1 12 en 2 4 Safety sticker Figure 1 Safety sticker ...
Page 276: ...Page 274 Appendix Group 12 Release R1 12 en JET2 neo Interface X4 Inputs Interface X3 Outputs ...


