Group 7
Data entry/Programming
Page 139
JET2 neo
Release R1.12 en
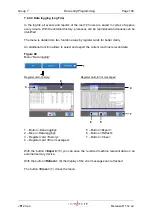
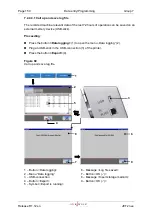
Click into the input field
<Password>
(6) of the window. A keyboard field (2) opens for
input.
Enter the defined password of the access authorization.
Press the button
<Return
>
(3) of the keyboard field to finish the input.
Now the input is displayed with placeholders (wildcards) in the input field
<Password>
(6.
Finally press the button
<OK
(
)
>
(4) to carry out the login process. The window is
closed and the user is logged in.
Figure 79
Define password
1
– Input field <Password>
5
– Window <Password query>
2
– Keyboard field
6
– Input field <Password>
3
– Button <Return
>
7
– Basic menu with password level display
4
– Button <OK (
)>
2
1
2
4
1
7
5
3
6
Summary of Contents for JET2 neo
Page 1: ...Manual LEIBINGER JET2NEO Release 1 12en ...
Page 2: ......
Page 11: ...Group 1 Table of contents Page 9 JET2 neo Release R1 12 en ...
Page 12: ......
Page 21: ...Group 2 Safety Page 19 JET2 neo Release R1 12 en 2 4 Safety sticker Figure 1 Safety sticker ...
Page 276: ...Page 274 Appendix Group 12 Release R1 12 en JET2 neo Interface X4 Inputs Interface X3 Outputs ...


