


92
Song operating mode
Song Record page
•
To
jump
to
the
next
measure,
filling
the
remain
‐
ing
beats
with
rests,
press
the
>>
button.
5.
To
change
the
step
value,
use
the
NOTE
VALUE
buttons,
on
the
lower
left
area
of
the
control
panel.
6.
Insert
a
note,
rest
or
chord
at
the
current
position.
•
To
insert
a
single
note,
just
play
it
on
the
key
‐
board.
The
inserted
note
length
will
match
the
step
length.
You
may
change
the
velocity
and
relative
duration
of
the
note,
by
editing
the
V
(Velocity)
and
D
(Duration)
parameters.
See
and
94.
•
To
insert
a
rest,
just
press
the
REST
button.
Its
length
will
match
the
step
value.
•
To
tie
the
note
to
be
inserted
to
the
previous
one,
press
the
TIE
button.
A
note
will
be
inserted,
tied
to
the
previous
one,
with
exactly
the
same
name.
You
don’t
need
to
play
it
on
the
keyboard
again.
•
To
insert
a
chord
or
a
second
voice,
see
below.
7.
After
inserting
a
new
event,
you
may
go
back
by
pressing
the
<
button.
This
will
delete
the
previ
‐
ously
inserted
event,
and
set
the
step
in
edit
again.
8.
When
finished
recording,
press
SEQ1
PLAY/STOP
to
turn
off
its
LED.
The
Main
page
of
the
Song
Record
mode
appears
again.
9.
From
the
Main
page
of
the
Song
Record
mode,
press
RECORD
to
exit
the
Record
mode.
While
in
the
Main
page
of
the
Song
mode,
you
may
press
SEQ1
PLAY/STOP
to
listen
to
the
Song,
or
select
the
Save
Song
command
to
save
the
Song
to
the
card.
Chords and second voices
With
microARRANGER,
you
are
not
obliged
to
insert
single
notes
in
a
track.
There
are
several
ways
to
insert
chords
and
double
voices.
For
more
information,
see
the
section
on
of
the
chapter.
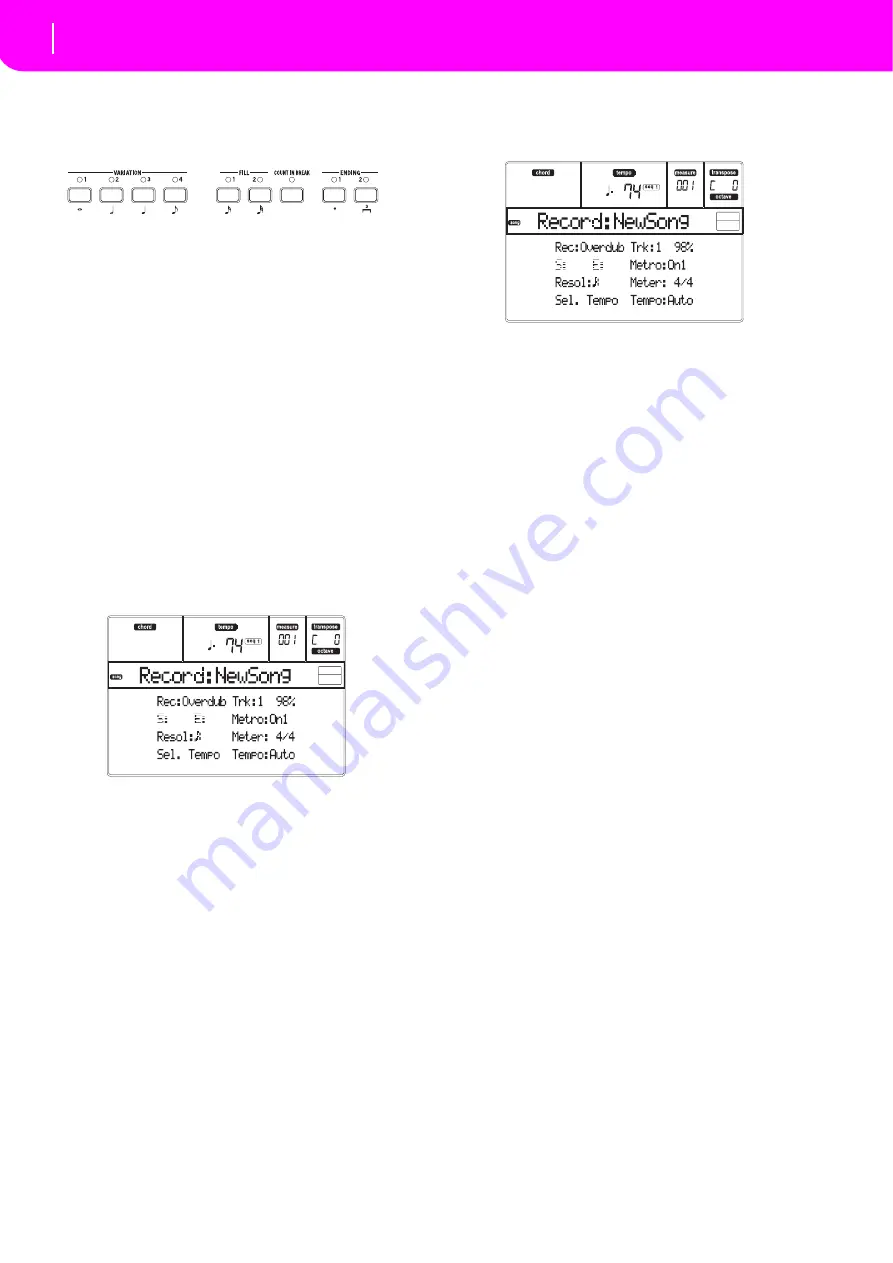
SONG RECORD PAGE
While
in
the
Song
mode,
press
RECORD
to
enter
the
Song
Record
mode.
The
Song
Record
page
appears.
Rec (Record mode)
Set
this
parameter
to
select
a
recording
mode.
Overdub
The
newly
recorded
events
will
be
mixed
to
any
existing
events.
Overwrite
The
newly
recorded
events
will
replace
any
existing
events.
Auto
Punch Recording
will
automatically
begin
at
the
“S”
position,
and
stop
at
the
“E”
position
(see
the
following
line).
Note:
The
Auto
Punch
function
will
not
work
on
an
empty
Song.
At
least
one
track
must
already
be
recorded.
PedalPunch Recording
will
begin
when
pressing
a
pedal
set
to
the
“Punch
In/Out”
function,
and
will
finish
when
pressing
the
same
pedal
again.
Note:
The
Pedal
Punch
function
will
not
work
on
an
empty
Song.
At
least
one
track
must
already
be
recorded.
StepDub
Step
Overdub.
This
recording
mode
lets
you
enter
events
one
at
a
time,
adding
events
to
the
existing
events.
StepOwr
Step
Overwrite.
This
recording
mode
lets
you
enter
events
one
at
a
time,
overwrit
‐
ing
all
existing
events.
Trk (Track)
Track
in
record.
1…16
One
of
the
16
tracks
selected.
To
select
a
track,
go
to
the
Track
pages
(see
and
S/E (Start/End)
These
parameters
appear
only
when
the
“Auto
Punch”
recording
mode
is
selected.
They
set
the
starting
and
ending
points
of
the
Punch
recording.
Metro (Metronome)
This
is
the
metronome
heard
during
recording.
Off
No
metronome
click
will
be
heard
during
recording.
A
one
‐
bar
precount
will
be
played
before
starting
recording.
On1
Metronome
on,
with
a
one
‐
bar
precount
before
starting
recording.
On2
Metronome
on,
with
a
two
‐
bar
precount
before
starting
recording.
Summary of Contents for microARRANGER
Page 1: ...Owner s Manual E 1...
Page 9: ...INTRODUCTION...
Page 25: ...BASIC GUIDE...
Page 41: ...REFERENCE GUIDE...
Page 145: ...APPENDIX...
Page 244: ...2011 KORG INC 4015 2 Yanokuchi Inagi city Tokyo 206 0812 Japan...


