28
Tutorial
Playing in Realtime (Without using Automatic Accompaniment)
7
Stop it!
OK,
you
could
say:
“Oh,
that’s
easy,
I
know
how
to
do
it,
I
can
just
press
that
big
red
START/STOP
button
again”.
Yes,
you
are
perfectly
right.
But
that’s
the
easy
way.
Let
us
suggest
a
more
colorful
way:
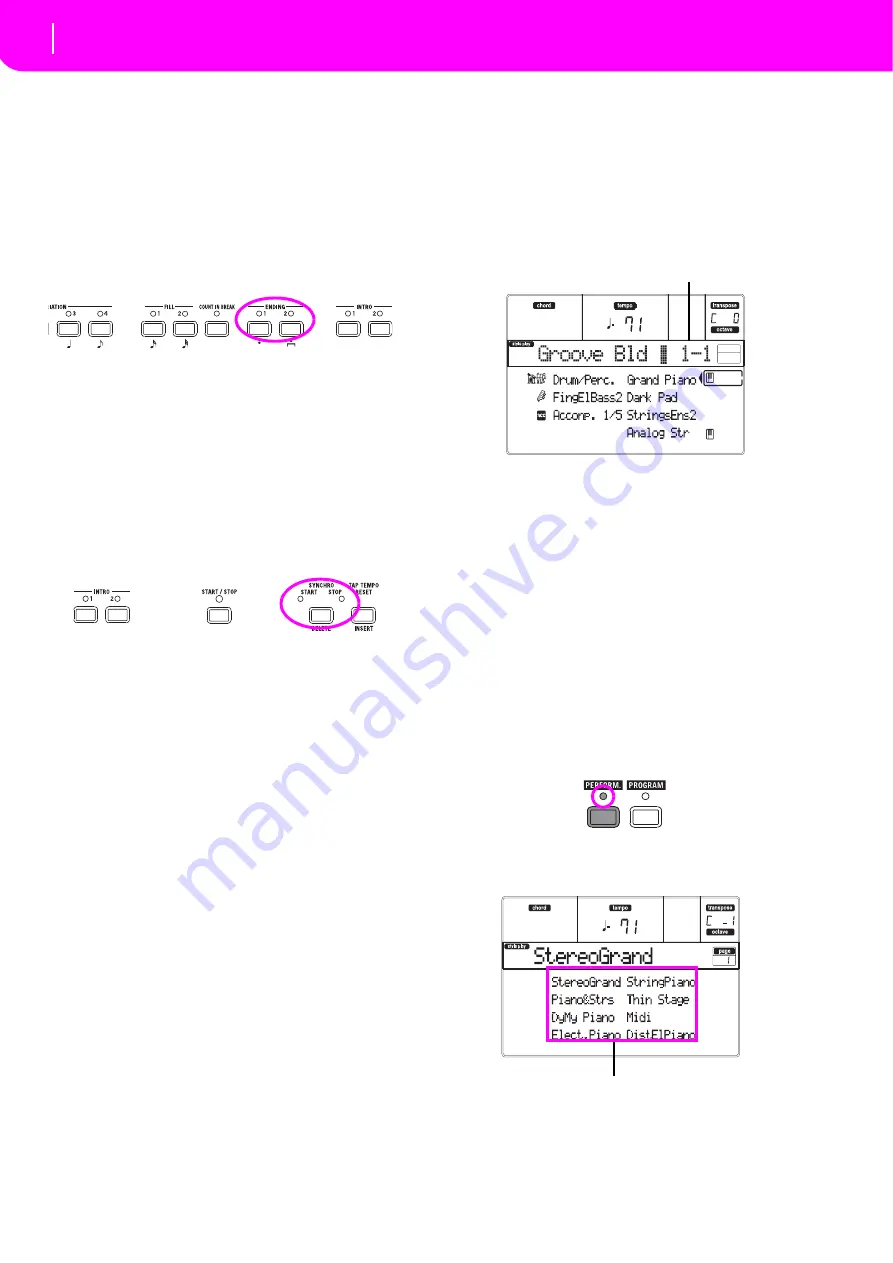
PRESS ENDING1 OR ENDING2
An
ending
is
instantaneously
called,
and
will
begin
playing,
to
lead
the
Style
to
a
colorful
end.
As
usual,
ENDING1
is
pre
‐
programmed,
while
ENDING2
asks
for
your
chord
progression.
In Sync
“What
if
I
want
to
avoid
all
that
START/STOP
stuff?
I
mean,
I
prefer
to
have
my
hands
free
for
playing
music!”
Good
point.
The
SYNCHRO
button
is
there
right
for
this
purpose.
1
While the Style is stopped, press the SYN-
CHRO button.
The
SYNCHRO
‐
START
LED
begins
blinking.
The
Syn
‐
chro
Start
function
is
enabled.
2
Play a chord on the keyboard.
You
must
play
a
chord
for
the
chord
recognition
engine.
Usually,
it
will
be
to
the
left
of
the
split
point,
but
it
depends
on
the
CHORD
SCANNING
section
(see
The
Style
starts.
3
Stop the Style using your chosen method.
Need more information?
Go
to
40.
The
Ref
‐
erence
Guide
includes
all
the
information
you
need.
PLAYING IN REALTIME
(Without using Automatic Accompaniment)
As
soon
as
you
turn
your
microARRANGER
on,
it
is
in
Style
Play
mode,
and
you
can
play
it
in
realtime.
Please
follow
me…
1
Play on the keyboard.
When
you
turn
the
microARRANGER
on,
Performance
1
‐
1
is
automatically
selected.
This
sets
the
Realtime
(Keyboard)
tracks
for
you.
In
this
case
you
get
the
Upper
1
track
playing
on
the
full
key
‐
board
range,
with
the
Grand
Piano
Program
selected.
As
you
may
know,
there
are
four
available
Realtime
tracks:
Upper
1–3
and
Lower.
Upper
Realtime
tracks
may
play
on
the
full
range
of
the
keyboard
(the
selected
KEYBOARD
MODE
shall
be
FULL
UPPER).
Otherwise,
the
Lower
track
plays
on
the
left
of
the
Split
Point,
and
the
Upper
tracks
on
the
right
(KEYBOARD
MODE
shall
be
SPLIT).
If
you
are
not
satisfied
with
this
setting
at
startup,
you
can
simply
select
another
Performance.
Or
change
the
track’s
settings—as
you
will
see
in
this
tutorial—and
save
them
into
Performance
1
‐
1.
You’ll
soon
see
how
to
do
it.
2
Select a different Performance.
Is
the
PERFORM.
LED
on?
If
so,
press
one
of
the
PROGRAM/PERFORMANCE
buttons,
and
select
a
Performance
with
the
VOLUME/
VALUE
buttons
(on
the
side
of
the
display).
Go
ahead
and
try
out
the
different
Performances.
We
provided
160
of
them
for
you.
Performance bank-number
Select a Performance with the VOLUME/VALUE buttons
Summary of Contents for microARRANGER
Page 1: ...Owner s Manual E 1...
Page 9: ...INTRODUCTION...
Page 25: ...BASIC GUIDE...
Page 41: ...REFERENCE GUIDE...
Page 145: ...APPENDIX...
Page 244: ...2011 KORG INC 4015 2 Yanokuchi Inagi city Tokyo 206 0812 Japan...


