background image

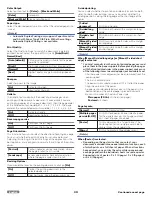
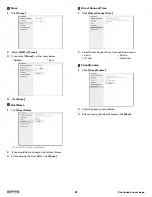
Color

Set the copy Color setting from pull-down menu.

Color

Black and White

Quality

Set the copy Quality from pull-down menu.

Text

Text/Photo

Photo

Draft

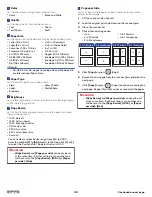
Paper Size

Set the Paper Size for the document copy from pull-down menu.

Letter (8.5 x 11 in.)

Legal (8.5 x 14 in.)

Executive (7.25 x 10.5 in.)

Statement (5.5 x 8.5 in.)

A4 (210 x 297 mm)

JIS B5 (182 x 257 mm)

A5 (148 x 210 mm)

A6 (105 x 148 mm)

4 x 6 in. (Postcard)

3 x 5 in. (Index Card)

5 x 7 in. (2L)

3.5 x 5 in. (L)

Hagaki (100 x 148 mm)

Envelope 10 (4.125 x 9.5 in.)

Envelope DL (110 x 220 mm)

Envelope C5 (162 x 229 mm)

 Note(s)

A4, JIS B5, A5, A6, Hagaki, Envelope DL and Envelope C5

are International Paper Sizes.

Paper Type

Set the Paper Type from pull-down menu.

Plain

Label

Envelope

Glossy Photo

Matte Photo

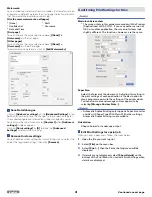
Brightness

Set the level of Brightness. Adjust the slider to the right to get lighter

and to the left to get darker.

Copy Resize

Set the Resize for enlarging or compressing the document copy

from pull-down menu.

100% Default

130% Letter->Legal

104% Executive->Letter

97% Letter->A4

93% A4->Letter

85% Letter->Executive

Custom*

*

You can select custom Resize range from 25% to 400%.

Enter the number 

[1]

 to 

[99]

 directly in the box, click 

[+]

 or 

[-]

to select the Resize value. The default value is 100%.

 CAUTION

[Copy Resize]

 and 

[Pages per side]

 can never be set

at the same time. If either setting is set, another one

will be reset to the 

[Copy Resize]

[100%]

 or 

[Pages

per side]

[One]

.

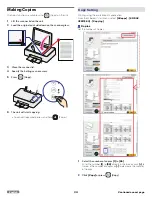
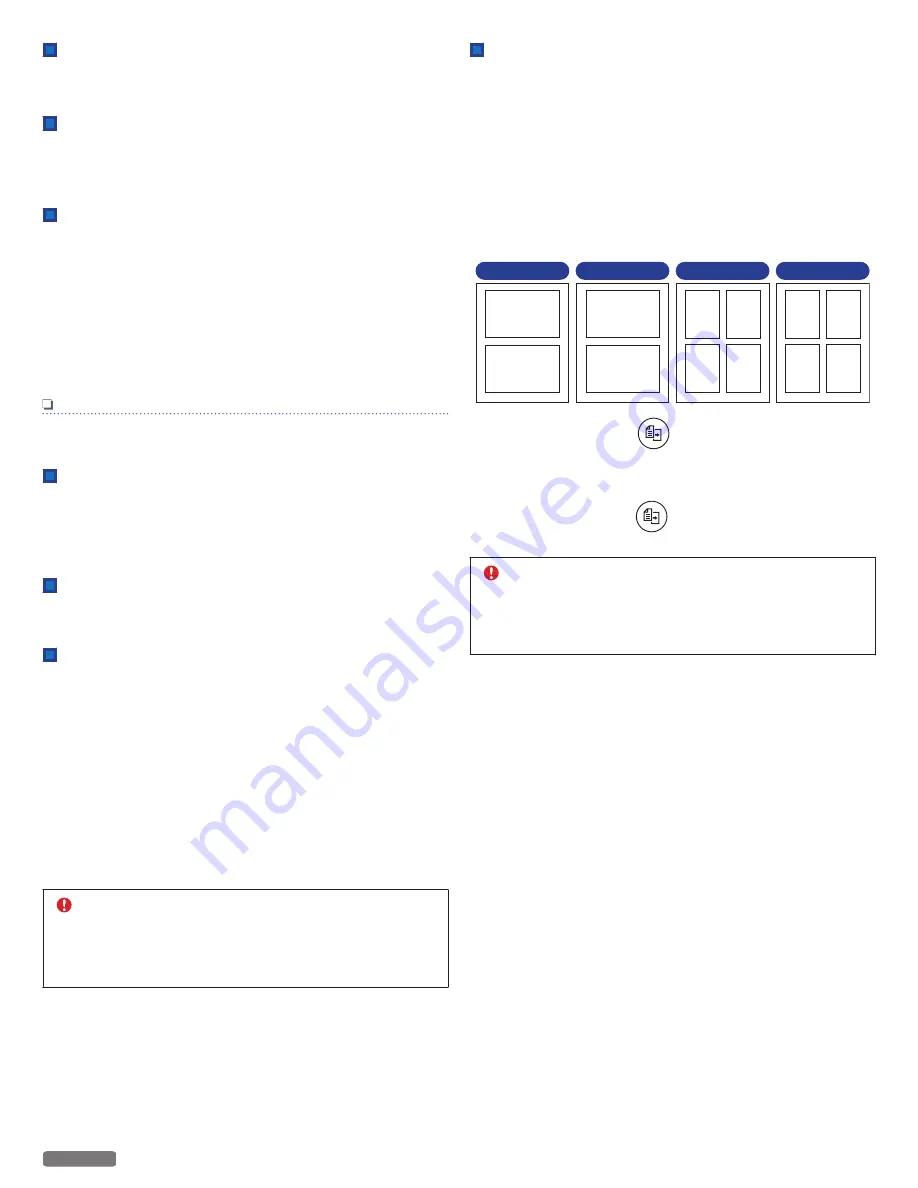
Pages per Side

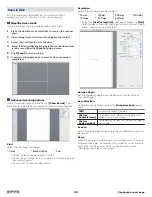
You can copy multiple pages on one sheet by printing smaller

images on each page.

1

Lift the scanner lid on the unit.

2

Load the original print side down on the scanner glass.

3

Close the scanner lid.

4

Click either printing option

One

2 in 1 Portrait

2 in 1 Landscape

4 in 1 Portrait

4 in 1 Landscape

2

1

1

2

4

3

2

4

3

1

1

2

2 in 1 Portrait

2 in 1 Landscape

4 in 1 Portrait

4 in 1 Landscape

5

Click 

[Copy]

 or press 

 (Copy).

6

Remove the first page from the scanner glass and place the

next page.

7

Click 

[Copy]

 or press 

 (Copy) to continue scanning the

next page. Repeat this until you have scanned all the pages.

 CAUTION

[Copy Resize]

 and 

[Pages per side]

 can never be set

at the same time. If either setting is set, another one

will be reset to the 

[Copy Resize]

[100%]

 or 

[Pages

per side]

[One]

.

35

English

Continued on next page.

Summary of Contents for verite 50 eco

Page 1: ...ke using your KODAK VERITÉ Wireless All In One Inkjet Printer more enjoyable If you have read your instructions and still need assistance you may access our online help at www kodakverite com support or call 1 844 995 6325 1 844 99KODAK Details explanations and expressions displayed on your smartphone tablet PC display may differ from those shown in this Extended User Guide The displayed items and...

Page 2: ... Print settings 29 Confirming Printing Preferences for Windows 29 Confirming Print Settings for Mac 31 Making Copies 34 Copy Setting 34 Scanner 37 Scan in Scanning application by Windows 37 Scan in Mac 38 Settings 40 Wi Fi Setup 40 Google Cloud Print 42 AirPrint 43 Software update 43 Printer Utility 43 Web interface 46 Confirming the IP Address 46 Calling the Web interface 46 Device Status 47 Devi...

Page 3: ...5g m2 onto the Paper support Refer to Specifications for print media on page 27 ID Card Copy function Using the ID Card Copy function you can copy both sides of a small document e g business card onto one page Refer to ID Card Copy on page 36 Web interface The web interface is available to you on all operating systems YoucanaccessthewebinterfacewithanInternetbrowseronyour PC and conduct many diffe...

Page 4: ...ice could overheat or degrade The area in which you operate the device must be adequately ventilated especially if the device is used frequently Set up your device in such a way that the Heat or A C vent s air flow must be directed away from the work station Never use a gas duster on this device This gas trapped inside of this device may cause ignition and explosion In the event that the device be...

Page 5: ...rd s Operation is subject to the following two conditions 1 This device may not cause interference and 2 this device must accept any interference including interference that may cause undesired operation of the device CAN ICES 3 B NMB 3 B PC connection Use only a custom high speed certified USB cable to connect the device to your PC The recommendable cable length is no longer than 5 feet 1 5 m Tra...

Page 6: ...rency Government bonds territorial bonds Postal money order certificates Postal stamps documentary stamps Capital stock certificates debenture stock certificates Bills checks Commuter passes coupon tickets Other valuable paper Official documents Forging any of the following to use as genuine articles is subject to punishment by law Licenses copies of corporate registration and other certifications...

Page 7: ... Control panel and LED indicators 1 2 4 3 5 6 7 When opening the lid door 8 Scanner glass 9 Ink door 10 Ink cartridge holder 11 Front cover 8 10 11 9 Rear view 12 Rear Cover Duplex Unit 13 Printer USB port USB connection for your PC 14 AC inlet 15 AC Power cord and AC plug 13 12 15 14 7 English Continued on next page ...

Page 8: ... in Meaning of LED behavior and error lights on the next page Please note the messages displayed in the Web Interface or in the Status Messenger for Windows only on your PC Buttons Wireless Use to connect to the Wireless Network Wireless feature On By using Easy Simple Print with the mobile device press it less than 3 seconds to establish the Wireless Connection By using Wireless router if your ro...

Page 9: ... saving power Even in Sleep mode the unit is able to receive a print job from USB Network equipment All LEDs Lights up and Blinking 9 Unit is Starting Lights up Indicates that the unit is Ready The unit is able to receive a print job This Yellow LED behavior is also used when copying scanning or cancelling copy or scan Blinking 5 Indicates that the unit is Running This Yellow LED behavior is used ...

Page 10: ...nnected to your smartphone tablet using Easy Simple Print connection The unit is connected to the Network using Easy Simple Print Blinking 7 Indicates that the Network connection has become unavailable and the unit is not currently connected to the Network Blinking 5 Indicates that the unit is in the process of the Google Cloud Print registration Proceed to Google account registration and register...

Page 11: ...Guide and Limited Warranty from the unit lift up the Ink door then remove the protective paper 2 1 3 Open the Scanner lid then remove the protective paper 2 1 4 Confirm that the Rear Cover Duplex Unit is correctly installed before operating the unit Note s How to Remove Re Install the Rear Cover Duplex Unit 1 Place your fingers in the bottom concave area then place your thumb on the top gray butto...

Page 12: ...ide the color ink cartridge all the way into the right slot using the green rail Slid e Slid e Slid e Slid e Slid e Slid e Color Right Black Left 6 Slidetheblackinkcartridgeallthewayintotheleftslotusing the green rail 7 Push and click the center green Cartridge tab to close the cartridge slot until the cover snaps securely into position Click Click 8 Close the Ink door CAUTION Ink Cartridge Not In...

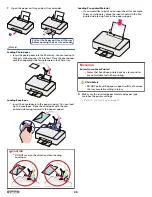
Page 13: ... are all the same 6 Set the plain paper Letter or A4 size 20 lb or 75 g m2 onto the paper support You can load up to 60 plain paper sheets Slide the paper guide firmly against the edge of the paper 1 2 7 Open the paper exit tray and the exit tray extender 1 2 Pull out the Paper exit tray all the way before opening the Exit tray extender Note s Loading Paper You can load up to 15 index cards or pos...

Page 14: ...how the file extensions the program and file names appear to be different from those described in this User Guide In this Extended User Guide the appearance of the screen images are based on Windows 10 however other operating systems e g Windows 8 etc provide basically the same operations There may be programs and functions named differently CAUTION If there are any programs running close them fir...

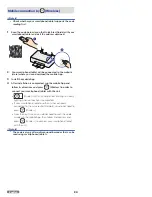
Page 15: ...is displayed on the bottom left of the Security Privacy window Click the lock Icon to unlock You may be required to enter the login password to proceed 4 Select Anywhere from options listed For more information visit our FAQ on the website at www kodakverite com support Install the printer driver to your PC There are two ways to connect to the unit Using Wi Fi Recommended When your PC finds the un...

Page 16: ...ck Start 7 The unit will start printing the alignment pattern 8 Open the scanner lid and place the alignment pattern paper facing down on the scanner glass then click Confirm after closing the scanner lid 9 The unit will start scanning the alignment pattern to set an appropriate alignment on this unit Note s Make sure to use only blank white paper sold separately Never use colored or patterned pap...

Page 17: ... Letter or A4 size paper is loaded in the paper support click Start 5 The unit will start printing the alignment pattern 6 Open the scanner lid and place the alignment pattern paper facing down on the scanner glass then click Confirm after closing the scanner lid 7 The unit will start scanning the alignment pattern to set an appropriate alignment on this unit Note s Make sure to use only blank pap...

Page 18: ...ill in the blank Network Name SSID Security type Security key then click Next 2 Connect up the Unit to your PC WPS Search 1 Click WPS Search 2 Press and hold the WPS button on your Router for a few seconds 3 Press and hold Wireless until the blinking pattern of Wireless LED changes 4 Click Continue 18 English Continued on next page ...

Page 19: ...l appear Select your printer s serial number and click Next Changing connection from USB to Wi Fi USB always has priority If you would like to change connection from USB to Wi Fi refer to the following instructions Microsoft Windows 1 Disconnect the USB cable between this unit and your PC first 2 From the Windows start menu select All apps KODAK VERITE 64 Device setting 3 Click Printer re search i...

Page 20: ... first 2 From the Windows start menu select All apps KODAK VERITE 64 Device setting 3 Click Printer re search in the Device setting window 4 Change the connection type automatically after checking one of the connections Apple Mac OS 1 Connect the USB cable between this unit and your PC 2 Activate System Preferences 3 Click Printers Scanners 4 Click Add printer or Scanner 5 Click the printer select...

Page 21: ...mage that is approx 88 of the original image size e g 1 Paper size Letter e g 2 Poster e g 3 Resizing Paper Letter changes to a smaller print size on Letter paper e g 4 Layout 2 up Selecting ECO mode you can automatically save ink and reduce the size of your print You can also select ECO mode under Printer Preferences on your PC If you set photo print borderless the print size is not reduced If th...

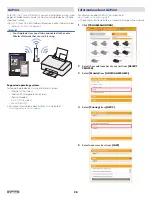
Page 22: ... camera In order to download the mobile App you will need a Google Account or an Apple ID Note s Connect your mobile to the same Wireless Network that your unit is using Use the mobile App Printing using the print application is available How to download the mobile App 1 From your mobile device go to www kodakverite com support 2 Confirm that the DOWNLOADS is selected then select the model number ...

Page 23: ... and follow its directions and press Wireless in order to connect your smartphone tablet with the unit Wireless LED will change from blinking to steady lighting when connection is completed If your smartphone tablet and the unit have already connected to the same router Network you do not need to press Wireless From the next time on you do not need to scan the code Simply run the mobile App then f...

Page 24: ...ations Google Cloud Print is compatible with the following operating systems and applications Supported operating systems Chrome OS Android 2 1 or later iOS 3 0 or later Applications that can be used for printing Applications for Chrome OS Google Chrome browser Google Drive for mobile Gmail webmail service for mobile For more information about Google Cloud Print visit website at www kodakverite co...

Page 25: ...ple devices running the latest version iPhone 3GS or later iPod touch 3rd generation or later iPad all models OS X v10 7 or later macOS v10 12 For more information about AirPrint visit website at www kodakverite com support Information about AirPrint For information about AirPrint visit website at www kodakverite com support The contents of the website are subject to change without notice 1 Click ...

Page 26: ...click on the pop up an error recovery guide appears so that you can confirm a detailed explanation on how to fix the problem Settings for pop up message and detailed information display can be configured in Status Messenger Settings For how to configure the settings refer to the following instructions Status Messenger Settings To configure the Status Messenger right click on the Icon in the system...

Page 27: ...es or with tape or glue that are pasted with note paper that are creased crumpled or torn that are curled 0 08 inches 2 mm or more Forms from a Laser Printer Forms that have been printed out by a laser printer are not suitable for further printing Note s Curled Paper If paper is curled use it after flattening paper 0 08 inches 2 mm or more curl may cause paper jam Storing Paper To avoid curling wh...

Page 28: ...the non printed side facing forward in the paper support CAUTION DO NOT reverse the direction when loading envelopes Loading Pre printed Material If you would like to print on an input sheet for example forms or stationery place the input sheet with the Pre printed side facing front in the paper support CAUTION Forms from a Laser Printer Forms that have been printed out by a laser printer are not ...

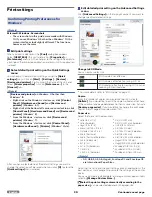
Page 29: ...g on the Advanced Settings menu Click Advanced Settings on the top right corner if you want to change specific detailed settings Change to ECO Mode You can easily use less Ink ECO mode is not effective ECO mode is effective for saving 20 ink ECO mode is effective for saving 20 ink and reducing 12 printed area For more details refer to ECO mode on page 21 Copies Enter the number of copies you would...

Page 30: ...ff Does not resize Keep the document size 2 sided printing You can select whether to print on one side only or print on both sides For both sides printing you can also select whether the binding position is along the long edge or the short edge of the paper 1 sided document Prints on one side 2 sided long edge Prints on both sides with a margin on long edge 2 sided short edge Prints on both sides ...

Page 31: ...ettings then click Remove Confirming Print Settings for Mac Note s Macintosh Screenshots The screen shots in this guide were made with the Preview Applications of OS X 10 11 If you use another version of OS X or another application the screen interfaces look slightly different The functions however are the same Paper Size Select the format of the document Adjusting this setting in the print settin...

Page 32: ...e Image or Fill Entire Paper automatically Copies per page s Print multiple copies of the page s Layout Pages per Sheet Print multiple pages on one sheet Layout Direction If you print multiple pages on a sheet select the layout direction Border Print the border on the sheet Reverse page orientation If you would like to reverse page orientation select the checkbox Flip horizontally If you would lik...

Page 33: ...th a Quality suitable for the type of Paper that is selected Draft High speed printing but low image quality Normal Standard speed printing and image quality Best Highest quality image but printing speed is low Paper Type Select the desired Paper Type Ensure that the selected paper size is used Note s Automatic Duplex Printing only supports Paper Size Letter and A4 with Paper Type 20 lb Plain With...

Page 34: ...t will start copying To cancel Copy mode press and hold Power Copy Setting Printing using the available print application From the Windows start menu select All apps KODAK VERITE 64 Copying Copies Set the number of Copies 1 Select the number of copies 1 to 99 Enter the number 1 to 99 directly in the box or click to increase the number of copies or to decrease the number of Copies 2 Click Copy or p...

Page 35: ...tter A4 93 A4 Letter 85 Letter Executive Custom You can select custom Resize range from 25 to 400 Enter the number 1 to 99 directly in the box click or to select the Resize value The default value is 100 CAUTION Copy Resize and Pages per side can never be set at the same time If either setting is set another one will be reset to the Copy Resize 100 or Pages per side One Pages per Side You can copy...

Page 36: ...r A4 size paper on the paper support 3 Lift the scanner lid on the unit 4 Load the front side of the ID card facedown on the scanner glass in the right front placement corner with arrows and then Click Copy or press Copy then Copying process will start 5 Lift the scanner lid on the unit flip ID card over and click Copy or press Copy Note s If you have changed the Paper Settings in the Setup Menu t...

Page 37: ...5 x 9 5 in Envelope DL 110 x 220 mm Envelope C5 162 x 229 mm Entire Flatbed 216 x 297 mm Note s A4 JIS B5 A5 A6 Hagaki Envelope DL and Envelope C5 are International Paper Sizes Entire Flatbed 216x297mm is the setting that scans the entire scanner glass Scan Resolution dpi Select the scan Resolution from below 75 dpi 100 dpi 150 dpi 200 dpi 300 dpi 600 dpi 1200 dpi Note s Scanning at 2400 dpi or mo...

Page 38: ... an object in Grayscale 256 or Thousands of grays Choose Text to scan text documents Resolution Select the scan Resolution from below 75 dpi 100 dpi 150 dpi 200 dpi 300 dpi 600 dpi 1200 dpi Select the Use Custom Size checkbox to enable the Size fields to specify the width and height you want to scan Select pixels inches or cm centimeters Rotation Angle Set the number of degrees for the clockwise r...

Page 39: ...Color balance between red and green Temperature to adjust the Color balance of warm and cool Saturation to adjust the vividness of Colors When choosing Black White in Kind Brightness to adjust the balance between light and dark Contrast to adjust the balance of sharpness and softness When choosing Text in Kind Threshold to adjust the transition point between dark and light Note s Those images are ...

Page 40: ...Steps below 1 Click the SSID you would like to connect 2 Enter Password and click Connect IP Address 1 Click IP Address 2 Select Auto or IP address Auto DHCP DynamicHostConfigurationProtocol mode It s easy to Automatically get the IP address of this unit from the Network IP address Static mode Set the Network address manually 3 If you select Manual set the items below IP Address Subnet Mask Defaul...

Page 41: ...ed 2 If you would like to change it enter Host Name 3 After entering the Host Name click Save Direct Connect Time 1 Click Direct Connect Time 2 Select Direct Connect Time from pull down menu 5 min 10 min 60 min Unlimited Friendly name 1 Click Friendly name 2 Enter the name you would like 3 After entering the Friendly Name click Save 41 English Continued on next page ...

Page 42: ...t service Disconnected Unit has been disconnected from the Google Cloud Print service The Google Cloud Print feature is not available Unit is registered in the Google Cloud Print service Registration in progress Registration is in process to use the Google Cloud Print service The Google Cloud Print feature is not available Registration should complete please wait Register to Google Cloud Print 1 C...

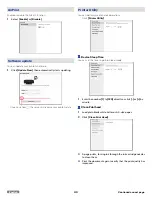
Page 43: ...ity You can perform maintenance operations Click Printer Utility Device Sleep Time You can set the time to go into Sleep mode 1 Enter the number 1 to 120 directly or click or by minute Clean Printhead 1 Load plain blank white Letter or A4 size paper 2 Click Clean Print Head 3 A page prints forcing ink through the ink cartridge nozzles to clean them 4 Print the document again to verify that the pri...

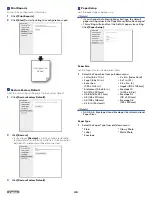
Page 44: ...ll start printing the alignment pattern The Power LED will light up then blink rapidly LED lighting pattern is Blinking 6 Refer to Meaning of LED behavior and lights on page 9 5 Open the scanner lid on the unit Load the front side of the alignment pattern result facedown at the placement corner of the scanner glass see below then click Next to start the alignment adjustment after closing the scann...

Page 45: ...e Note s If you change the following Paper Settings the default papersettingvaluesintheCopyMenuwillalsobechanged This setting will also affect the AirPrint paper size setting Click Paper Setup Paper Size Set the Paper Size for the document copy 1 Select the Paper Size from pull down menu Letter 8 5 x 11 in Legal 8 5 x 14 in Executive 7 25 x 10 5 in Statement 5 5 x 8 5 in A4 210 x 297 mm JIS B5 182...

Page 46: ...Page 65 CartridgeStatus Installed CartridgeType XXL InkLevel 43 CartridgeStatus Installed CartridgeType XXL InkLevel 75 Language English DefaultPaperSize Letter DefaultPaperType Plain SleepTime out 10min EWSAccessPath http xxx xxx xxx xxx 㸸 㸸 Color Cartridge Black Cartridge Device Information Device Statistics Information Supply Information Device Configuration Network Information EWS Access Path ...

Page 47: ... can confirm or set the state of the Network If you are not familiar with Network management use the default settings Note s Be careful if you want to assign the IP address manually If the IP address you entered is not correct you will not be able to connect to the unit When you cannot connect to the unit after a configuration change please reset the unit to the factory default Refer to Restore Fa...

Page 48: ...t on page 25 for more information Note s When you select Certificate Installation or Generate Certificate Request you can set the encrypted communication AirPrint Configuration You can turn On Off the AirPrint function If set to On you can print using the AirPrint The printer name Friendly Name and its information are displayed when you are using AirPrint Google Cloud Print You can set the Google ...

Page 49: ...n ensure plain Letter or A4 size paper is loaded Order Supplies If you would like to purchase consumable material visit the following website at www kodakverite com support Software Update If the Software Update for this unit is available the Update button is displayed Click it and start to update the Software When the Software is the latest version the Update button is not displayed Login Passwor...

Page 50: ...ructions Follow the instructions on the packaging of the consumable materials 1 Open the unit by lifting the Ink door DO NOT Open During a Print Job Never open the Ink door while printing 1 2 2 Press front side blue Cartridge tab with 2 fingers to open the Cartridge slot Press Press 3 Remove the cartridges Slid e Slid e Slid e Slid e Slid e Slid e Color Black 4 Remove the Black and Color Ink cartr...

Page 51: ...reen Cartridge tab to close the slot until the cover snaps securely into position Click Click 9 Close the Ink door CAUTION Ink Cartridge Not Inserted Correctly If the Ink door does not close properly the Ink cartridges are not inserted correctly Remove the Ink cartridges and then correctly insert them again CLOSE use only GREEN part OPEN use only BLUE part Green Blue DO NOT PUSH the green blue par...

Page 52: ...h the unit and help extend the life of your product We recommend that you use only genuine KODAK VERITÉ Ink Cartridges sold by Funai Corporation Inc Funai s warranty does not cover damage caused by non KODAK VERITÉ Ink or Ink Cartridges Fixing a paper jam Clearing paper jam in the unit Note s The Parts inside the unit are Sensitive Avoid unnecessarily touching Parts while Clearing Jams 1 Check the...

Page 53: ...dges Keep new ink cartridges in their packaging until you are ready to install them DO NOT remove an ink cartridge from the unit except to replace clean or store it in an airtight container The cartridges do not print correctly if left exposed for an extended period of time CAUTION Refilling ink cartridges The warranty does not cover repair of failures or damage caused by a refilled ink cartridge ...

Page 54: ...sing a damp cloth to clean the interior may cause damage to your unit 5 Make sure the paper support and paper exit tray are dry before beginning a new print job Periodic maintenance is required The unit will automatically clean the nozzle itself regularly to keep an appropriate print quality This maintenance begins automatically even when the unit is in Sleep mode Important Notice Regarding Printh...

Page 55: ...6 OS Version Processor Browser USB port OS Version Processor Browser USB port OS Version Processor Browser USB port 32 bit x86 or 64 bit x64 Microsoft Edge Only Windows 10 Internet Explorer USB 2 0 High Speed or Full Speed USB 2 0 High Speed or Full Speed USB 2 0 High Speed or Full Speed Intel Core Processor 700MHz about Intel Celeron or better macOS v10 12 Sierra OS X v10 11 El Capitan OS X v10 1...

Page 56: ...Icon for your unit and select see what s printing to open the print queue 3 On the menu make sure there are no check marks next to Pause Printing or Use Printer Offline 4 If you made any changes try to print again If a check mark does not appear next to Set As Default Printer then you must select the unit for each file that you want to print Disconnect and Reconnect Power Supply 1 Press and hold P...

Page 57: ... AllPrograms and then select the printer Software folder KODAK VERITE 64 from the list Windows 7 Vista 2 Select Uninstall 3 Follow the instructions on your PC screen to remove the printer Software 4 Restart the PC before Reinstalling the printer Software 5 Click Cancel on all New Hardware Found screens 6 From your computer go to www kodakverite com support and confirm that the DOWNLOADS is selecte...

Page 58: ...d but there are problems with Print quality Refer to Improving the print quality on page 65 Network problems If you need additional help the Funai Solutions Center offers the most up to date driver manuals the latest FAQs and troubleshooting tips Visit our website at www kodakverite com support Alignment problems A failure notification will only be displayed on the App being used to print Status M...

Page 59: ...t at least 30 seconds then reconnect the AC plug back into the AC socket If this error occurs occasionally visit our website at www kodakverite com support for the latest troubleshooting If you cannot solve the problem disconnect the AC plug and contact an Authorized Service Center Hard Reset on page 52 and blink as pattern 1 Memory Error Unplug and replug the power cable Unplug the AC plug Wait a...

Page 60: ...ce of the nozzles and contacts on the Ink cartridge s with a dampened soft cloth then let them dry before reinserting cartridge s Replace the current Ink cartridge s with an authorized Ink cartridge s Cleaning the ink cartridge nozzles and contacts on page 53 Changing the ink cartridge on page 50 and blink as pattern 6 blinks as pattern 1 Both inks are empty The ink is empty in the ink cartridge s...

Page 61: ...artridge Replace with a new Ink cartridge Order a new Ink cartridge from our website at www kodakverite com Changing the ink cartridge on page 50 blink as pattern 6 blinks as pattern 1 Black Ink Error Black ink cartridge error Clean the surface of the nozzles and contacts on the Ink cartridgewithadampenedsoftcloththenletthemdrybefore reinserting cartridge Replace the current Ink cartridge with an ...

Page 62: ...lor ink cartridge is not detected Color ink is not inserted You get good printed results with Mono mode in this condition If you want to use both Ink cartridges please cancel the print job then press and hold Power Standby and replace with a new Color Ink cartridge blink as pattern 4 and blink as pattern 4 Color Ink level is Low Color ink level is low You should purchase a new Ink cartridge Order ...

Page 63: ...rn 1 Defective Cartridge Ink cartridge s error Clean the surface of the nozzles and contacts on the Ink cartridges with a dampened soft cloth then let them dry before reinserting cartridge s Replace the current Ink cartridges with authorized Ink cartridge s If this error occurs occasionally try to replace the current Ink cartridges with new Ink cartridges Cleaning the ink cartridge nozzles and con...

Page 64: ... cartridges setup Cartridge setup is not done yet You need to set up for ink cartridges before use Cartridge Setup on page 44 Communication failure Communication failed on the unit Check the AC plug is connected to the AC outlet properly the unit is turned On or the connection environment USB Wireless to the unit Then follow the procedures by showing the help text on your connected unit If this er...

Page 65: ... 5 Cleaning the ink cartridge nozzles and contacts Refer to Cleaning the ink cartridge nozzles and contacts on page 53 6 Cleaning the scanner glass Copy function Refer to Cleaning the scanner glass on page 53 7 Cleaning the exterior of the unit Refer to Cleaning the exterior of the unit on page 54 8 Please change to the higher quality mode Faint or White lines Refer to Confirming Printing Preferen...

Page 66: ... 1200 dpi color Scanner Scanner type Flatbed scanner Scan resolution optical Software enhanced Up to 1200 x 1200 dpi Up to 19 200 x 19 200 dpi Maximum scan area 8 5 x 11 7 inches 216 x 297 mm Supported file types JPEG PDF Paper Input capacity Plain paper 20 lb or 75 g m2 Up to 60 Photo Paper 4x6 in Up to 10 Photo tray Output capacity Plain paper 20 lb or 75 g m2 Up to 25 Size Letter Legal JIS B5 A...

Page 67: ... Paper Currency Bank notes travel checks payment orders Postage stamps tax stamps stamped or unstamped Loan papers certificates of deposit bonds Documents protected by copyright Neither Funai nor its affiliates shall be liable to the purchaser of this product or third parties for damages losses costs or expenses incurred by the purchaser or third parties as a result of accident misuse or abuse of ...

Page 68: ...esults from accident misuse abuse mishandling misapplication alteration faulty installation improper maintenance commercial use such as hotel rental or office use of this product or damage which results from fire flood lightning or other acts of God THISWARRANTYDOESNOTCOVERPACKINGMATERIALS ANYACCESSORIES ANYCOSMETICPARTS COMPLETEASSEMBLY PARTS DEMO OR FLOOR MODELS FUNAI AND ITS REPRESENTATIVES OR ...

Page 69: ...The Kodak trademark logo and trade dress are used under license from Kodak www kodakverite com 2017 Funai Electric Co Ltd All rights reserved ...

Reviews: