background image

Keysight E3632A Service Guide

73

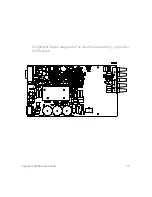
Component locator diagram for the main board assembly — top (serial 

MY53xx6xxx)

Summary of Contents for E3632A

Page 1: ...Keysight E3632A DC Power Supply Service Guide ...

Page 2: ...ustomarily provided to the public to use modify reproduce release per form display or disclose commercial computer software or commercial com puter software documentation No additional government requirements beyond those set forth in the EULA shall apply except to the extent that those terms rights or licenses are explicitly required from all providers of commercial computer software pursu ant to...

Page 3: ...er refer to this manual for specific Warning or Caution information Direct current DC Protective conductor terminal Alternating current AC Earth ground terminal Out position of a bi stable push control Terminal is at earth potential Used for measurement and control circuits designed to be operated with one terminal at earth potential In position of a bi stable push control Positive binding post Ne...

Page 4: ...es safety standards for design manufacture and intended use of the instrument Keysight Technologies assumes no liability for the customer s failure to comply with these requirements CAUTION Use the device with the cables provided with the shipment If the device is used in a manner not specified by the manufacturer the device protection may be impaired Always use a dry cloth to clean the device Do ...

Page 5: ...pears damaged or defective REMOVE POWER and do not use the device until safe operation is verified by service trained personnel If necessary return the device to Keysight for service and repair to ensure that the safety features are maintained Do not operate the device around flammable gases or fumes vapor or wet environments Observe all markings on the device before connecting any wiring to the d...

Page 6: ...EC 61010 1 2001 EN 61010 1 2001 Canada CAN CSA C22 2 No 61010 1 04 USA ANSI UL 61010 1 2004 Environmental Conditions This instrument is designed for indoor use and in an area with low condensation The table below shows the general environmental requirements for this instrument Environmental condition Requirements Temperature Operating condition 0 C to 40 C Storage condition 20 C to 70 C Humidity U...

Page 7: ... or toxic substance elements are expected to leak or deteriorate during normal use Forty years is the expected useful life of the product ICES NMB 001 indicates that this ISM device complies with the Canadian ICES 001 Cet appareil ISM est conforme a la norme NMB 001 du Canada This symbol is a South Korean Class A EMC Declaration This is a Class A instrument suitable for professional use and in ele...

Page 8: ...Control Instrument product The affixed product label is as shown below Do not dispose in domestic household waste To return this unwanted instrument contact your nearest Keysight Service Center or visit http about keysight com en companyinfo environment takeback shtml for more information Sales and Technical Support To contact Keysight for sales and technical support refer to the support links on ...

Page 9: ...ysight Calibration Services 20 Calibration Interval 20 Automating Calibration Procedures 21 Recommended Test Equipment 22 Test Considerations 23 Performance Verification Tests 24 Self test 24 Performance verification tests 24 Measurement Techniques 25 Setup for most tests 25 Electronic load 26 Current monitoring resistor 26 Programming 26 Constant Voltage CV Verifications 27 Constant voltage test ...

Page 10: ...ecord 38 Calibration Security Code 39 To unsecure the power supply for calibration 40 To unsecure the power supply without the security code 41 Calibration Count 42 Calibration Message 42 General Calibration Adjustment Procedure 43 Voltage and OVP calibration 44 Current and OCP calibration 46 Aborting a Calibration in Progress 49 Calibration Record for E3632A 50 Error Messages 51 System error mess...

Page 11: ...s 65 Unit is inoperative 65 Unit reports errors 740 to 750 65 Unit fails self test 65 Bias supplies problems 66 Self Test Procedures 67 Power on self test 67 Complete self test 67 Component Locator Diagram 71 Component locator diagram for the main board assembly top 71 72 Component locator diagram for the front panel top 72 Component locator diagram for the main board assembly top serial MY53xx6xx...

Page 12: ...Keysight E3631A Service Guide 14 THIS PAGE HAS BEEN INTENTIONALLY LEFT BLANK ...

Page 13: ...Keysight E3631A Service Guide 15 List of Figures Figure 1 1 Performance verification test setup 25 Figure 1 2 Transient response time 31 ...

Page 14: ...16 Keysight E3631A Service Guide THIS PAGE HAS BEEN INTENTIONALLY LEFT BLANK ...

Page 15: ...ormance test record 38 Table 1 4 Parameters for calibration 43 Table 1 5 Calibration record for E3632A 50 Table 1 6 System error messages 51 Table 1 7 Self test error messages 52 Table 1 8 Calibration error messages 53 Table 2 1 Bias supplies voltages 66 Table 2 2 Bias supplies voltages serial MY53xx6xxx 66 Table 2 3 Self test error messages 67 ...

Page 16: ...18 Keysight E3631A Service Guide THIS PAGE HAS BEEN INTENTIONALLY LEFT BLANK ...

Page 17: ...asurement Techniques 25 Constant Voltage CV Verifications 27 Constant Current CC Verifications 32 Common Mode Current Noise 36 Performance Test Record for E3632A 37 Calibration Security Code 39 Calibration Count 42 General Calibration Adjustment Procedure 43 Aborting a Calibration in Progress 49 Calibration Record for E3632A 50 Error Messages 51 Calibration Program 54 This chapter contains procedu...

Page 18: ...alibration contact your local Keysight Service Center for a low cost calibration The Keysight E3632A power supply is supported on calibration processes which allow Keysight to provide this service at competitive prices Calibration Interval The power supply should be calibrated on a regular interval determined by the accuracy requirements of your application A 1 year interval is adequate for most a...

Page 19: ...imit values You can also enter calibration constants from the remote interface Remote operation is similar to the local front panel procedure You can use a computer to perform the adjustment by first selecting the required setup The calibration value is sent to the power supply and then the calibration is initiated over the remote interface The power supply must be unsecured prior to initiating th...

Page 20: ...ities Keysight 82341C Interface card Programming and readback accuracy Oscilloscope 100 MHz with 20 MHz bandwidth Keysight 54602B Displaytransient responseand ripple and noise waveform RMS voltmeter 20 MHz Measure rms ripple and noise Digital voltmeter Resolution 0 1 mV Accuracy 0 01 Keysight 34401A Measure DC voltages Electronic load Voltage Range 50 Vdc Current Range 10 Adc Open and Short Switch...

Page 21: ...cation all test procedures should comply with the following recommendations Assure that the calibration ambient temperature is stable and between 20 C and 30 C Assure ambient relative humidity is less than 80 Allow a 1 hour warm up period before verification or calibration Keep cables as short as possible consistent with the impedance requirements CAUTION The tests should be performed by qualified...

Page 22: ...abled by pressing the Recall key actually any front panel keys except the Error key and the power line switch simultaneously and then continuing to press the Recall key for 5 seconds The complete self test will be finished in 2 more seconds You can also perform a self test from the remote interface see chapter 3 in the E3632A User s Guide If the self test is successful PASS is displayed on the fro...

Page 23: ...uide 25 Measurement Techniques Setup for most tests Most tests are performed at the front terminals as shown in the following figure Measure the DC voltage directly at the and terminals on the front panel Figure 1 1 Performance verification test setup ...

Page 24: ...itution of the electronic load requires minor changes to the test procedures in this chapter Current monitoring resistor To eliminate output current measurement error caused by the voltage drops in the leads and connections connect the current monitoring resistor between the output terminal and the load as a four terminal device Connect the current monitoring leads inside the load lead connections...

Page 25: ...entical to those displayed on the front panel 1 Turn off the power supply and connect a digital voltmeter between the and terminals of the output to be tested as shown in Figure 1 1 2 Turn on the power supply Select the 30 V 4 A range and enable the outputs by sending the commands VOLT RANG P30V OUTP ON 3 Program the output voltage to zero volt and current to full rated value 4 0 A by sending the ...

Page 26: ...voltmeter between the and terminals of the output to be tested as shown in Figure 1 1 2 Turn on the power supply Select the 30 V 4 A range enable the output and set the display to the limit mode When the display is in the limit mode program the output current to the maximum programmable value and the voltage to the full rated value 30 0 V 3 Operate the electronic load in constant current mode and ...

Page 27: ...the CV annunciator lights 5 Adjust the transformer to low line voltage limit 104 Vac for nominal 115 Vac 90 Vac for nominal 100 Vac or 207 Vac for nominal 230 Vac Record the output reading on the digital voltmeter 6 Adjust the autotransformer to high line voltage 127 Vac for nominal 115 Vac 110 Vac for nominal 100 Vac or 253 Vac for nominal 230 Vac Record the voltage reading on the digital voltmet...

Page 28: ...he current to the full rated value 4 0 A and the voltage to the full rated value 30 0 V 3 Check that the front panel CV annunciator remains lit If not lit adjust the load down slightly 4 Note that the waveform on the oscilloscope does not exceed the peak to peak limit of 2 mV 5 Disconnect the oscilloscope and connect an AC RMS voltmeter in its place The rms voltage reading does not exceed the rms ...

Page 29: ...outputs and set the display to the limit mode When the display is in the limit mode program the current to the full rated value 4 0 A and the voltage to the full rated value 30 0 V 3 Set the electronic load to transient operation mode between one half of the output s full scale value and the output s full rated value at a 1 kHz rate with 50 duty cycle 4 Set the the oscilloscope for AC coupling int...

Page 30: ...ct a 0 01 Ω current monitoring resistor RM across the output to be tested and a digital voltmeter DVM across the current monitoring resistor RM 2 Turn on the power supply Select the 15 V 7 A range and enable the output by sending the commands VOLT RANG P15V OUTP ON 3 Program the output voltage to full rated voltage 15 0 V and output current to zero amp by sending the commands VOLT 15 CURR 0 4 Divi...

Page 31: ...connect the output to be tested as shown in Figure 1 1 with the digital voltmeter connected across the 0 01Ω current monitoring resistor RM 2 Turn on the power supply Select the 15 V 7 A range enable the output and set the display to the limit mode When the display is in the limit mode program the output voltage to the maximum programmable value and the output current to the full rated value 7 0 A...

Page 32: ... full rated value 7 0 A 4 Operate the electronic load in constant voltage mode and set its voltage to 15 0 V Check that the CC annunciator remains lit If not lit adjust the load so that the output voltage drops slightly until the CC annunciator lights 5 Adjust the transformer to low line voltage limit 104 Vac for nominal 115 Vac 90 Vac for nominal 100 Vac or 207 Vac for nominal 230 Vac Record the ...

Page 33: ...ltmeter across the load resistor Use only a resistive load for this test 2 Turn on the power supply Select the 15 V 7 A range enable the output and set the display to the limit mode When the display is in the limit mode program the current to full rated value 7 0 A and the voltage to the full rated value 15 0 V 3 The output current should be at the full rated rating with the CC annunciator on If n...

Page 34: ...dance to earth ground will create a voltage drop equal to the output current flow multiplied by the impendance 1 Turn off the power supply and connect a 100 KΩ resistor RS and a 2200 pF capacitor in parallel between the terminal and chassis ground 2 Connect a digital voltmeter DVM across RS 3 Turn on the power supply Select the 15 V 7 A range enable the output and set the display to the limit mode...

Page 35: ... limit Lower limit CV programming accuracy 0 volts DVM reading 0 0100 V 0 0100 V CV readback accuracy 0 volts DVM 0 0050 V DVM 0 0050 V CV programming accuracy full scale DVM reading 30 025 V 29 9750 V CV readback accuracy full scale DVM 0 0200 V DVM 0 0200 V CV load regulation Maximum change 5 mV CV line regulation Maximum change 5 mV CV ripple noise 2 mVp p 0 35 mVrms Load transient response tim...

Page 36: ...per limit Lower limit CC programming accuracy 0 A IO 0 0100 A 0 0100 A CC readback accuracy 0 A IO 0 0050 A IO 0 0050 A CC programming accuracy full scale IO 7 0240 A 6 9760 A CC readback accuracy full scale IO 0 0155 A IO 0 0155 A CC load regulation Maximum change 0 95 mA CC line regulation Maximum change 0 95 mA CC ripple noise 2 mA Common mode current noise 1 5 μArms ...

Page 37: ...o 12 alphanumeric characters as shown below The first character must be a letter but the remaining characters can be letters or numbers You do not have to use all 12 characters but the first character must always be a letter A _ _ _ _ _ _ _ _ _ _ _ 12 characters To secure the power supply from the remote interface so that it can be unsecured from the front panel use the eight character format show...

Page 38: ...curity code using the knob and resolution selection keys 003632 CODE The security code is set to HP003632 when the power supply is shipped from the factory The security code is stored in non volatile memory and does not change when the power has been off or after a remote interface reset To enter the security code from the front panel enter only the last six digits To enter the security code from ...

Page 39: ...ard Be careful not to touch the power line connections 4 Apply a short between the two exposed metal pads on JP5 1 located near U13 Refer to Component locator diagram for the main board assembly top on page 71 5 While maintaining the short press Secure to move to the security code and enter any unsecure code in the calibration mode The power supply is now unsecured 6 Remove the short at JP5 2 An e...

Page 40: ... it left the factory When you receive the power supply read the calibration count to determine its value The calibration count increments up to a maximum of 32 767 after which it wraps around to 0 No way is provided to program or reset the calibration count Calibration Message You can use the calibration message feature to record calibration information about your power supply For example you can ...

Page 41: ...inals of the monitoring resistor The following table shows calibration parameters and points which should be used to calibrate the output voltage and current Table 1 4 Parameters for calibration NOTE The power supply should be calibrated after 1 hour warm up with no load connected Calibration parameter Voltage current Calibration point mnemonic CAL SETUP 1 Voltage V LO V MI V HI CAL SETUP 2 OVP No...

Page 42: ...until a beep is heard Make sure that the power supply is in CV mode If the power supply is not in CV mode an error occurs Voltage and OVP calibration 4 Move down a level to the voltage calibration mode CAL SETUP 1 The display shows the above message to indicate that the power supply is ready for the voltage calibration 5 Calibrate DAC and select the low voltage calibration point 30 LEFT The START ...

Page 43: ...ts the high voltage calibration point V HI 29 500 V If the entered number is within an acceptable range a ENTERED message appears for one second If the entered number is not correct a MIN VALUE or MAX VALUE message appears for one second and the display shows the middle voltage calibration point again The display now shows the high voltage calibration point 10 Read the DVM and change the high volt...

Page 44: ...tion If the calibration fails a OVP CAL FAIL message appears for one second and the display shows the CAL SETUP 2 for OVP calibration again 13 Select the low current calibration point I LO 0 2000 A The display shows the low current calibration point 14 Read the DVM and change the low current value on the display to match the computed current DVM reading divided by shunt resistance For example if t...

Page 45: ...sing the Calibrate key saves the change and selects the high current calibration point I HI 6 9000 A If the entered number is within an acceptable range an ENTERED message appears for one second If the entered number is not correct a MIN VALUE or MAX VALUE message appears for one second and the display shows the middle current calibration point again The display now shows the high current calibrat...

Page 46: ...icate that the power supply is ready for the OCP calibration If the calibration fails a DAC CAL FAIL or ADC CAL FAIL message appears for one second and the display shows the CAL SETUP 3 for current calibration again 20 Pressing the Calibrate key saves the new OCP calibration constants and return to the calibration mode CAL MODE A CALIBRATING message appears for several seconds to indicate that the...

Page 47: ...t a calibration after the procedure has already been initiated You can abort a calibration at any time by turning the power supply off from the front panel When performing a calibration from the remote interface you can abort a calibration by issuing a remote interface device clear message or by pressing the front panel Local key ...

Page 48: ...ading V Middle voltage point calibration 6 V HI 29 500 V appears on the display press the Calibrate key and change the display to match the DVM reading V High voltage point calibration 7 CAL SETUP now appears on the display press the Calibrate key V OVP calibration 8 CAL SETUP 3 now appears on the display press the Calibrate key and connect 0 01 Ω resistor across the output terminals Current calib...

Page 49: ...contained in Chapter 4 of the E3632A User s Guide System error messages Table 1 6 System error messages Error Error Message 330 Self test failed 350 Queue overflow 501 Isolator UART framing error 502 Isolator UART overrun error 503 a a This error message is only applicable for serial MY53xx6xxx SPI data error 511 RS 232 framing error 512 RS 232 overrun error 513 RS 232 parity error 514 Command all...

Page 50: ...onvergence failed 605 Cannot calibrate rundown gain 606 Rundown gain out of range 607 Rundown too noisy 608 Serial configuration readback failed 609 a a This error message is only applicable for serial MY53xx6xxx System ADC test failed 624 Unable to sense line frequency 625 I O processor does not respond 626 I O processor failed self test 630 Fan test failed 631 System DAC test failed 632 Hardware...

Page 51: ...d OVP DNL error correction data 717 Cal OVP or OCP status enabled 740 Cal checksum failed secure state 741 Cal checksum failed string data 742 Cal checksum failed store recall data in location 0 743 Cal checksum failed store recall data in location 1 744 Cal checksum failed store recall data in location 2 745 Cal checksum failed store recall data in location 3 746 Cal checksum failed DAC cal const...

Page 52: ...20 REAL Dmm_rdg Current_shunt 130 Current_shunt 01 Current Shunt value in Ohms 140 Sec_code HP003632 Assign the security code 150 ASSIGN Dmm TO 722 Assign address 22 to the Dmm 160 ASSIGN Pwrsupply TO 705 Assign address 5 to the Power Supply 170 CLEAR 7 Clear GPIB Dmm and Power Supply 180 OUTPUT Pwrsupply CLS Clear Power Supply errors 190 OUTPUT Dmm RST Reset Dmm 200 OUTPUT Pwrsupply RST Reset Pow...

Page 53: ...r If there is an error 680 display the error and exit the program 690 700 CLEAR SCREEN 710 IF Error 0 No error THEN 720 PRINT DAC DNL Error Correction completed for Power Supply 730 ELSE 740 PRINT ERROR Error DAC DNL Error not corrected 750 BEEP 760 GOTO 2250 770 END IF 780 PRINT TABXY 10 5 DAC DNL ERROR CORRECTION COMPLETE 790 PRINT TABXY 10 7 BEGIN VOLTAGE CALIBRATION 800 WAIT 4 810 OUTPUT Pwrsu...

Page 54: ...wer Supply output 1210 OUTPUT Pwrsupply CAL VOLT PROT Perform OVP circuit calibration 1220 WAIT 9 Allow OVP calibration to finish 1230 OUTPUT Pwrsupply OUTP OFF Turn off Power Supply output 1240 OUTPUT Pwrsupply SYST ERR 1250 ENTER Pwrsupply Error 1260 1270 Check to see if there is an error If there is an error 1280 display the error and exit the program 1290 1300 CLEAR SCREEN 1310 IF Error 0 No e...

Page 55: ...le reading to amps 1710 PRINT Dmm_rdg 1720 OUTPUT Pwrsupply CAL CURR DATA Dmm_rdg send stored value to Power Supply 1730 OUTPUT Pwrsupply CAL CURR LEVel MAX set output to maximum cal value 1740 WAIT 2 allow output to settle 1750 OUTPUT Dmm MEAS VOLT DC measure output with Dmm and 1760 ENTER Dmm Dmm_rdg store in variable Dmm_rdg 1770 Dmm_rdg Dmm_rdg Current_shunt scale reading to amps 1780 PRINT Dm...

Page 56: ...rror 0 No error THEN 2120 PRINT OCP calibration completed for Power Supply 2130 ELSE 2140 PRINT ERROR Error OCP not Calibrated 2150 BEEP 2160 GOTO 2250 2170 END IF 2180 CLEAR SCREEN 2190 PRINT TABXY 10 5 CURRENT OCP CALIBRATION COMPLETE 2200 2210 Create a time stamp and output to power supply 2220 2230 Cal_msg Last Calibrated DATE TIMEDATE TIME TIMEDATE 2240 OUTPUT Pwrsupply CAL STR Cal_msg 2250 O...

Page 57: ...61 Electrostatic Discharge ESD Precautions 62 Surface Mount Repair 62 To Replace the Power Line Fuse 63 To Disconnect the Output Using an External Relay 63 Troubleshooting Hints 65 Self Test Procedures 67 Component Locator Diagram 71 This chapter contains procedures for returning a failed power supply to Keysight for service or repair ...

Page 58: ...tch is depressed Verify that the power line fuse is installed Use the 4 AT 250 V fuse for 100 Vac or 115 Vac operation Use the 2 5 AT 250 V fuse for 230 Vac operation Verify the power line voltage setting Refer to the E3632A User s Guide Does the power supply fail self test Verify that the correct power line voltage is selected Refer to the E3632A User s Guide Remove all load connections to the po...

Page 59: ... Keysight Service Center using the shipping carton of the exchange unit A shipping label will be supplied Keysight will notify you when your failed unit has been received If the instrument is to be shipped to Keysight for service or repair be sure to Attach a tag to the power supply identifying the owner and indicating the required service or repair Include the instrument model number and full ser...

Page 60: ... to dissipate static charge Use a conductive wrist strap to dissipate static charge accumulation Minimize handling Keep replacement parts in original static free packaging Remove all plastic styrofoam vinyl paper and other static generating materials from the immediate work area Use only anti static solder suckers Surface Mount Repair Surface mount components should only be removed using soldering...

Page 61: ...e output To disconnect the output an external relay must be connected between the output and the load A TTL signal of either low true or high true is provided to control an external relay This signal can only be controlled with the remote command OUTPut RELay OFF ON The TTL output is available on the RS 232 connector pin 1 and pin 9 When the OUTPut RELay state is ON the TTL output of pin 1 is high...

Page 62: ...ke off the cover 2 Install JP3 1 and JP4 1 located adjacent to the connector P5 refer to Component locator diagram for the main board assembly top on page 71 A bare wire may be used 3 Reassemble the power supply 1 For serial MY53xx6xxx install JP751 and JP752 located adjacent to the connector CN751 refer to Component locator diagram for the main board assembly top serial MY53xx6xxx on page 73 on p...

Page 63: ... fuse for 100 Vac or 115 Vac operation Use the 2 5 AT 250 V fuse for 230 Vac operation Verify the power line voltage setting Refer to the E3632A User s Guide Unit reports errors 740 to 750 These errors may be produced if you accidentally turn off power the unit during a calibration or while changing a non volatile state of the instrument Recalibration or resetting the state should clear the error ...

Page 64: ...to check that these local bias supplies are active In particular the ADC analog to digital converter AC input and front panel sections have local bias supplies Always check that the power supplies are free of AC oscillations using an oscilloscope Failure of bias supplies will cause many self test failures 1 For serial MY53xx6xxx failure of the DAC U36 on the top board will cause many self test fai...

Page 65: ... with the front panel controller U7 U602 for serial MY53xx6xxx on the front panel board During this test the U7 U602 for serial MY53xx6xxx turns on all display segments Communication must function in both directions for this test to pass If this error is detected during power on self test the power supply will beep twice This error is only readable from the remote interface 602 RAM read write fail...

Page 66: ... The main controller U10 establishes communication with the ADC and checks if there are any error bits set for the ADC s status reporting 624 Unable to sense line frequency This test checks that the LSENCE logic input U17 is toggling If no logic input detected the power supply will assume a 50 Hz line operation for all future measurements 625 I O processor does not respond This test checks that co...

Page 67: ...ata to DAC and converts the DAC output to digital data to see if the digital data is within a valid range 632 Hardware test failed This test checks the status of voltage and current error amplifiers for the power circuit of output1 If both amplifiers are not operational the power supply will beep and the error annunciator will be lit on a This error message is only applicable for serial MY53xx6xxx...

Page 68: ...2 Service 70 Keysight E3632A Service Guide ...

Page 69: ...71 Keysight E3632A Service Guide Component Locator Diagram Component locator diagram for the main board assembly top ...

Page 70: ...72 Keysight E3632A Service Guide Component locator diagram for the front panel top ...

Page 71: ...Keysight E3632A Service Guide 73 Component locator diagram for the main board assembly top serial MY53xx6xxx ...

Page 72: ...74 Keysight E3632A Service Guide Component locator diagram for the front panel top serial MY53xx6xxx ...

Page 73: ...ion is subject to change without notice Always refer to the Keysight website for the latest revision Keysight Technologies 1997 2019 Edition 9 March 2019 Printed in Malaysia E3632 90010 E3632 90010 www keysight com ...

Reviews: