2
Service
64
Keysight E3632A Service Guide
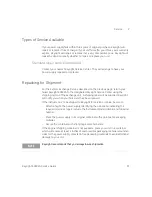
Installation procedure for an external relay
The assembly drawings are located in
1
Remove the front and rear bumpers and take off the cover.
2
Install JP3
[1]
and JP4
[1]
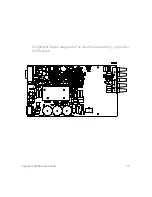
located adjacent to the connector P5 (refer to
“Component locator diagram for the main board assembly — top”
A bare wire may be used.
3
Reassemble the power supply.
[1] For serial MY53xx6xxx, install JP751 and JP752 located adjacent to the connector CN751 (refer to
“Component locator diagram for the main board assembly — top (serial MY53xx6xxx)”
on page 63)
Summary of Contents for E3632A
Page 1: ...Keysight E3632A DC Power Supply Service Guide ...
Page 12: ...Keysight E3631A Service Guide 14 THIS PAGE HAS BEEN INTENTIONALLY LEFT BLANK ...
Page 14: ...16 Keysight E3631A Service Guide THIS PAGE HAS BEEN INTENTIONALLY LEFT BLANK ...
Page 16: ...18 Keysight E3631A Service Guide THIS PAGE HAS BEEN INTENTIONALLY LEFT BLANK ...
Page 68: ...2 Service 70 Keysight E3632A Service Guide ...
Page 70: ...72 Keysight E3632A Service Guide Component locator diagram for the front panel top ...


