background image

4 FILE MENU

13

Field Programming Reference (FPRG)

Version: 1.01

"

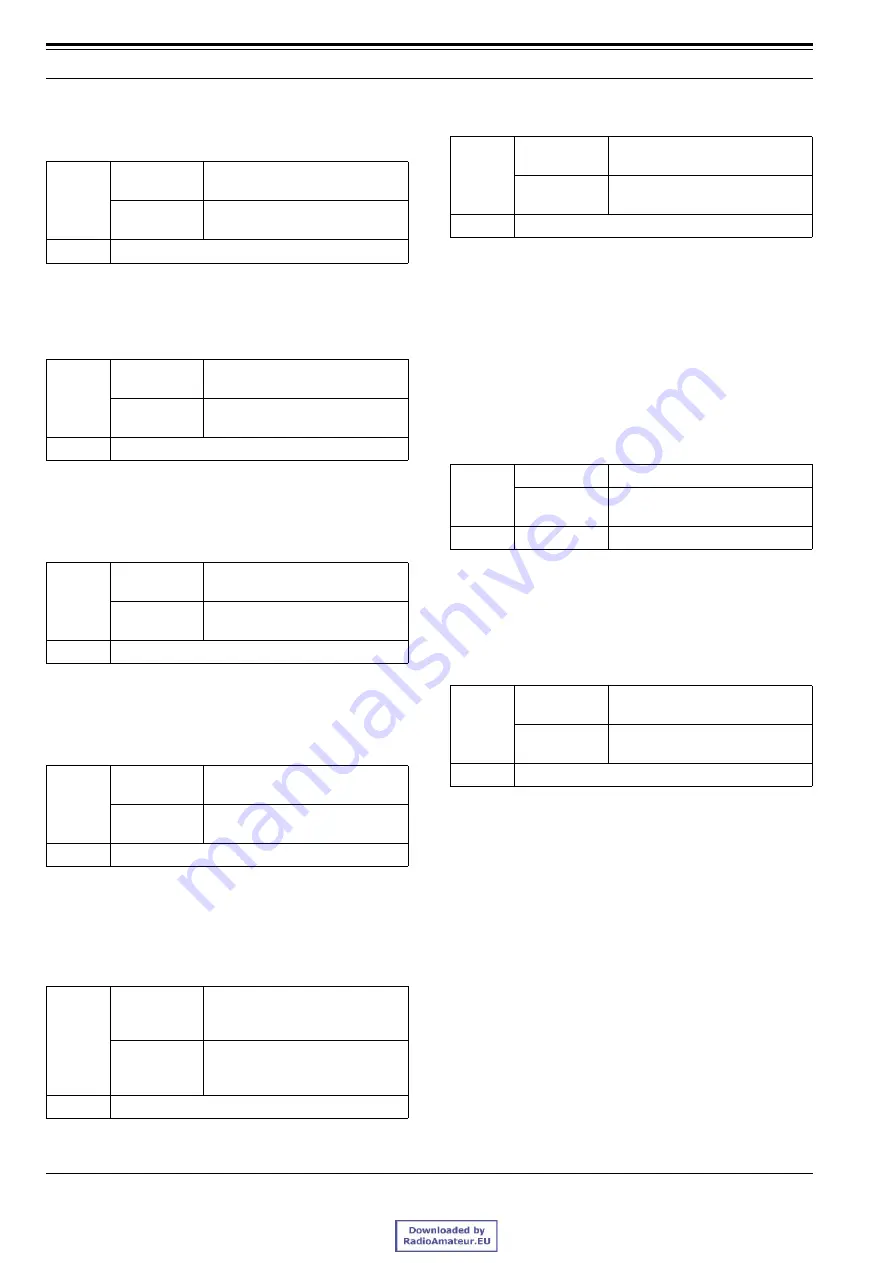
Multi-table

The configure “Multi-table” parameters are printed. 

(Refer to 6.11 Multi-table Window.)

"

CW Message

The configured “CW Message” parameters are 
printed. 

(Refer to 6.12 CW Message Window.)

"

Test Frequency

The configured “Test Frequency” parameters are 
printed. 

(Refer to 6.13 Test Frequency Window.)

"

Embedded Message

The configured “Embedded Message” parameters are 
printed. 

(Refer to 6.14 Embedded Message Window.)

"

Embedded Message w/Password

The configured “Embedded Message w/Password” 
parameters are printed. 

(Refer to 6.15 Embedded 

Message w/Password Window.)

"

Channel Information

The configured “Channel Information” parameters are 
printed. 

(Refer to 6.1 Channel Information.)

"

Start Channel - End Channel

It is possible to choice the start channel and end 
channel only when the “Channel Information” check 
box is checked.

You can select the channel to print from the channels 
1 to 16.

Note:

The value of the “Start Channel” must be lower than the 
“End Channel” value. The End Channel will be equal to 
the Start Channel if you enter the higher value in the 
Start Channel than the End Channel.

"

CW ID

It is possible to select the CW ID only when the 
“Channel Information” checkbox is checked.

You can configure the CW ID parameters to print. 

(Refer to 6.3 CW ID Window.)

"

“Print Setup” Button

Click “Print Setup” to view the “Print Setup” window. 
You can configure the printer used to print out the 
configuration data, the paper size, and the paper 
rotation.

"

“Print Preview” Button

Click “Print Preview” to view the “Print Preview” 
window

(Refer to 4.6 Print Preview.)

Range

Checked

The “Multi-table” parameters will be 
printed out.

Unchecked

The “Multi-table” parameters will 
not be printed out.

Default

Unchecked

Range

Checked

The “CW Message” parameters 
will be printed out.

Unchecked

The “CW Message” parameters 
will not be printed out.

Default

Unchecked

Range

Checked

The “Test Frequency” parameters 
will be printed out.

Unchecked

The “Test Frequency” parameters 
will not be printed out.

Default

Unchecked

Range

Checked

The “Embedded Message” 
parameters will be printed out.

Unchecked

The “Embedded Message” 
parameters will not be printed out.

Default

Checked

Range

Checked

The “Embedded Message w/
Password” parameters will be 
printed.

Unchecked

The “Embedded Message w/
Password” parameter will not be 
printed out.

Default

Unchecked

Range

Checked

The “Channel Information” 
parameters will be printed out.

Unchecked

The “Channel Information” 
parameters will not be printed out.

Default

Unchecked

Range

Start Channel

End Channel

1 - 16 
(Channel)

1 - 16 (Channel)

Default

1

16

Range

Checked

The CW ID parameters will be 
printed out.

Unchecked

The CW ID parameters will not be 
printed out.

Default

Unchecked

Summary of Contents for TKR-750

Page 1: ...Version 1 01 Last Updated Sep 2005 Language English Type K Field Programming Reference FPRG For T TK KR R 7 75 50 0 8 85 50 0 V Ve er rs si io on n2 2 T TK KR R 7 75 51 1 8 85 51 1 ...

Page 2: ......

Page 3: ... Kenwood Corporation however the title to and ownership of the software shall be owned by Kenwood Corporation Refer to the help texts attached to this software for details Kenwood Corporation does not warrant quality and performance of the software described in this technical document and relevant in depth manuals to conform to the applicability of any use and Kenwood Corporation shall be free fro...

Page 4: ...al Board 16 6 EDIT MENU 17 6 1 Channel Information 17 6 1 1 Reception Frequency 17 6 1 2 Transmission Frequency 17 6 1 3 QT DQT Decode 17 6 1 4 QT DQT Encode 18 6 1 5 Channel Name 18 6 1 6 Multi table 18 6 1 7 W N 18 6 1 8 Power 19 6 1 9 Operation Mode 19 6 1 10 Scan Add 19 6 1 11 CW ID 19 6 1 12 Channel Edit Button 19 6 1 13 Channel Copy Shift F3 19 6 1 14 Frequency Copy Shift F4 20 6 1 15 QT DQT...

Page 5: ...dio Frequency 56 6 12 5 Send CW Message to RA 56 6 12 6 Encode with QT DQT CW Message 56 6 13 Test Frequency Window 56 6 13 1 Reception Transmission 56 6 13 2 CH Paste Button 57 6 14 Embedded Message Window 57 6 15 Embedded Message w Password Window 58 7 PROGRAM MENU 60 7 1 Read Data from Repeater 60 7 2 Write Data to Repeater 60 7 3 Test Mode Window 60 7 3 1 Test Channel 61 7 3 2 Test Signalling ...

Page 6: ...t the communication port from COM1 COM20 ports Connection cable It has to connect the TKR 750 850 751 851 to the PC using KPG 46 programming cable The DB 9 pin female to DB 25 pin male gender changer may be required depending on the COM port of your PC Note KPG 91D may not work properly due to the insufficient resource when running it with other software 1 2 Connecting to the PC Follow the procedu...

Page 7: ...ow the instructions on the screen to install the software 1 4 Uninstalling KPG 91D Follow the procedures below to uninstall KPG 91D from the PC Note You must exit the KPG 91D before uninstalling it You must have the administrative privilege in order to uninstall the KPG 91D from the PC Windows 2000 XP To update the software uninstall the old version before installing the newer version 1 Execute th...

Page 8: ...ow to edit and write the configuration data 1 Enter all the necessary data Select the item that you want to configure in the Edit menu and enter data in the window Refer to 6 EDIT MENU 2 Write the updated data to the repeater Select Program Write Data to Repeater Refer to 7 PROGRAM MENU 2 4 Modify the Configuration Data Follow the procedures below to edit and write the configuration data 1 Read th...

Page 9: ...nd drop the Toolbar to any desired position Table 3 1 Descriptions of the Buttons on the Toolbar Button Function New This icon is for the New function in the File menu This function allows you to clear the current configuration data and create the new configuration data Refer to 4 1 New Open This icon is for the Open function in the File menu This function allows you to open the configuration data...

Page 10: ...New This function allows you to clear the current configuration data and create the new configuration data Refer to 4 1 New Open This function allows you to open the configuration data stored in the hard disk drive or other external storage devices Refer to 4 2 Open Save This function allows you to save the current configuration data to the hard disk or other external storage devices Refer to 4 3 ...

Page 11: ...nction allows you to configure the Encode Decode function parameters Refer to 6 11 Multi table Window CW Message This command allows you to configure the data relating to the CW Message Refer to 6 12 CW Message Window Test Frequency This function allows you to configure the Test Frequency used in Test Mode Refer to 6 13 Test Frequency Window Embedded Message This function allows you to configure t...

Page 12: ...ion cascade format Refer to 11 1 Cascade Horizontal Tile This function allows you to rearrange the opened windows in the horizontal tiles fashion Refer to 11 2 Horizontal Tile Vertical Tile This function allows you to rearrange the opened windows in the vertical tiles fashion Refer to 11 3 Vertical Tile Arrange Icons This function allows you to rearrange the icons of the minimized windows Refer to...

Page 13: ...ion Ctrl n Perform File New Refer to 4 1 New Ctrl o Perform File Open Refer to 4 2 Open Ctrl s Perform File Save Refer to 4 3 Save Ctrl p Perform File Print Refer to 4 5 Print Key Name Function Shift F3 Appear the Channel Copy window You can also copy the configured channel data to the specified channel Refer to 6 1 13 Channel Copy Shift F3 Shift F4 Appear the Frequency Copy window You can copy th...

Page 14: ...1 Tuning Mode Key Name Function F1 Appear the KPG 91D HTML Help window The help topic operating when the F1 key is pressed is shown Key Name Function Tab Jump to the other configuration item by pressing this key Shift Tab Go back to the previously selected configuration item by pressing these keys Enter Confirm the entered value and jump to the next configuration item ING3 ING4 Use these buttons a...

Page 15: ...ile stored in the hard disk or other external storage devices file extension dat Follow the procedures below to open the configuration data file 1 Select File Open The Open window appears Figure 4 2 File_Open_1 Select a file name to open The embedded message appears if the selected file contains an embedded message 2 Click Open You can read the file selected at the previous step using the KPG 91D ...

Page 16: ...ave You can store the configuration data with the file name entered in the File Name The warning message appears if a file with the same name exists in the destination folder Figure 4 6 File_Save As_2 3 Select one of the following options Click Yes Store the new configuration data to the storage device Click No The new configuration data will not be stored and returns to the Save As window 4 5 Pri...

Page 17: ...ntrol Window Function Port The configured Function Port parameters are printed Refer to 6 10 Function Port Window Range Checked The Model Information parameters will be printed out Unchecked The Model Information parameters will not be printed out Default Checked Range Checked The Optional Features parameters will be printed out Unchecked The Optional Features parameters will not be printed out De...

Page 18: ...e the CW ID parameters to print Refer to 6 3 CW ID Window Print Setup Button Click Print Setup to view the Print Setup window You can configure the printer used to print out the configuration data the paper size and the paper rotation Print Preview Button Click Print Preview to view the Print Preview window Refer to 4 6 Print Preview Range Checked The Multi table parameters will be printed out Unc...

Page 19: ...Click Print to view the Print Out List window Next Page Prev Page button Click Next Page to view the next page of the current print image Click Prev Page to view the previous page of the current print image Note You can click the Next Page only when there are more than one page s You can click the Prev Page only when there are preceding page s Two Page One Page Button Click Two Page to display two...

Page 20: ...iately exit the KPG 91D program by pressing Yes when the configuration data has not been modified or already stored The confirmation dialog box appears to ask you to store the configuration data if you have modified it Figure 4 12 File_Exit_2 3 Select one of the following options Click Cancel The exit is canceled Click No Exit the KPG 91D program without storing the configuration data to the stora...

Page 21: ...Model Type or the transmission reception frequency Click Cancel to return to the Model Information window without changing the model type and the transmission reception frequency Figure 5 2 Model Information_Warning_1 406 0 MHz and 406 1MHz are assigned as the Emergency locator beacons in the United States Therefore the TKR 750 751 850 851 is not designed to use these frequencies 5 1 3 Optional Bo...

Page 22: ...ue within the range when configuring the frequency When entering the frequency which is out of the range it will be automatically replaced with the highest value or the lowest value within the range configured in Model Information Frequency window Refer to 5 1 Model Information 6 1 3 QT DQT Decode It can configure the signalling used to receive a call You can select the QT tone or DQT code from th...

Page 23: ...e 6 1 6 Multi table It can select whether or not the TKR 750 850 751 851 waits for a call with the QT DQT Decode code configured to each channel and the QT DQT Decode code configured in the Multi table This function is available only when the QT DQT Decode code is configured on the Channel Information window and the Decode code is configured on the Multi table Refer to 6 11 Multi table Window Note...

Page 24: ... cannot send a CW ID while scanning or Scan pauses When CW ID On or CW Message On is enabled while sending the CW ID the TKR 750 850 751 851 stops sending the current CW ID and sends the new CW ID instead 6 1 12 Channel Edit Button Click Channel Edit to view the Channel Edit window Refer to 6 2 Channel Edit Window Note You can open the Channel Edit window with one of the following options Press F1...

Page 25: ... Figure 6 4 QT DQT Copy window 3 Click Copy You can copy the data configured in the QT DQT Decode to the QT DQT Encode of the same channel Note When directly entering the QT DQT Encode code in the QT DQT Copy window or selecting it from the dropdown list the entered value is used as the QT DQT Encode You cannot copy the QT DQT Decode configuration data to other channels You can copy the configurat...

Page 26: ...et code Refer to FUNC 1 2 Transmission Reception Frequency You can use numbers and for the 9 digits of the frequency You must enter the value within the range when configuring the frequency When entering the frequency which is out of the range it will be automatically replaced to the highest value or the lowest value within the range configured in Model Information Frequency window Refer to 5 1 Mo...

Page 27: ...ured as the DQT code When entering the value which is out of the range it will be automatically replaced with the highest value or the lowest value in the range 6 2 4 QT DQT Encode It can configure a signalling to make a call You can select a QT tone or DQT code from the dropdown list You can also directly enter the QT tone and the DQT code Selecting the QT DQT Encode Code from the Dropdown list D...

Page 28: ... configured in the Multi table Refer to 6 11 Multi table Window Note The signalling which is encoded when the PTT switch is pressed is depend on the Encode Tone in Multiple configuration on the Channel Edit window Refer to 6 2 7 Encode Tone in Multiple Do not configure the same QT DQT Decode data in the Multi table When one or more same QT DQT Decode data are configured in the Multi table and the ...

Page 29: ...s When CW ID On or CW Message On is enabled while sending the CW ID the repeater stops sending the current CW ID and sends the new CW ID instead 6 2 16 CW ID Button It can use the CW ID button only when CW ID is enabled Click this button to view the CW ID window Refer to 6 3 CW ID Window 6 2 17 Voice Scrambler You can enable disable Voice Scrambler You must install the optional Voice Scramble boar...

Page 30: ...directly enter the value Refer to 6 3 2 TX Interval Time The CW ID is sent after the CW Mod Delay Time is expired Refer to 6 3 5 CW Mod Delay Time Note TX Delay Time function is not applicable when sending the CW ID with the CW ID On function 6 3 4 CW Speed It can configure a interval duration to send the CW ID You can configure the speed using the spin buttons or directly enter the value 6 3 5 CW...

Page 31: ... Time and the TX Interval Time 6 3 11 Encode with QT DQT CW ID It can encode a QT DQT Primary code configured to each channel while sending a CW ID Note The TKR 750 850 751 851 sends the QT DQT code configured to each channel when Encode with QT DQT is enabled and it does not send the QT DQT code when Encode with QT DQT is disabled However the new CW ID CW Message is sent in conjunction with the E...

Page 32: ...mer is configured to Off TOT Rekey Time Repeater Ext PTT It can configure the duration between the time that the transmission ends with the TOT and the time that the TKR 750 850 751 851 can start transmitting again You can configure the duration by the spin buttons or directly enter the value Refer to Time out Timer TOT Repeater Ext PTT Note You can transmit immediately after the TOT expires when ...

Page 33: ... communication You can configure the level by the spin buttons or directly enter the value Note When using the channel that Operation Mode is configured as Repeat and the QT DQT Encode is configured as None the TKR 750 850 751 851 activates the repeat operation regardless of the presence of the reception signal if the Squelch Level is configured as 0 Refer to 6 2 4 QT DQT Encode 6 2 8 Operation Mo...

Page 34: ...ble the operation of the fan Data Password It can configure a Data Password With this function enabled the configuration data of the TKR 750 850 751 851 will not be read even when an unauthorized person attempts to read it by FPU Click Data Password to view the Data Password window then configure the data password Figure 6 9 Data Password window Enter the password a maximum of 6 digits in the Data...

Page 35: ...nding to the selected PTT configuration that has higher priority Change the priority of the PTT by the spin buttons Refer to FUNC 6 7 PTT Priority Firmware Program It can allow the TKR 750 850 751 851 enter in the Firmware Programming Mode When this function is enabled the it enters Firmware Programming Mode by pressing the PF1 key and the power switch on at the same time Note You must run the FPR...

Page 36: ...e out Timer is configured as Off TOT Reset Time Local Mic PTT This is a duration between the time when the transmission ends before the TOT expires and the time when the counter of the TOT resets Configure the timing by the spin buttons or directly enter the value Refer to Time out Timer TOT Local Mic PTT Note The TOT is reset immediately after the end the transmission when the TOT Reset Time is d...

Page 37: ...onfigure a frequency by the spin buttons or Range Checked The Power On Tone sounds Unchecked The Power On Tone does not sound Default Checked Range Checked There are three Warning Tones Warning Alert Tone This tone sounds when pressing the PTT switch even after the Time out Timer of the Local Mic PTT expires or while the Rekey Time is activated TOT Pre alert Tone This tone sounds when the Time out...

Page 38: ...r to Courtesy Tone Note You can configure this tone only when the DTMF signalling is used You can configure this tone only when the Courtesy Tone is enabled Courtesy Tone Period This is a period of the Courtesy Tone Configure the period by the spin buttons or directly enter the value to configure the period Refer to Courtesy Tone Note You can configure this period only when the DTMF signalling is ...

Page 39: ...red to the Auxiliary I O ports 1 6 Refer to Table 6 7 Assigning Functions to the Auxiliary Output Ports Channel 1 Channel 16 The TKR 750 850 751 851 moves to the channel selected from CH 1 to CH 16 You cannot configure this function when Channel Select is configured to Auxiliary I O ports 1 4 E2 appears on the display when specifying the channel without data Refer to Table 6 7 Assigning Functions ...

Page 40: ...e repeat operation QT DQT Decode Enable The TKR 750 850 751 851 enables the QT DQT Decode function QT DQT Encode Disable The TKR 750 850 751 851 disables the QT DQT Encode function QT DQT Encode Enable The TKR 750 850 751 851 enables the QT DQT Encode function Repeat Disable The TKR 750 850 751 851 disables the repeat operation You cannot configure this function if no channel is configured to the ...

Page 41: ...s Power Saver Mode You can assign three functions and they operate in order of 1st 2nd then 3rd Select the function from the dropdown list Save Off Function It can configure the function to activate when the TKR 750 850 751 851 exits Power Saver Mode You can assign three functions and they operate in order of 1st 2nd then 3rd Select the functions from the dropdown list Start Up It can configure th...

Page 42: ...51 851 moves to the channel from one of CH 1 to CH 16 channels You cannot configure this function when Channel Select is configured to Auxiliary I O ports 1 4 E2 appears on the display when specifying the channel without data Refer to 6 10 1 AUX Select Tab Channel Down The TKR 750 850 751 851 moves to the next lower channel The channel without data is skipped Channel Up The TKR 750 850 751 851 mov...

Page 43: ...e TKR 750 850 751 851 is reset and it returns to the default when pressing the PF key Scan On Off It can enable disable the Scan function by pressing the PF Scan On Off key Scrambler On Off It can enable disable Scrambler by pressing the PF Scrambler On Off key Squelch On Off It can disable enable Squelch by pressing the PF Squelch On Off key Squelch Momentary It can disable Squelch while pressing...

Page 44: ...to check the priority channel when the scan is stopping on the normal channel and no signal is on the priority channel Configure the period by the spin buttons or directly enter the value to configure the period Note It pauses on the Priority Channel when there is a signal to receive and the signalling matches while scanning the Priority Channel 6 6 4 Look Back Time B This is a interval time to ch...

Page 45: ... Function Port Window Function Description Last Called The revert channel is assigned to the last channel that is received signal and stopped scanning during scanning and transmit on it In case of pausing the scan due to changing channel by PF key it transmits on that channel During pausing scan due to receiving signal It is assigned as the revert channel and transmits on it Last Used The revert c...

Page 46: ...btained by adding the transmission time configured in the DTMF Speed and the First Digit Time Refer to 6 7 1 DTMF Speed 6 7 4 and Digit Time This is a duration time to transmit the tone and the tone of the DTMF code Select the delay time from the dropdown list In some case these tone is used for special function such as Connecting tone and Disconnecting tone To extend these tone transmitting time ...

Page 47: ...or directly enter the value to configure the frequency 6 8 3 Period This is a period to transmit Single Tone as the Transpond code when the function assigned to a PF key or an Auxiliary port activates deactivates You can configure the transmission period for both of Activation and Deactivation Configure the period by the spin buttons or directly enter the value to configure the period 6 8 4 Sideto...

Page 48: ...ut Level port gets the preference over the operation of the PF key In this case the Transpond code is not sent and the Air Remote function is canceled For example when the scan function is assigned to the Auxiliary Input Level port and activating the PF keys relating to the Scan operation and the Air Remote function are not acceptable It can select a timing to send a Transpond code from Before Aft...

Page 49: ...From the dropdown list you can select a table number in the Decode tab from Encode Decode table window Refer to 6 8 Encode Decode Table Window Note You cannot configure Deactivation if no function is assign to Function Refer to Function PF Key You cannot configure Deactivation to the functions that it cannot be disable such as Channel Up function When Dec Table is already used to other functions y...

Page 50: ...UX Input Output Tab On this tab it can control the function assigned to the Auxiliary Port by the Air Remote code Figure 6 18 AUX Input Output tab Function AUX Input The function assigned on the Aux Input tab of the Function Port window appears However you cannot change the configuration in this window Refer to 6 10 2 AUX Tab Although you can configure three functions 1st 2nd and 3rd to the Auxili...

Page 51: ... function assigned to the Auxiliary Output port activates When no function is assigned to Function None you can control external devices by specifying the decode code Select the table number configured on the Decode tab of the Encode Decode Table window from the dropdown list Refer to 6 8 Encode Decode Table Window Note You cannot use the TX Unlock and TXS with Air Remote Refer to 6 10 Function Po...

Page 52: ...is configured Refer to Single Tone Aux Transponder Deactivation AUX Transponder This is a Transpond code when the function assigned to the Auxiliary port is deactivated by the Air Remote code and the Transponder is configured as Yes Refer to Transponder AUX Input Transponder AUX Output Select a table number configured on the Encode tab of the Encode Decode Table window from the dropdown list Refer...

Page 53: ...l Select and Multi table Select Note It can assign Channel Select and the Multi table Select to the AUX Input Output ports 1 4 only It cannot change the order of the AUX Input Output ports 1 4 when assigning the Channel Select function to these ports If the AUX Input Output 1 port is assigned the Multi table Select the Multi table Select function is automatically assigned to AUX Input Output ports...

Page 54: ... operation AUX Out 1 Off AUX Out 5 Off When the signal is applied to one of the PF AUX Out 1 Off PF AUX Out 5 Off input ports the function assigned to the Auxiliary Output port is deactivated You can assign this function when Selectable is configure to the Auxiliary Output ports 1 to 5 Refer to Table 6 7 Assigning Functions to the Auxiliary Output Ports AUX I O 1 Off AUX I O 6 Off When the signal ...

Page 55: ...pplied to the PF Display On input port This function is valid for only Power Saver Mode When the signal is detected with Down Edge it cannot make all LEDs unlit after this function is enabled Display On Off Switch the LEDs located on the front panel On Off when the signal is applied to the PF Display On Off input port This function is valid for only Power Saver Mode Hold Time Disable Switch Repeat...

Page 56: ...ode when the signal is applied to the PF QT DQT Decode Enable input port When the signal is detected with Down Edge it cannot switch the QT DQT Decode function Off after this function is on QT DQT Decode Disable Enable Switch disable enable QT DQT Decode when the signal is applied to the PF QT DQT Encode Disable Enable input port QT DQT Encode Disable Restrict QT DQT Encode when the signal is appl...

Page 57: ...ction is enabled Squelch On Off Switch Squelch On Off when the signal is applied to the PF Squelch On Off input port TA Line Pre emphasis Off It can disable the pre emphasis of the TA terminal It can use this function only when the signal is detected with the Level TA Line Pre emphasis On Off Switch enable disable the pre emphasis of the TA terminal Test Tone Off Stop Test Tone when the signal is ...

Page 58: ... in Busy status so that it cannot receive the Air Remote code and the Repeater Open code Refer to 6 10 2 AUX Tab Since the status of Air Remote Encode is retained while transmitting using Repeater PTT Local Mic PTT or External PTT or CW ID TKR 750 850 751 851 cannot send the Activation code even when the function is activated while the Activation code is configured to the PF Power Supply Lower Lim...

Page 59: ...h is out of the range it will be automatically replaced with the highest value or the lowest value in the range 6 11 2 Encode Multi table It can configure the signalling used to transmit Select the QT tone or DQT code with the dropdown list or directly enter the QT tone and the DQT code When Selecting the QT DQT Encode Code with the Dropdown List Directly entering the QT DQT Encode Code Note It ca...

Page 60: ...d ON if the CW Message transmission function is assigned to Start Up Refer to 6 4 3 Others Tab Optional Features Backup Power Function TKR 750 850 751 851 sends CW Message when the power is switched from the main power to the backup power if the CW Message transmission function is assigned to the Backup Power function Refer to 6 4 3 Others Tab Optional Features Main Power Function TKR 750 850 751 ...

Page 61: ... varies depending on the model and the market code Figure 6 22 Test Frequency window 6 13 1 Reception Transmission This is a test frequency Directly enter the value in the Reception edit box and the Transmission edit box Table 6 8 Test Frequency Range Table 6 9 Default Test Frequency of the TKR 750 751 K Range 400 2000 Hz In steps of 100 Hz Default 800 Hz Range Checked CW Message audio signals sen...

Page 62: ...dded Message Window It can configure the message that is stored in the TKR 750 850 751 851 on the Embedded Message window It can store a message with up to 64 characters combination of alphabets and numerals It can embed the specific information such as the control number or the name of the configuration data written The Embedded Message appears on the Open window when the configuration data is op...

Page 63: ...ite 3 Click OK Note The error message appears if you enter an incorrect password The password entry display closes when entering a wrong password three times in a row When writing the message with Embedded Message w Password you can store the message as a separate data from the configuration data Password Button It can configure the password and change it Follow the procedures below to configure c...

Page 64: ...6 EDIT MENU 59 Field Programming Reference FPRG Version 1 01 ...

Page 65: ...ite Data to Repeater This function allows to write the configuration data into TKR 750 850 751 851 connected to the PC with the KPG 46 programming cable by KPG 91D Refer to 1 2 Connecting to the PC Follow the procedures below to write the configuration data 1 Select one of the following options Select Program Write Data to Repeater Click on the Toolbar 2 Click Write The PC starts writing the confi...

Page 66: ...configured by the spin buttons The Decode Tone Encode Tone configured to the selected signalling Number appears on the Frequency window signalling No signalling No of the Test Mode Decode Tone Reception signalling Encode Tone Transmission signalling Table 7 1 Test Signalling Note TKR 750 850 751 851 deactivates AF Mute when the signalling is decoded with the QT DQT code and the signalling matches ...

Page 67: ...t Off or On from the dropdown list 7 3 8 Repeat It can configure Repeat operation to the Test Channel Select Off or On from the dropdown list 7 3 9 TX RX Button Click TX RX to toggle between transmission and reception 7 3 10 Print Button Click Print to print out the configured Tuning Data 7 3 11 Tuning Mode It can make various adjustments for the TKR 750 850 751 851 by the KPG 91D Double click the...

Page 68: ...rence Level Adjustment The TKR 750 850 751 851 stores the RSSI Level at the same time Narrow RD RX Detector Output Level Wide You can adjust the RD RX Detector Signal Output level Single Reference Level Adjustment Narrow RA RX Audio Output Level Wide You can adjust the RA RX Audio Signal Output level Single Reference Level Adjustment Narrow TX High Power You can adjust the TX High Power level High...

Page 69: ...ig CH 10 Narrow DTMF Deviation Wide You can adjust the DTMF Encode level TKR 750 751 VHF 2 Reference Level Adjustments TKR 850 851 UHF Single Reference Level Adjustment Sig CH 12 Narrow Courtesy Tone Deviation Wide You can adjust the Courtesy Tone Encode level TKR 750 751 VHF 2 Reference Level Adjustments TKR 850 851 UHF Single Reference Level Adjustment Configurati on value in the KPG 91D Narrow ...

Page 70: ...selecting Radio Information in the Tools menu Figure 8 1 Radio Information window 8 1 1 Model Type The model type of the TKR 750 850 751 851 appears Refer to 5 1 1 Model Type 8 1 2 Frequency The frequency bandwidth configured to the TKR 750 850 751 851 appears Refer to 5 1 2 Frequency 8 1 3 Serial Number The serial number assigned to the TKR 750 850 751 851 appears 8 1 4 Checksum The checksum whic...

Page 71: ...ommunication Port in the Setup menu Figure 9 1 Communication Port window Select the Communication Port from COM1 COM20 and click OK 9 2 Language File Setup Window It can select the language on Language File Setup window Figure 9 2 Language File Setup window From the dropdown list Select the language Note The selected language in the Language File Setup window is applied to all KPG 91D software fun...

Page 72: ...h item to display the window of the selected item Figure 10 1 Tree View window 10 2 Toolbar It can display hide the toolbar You can display or hide the Toolbar by selecting View Toolbar Refer to 3 1 3 Toolbar 10 3 Status Bar It can display hide the Status bar You can display or hide the Status bar by selecting View Status Bar Refer to 3 1 4 Status Bar ...

Page 73: ...indows in an overlapped fashion cascade format by selecting Cascade Figure 11 1 Cascade 11 2 Horizontal Tile You can rearrange the opened windows in the horizontal tiles fashion by selecting Horizontal Tile Figure 11 2 Horizontal Tile 11 3 Vertical Tile You can rearrange the opened windows in the vertical tiles fashion by selecting Vertical Tile Figure 11 3 Vertical Tile 11 4 Arrange Icons You can...

Page 74: ... 1 01 11 5 Close All Windows You can close all opened windows by selecting Close All Windows 11 6 Opened Window List You can display the title of the opened window When clicking the title of the window the selected window appears Figure 11 5 Opened Window List ...

Page 75: ...ure 12 1 Contents tab The help text appears in the right frame of the Help window when clicking ILG or You can view the detailed help text on the when double clicking the or clicking 12 1 2 Index Tab You can search the help topic from the Keyword list Enter the keyword into the edit box then click the keyword from the Keyword List or click Display 12 1 3 Search Tab You can search the help topic wi...

Page 76: ... Y Y Y Y AUX Out 1 On N Y Y Y Y AUX Out 2 On N Y Y Y Y AUX Out 3 On N Y Y Y Y AUX Out 4 On N Y Y Y Y AUX Out 5 On N Y Y Y Y AUX I O 1 On N Y Y Y Y AUX I O 2 On N Y Y Y Y AUX I O 3 On N Y Y Y Y AUX I O 4 On N Y Y Y Y AUX I O 5 On N Y Y Y Y AUX I O 6 On N Y Y Y Y AUX Out 1 On Off Y Y N N N AUX Out 2 On Off Y Y N N N AUX Out 3 On Off Y Y N N N AUX Out 4 On Off Y Y N N N AUX Out 5 On Off Y Y N N N AUX...

Page 77: ...or On Off Y Y N N N Function PF Key AUX Input Save On Off Start Up Power Supply Monitor Momentary Y N N N N Multi Table Sub N Y Y Y Y Multi Table Main N Y Y Y Y Multi Table Main Sub Y Y N N N QT DQT Dec Disable N Y Y Y Y QT DQT Dec Enable N Y Y Y Y QT DQT Dec Dis En Y Y N N N QT DQT Enc Disable N Y Y Y Y QT DQT Enc Enable N Y Y Y Y QT DQT Enc Dis En Y Y Y N Y Repeat Disable N Y Y Y Y Repeat Enable...

Page 78: ... when the signal is detected with the Level Test Tone Off N Y Y Y Y Test Tone On N Y Y Y Y Test Tone On Off Y Y N N N TOT Disable N Y Y Y Y TOT Enable N Y Y Y Y TOT Dis En Y Y N N N TX Disable N Y Y Y Y TX Enable N Y Y Y Y TX Dis En Y Y N N N Low Power Off N Y Y Y Y Low Power On N Y Y Y Y Low Power On Off Y Y N N N Function PF Key AUX Input Save On Off Start Up Power Supply ...

Page 79: ......

Page 80: ...6 CW ID button 24 CW ID on Channel Change 26 CW ID window 25 CW Message 55 CW Message window 55 CW Mod Delay Time 55 CW Mod Delay Time 25 CW Speed 25 55 Cascade 68 Ch Paste button 57 Channel Copy 19 24 Channel Delete 20 Channel Edit button 19 Channel Edit window 21 Channel Information window 17 Channel Insert 20 Channel Name 18 22 Clear To Transpond Remote Control 48 Closes All Windows 69 Communic...

Page 81: ...Information 18 Multi table window 54 O Off hook Decode 29 Off hook Scan 40 Opened Window List 69 Operation Mode 19 23 Optional Board 16 Optional Features 1 tab 27 Optional Features 2 tab 31 Optional Features window 27 Others tab Optional Features 34 P PF Key tab 44 PTT Priority 30 Password button 58 Period 42 Power 19 Power Test Mode 62 Power On Tone 32 Power Supply Lower Level 28 Print 11 Print O...

Page 82: ...requency 30 TX RX Button 62 Test Channel 61 Test Frequency window 56 Test Mode window 60 Test Signalling 61 Test Tone 28 Time out Pre alert Local Mic PTT 31 Time out Timer Local Mic PTT 31 Title Bar 4 Tone Volume 31 Toolbar 4 Tools menu 65 Transmission Frequency 22 Transponder AUX Input 46 Transponder AUX Output 47 Transponder PF Key 44 Tree View window 67 Tuning Mode 62 U Uninstalling the KPG 91D...

Page 83: ......

Reviews: