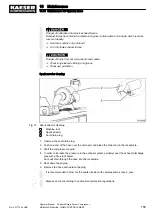
10.6.8 Fit the flexible pipe connection
With the machine stopped, the clamping bolts must be freely movable by hand and parallel
with the pipe.
In LOAD operation, all clamping bolts must be equally loaded.
➤ Replace the self-locking nuts.
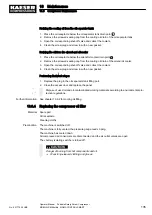
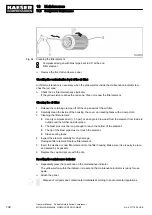
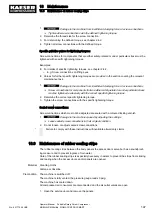
Fig. 65 Fit the flexible pipe connection
1
Pipe
2
Seal holder
3
Gasket (seal ring)
4
Self-locking nut
5
Clamping screw
6
Self-locking nut
7
Pipe clamp halves
8
Sleeve
a
Pipe cut edge
b
Pipe sealing surface
d
Pipe diameter (outside)
s
Dimension of the flexible pipe joint under
tension.
Precondition The components to be connected must be flush-aligned.
The pipe must be deburred and the sealing face clean and undamaged. Point-shaped small con‐
cavities can be ignored, the axial direction must not exhibit any grooves.
1. Slide the seal holder
2
and gasket
3
over the pipe
1
.
2. Slide the pipe end
8
into the bush without pretension.
3. Ensure proper alignment of the pipe and push the sealing ring with sealing holder up to the
beveled edge of the sleeve.
4. Lay the pipe clamp halves
7
over the seal holder
2
and bush
8
and tighten the self-locking
nuts
4
until the dimension
s
is reached.
Pipe diameter: d [in]
Clamp diameter: s [in]
1.9
3.2
Tab. 77 Dimensions of the flexible pipe connection
5. Tighten up the clamping bolts
5
with the self-locking nuts
6
.
It must be just possible to manually move the screw connections.
10 Maintenance
10.6 Compressor Maintenance
No.: 901779 08 USE
Operator Manual Portable Rotary Screw Compressor
MOBILAIR M58utility SIGMA CONTROL SMART
143

