background image

INSTALLATION

8

Harrier GT Range 

- Installation

6

OIL OR GAS CONNECTION

See specific technical information supplied with the burner.

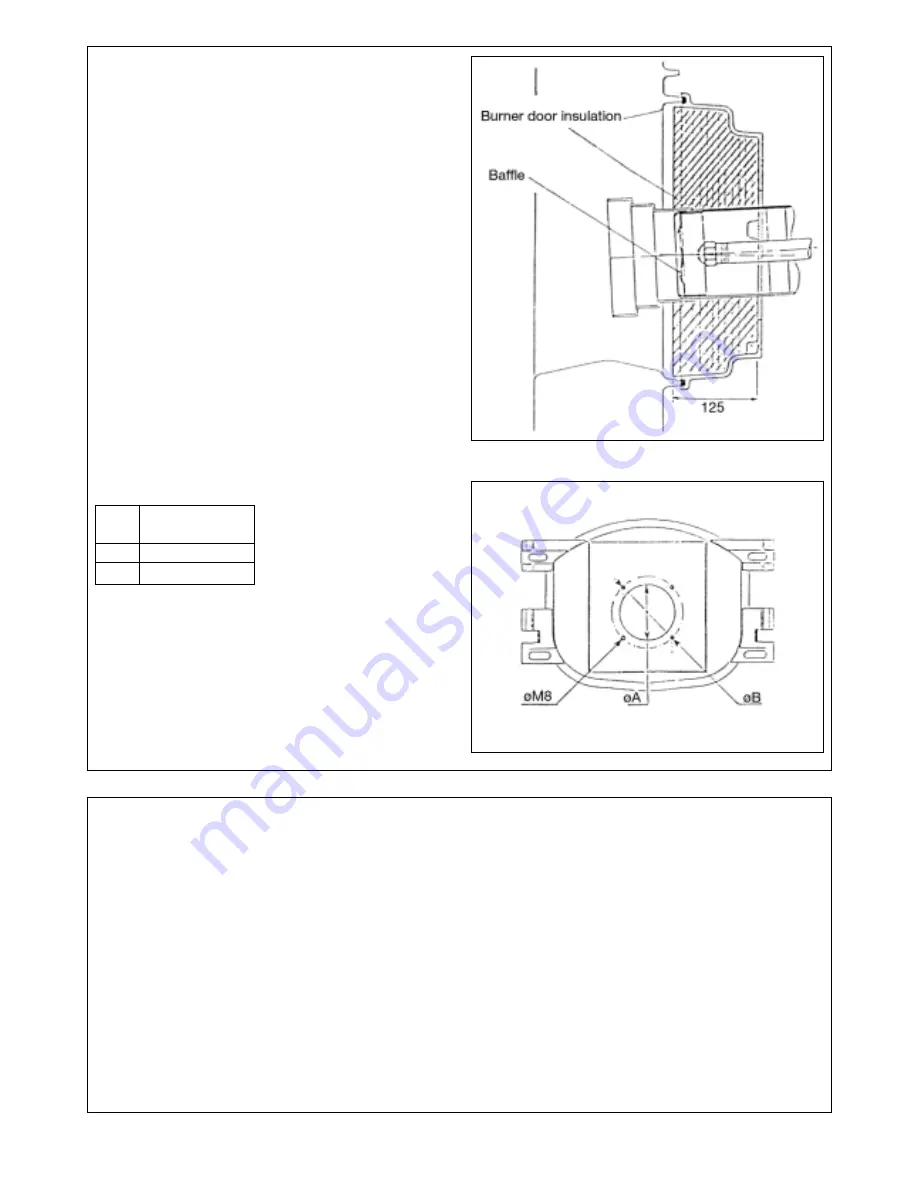
Burner positioning
Caution
: the baffle at the head of the burner must be in line
with the burner door insulation level.

GAS SUPPLY
The gas supply MUST be sized in accordance with British
Gas recommendations and be fabricated in compliance with
CP.331 Pt. 3 and any Local Gas Board installation standards.
The Local Gas Board should be contacted, at a stage prior to
actual insallation, for any advice or information required.
Details and advice, relating to the use of L.PG. for firing the
IDEAL HARRIER GT range of heating boilers, are available on
request to Caradon Ideal Ltd.
OIL STORAGE TANK
The oil storage tank, oil supply pipe and connections to the
burner unit MUST comply with the requirements of BS. 779
and CP.541 0.
The installation should conform to the recognised standards
of good practice in the trade and comply with the relevant
Codes of Practice, Building Regulations and Local Authority,
Fire and insurance requirements.

8219-EN-22

8219-EN-61

Drilling ø for burner door:

Harrier GT

5 to 9 sections

ø A

135

ø B

170

7

ELECTRICAL CONNECTIONS TO THE CONTROL PANEL

CAUTION: The connection must be carried out by a
qualified professional.

As the electrical wiring has been carefully checked in the
factory, the internal connections of the control panel must
not be modified under any circumstances.

The electrical connections of the boiler must conform with
the lEE wiring regulations in force and with the specifications
shown on the electrical drawings provided with the
equipment, and the directions given below. The equipment
should be supplied by a circuit using an omnipolar circuit
breaker with an opening gap greater than 3 mm.

Summary of Contents for Harrier GT

Page 1: ...on servicing or cleaning of this appliance care should be taken when handling edges of sheet steel components Assembly and Installation Instructions for Ideal Harrier Oil Gas or Dual Fuel Fired heating boilers should be read in conjunction with the general technical data tables enclosed and any other technical publication supplied with the burner ...

Page 2: ...n accordance with the latest l E E Wiring Regulations local building regulations bye laws of the local water authority the building regulations and the Building Standards Scotland and any relevant requirements of the local authority Detailed recommendations are contained in the following British Standard Codes of Practice BS 6891 Low pressure installation pipes BS 5449 Forced circulation hot water...

Page 3: ...ID 18 1 ID 19 1 ID 20 1 ID 21 1 Casing ID 2 1 ID 3 1 ID 4 1 ID 5 1 ID 6 1 Control panel E ID 22 Standard ID 24 1 1 1 1 1 For the optional equipment see the current price list HEALTH SAFETY DOCUMENT NO 635 The Electricity at Work Regulations 1989 The manufacturer s notes must NOT be taken in any way as overriding statutory obligations IMPORTANT These appliances are CE certificated for safety and pe...

Page 4: ...s which are installed in or near rooms in which the atmosphere can be polluted by chloride or fluoride substances E g industrial buildings solvents refrigerating machines etc In these cases we cannot provide a warranty INSTALLATION Boiler Type Harrier GT 5 Harrier GT 6 Harrier GT 7 Harrier GT 8 Harrier GT 9 Dimension A 968 1128 1288 1440 1608 Dimension B Standard control panel 105 Diematic and E c...

Page 5: ... into the hole provided in each foot of the heating body and screw the adjustable foot into it Level 8219 EN 20 3 ASSEMBLY For the assembly of the boiler refer to the relevant paragraph of the instruction book 4 1 DIMENSIONAL INFORMATION REQUIRED 8219 EN 17 4 HYDRAULIC CONNECTION ...

Page 6: ...ver riding statutory obligations General Recomendations relating to the water system are contained in BS 5449 Pt 1 BS 5401 Pt 2 and E3S 6880 INSTALLATION 4 3 FILLING THE INSTALLATION The boiler may be filled by the drain tap Filling should be done at a slow flow rate in order to purge all the air contained in the boiler by the upper point of the installation Filling is always done with circulating...

Page 7: ...en to seal carefully between the outlet and flue The installer should provide a measuring point ø 10 mm hole on the flue for burner adjustment and control of the combustion Detailed recommendations relating to the design of flues for GAS fired appliances are quoted in BS 6644 and British Gas Publication No IM 11 whilst BS 5410 Pt 3 similarly applies OIL fired burners 5 2 DIMENSIONAL INFORMATION NE...

Page 8: ...urner unit MUST comply with the requirements of BS 779 and CP 541 0 The installation should conform to the recognised standards of good practice in the trade and comply with the relevant Codes of Practice Building Regulations and Local Authority Fire and insurance requirements 8219 EN 22 8219 EN 61 Drilling ø for burner door Harrier GT 5 to 9 sections ø A 135 ø B 170 7 ELECTRICAL CONNECTIONS TO TH...

Page 9: ...he boiler use the 2 cable runs Outside the boiler 2 wiring ducts at least 10 cm apart should be used Wiring is secured in the control panel using cable clips 6 cable clips are supplied in a separate packet these are to be fitted into the control panel base see diagram below Caution the maximum current which may be switched by the outlet is 2 A cos ϕ 0 7 450 W at the motor of 0 5 méch hp signal cur...

Page 10: ...tions situated behind the blank 3 to the back of the SVR unit blue connector to the blue plug red connector to the red plug Locate the unit by its front 3 and fix it using the two screws sited in the front part of the equipment 1 4 turn clockwise The limit thermostat supplied with the SVR option is to be fitted in the control panel in the place provided for this purpose using the two self tapping ...

Page 11: ...ack line and by breaking the perfo rations in the steel plate behind 2 with a pair of snips Connect the two connections situated behind the blank 3 to the back of the SVR unit blue connector to the blue plug red connector to the red plug Locate the unit by its front and fix it using the two screws sited in the front part of the equipment l 4 turn clockwise Caution when a two stage SV matic weather...

Page 12: ... top panel 8 1 DELUXE OPTION CONTROL PANEL 8 START UP 8 1 1 Presentation of the control panel 1 Double STB STW switch to test the safety thermostat press simultaneously on the two switches STB and STW put the summer winter switch 2 in Summer position 2 Burner Heating pump double switch Switch controlling the burner and heating pump In Winter position the heating and the domestic hot water are on I...

Page 13: ... domestic hot water calorifier 12 Control rheostat for the temperature for the DHW sited on the SVR box or the type B SV matic weather compensator graduated from 20 to 80 C adjustment advised 50 C 8 1 2 Operating instructions of the Deluxe control panel Regulation of the boiler the boiler is controlled either by the boiler thermostats or by the SV matic weather compensator in option For boilers fi...

Page 14: ...tions The temperature of the hot water thermostat must always be lower than the setting on the first stage boiler thermostat or of the limit thermostat in the unique case of the SVR option Put switch 3 either on manual position boilers not fitted with an SV matic weather compensator or on automatic position AUTO boilers fitted with an SV matic weather compensator Check that the safety thermostat 9...

Page 15: ... thermometer 6 5 AT fuse 7 Safety thermostat with manual reset factory set at 100 C 8 2 3 Start up Put the boiler thermostat 3 on the desired position alter the stop position if necessary Where a control unit is fitted see directions supplied with this control unit Check that the safety thermostat 7 is not tripped To do this unscrew the hexagonal cap and using a suitable screw driver press on the ...

Page 16: ...t be carried out as often as required and at least as for the chimney once a year or more according to the regulations in force The following operations are always carried out with the boiler and the power supply shut off Cleaning of the flue gas circuit For this purpose switch off the electricity supply to the boiler unhook the front cover open the sweeping door uppet door by unscrewing the 4 loc...

Page 17: ...nner 17 brush the inside of the combustion chamber using a vacuum cleaner vacuum up the soot deposits accumulated in the combustion chamber close the door and replace the front cover 9 1 BOILER continued Baffles Harrier GT 5 Harrier GT 6 Harrier GT 7 Harrier GT 8 Harrier GT 9 Upper lg 410 8 8 lg 570 4 4 4 Lower lg 412 4 lg 572 2 2 2 2 8219 EN 25 A 8219 EN 62 A ...

Page 18: ...the burner 9 2 PRECAUTIONS TO BE OBSERVED IN CASE OF VERY LONG STOP OF THE BOILER The boiler and the chimney must be carefully swept Shut the boiler doors to avoid any air flow inside If the boiler is going to be stopped for several months we also advise removing the flue connection off the nozzle and to close the nozzle with a cover In case of stop of the heating in winter leading to risks of fre...

Page 19: ...s burner unit lb 1340 1530 1744 1953 2153 General Data Boiler size no of sections Harrier GT 5 Harrier GT 6 Harrier GT 7 Harrier GT 8 Harrier GT 9 Maximum oil rate l h 14 26 18 34 23 43 28 53 33 59 gal h 3 14 4 03 5 16 6 27 7 39 Maximum flue gas volume l sec 88 9 114 146 177 5 209 2 ft3 min 188 4 241 8 309 6 376 2 443 4 Oil Firing Data Boiler size no of sections Harrier GT 5 Harrier GT 6 Harrier G...

Page 20: ... 6 Harrier GT 7 Harrier GT 8 Harrier GT 9 Standard A 130 130 130 130 130 control panel B 105 105 105 105 105 C 165 165 165 165 165 E Diematic A 355 355 355 355 355 control panel B 195 195 195 195 195 C 145 145 145 145 145 L 968 1128 1288 1448 1608 P 650 810 970 1130 1290 ø R 180 180 200 200 200 S 730 890 1050 1210 1370 ...

Page 21: ...D TE or W simplified installation tool 1 jumper bar 1 pipe wrench 1 35 mm spanner or a parallel groove clamp Remark spare screws etc are provided 1 Establish the A or B dimensions depending on the direction in which the burner door will be opened and the length of the burner see instructions 2 1 Put the rear section into position and support it If applicable fit the adjustable feet see 2 2 of this...

Page 22: ...inst the thermocord Drive in the two nipples lightly and af the same time using a hammer and a piece of wood checking that thig nipples are aligned with the bore before tightening Drive in the nipples slightly using a piece of wood A to avoid damaging them 4 Put the silicone thermocord into place in the rear section using a few spots of silicone sealant Respect the junction point indicated in the ...

Page 23: ...gs 2 3 4 5 and 6 Each time that two or three sections have been tightened slide the chocks forward using the jumper bar to raise the boiler 8219 EN 34 8 Put the front section into position and tighten using the assembly tool leave the assembly tool in position Remove the 170 mm high chocks Fit the three assembly rods with dia 12 washer and H12 nuts 19 mm spanner The washers are to be found in the ...

Page 24: ...studs Put the burner door into place with its pin D Using the pipe wrench fit the 4 M8 studs and the 8 M10 studs for the flanges the shorter thread is to be screwed into the section Attach the outlet and return flanges using 4 H10 nuts for each flange 17 mm spanner and place a sealing gasket in between each time For the GT 8 9 the return flange is replaced by a flange with water balancing tube Fit...

Page 25: ...eeping door at the right or left hand side on the 2 lower pins using 2 H 12 nuts and washers 19 mm spanner Put the sweeping door into place along with its pin D 8219 EN 60 8219 EN 40 B If the orifice on the burner door needs to be enlarged proceed as per the drawing Remove the first segment with a chisel and the other segments with an adjustable spanner Adjust the thermal insulation of the burner ...

Page 26: ...es Table 8219 EN 62 A ID 17 to 21 Fit the lower 2 1 2 1 1 2 reducer along with its 1 1 2 plug or a quick opening valve not supplied for sludge removal Do not forget the hemp Fit the upper plug using the small sleeve 35 mm spanner or parallel groove clamp Fit the baffles of the 4 upper flue ways A and B interlock the baffles one into another before placing them in the flue way see detail C Insert t...

Page 27: ...affles using a mallet for instance except the stop at the front see figure Fit the baffles of the 2 lower flue ways placing the 2 last baffles until the stop is reached detail E see leaflet provided with the baffles Close and fasten the door 4 H 12 nuts 4 L 12N thick washers 19 mm spanner After assembly of the body the installer should carry out a water pressure test to 5 2 bar 8219 EN 40 B 8219N5...

Page 28: ...ards See drawing 8219 EN 43 16 Encircle the insulation with the 2 Cordostraps and buckles and tighten Attach the clips to hold it all in place Fit the rear insulation and hold it in place using clips as per the diagram 8219 EN 44 17 Place the two upper transversal parts into position with 2 M12 x 40 bolts 2 H12 nuts and 2 dia 12 mm lockwashers and the lower brackets with 4 M8 x 12 bolts and 4 DE8 ...

Page 29: ...crewdriver 8219 EN 47 8219 EN 54 A Hook the side panels onto the transversal parts Ensure that the insulation slides behind this protection Screw the side panels onto the transversal parts 2 A45 screws 2 DE5 washers 8 mm spanner Slide the wiring duct between the transversal parts and fit the rubberproffle strip Fit the wiring duct end cap on the front transversal part using 2 screws dia 3 94 x 12 ...

Page 30: ...m to the front via the cut out in the front top panel See technical instructions chapter 7 for the E and standard control panels or the instructions particular to the DIEMATIC if applicable BP 22 23 24 Fit the control panel and pass the burner cable optional on the standard control panel through the orifice provided in the top panel then bring it down inside the fold of the right hand protective s...

Page 31: ...lation 31 ASSEMBLY 22 23 8219 EN 50 Screw the side panels to the angle brackets 2 DE5 lockwashers M5 bolts 8 mm spanner The burner cable must pass behind the angle bracket Attach the lower cable cut it if necessary 8219 EN 51 ...

Page 32: ...anel in the front rivet studs Open the control panel by unscrewing the three screws at the rear Deluxe control panel Screw the front of the control panel to the top panel using two self tapping screws of dia 3 94 x 12 7 lockwashers cross head screwdriver Carefully unwind and remove the various bulbs of the control panel by passing them through the orifice of the front top cover Insert them into th...

Page 33: ...rious bulbs of the control panel by passing them through the orifice of the front top cover Insert them into the small pocket and maintain them there with the use of a spring 8219 EN 66 28 Make the electrical connections to the terminal blocks provided for this purpose inside of the control panel See chapter 7 of the instructions for the standard and E control panels or the instructions particular...

Page 34: ...ier GT Range Installation ASSEMBLY 29 30 8219 EN 55 Hook on the front panel Hook on the rear front cover and fasten it at the rear using two self trapping screws of dia 3 9 x 12 7 DE4 lockwashers 8219 EN 56 A ...

Page 35: ... PHASE N NEUTRAL TCH1 BOILER THERMOSTAT 1st STAGE TCH2 BOILER THERMOSTAT 2nd STAGE TS1 SAFETY THERMOSTAT TS2 CONDENSOR THERMOSTAT TW SAFETY LIMITER THERMOSTAT VA ALARM INDICATOR ZB BURNER SWITCH ZTB TEST SWITCH STB ZTW TEST SWITCH TW OPTIONAL DELIVERED EARTH GR GREY NO BLACK MA BROWN RO RED OR ORANGE BL BLUE VI VIOLET BA WHITE V J GREEN YELOW ...

Page 36: ... NEUTRAL P1 LOAD PUMP P2 SHUNT PUMP R RESISTANCE 1430 RG REGULATOR TCH1 BOILER THERMOSTAT 1st STAGE TCH2 BOILER THERMOSTAT 2nd STAGE TL LIMITER THERMOSTAT TS1 SAFETY THERMOSTAT TS2 CONDENSOR THERMOSTAT TW SAFETY LIMITER THERMOSTAT VA ALARM INDICATOR VB1 ON OFF INDICATOR 1st STAGE VB2 ON OFF INDICATOR 2nd STAGE V3V THREE WAY VALVE VI GATE VALVE ZEH A SUMMER WINTER SWITCH HEATING PUMP ZEH B SUMMER W...

Page 37: ...ostat High temperature setting No 6 T2 Return from 1st stage control thermostat High temperature setting Live on this lead hence on T2 allows burner to fire on low fire in a 2 stage burner No 10 S3 Burner lock indicator Feeds signal from lockout terminal on burner control box to lock out indicator on boiler control panel No 4 B4 Feed to 1st stage operating indicator from burner low fire control In...

Page 38: ...38 Harrier GT Range Installation NOTES ...

Page 39: ...Harrier GT Range Installation 39 NOTES ...

Page 40: ...e Caradon Plumbing Limited Technical Training Centre offers a series of first class training courses for domestic commercial and industrial heating installers engineers and system specifiers For details of courses please ring Technical Training 01482 498432 Caradon Plumbing Limited pursues a policy of continuing improvement in the design and performance of its products The right is therefore reser...

Reviews: