


v
Microprocessors and heat sinks (see “Removing a microprocessor and heat
sink” on page 315)
Attention:
Remove the socket cover from the microprocessor socket on the
new microprocessor 2 expansion board and place it on the microprocessor
socket of the microprocessor 2 expansion board you are removing.
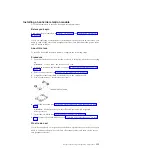
7.
Loosen the two thumb screws on the release lever and rotate the lever toward
the back of the chassis till the stop point. The microprocessor 2 expansion
board will lift up slightly when the release lever is fully open.
8.
Grasp the release lever and the handle and carefully lift the microprocessor 2
expansion board out of the server.
Chapter 6. Removing and replacing components
327
Summary of Contents for 7383
Page 1: ...System x3500 M4 Type 7383 Installation and Service Guide ...
Page 2: ......
Page 3: ...System x3500 M4 Type 7383 Installation and Service Guide ...
Page 8: ...vi System x3500 M4 Type 7383 Installation and Service Guide ...
Page 42: ...24 System x3500 M4 Type 7383 Installation and Service Guide ...
Page 200: ...182 System x3500 M4 Type 7383 Installation and Service Guide ...
Page 360: ...342 System x3500 M4 Type 7383 Installation and Service Guide ...
Page 416: ...398 System x3500 M4 Type 7383 Installation and Service Guide ...
Page 470: ...452 System x3500 M4 Type 7383 Installation and Service Guide ...
Page 479: ...Taiwan Class A compliance statement Notices 461 ...
Page 480: ...462 System x3500 M4 Type 7383 Installation and Service Guide ...
Page 487: ......
Page 488: ... Part Number 46W8192 Printed in USA 1P P N 46W8192 ...