


3.
Remove the fan cage assembly (see “Removing the fan cage assembly” on page
304).
4.
Disconnect the drive cables from the back of the drive bay 1.
5.
Remove the DVD drive (see “Removing a DVD drive” on page 230) or the tape
drive (see “Removing an optional tape drive” on page 233) which is installed in
drive bay 1.
6.
Disconnect the operator information panel assembly cable from the system
board (see “System-board internal connectors” on page 27).
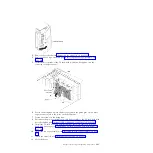
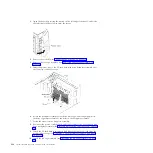
7.
Locate the operator information panel assembly release latch just above the
DVD drive.
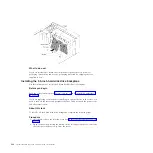
8.
Push up on the release latch while you pull the operator information panel
assembly toward the rear of the server; then, angle the back of the assembly
toward the system board and remove the assembly from the server.
What to do next
If you are instructed to return the component or optional device, follow all
packaging instructions, and use any packaging materials for shipping that are
supplied to you.
Chapter 6. Removing and replacing components
291
Summary of Contents for 7383
Page 1: ...System x3500 M4 Type 7383 Installation and Service Guide ...
Page 2: ......
Page 3: ...System x3500 M4 Type 7383 Installation and Service Guide ...
Page 8: ...vi System x3500 M4 Type 7383 Installation and Service Guide ...
Page 42: ...24 System x3500 M4 Type 7383 Installation and Service Guide ...
Page 200: ...182 System x3500 M4 Type 7383 Installation and Service Guide ...
Page 360: ...342 System x3500 M4 Type 7383 Installation and Service Guide ...
Page 416: ...398 System x3500 M4 Type 7383 Installation and Service Guide ...
Page 470: ...452 System x3500 M4 Type 7383 Installation and Service Guide ...
Page 479: ...Taiwan Class A compliance statement Notices 461 ...
Page 480: ...462 System x3500 M4 Type 7383 Installation and Service Guide ...
Page 487: ......
Page 488: ... Part Number 46W8192 Printed in USA 1P P N 46W8192 ...