


d.
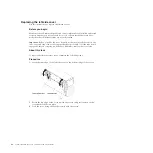
Twist the handle on the microprocessor tool counterclockwise to insert the
microprocessor into the socket. The microprocessor is keyed to ensure that
the microprocessor is installed correctly. The microprocessor rests flush on
the socket only if properly installed.
Attention:
v
Do not press the microprocessor into the socket.
v
Make sure that the microprocessor is oriented and aligned correctly in
the socket before you try to close the microprocessor retainer.
v
Do not touch the thermal material on the bottom of the heat sink or on
top of the microprocessor. Touching the thermal material will
contaminate it.
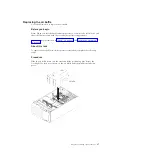
7.
Remove the microprocessor socket dust cover, tape, or label from the surface
of the microprocessor socket, if one is present. Store the socket cover in a safe
place.
86
System x3500 M4 Type 7383: Installation and Service Guide
Summary of Contents for 7383
Page 1: ...System x3500 M4 Type 7383 Installation and Service Guide ...
Page 2: ......
Page 3: ...System x3500 M4 Type 7383 Installation and Service Guide ...
Page 8: ...vi System x3500 M4 Type 7383 Installation and Service Guide ...
Page 42: ...24 System x3500 M4 Type 7383 Installation and Service Guide ...
Page 200: ...182 System x3500 M4 Type 7383 Installation and Service Guide ...
Page 360: ...342 System x3500 M4 Type 7383 Installation and Service Guide ...
Page 416: ...398 System x3500 M4 Type 7383 Installation and Service Guide ...
Page 470: ...452 System x3500 M4 Type 7383 Installation and Service Guide ...
Page 479: ...Taiwan Class A compliance statement Notices 461 ...
Page 480: ...462 System x3500 M4 Type 7383 Installation and Service Guide ...
Page 487: ......
Page 488: ... Part Number 46W8192 Printed in USA 1P P N 46W8192 ...