110
REMOVAL AND REPLACEMENT PROCEDURES
System Board
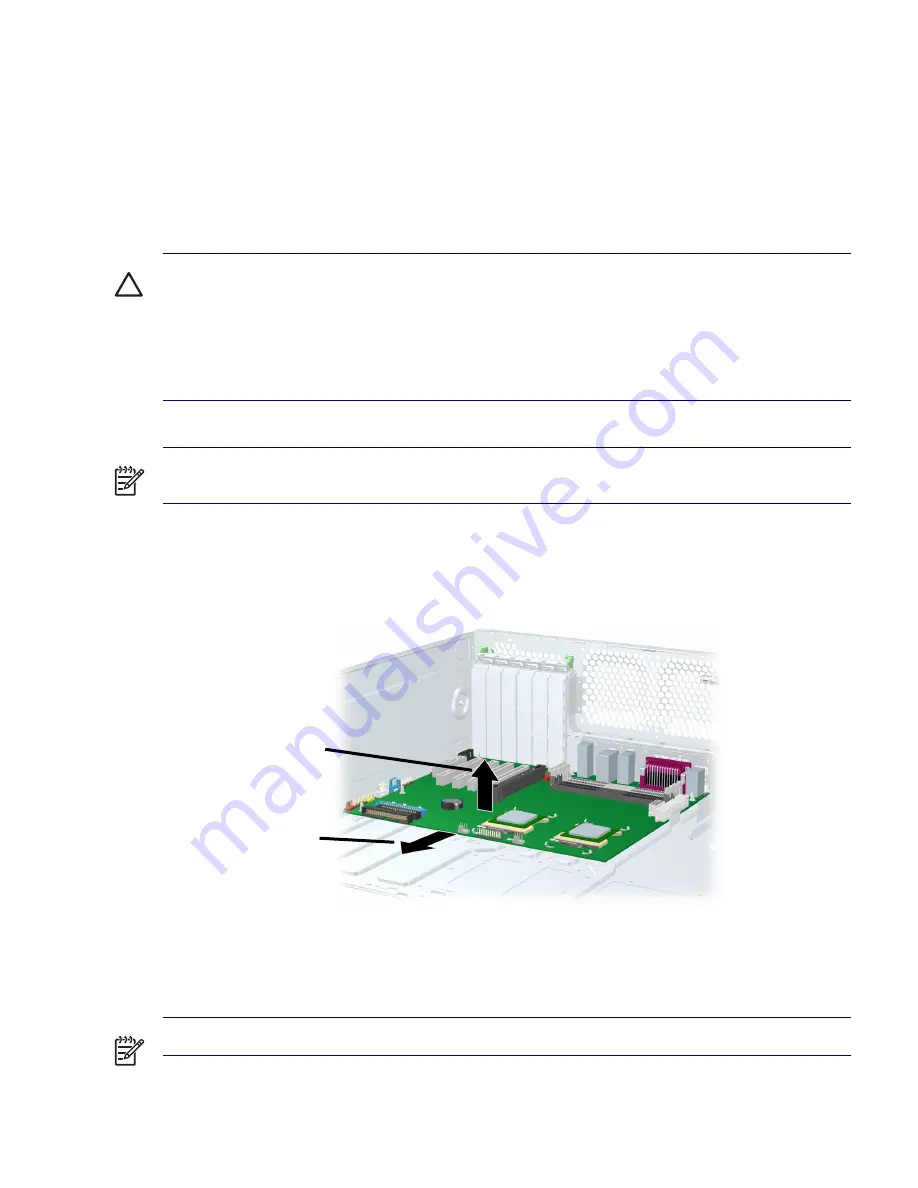
To remove the system board:
1
Disconnect power from the system (
page 68
), remove the access panel (
page 74
), lay the
workstation on its side with the system board facing up, remove all expansion boards and graphics
cards (
page 90
), remove the CPU heatsink (
page 105
), and if an airflow duct is installed, remove the
system fan assembly (page 80).
2
Disconnect all cabling from the system board.
CAUTION
Be sure you can differentiate which power cable was disconnected from the PCI Express x16
graphics card and which power cable was disconnected from the system board. These two cables look
very similar. The PCI Express power cable has a black connector and the power cable has a white
connector. When power is present, you must NEVER connect the PCI Express power cable to the
system board. If you do so, the system board may be damaged and your warranty voided. To see a
picture of the PCI Express cable and where it must be connected, refer to the
“PCI or PCI Express
Installation” section on page 91
.
NOTE
Make note of the cable connections before disconnecting them from the system board. Refer to
“Power Connections to Drives” section on page 95
for more information.
3
Slide the system board forward
1
to disengage the plastic mounting standoffs from the chassis.
4
Lift the system board out
2
of the chassis, being careful not to damage the cables and rear panel
connectors.
To replace the system board:
1
Insert straight down and make sure all system board standoffs engage with the keyholes in the
chassis.
NOTE
Be sure the system board connectors engage correctly with the rear I/O panel.
1
2
Summary of Contents for Xw6200 - Workstation - 2 GB RAM
Page 1: ...HP Workstation xw6200 Service and Technical Reference Guide ...
Page 8: ...VIII CONTENTS ...
Page 14: ...XIV PREFACE ...
Page 26: ...26 PRODUCT OVERVIEW ...
Page 62: ...62 SYSTEM MANAGEMENT ...
Page 112: ...112 REMOVAL AND REPLACEMENT PROCEDURES ...
Page 154: ...154 SCSI DEVICES ...
Page 158: ...158 SATA DEVICES ...
Page 174: ...174 CONNECTOR PINS 5 BLK GND 6 BLK GND 6 Pin Power Auxiliary PCI Express Pin Color Signal ...
Page 178: ...178 POWER CORD SET REQUIREMENTS ...
Page 184: ...184 ADDITIONAL PASSWORD SECURITY AND RESETTING CMOS ...
Page 186: ...186 QUICK TROUBLESHOOTING FLOWS Initial Troubleshooting ...
Page 187: ...NO POWER 187 Appendix I No Power No Power Part 1 ...
Page 188: ...188 QUICK TROUBLESHOOTING FLOWS No Power Part 2 ...
Page 189: ...NO POWER 189 Appendix I No Power Part 3 ...
Page 190: ...190 QUICK TROUBLESHOOTING FLOWS No Video No Video Part 1 ...
Page 191: ...NO VIDEO 191 Appendix I No Video Part 2 ...
Page 192: ...192 QUICK TROUBLESHOOTING FLOWS No Video Part 3 ...
Page 193: ...ERROR MESSAGES 193 Appendix I Error Messages Error Messages Part 1 ...
Page 194: ...194 QUICK TROUBLESHOOTING FLOWS Error Messages Part 2 ...
Page 195: ...ERROR MESSAGES 195 Appendix I Error Messages Part 3 ...
Page 196: ...196 QUICK TROUBLESHOOTING FLOWS No OS Loading ...
Page 198: ...198 QUICK TROUBLESHOOTING FLOWS No OS Loading from Hard Drive Part 2 ...
Page 199: ...NO OS LOADING FROM HARD DRIVE 199 Appendix I No OS Loading from Hard Drive Part 3 ...
Page 200: ...200 QUICK TROUBLESHOOTING FLOWS No OS Loading from Diskette Drive ...
Page 201: ...NO OS LOADING FROM CD ROM DRIVE 201 Appendix I No OS Loading from CD ROM Drive ...
Page 202: ...202 QUICK TROUBLESHOOTING FLOWS No OS Loading from Network ...
Page 203: ...NON FUNCTIONING DEVICE 203 Appendix I Non functioning Device ...
Page 204: ...204 QUICK TROUBLESHOOTING FLOWS ...
Page 208: ...208 ...
Page 209: ...209 Index ...


