REMOVAL AND REPLACEMENT OF COMPONENTS
101
Cha
pter 4
For example, if the drive must be set to 3, the drive might show that the 4 ID bits are at the far left of the
connector (ID0, ID1, ID2, and ID3), then using the jumpers provided, cover each block to set the SCSI
ID.
After you have given the hard drive a unique SCSI ID, you can install the hard drive into your system.
1
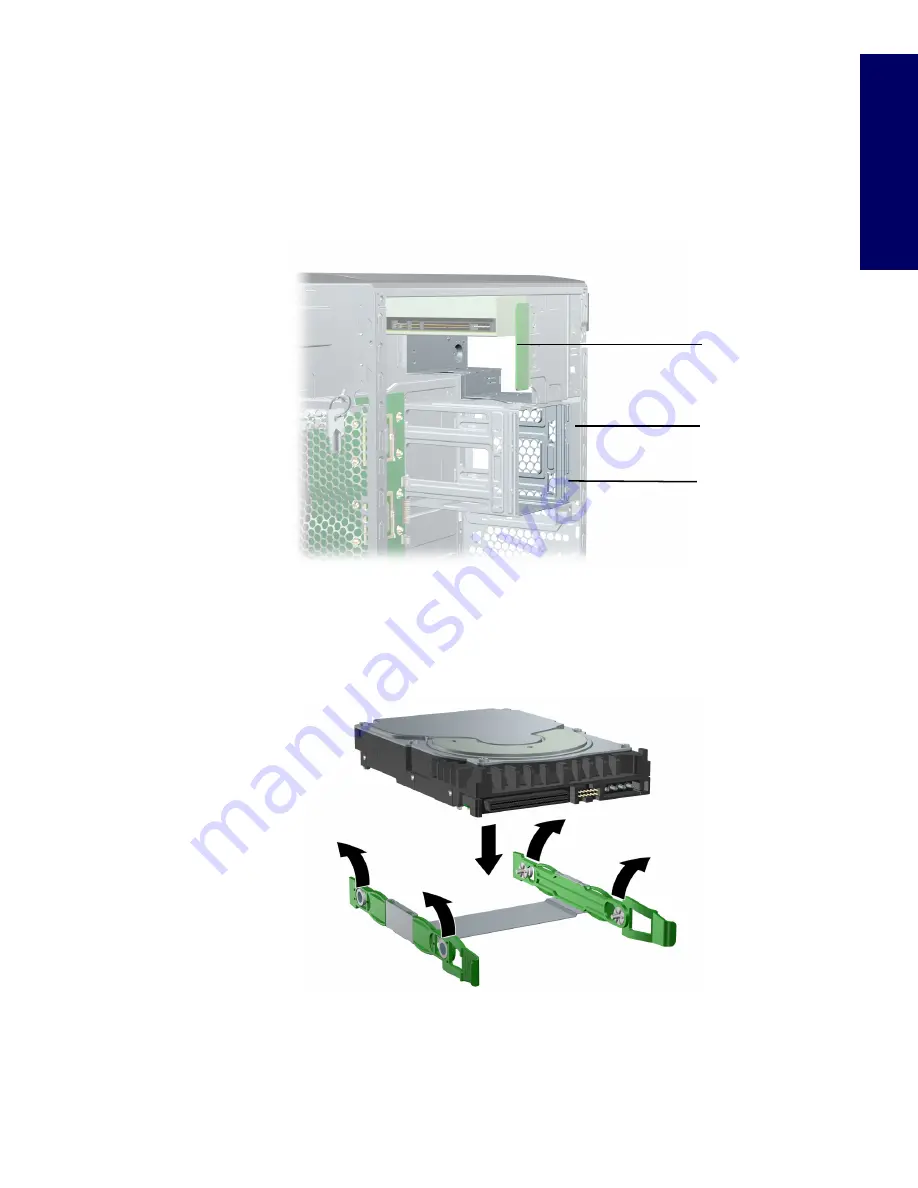
Select a drive bay in which to install the drive. If installing more than one hard drive, use the hard
drive order in the following image.
If installing the hard drive into the 5.25-inch bay, you must install the optional bracket (
page 104
).
2
Simultaneously disengage the green tabs of the rail assembly and slide the rails out of the empty bay.
3
Attach the rails to the hard drive by first inserting the hard drive rail assembly pins into one side of the
hard drive screw holes. Next, gently flex open the opposite side of the hard drive rail assembly and
insert the remaining pins into the holes in the hard drive. If installing the hard drive into the 5.25-inch
bay, skip this step.
3
2
1
Summary of Contents for Xw6200 - Workstation - 2 GB RAM
Page 1: ...HP Workstation xw6200 Service and Technical Reference Guide ...
Page 8: ...VIII CONTENTS ...
Page 14: ...XIV PREFACE ...
Page 26: ...26 PRODUCT OVERVIEW ...
Page 62: ...62 SYSTEM MANAGEMENT ...
Page 112: ...112 REMOVAL AND REPLACEMENT PROCEDURES ...
Page 154: ...154 SCSI DEVICES ...
Page 158: ...158 SATA DEVICES ...
Page 174: ...174 CONNECTOR PINS 5 BLK GND 6 BLK GND 6 Pin Power Auxiliary PCI Express Pin Color Signal ...
Page 178: ...178 POWER CORD SET REQUIREMENTS ...
Page 184: ...184 ADDITIONAL PASSWORD SECURITY AND RESETTING CMOS ...
Page 186: ...186 QUICK TROUBLESHOOTING FLOWS Initial Troubleshooting ...
Page 187: ...NO POWER 187 Appendix I No Power No Power Part 1 ...
Page 188: ...188 QUICK TROUBLESHOOTING FLOWS No Power Part 2 ...
Page 189: ...NO POWER 189 Appendix I No Power Part 3 ...
Page 190: ...190 QUICK TROUBLESHOOTING FLOWS No Video No Video Part 1 ...
Page 191: ...NO VIDEO 191 Appendix I No Video Part 2 ...
Page 192: ...192 QUICK TROUBLESHOOTING FLOWS No Video Part 3 ...
Page 193: ...ERROR MESSAGES 193 Appendix I Error Messages Error Messages Part 1 ...
Page 194: ...194 QUICK TROUBLESHOOTING FLOWS Error Messages Part 2 ...
Page 195: ...ERROR MESSAGES 195 Appendix I Error Messages Part 3 ...
Page 196: ...196 QUICK TROUBLESHOOTING FLOWS No OS Loading ...
Page 198: ...198 QUICK TROUBLESHOOTING FLOWS No OS Loading from Hard Drive Part 2 ...
Page 199: ...NO OS LOADING FROM HARD DRIVE 199 Appendix I No OS Loading from Hard Drive Part 3 ...
Page 200: ...200 QUICK TROUBLESHOOTING FLOWS No OS Loading from Diskette Drive ...
Page 201: ...NO OS LOADING FROM CD ROM DRIVE 201 Appendix I No OS Loading from CD ROM Drive ...
Page 202: ...202 QUICK TROUBLESHOOTING FLOWS No OS Loading from Network ...
Page 203: ...NON FUNCTIONING DEVICE 203 Appendix I Non functioning Device ...
Page 204: ...204 QUICK TROUBLESHOOTING FLOWS ...
Page 208: ...208 ...
Page 209: ...209 Index ...


