background image

59

Operation manual geodyna 2350 - 9413 126

User calibration

135

136

137

138

139

1

.

.

13. User calibration

If several measuring runs are necessary to balance a wheel be-
cause balance weight size and position have to be changed re-
peatedly, it may be necessary to readjust the machine.

For readjustment by the operator a calibration weight is sup-
plied with the machine (ref. no. 6418 416 - kept on the rear of
the weight tray).

Important:
Readjustment must be carried out using the clamping
adapter supplied with the machine.

Readjustment

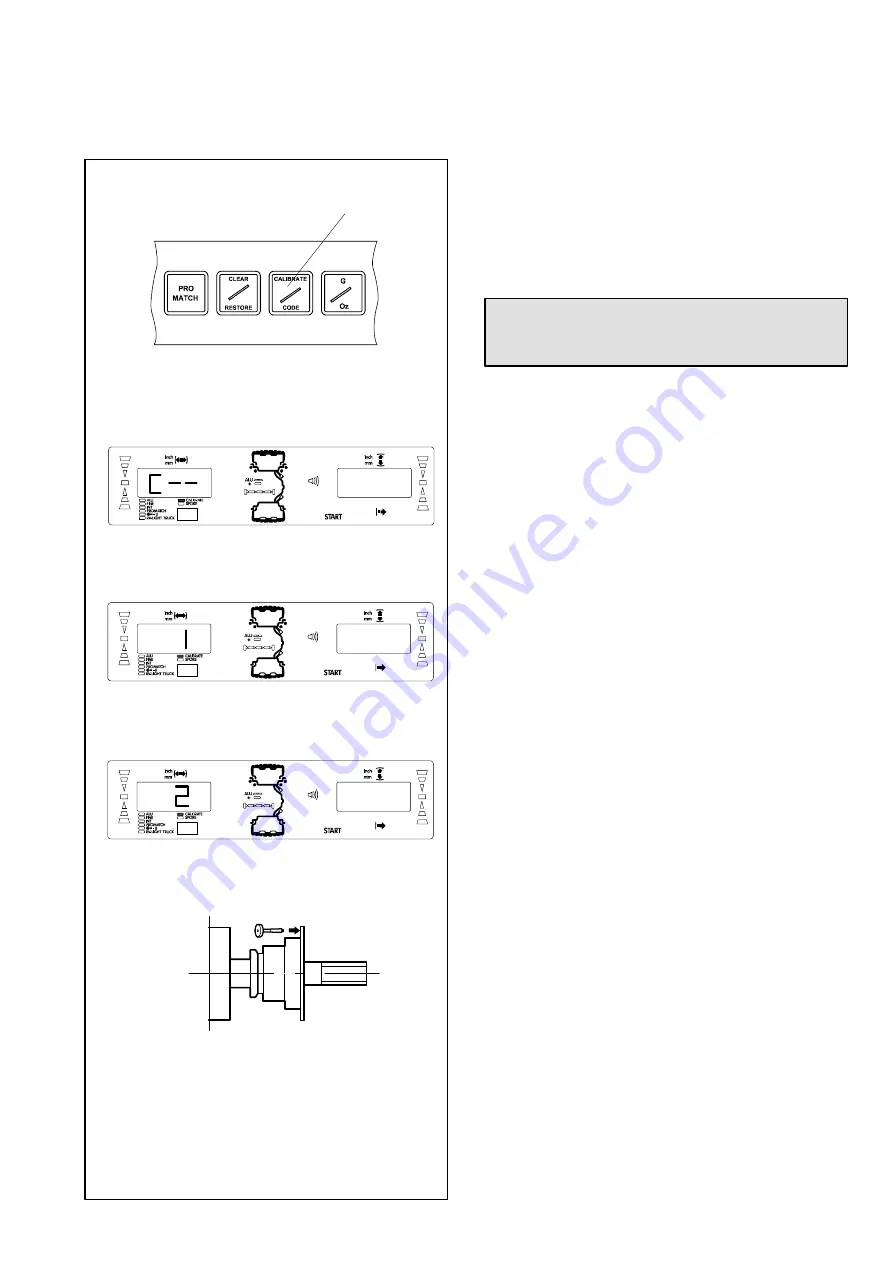
(Code C14)

D

Make sure no wheel or other clamping means is clamped
on the machine.

D

Press and hold the CODE key

(Fig. 135, pos. 1)

.

The basic reading C -- is read out

(Fig. 136)

.

D

Release the CODE key.

Reading 1. and START are read out

(Fig. 137)

.

D

Close the optional wheel guard, and press the START
key to carry out a readjustment run.

On completion of the first run reading 2. and START are read
out

(Fig. 138)

.

D

Screw the calibration weight into the threaded bore pro-
vided for this purpose in the basic body of the wheel
adapter

(Fig. 139)

.

D

Press the START key to carry out a second readjustment
run with the calibration weight fitted on the adapter (to de-
tect the correction values).

On completion of the processing operation a three-tone signal
is given and readjustment is completed. The machine is now
operative and the basic readings come back

(Fig. 135)

.

D

Remove the calibration weight from the wheel adapter
and put it back in its designated place.

Summary of Contents for Geodyna 2350

Page 1: ...Operation manual Car wheel balancer geodyna 2350 Hofmann Werkstatt Technik â ...

Page 2: ...instructions D signals the operator where to act Safety rules are highlighted in grey Arrow showing where to look Arrow showing the direction to move 1 2 Scope of application The off the vehicle wheel balancer is designed for static and or dynamic balancing of car and light truck wheels weighing up to 150lbsandhavinganoveralldiameterof44 Anoptionalwheel guard is available especially for balancing ...

Page 3: ...ade inoperative In general any work on the electrical system such as fitting of a plug or changing of connections if necessary must be carried out by a qualified electrician in line with relevant national standards and the regulations of the local power station It should be noted that working with technical equipment may involve an unforeseeable acceptable risk Therefore the operator should elimin...

Page 4: ...ancearereadoutseparatelyfor each correction plane Main shaft lock The machine has a pedal operated main shaft lock which is used to retain the wheel in the correction position so that the balance weights can be fitted This lock is designed only to fa cilitateorientationofthewheelandmustnotbeusedforbraking the main shaft Store wheel profiles Wheel profiles permit the storage of values for wheels th...

Page 5: ... Make sure that the ma chine has a stable position i e that it is supported on three seatings If not ensure three point contact on ground by insert ing appropriate spacers between the floor and machine base For transport the wheel balancer is provided with special pack ing on pallet 2 1 Unpacking the machine The machine should be unpacked by two persons Note Whenunpackingthemachinemakesurethatthep...

Page 6: ...ntral position relative to the wheel guard holder and insert the connecting lead of the microswitch D Fit the wheel guard spring Fig 9 item 1 into the spring holder Fig 9 item 2 D Pass the holder for the wheel guard spring through the opening tiltingitintheprocess andthenfititverticallyso that the recesses in the holder are located in the cabinet panel D Extend the wheel guard spring and fit it in...

Page 7: ...wheel guard during a measuring run code C5 These modes of operation can be changed either permanently or only as long as the machine is switched on by means of codes see 10 Changing modes of operation 3 Electrical connection In general any work on the electricalsystem suchas fittingof aplugorchangingofconnections ifnecessary mustbecar ried outby aqualified electricianin linewith relevantnational s...

Page 8: ... Fig 15 Function keys in the middle 4 PRO MATCH Starts an optimisation program LED PRO MATCH lights In the Pro Match program enter valve position 5 CLEAR RESTORE CLEAR key pressed briefly Setting the factory adjusted modesofoperation Allsettingsaredeletedandthedisplay returns to standard RESTORE key pressed for 3 seconds Restores all modes the way they were before clear was pressed 6 CALIBRATE COD...

Page 9: ...hange the number of spokes When the key is pressed without rotating the wheel the current setting is entered OPERATOR Recalls and stores wheel profiles RCL Keep the key pressed on bottom RCL recall comes up in the left hand section of the display and 1 comes up in the right hand section for the first wheel profile to be stored Keep the key pressed on bottom and rotate the wheel Profiles 2 through ...

Page 10: ...f balancing mode Alu 1 to Alu 5 is selected press and hold the FINE key and then press the function key for balancing mode ALU ALU The unbalance readings switch over to those for standard balancing mode and the relative rim symbol appears In the OP and Un programs the FINE key serves as change over key INT pressed on bottom Switches to the patch balance mode All wheel data must have been entered I...

Page 11: ...iles Note Error codes are read out in both digital displays Fig 18 Status LEDs 1 ALU Any ALU balance mode is selected 2 FINE FINE key is pressed cancels supression of small imbalances Display changes to normal resolution as soon as key is released 3 INT Patch Balance is selected All special functions in cluding FINE are inactive and cannot be selected 4 PRO MATCH is selected 5 0 Compensation run h...

Page 12: ...rpendicular to the main shaft After the valve has been placed perpendicular to the main shaft and the PRO MATCH key is pressed the LED is turned off 4 SAPE symbol Asthedistanceleverismovedthefirstbarandgradually the remaining bar segments light up On reaching the correction position the segment furthest to the right lights up and the speaker beeps The symbol lights up when the weight fitting posit...

Page 13: ... Direction indicator of right correction plane 6 Indicates when correction position in the right correc tion plane has been reached 7 Distance machine left correction plane lights whenever distance key is pressed or distance gauge arm is moved 8 START flashes when the START key is to be pressed during pro match and operator calibration Fig 21 Pedal for main shaft lock This lock is designed only to...

Page 14: ...which are available after turning on car wheel with nominal dimensions in inches width 6 5 and diameter 15 0 entry of rim data in inches display of amount of unbalance in 1 4 ounce increments suppression of minor unbalance readings limit set to 1 4 ounce compensation of adapter unbalance switched off start of measuring run by START key Error codes at power on Ifanerrorcodeoccursitmustbeacknowledge...

Page 15: ... phanumeric code consisting of six digits and or letters Note The displayed error codes refer only to the internal line voltage of the machine C10 800 Fig 30 Line voltage too low Balancing is feasible if the motor can drive themain shaftto themeasuring speed Wheel datamay belost D Connect the machine to 110 125 V AC C10 801 Fig 31 Line voltage too high Damage to the electronic unit of the ma chine...

Page 16: ...sing the fastening screw Fig 33 item 3 6 2 Performing a compensation run All clamping and centring means are balanced in our works to within a certain tolerance To compensate for any residual unbalance that might be left in the clamping means it is recommended that an electrical com pensation run be performed also see 10 Changing modes of operation This mode cannot be transferred into the perma ne...

Page 17: ...ng car and light truck wheels Fig 34 Cone adapter to clamp center bore located wheels 1 Cone 2 Rim 3 Clamping head with clamping nut Fig 35 Universal clamping adapter for clamping stud hole lo cated wheels or wheels with closed rim 1 Rim with center bore center bore location 2 Closed rim ...

Page 18: ...is also given on the tire Rim width and diameter are always entered by pressing and holding the relative function key Fig 36 item 2 or3 and rotat ing the wheel until the desired value is read out On releasing the function key the inputis retained until anotherinput is made The distance between left correction plane and machine is usually entered using the integrated gauge arm but may also be enter...

Page 19: ...or on the digital displays when the ALU key is pressed reading e g Alu 1 D Press and hold the ALU key Fig 38 item 1 and rotate the wheel to set the desired balancing mode weight fit ting positions Fig 38 D Release the ALU key as soon as the desired mode is read out Fig 38 Rim symbols showing weight fitting positions nor Standard balancing mode where hammer on weights are attached to the rim flange...

Page 20: ... of rim width Use the rim width callipers Fig 40 Fig 39 Input of rim width D To enter the rim width press and hold the relative func tion key Fig 39 item 1 D Rotate the wheel while the key is pressed in order to set the value for the rim width on the display and then re lease the key 7 2 2 Determination and input of wheel diameter D Note the wheel diameter on the rim or tire D To enter the wheel d...

Page 21: ...at hidden adhesive weight attached in the rim the correction planes for the adhesiveweights arede termined automatically by the machine Alu 2P Adhesive weights adhesive weight on bead seat hidden adhesive weight attached in the rim the correction planes for the adhesive weights can be determined exactly Alu 3 Hammer onweightonleftrimflange adhesiveweight attached in hidden position in the rim the ...

Page 22: ...on the segment furthest to the right lights up and the speaker beeps D Re place the gauge arm in its home position Upon operation of the key the distance can be read out once again Manual input of distance rim machine If automatic determination of the distance rim machine is not possible error code E92 the distance can be determined manually in balancing modes normal Alu 1 Alu 2 Alu 3 Alu 4 and Al...

Page 23: ...el until mode Alu 2P is shown Fig 45 a the left weight symbol is dis played as long as the key is pressed Release the ALU key as soon as the desired balancing mode is read out D To determine the gauge application position AP1 pull the distance gauge arm out of the cabinet apply the gauge on the rim in the center of the intended weight position as shown in Fig 45b item AP1 and hold in that position...

Page 24: ...f the gauge Fig 46 item 2 inwards D Insert the adhesive weight Fig 46 item 3 into the gauge with the protective tape facing upwards to the arrow Fig 46 item 4 D Press the adhesive weight firmly into the gauge and re move the protective tape from the weight D Pull the gauge arm towards application position AP1 The display shows the dimension for the first distance which decreases as the gauge is ap...

Page 25: ...e the wheel until mode Alu 3P is shown Fig 47a the left weight symbol is dis played as long as the key is pressed Release the ALU key as soon as the desired balancing mode is read out D To determine the gauge application position AP1 pull the distance gauge arm out of the cabinet apply the gauge on the rim in the center of the weight position as shown in Fig 47b item AP1 and hold in that position ...

Page 26: ...hts D Select an adhesive weight and adjust it to the wheel radius by bending D Raise the gauge arm Fig 48 item 1 and pull the hold ing ring of the gauge Fig 48 item 2 inwards D Insert the adhesive weight Fig 48 item 3 into the gauge with the protective tape facing upwards to the arrow Fig 48 item 4 D Press the adhesive weight firmly into the gauge and re move the protective tape from the weight D ...

Page 27: ...eful for shops that frequently handle the same wheel types It is possible to store up to 4 wheel profiles via code C18 and to select previously stored profiles via code C17 see 10 Changing modes of operation The following values are stored Wheel dimensions Values measured with the gauge arm Weight positions Positions for relocation D Press and hold OPERATOR key on bottom RCL comes up in the left h...

Page 28: ...rement D Start the measuring run by pressing the START key or closing the guard depending on adjustment D Index the wheel into correction position following the direction indicated Fig 52 item 1 On reaching the respective correction position only the center element of the direction indicator is lit Fig 53 item 1 D In this position attach a balance weight in the correction position at the top of th...

Page 29: ...rre locating thecorrec tion plane see 11 Error codes This means that either an error was made in applying the gauge arm or the adhesive weight cannot be fitted on the rim using the gauge head In this case refer to 8 2 3 D If necessary index the wheel to the exact correction position in the left correction plane On reaching the correction position only the two center elements of the dirction indica...

Page 30: ...unction keys and rotating the wheel D Fit adhesive weights in the given positions according to the balancing mode Make sure to observe the given positioning dimensions Fig 56 8 3 Check run D When the balance weights are fitted start a check run On completion of the check run when the wheel is perfectly bal anced both digital displays show 0 and the OK indicators come up Fig 57 Note If both amount ...

Page 31: ...nbalance see Fig 59 Recommendations for fitting balance weights for static unbalance correction Hammer on weights Figures 59 1 59 3 illustrate how hammer on weights can be fitted D With large static unbalance e g 1 ounce divide the un balance into two equal parts Fig 59 1 D With small static unbalance fit the balance weight either in the outer or inner correction plane Fig 59 2 and 59 3 Adhesive w...

Page 32: ...nd reads the balance weight locations on the display panel The operating steps for the hidden spoke placement mode are described and illustrated below 9 1 How to proceed The hidden spoke placement HSP mode is activated auto matically in Alu 2 Alu 2P Alu 3 and Alu 3P balancing modes 9 2 Choice of balancing mode choice of hidden spoke placement mode and input of wheel data D Press and hold the ALU k...

Page 33: ...idden adhesive weight D Rotate the wheel so that a spoke is at 12 00 o clock Fig 65 arrow D In this position press the ALU key for balancing mode Fig 61 item 1 The divided amount of unbalance of the hidden spoke placement is read out for the first adhesive weight in the right correction plane Fig 66 in the example 15 g Note The small arrow on the left hand side in Fig 66 indicates the shortest way...

Page 34: ...tion plane are read out The program hidden spoke placement mode is still active as long as Alu 2 Alu 2P Alu3 or Alu 3P are set To leave the hidden spoke placement and reset the electronics to the conventional balancing mode D Press and hold the ALU key Rotate the wheel to set a balancing mode other than Alu 2 Alu 2P or Alu 3 Alu 3P or D In the reading Wheel data press twice the key for bal ancing ...

Page 35: ...and hold the FINE key Rotate the wheel to set the desired state e g 1 in the display For some codes a given value can be set D Release the FINE key when the desired code or value is read out D Press the CODE key to acknowledge the input and to re turn to the basic reading Fig 69 or abort by pressing STOP Quit the modes of operation and return to normal working mode D Press the STOP key Having comp...

Page 36: ...rns to standard RESTORE key pressed for 3 seconds Restores all modes thewaytheywerebeforeclearwaspressed provided they were stored previously Code C1 Fig 71 Selecting the resolution of unbalance readings in 1 or 5 g or 0 05 or 0 25 oz increments 0 5 g 0 25 oz increments 1 1 g 0 05 oz increments The selected mode of operation can be transferred to the per manent memory Code C2 Fig 72 Selecting supp...

Page 37: ...in when the wheel adapter is exchanged Resetting the status to 0 cancels the compensation of adapter unbalance The compensation is cancelled by calibration or readjustment of the machine by Pro Match or when the machine is turned off 0 Carry out compensation 1 Compensation completed compensation run LED lights up 0 Compensation after the mesuring run switched off again Code C5 Fig 75 Braking of th...

Page 38: ...e of audible signal Scale of volume 0 to 100 low high factory adjusted to 50 Example set volume to 60 The volume is not changed before the CODE key is pressed for quitting the mode The selected mode of operation can be transferred to the per manent memory Code C8 Fig 78 Selectingthelimit threshold valueforsuppressionof minor unbalance readings in grammes or ounces Theunit gmsor oz depends onthe se...

Page 39: ...ansfer it via code C10 into the permanent memory not possible for code C4 Code C12 Fig 80 Readings of numbers of measuring runs Example 222 123 measuring runs so far performed By pressing the FINE key and rotating the wheel the following counters can be displayed 1 Total number of measuring runs 2 Number of measuring runs where balance quality was considered OK 3 Number of Pro Match performed 4 Nu...

Page 40: ...arereadoutintheright handdisplay The stored wheel profile e g 3 is entered once the key is released The following information is available if applicable Nominal wheel dimensions Values measured with the gauge arm Weight positions Positions for relocation See also C18 Code C18 Fig 83 Store wheel profile D Ifawheelprofileistobestored keeponpressingtheOP ERATOR key after the RCL readings have come up...

Page 41: ... and clear the error memory The last 10 different error codes are written to the error memory so that they can be called up and reportedby theoperator ofthe wheel balancer e g for remote diagnosis of malfunctions The most recent error code is written to memory location 1 and the previous error codes are shifted to the higher memory loca tions D Select one of the 10 malfunction code messages D Pres...

Page 42: ...osed E3 Fig 88 Distance gauge arm is not in home position E5 Fig 89 Range of electrical compensation exceeded wheel adapter has unacceptable unbalance D Press STOP key D Check wheel adapter repeat compensation run E6 Fig 90 The calibration weight was not attached for readjustment D Press STOP key D Repeat readjustment E7 Fig 91 With this wheel type it is not possible to choose a balancing mode E8 ...

Page 43: ...re entered D Repeat the Pro Match procedure E15 Fig 94 Readjustment is out of range During readjustment values were determined which exceed or fall below the adjustment value D Press the CODE key to transfer the corrective terms into the permanent memory D Call for the service technician to readjust the machine E16 Fig 95 During the first readjustment run by the operator the calibration weight was...

Page 44: ...ake sure the machine is on a solid floor and repeat the measuring run again E88 Fig 98 The rotating speed of the main shaft exceeds the limit E89 Fig 99 A key is stuck at power on D Find and release the key or call service D E92 Fig 100 Distance gauge arm defective D Call service D As long as the gauge arm is defective enter by pressing the distance key and rotating the wheel see 7 2 ...

Page 45: ...ded Pro Match can achieve no further improvement H3 Fig 104 Pro Match not recommended H20 Fig 105 Correction plane cannot be re located with the gauge arm D Measure the correction plane and switch to dynamic un balance reading H21 Fig 106 The indexed position is not the one for the correction plane in which the adhesive weight is to be fitted with the gauge arm D Indexthecorrectpositionforthiscorr...

Page 46: ...ng the STOP key H90 Fig 109 Thewheelwasacceleratedtooslowlyordeceleratedtooslowly after a measuring run If the main shaft does not reach the required speed check whether the shaft with mounted wheel can not rotate freely or whether the weight of the wheel is excessive In this case D Release main shaft lock D Make sure that the shaft with mounted wheel can rotate freely D Turn the wheel by hand and...

Page 47: ...aftto themeasuring speed Wheel datamay belost D Bring the line voltage to within a range of 110 125 V AC 300 801 or C10 801 Fig 112 Line voltage too high Damage to the electronic unit of the ma chine is likely D Turn off machine immediately Damage is not covered under warranty 300 804 or C10 804 Fig 113 Line voltage too high Damage to the electronic unit of the ma chine is likely D Turn off machin...

Page 48: ...termined 12 2 General instructions for the Pro Match weight minimisation programs It may be necessary to interrupt the Pro Match minimisation program by pressing the STOP key The electronic unit will store the current program step the rim dimensions and all measurements taken so far To continue with the Pro Match minimisation program press the OP and CODE keys in succession The program then con ti...

Page 49: ...tioned at 12 00 o clock after the tire has been displaced on the rim D Rotate the tire so that the valve stem is set at 12 00 o clock D Depress the PRO MATCH key Fig 115 item 1 to enter the valve position Reading OP 2 Fig 117 comes up An incorrect valve position input can be corrected by repeating this step Weight minimisation matching If no Pro Match but only weight minimisation i e without com p...

Page 50: ...adjust such that the valve is set to 12 00 o clock D Press the PRO MATCH key to enter the valve position Reading OP 4 Fig 119 comes up D Press the START key The measuring run is carried out After the measuring run two readings are possible OP 5 H 1 see Fig 120 Further Pro Match is not recommended but possible OP 5 reference mark see Fig 121 Continue with the Pro Match program Reading OP 5 H 1 Fig ...

Page 51: ...es up D Press the START key After the measuring run four readings are possible OP 7 see Fig 123 Proceed with the OP program It is recommended that the tire be turned over on the rim OP 7 see Fig 124 Proceed with the OP program It is recommended that the tire be readjusted on the rim H 0 see Fig 125 Optimum condition has been achieved and cannot be im proved H 2 see Fig 126 Wheel running conditions...

Page 52: ...n has beencarried outcorrectly followingthe above sequence of operations the balancer will return to the balancing mode selected before Pro Match and read out the dynamic unbalance still left in the wheel Fig 123 D Balance the wheel according to the readings Choice 2 Do not turn tire over on the rim D Press the FINE key The result is then converted Reading is OP 7 see Fig 124 or H0 see Fig 125 or ...

Page 53: ... to enter the valve position Reading OP 8 comes up D Press the START key check run If the Pro Match run has beencarried outcorrectly followingthe above sequence of operations the balancer will return to the balancing mode selected before Pro Match and read out the dynamic unbalance still left in the wheel Fig 124 D Balance the wheel according to the readings Choice 2 D Press the STOP key to return...

Page 54: ...been achieved and cannot be improved Reading H 2 Fig 126 Wheel running conditions cannot be improved However it is possible to achieve weight minimisation Choice 1 Continue with weight minimisation D Press the FINE key to continue in the program As a result readings are Un 7 Fig 132 or Un 7 Fig 133 Choice 2 Abort Pro Match D PresstheSTOPkeytoleavethePro Matchprogramand return to the balancing prog...

Page 55: ...y The measuring run is carried out After the measuring run two readings are possible Un 5 H 1 see Fig 129 Further minimisation is not recommended but possible Un 5 reference mark see Fig 130 Continue with the Un program Reading Un 5 H 1 Fig 129 If Un 5 H 1 is read out further minimisation is not recom mended In this case the measured data does not exceed one ounce However it is possible to continu...

Page 56: ...ve is at 12 00 o clock D Press the PRO MATCH key to enter the valve position Reading Un 6 Fig 131 comes up D Press the START key The second measuring run of the tire rim assembly is started After the measuring run three readings are possible Un 7 see Fig 132 ProceedwiththeUnprogram Itisrecommendedthatthetirebe turned over on the rim Un 7 see Fig 133 ProceedwiththeUnprogram Itisrecommendedthattheti...

Page 57: ...has been carried out correctly following the above sequence of operations the balancer will return to the balancing mode selected before minimisation and read out the dynamic unbalance still left in the wheel Fig 132 D Balance the wheel according to the readings Choice 2 Do not turn tire over on the rim D Press the FINE key The result is then converted Reading is Un 7 see Fig 133 or H0 see Fig 134...

Page 58: ...s been carried out correctly following the above sequence of operations the balancer will return to the balancing mode selected before minimisation and read out the dynamic unbalance still left in the wheel Fig 133 D Balance the wheel according to the readings Choice 2 Do not readjust tire on the rim D Press the STOP key to return from the minimisation to the balancing program The unbalance presen...

Page 59: ...e CODE key Fig 135 pos 1 The basic reading C is read out Fig 136 D Release the CODE key Reading 1 and START are read out Fig 137 D Close the optional wheel guard and press the START key to carry out a readjustment run On completion of the first run reading 2 and START are read out Fig 138 D Screw the calibration weight into the threaded bore pro vided for this purpose in the basic body of the whee...

Page 60: ...mann Canada PO Box 1270 Belleville Ontario K8N 5E9 Phone 613 962 9138 Fax 613 962 8302 www hofmann ca com 15 Technical data Machine dimensions see Fig 140 Height of machine 40 inches Weight of machine 150 lbs Power required 115 120 V 50 60 Hz Motor rating 0 12 kW Balancing speed 98 rpm Measuring time 7 s Max unbalance reading 14 oz Resolution of amount reading 1 5 g or 0 05 0 25 oz Resolution of p...

Page 61: ...61 Operation manual geodyna 2350 9413 126 16 Electrical diagram ...

Page 62: ...62 Operation manual geodyna 2350 9413 126 Notes ...

Page 63: ...63 Operation manual geodyna 2350 9413 126 Notes ...

Page 64: ...nada 6500 Millcreek Dr Mississauga Ontario L5N4G4 Phone 800 267 2185 Fax 905 821 2073 Web www hofmann ca Snap on Equipment GmbH Germany Geschäftsbereich Hofmann Werkstatt Technik PO Box 1202 64311 Pfungstadt Phone 49 6157 12 482 Fax 49 6157 12 484 Web www hofmann ge com _ 9413 126 060904 US Technical alterations reserved ...

Reviews: