background image

6. RAS FEATURES IN HF-W100E/IoT


6-25 

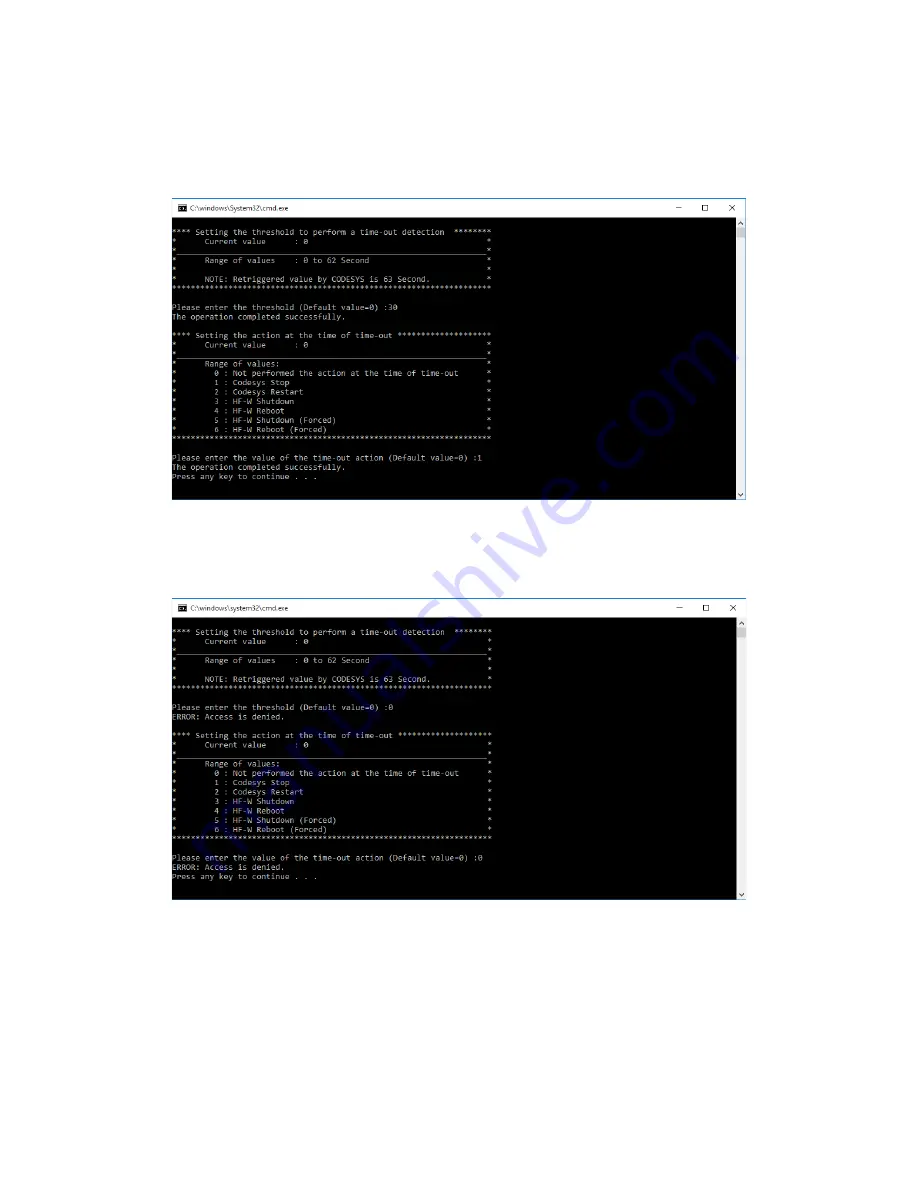
6. As an example, enter 1 for the action at the time of time-out. If the setting is complete 

successfully, “The operation completed successfully.” is displayed.   
When “Press any key to continue...” is displayed, press any key to exit the batch file. 
Then, restart the device. 


If you do not launch the batch file as administrator, “ERROR: Access is denied.” is 
displayed. 
If this message is displayed, run the command as administrator. 


Summary of Contents for HF-W100E/IoT

Page 1: ...HIOT 63 0002 03 INDUSTRIAL CONTROLLER FOR IoT APPLICATIONS STARTUP GUIDE HF W100E IoT USER S MANUAL ...

Page 2: ...AL CONTROLLER FOR IoT APPLICATIONS STARTUP GUIDE HF W100E IoT Read and keep this manual Read safety instructions carefully and understand them before starting your operation Keep this manual at hand for reference USER S MANUAL ...

Page 3: ...t Third Edition April 2018 HIOT 63 0002 03 All Rights Reserved Copyright 2017 2018 Hitachi Ltd The contents of this publication may be revised without prior notice No part of this publication may be reproduced in any form or by any means without permission in writing from the publisher Printed in Japan TP FL MW2007 ...

Page 4: ...highly likely result in serious personal injury or death WARNING This symbol is used to indicate potential hazards that may result in serious personal injury or death CAUTION This symbol is used to indicate potential hazards that may result in minor or moderate personal injury NOTICE This symbol is used to indicate hazards that may result in equipment or property damage but not personal injury The...

Page 5: ...l Using the faulty equipment without repair may result in a fire or an electric shock This equipment has built in hard disk drives Do not hit the equipment or give a shock or vibration to the equipment because that may cause the equipment to fail Should you drop the equipment or damage its chassis disconnect the power cord from the outlet and contact your maintenance personnel Using the faulty equ...

Page 6: ... the equipment in operation directly by hand This equipment alone cannot guarantee the system safety In order to ensure sufficient safety of your system even when this equipment should fail malfunction or have program bugs you must add systemic protections such as building external protective safety circuits to facilitate safety measures to prevent personal injury and serious accidents An emergenc...

Page 7: ... rise and that may cause a failure or short life span of the equipment In addition you need to ensure sufficient clearance for maintenance work Use an operating system specified by the Manufacturer The Manufacturer cannot guarantee proper operation of the equipment if you use an operating system not specified by the Manufacturer Performing emergency shutdown that is unplugging the power cord from ...

Page 8: ...al computers download the electronic manuals for the HF W100E from the following home page http www hitachi co jp hfw Titles of the electronic manuals Manual number HITACHI INDUSTRIAL COMPUTER HF W100E INSTRUCTION MANUAL WIN 62 0069 HITACHI INDUSTRIAL COMPUTER HF W100E RAS FEATURES MANUAL WIN 63 0095 Trademarks Microsoft and Windows are registered trademarks or trademarks of U S Microsoft Corporat...

Page 9: ... to the right of the equals signs 1 KB kilobyte 1 024 bytes 1 MB megabyte 1 048 576 bytes 1 GB gigabyte 1 073 741 824 bytes 1 TB terabyte 1 099 511 627 776 bytes Disk capacities however must be calculated using the formula 10n Listed below are the results of calculating the above example capacities using 10n in place of 2n 1 KB kilobyte 1 000 bytes 1 MB megabyte 1 0002 bytes 1 GB gigabyte 1 0003 b...

Page 10: ...Starting PLC 3 7 3 1 5 Running a PLC program 3 12 3 1 6 Debugging a PLC program 3 14 3 2 Programming Languages 3 16 3 3 Visualization Objects 3 17 3 4 Creating and Setting Up a G Code 3 19 3 5 Reset Action When an Error Occurs 3 23 CHAPTER 4 CONFIGURATION OF EtherCAT CONNECTION 4 1 4 1 Configuration for Using I O Modules 4 2 4 1 1 Adding EtherCAT devices I O modules 4 2 4 1 2 EtherCAT NIC setting ...

Page 11: ...S Library for the CODESYS Runtime Environment 6 2 6 2 1 RAS library interface 6 2 6 2 2 Adding the RAS library 6 7 6 2 3 Examples of using the RAS library 6 12 6 3 Monitoring the CODESYS Runtime Environment 6 14 6 3 1 Overview 6 14 6 3 2 Enabling Disabling the CODESYS runtime environment monitor 6 16 6 3 3 Event notification 6 20 6 3 4 Recording the event log 6 21 6 3 5 HIoTRAS setting command 6 2...

Page 12: ... 1 Table 6 2 List of RAS Library Functions 6 2 Table 6 3 Bit Allocation of usiOutput and usiMask for GendoContorlN 6 3 Table 6 4 Return Value from the GendoControlN Function Error Cases 6 3 Table 6 5 Bit Allocation of pusiInput for GetGendiN 6 5 Table 6 6 Return Value from the GetGendiN Function Error Cases 6 5 Table 6 7 List of Enumeration Types in the RAS Library 6 6 Table 6 8 Variables Used in ...

Page 13: ...This Page Intentionally Left Blank ...

Page 14: ... information about the instructions on how to use CODESYS not described in this manual refer to the online help for the development environment You can start the online help on the help menu in CODESYS In addition to the online help CODESYS original manuals PDF format in English from 3S are available and stored in the following locations Refer to them when needed Note that Adobe Reader from Adobe ...

Page 15: ...0E PBMM HJ 100E PHMM Pre installed OS See 1 Pre installed OS Development environment CODESYS Development System V3 5 SP10 Patch1 Programming languages IEC 61131 3 standard programming languages LD Ladder diagram FBD Function block diagram including CFC SFC Sequential function chart ST Structured text Runtime environment CODESYS Control SoftMotion RTE V3 5 SP10 Patch1 I O control Software PLC Motio...

Page 16: ...date the driver see 2 3 Updating the Network Driver For information about the location of the LAN port connectors refer to 1 5 Name and Function of Each Part in the HF W instruction manual 2 LAN cables In 5 8 Interface Specifications in the HF W instruction manual UTP cables are recommended for use in connection to LAN ports In spite of that we recommend using cables with the following specificati...

Page 17: ...er to 5 3 BIOS Setup in the HF W instruction manual Top menu Setting item Value Caution Chipset South Bridge USB Configuration Legacy USB Support Disabled Do not change these settings Caution If you use Restore Defaults for Windows 7 in the case of Windows Embedded Standard 7 or Restore Defaults for Windows 10 in the case of Windows 10 in the setup menu the BIOS settings go back to the initial set...

Page 18: ...oring the factory condition is approximately 30 minutes for HF W100E IoT 1 3 2 Recovery DVD name The name of the recovery DVD described in 7 2 Preparation and 7 3 Restoring the System Drive Back to the Factory Shipped Condition in the HF W instruction manual must be replaced as follows Name to replace Before HITACHI HJ 100E Product Recovery DVD The underlined part is the model number of the device...

Page 19: ...This Page Intentionally Left Blank ...

Page 20: ...rm the activation process Please check to 2 2 1 Confirmation of Activation Status to see if license activation is being done The CODESYS development environment and the runtime environment are pre installed You do not have to install or set them up 2 1 Setup Items Refer to CHAPTER 3 SETUP in the HF W100E INSTRUCTION MANUAL manual number WIN 62 0069 Activate the license of the CODESYS runtime envir...

Page 21: ...ation area by the following procedure Right click in the notification area and click Properties from the displayed menu Click Customize on the displayed screen Click Select which icons appear on the taskbar Set the icon of CODESYS Control RTE V3 RTE SysTray to ON 2 After the icon turns yellow point the CODESYS Control RTE V3 icon again and check the display contents last string of Address line in ...

Page 22: ...he Internet Using the CODESYS development environment Using a Web browser 2 Offline activation Activate the license on the environment PC with Internet access outside this device You can activate the license without connecting this device to the Internet For the procedure refer to 2 2 3 License activation procedure in the next section ...

Page 23: ...ows 10 click Start and click 3S CODESYS CODESYS CODESYS V3 5 SP10 Patch1 from the list of applications Alternatively double click the CODESYS V3 5 SP10 Patch1 icon on the desktop 2 The CODESYS development environment starts Click New Project Create a new project as follows Categories Projects Templates Standard project Name Any Location Any Device Different depending on the model you purchased Sel...

Page 24: ...bar The icon is hidden by default and you must click to find it Then click Start PLC to start the CODESYS Softmotion RTE Before the activation the CODESYS Softmotion RTE runs in DEMO mode 4 Double click Device in the Devices window shows the selected device name Then click Scan network ...

Page 25: ...ntroller repeat clicking Scan network If you still cannot find any devices the CODESYS Softmotion RTE may not have started yet Do the following Check that the settings in Step 2 are all correct Stop and then restart the CODESYS Softmotion RTE To stop the CODESYS Softmotion RTE click Stop PLC in Step 3 6 Click PLC Settings in the Device tab Then click Edit License ...

Page 26: ...2 SETUP 2 7 7 The Edit Licenses window is displayed Click Install licenses 8 The Select Operation window is displayed Select Activate license and then click Next ...

Page 27: ... shown on the license certificate included with the product in the Ticket ID box Then click Next 10 The Select Licenses window is displayed Select the checkbox for CODESYS Control SoftMotion RTE SL and then click Next When the authentication process is finished click Finish ...

Page 28: ...cense activation status In the Edit Licenses window you can check that the license for CODESYS Control SoftMotion RTE has been activated You can also check the display status of the CODESYS Control RTE V3 icon in notification area on the taskbar to see whether the mode has been changed from DEMO to licensed ...

Page 29: ...lick Start PLC to start the CODESYS Softmotion RTE Before the activation the CODESYS Softmotion RTE runs in DEMO mode 2 Visit the CODESYS license activation site http license codesys com Enter the ticket ID shown on the license certificate included with the product in the License key box Then click Next 3 The activation status of the license is displayed Click Activate licenses ...

Page 30: ...2 SETUP 2 11 4 Click CODESYS Software Key Softcontainer as the binding for the license Note Do not select CODESYS Runtime Key Dongle not supported by this device ...

Page 31: ...ETUP 2 12 5 Select the license container and click Activate selected licenses now License being activated License activated A window is displayed to indicate that license activation was successful Click OK ...

Page 32: ...ey box again and click Next Then you can confirm that the license status has changed to Activated You cannot reactivate using the same ticket ID You can also check the display status of the CODESYS Control RTE V3 icon in notification area on the taskbar to see whether the mode has been changed from DEMO to licensed ...

Page 33: ...ODESYS development environment 2 The Select Operation window is displayed Select Request license and then click Next 3 The Request License window is displayed Create a request file WibuCmRaC to be used in license activation Specify the Software vendor and the file save location and click Finish ...

Page 34: ... the CODESYS license activation site http license codesys com Enter the ticket ID shown on the license certificate included with the product in the License key box Then click Next 5 The activation status of the license is displayed Click Activate licenses ...

Page 35: ...for online activation click the Offline license transfer link near the lower right corner In the following examples CODESYS is not installed and therefore an error message is shown to indicate that the license activation system CodeMeter is not supported If you are prompted to install a CodeMeter add on you do not have to install the add on because offline activation is still possible ...

Page 36: ... license request file specify the path of the request file created in Step 3 Click Upload request and continue now to upload the request file 9 Click Download license update file now to obtain the license update WibuCmRaU file ...

Page 37: ... following window is displayed for uploading the result of the license activation but first execute the following Steps 11 to 13 11 In the Select Operation window of HF W100E IoT select Install license and then click Next ...

Page 38: ...essful license activation to the license activation site follow Steps 1 to 3 again and create a new request file WibuCmRaC 15 Go back to the PC with Internet access In Select license receipt file in the window in Step 10 specify the path of the request file created in Step 14 Click Upload receipt now to upload the result of the license activation 16 A message is displayed to indicate that the resu...

Page 39: ...ey box again and click Next Then you can confirm that the license status has changed to Activated You cannot reactivate using the same ticket ID You can also check the display status of the CODESYS Control RTE V3 icon in notification area on the taskbar to see whether the mode has been changed from DEMO to licensed ...

Page 40: ...f the system Event ID Source Type Description 10317 NDIS Error Miniport 1 2 had event Fatal error The miniport has detected an internal error 1 shows the network adapter name 2 shows the GUID 1 Log on to the computer as an administrator account 2 Open Control Panel If the OS is Windows Embedded Standard 7 click Start and click Control Panel If the OS is Windows 10 right click Start and click Contr...

Page 41: ...pter displayed below in the example above Intel R I210 Gigabit Network Connection To update the driver for built in LAN LAN B Click Intel R Atom TM Celeron R Pentium R Processor PCI Express Root Port2 0F4A Then right click on the network adapter displayed below in the example above CoDeSys EtherExpress GBit PCI Ethernet Adapter 3 To update the driver for built in LAN LAN C Click Intel R Atom TM Ce...

Page 42: ...ect Intel R 210 Gigabit Network Connection and then click Next Note If the OS is Windows 10 two Intel R 210 Gigabit Network Connection are displayed select the upper side To use a port as EtherCAT Select CoDeSys EtherExpress GBit PCI Ethernet Adapter and then click Next 10 A message is displayed to indicate that the driver has been successfully updated Confirm the message and then click Close This...

Page 43: ...This Page Intentionally Left Blank ...

Page 44: ...the OS is Windows Embedded Standard 7 click Start and click All Programs 3S CODESYS CODESYS CODESYS V3 5 SP10 Patch1 If the OS is Windows 10 click Start and click 3S CODESYS CODESYS CODESYS V3 5 SP10 Patch1 from the list of applications Alternatively double click the CODESYS V3 5 SP10 Patch1 icon on the desktop 2 Click the File menu and on the menu click New Project 3 The New Project window is dis...

Page 45: ... of the following A device not described in the following table can be selected but it will not be supported in HF W100E IoT Model Device Motion model HJ 100E RTE SoftMotion 64bit Hitachi Industry Control Solutions Ltd CNC model HJ 100E RTE CNC 64bit Hitachi Industry Control Solutions Ltd For PLC_PRG in specify a language to use In the figure below Structured Text ST is selected as an example ...

Page 46: ...click MainTask in the Devices window to display a window for setting up the task configuration In the MainTask tab you can set task priority type and interval Adding a task 1 If you want to add a task in the right click menu on Task Configuration in the Devices window click Add Object Task ...

Page 47: ...a program You can create a program in the PLC_PRG tab In the declaration part in the upper pane define variables In the body in the lower pane describe an algorithm POU is a program unit Each POU is made of a declaration part and a body Only one programming language can be used in one POU If you want to use multiple programming languages you must add a POU for each language Declaration part Body P...

Page 48: ...o add a POU follow the procedure below 1 In the right click menu on Application in the Devices window click Add Object POU 2 The Add POU window is displayed Enter the POU name configure the type and the implementation language and then click Add ...

Page 49: ...les follow the procedure below 1 In the right click menu on Application in the Devices window click Add Object Global Variable List 2 The Add Global Variable List window is displayed Enter a name and then click Add 3 You can add global variables in the new Global Variable List ...

Page 50: ...tomatically 1 Starting PLC manually 1 Click the CODESYS Control RTE V3 icon in notification area on the taskbar The icon is hidden by default and you must click to find it Then click Start PLC Notes 1 Wait until the startup process is complete Be aware that it may take dozens of seconds 2 To stop PLC click Stop PLC NOTE When you start PLC by clicking Start PLC or stop PLC by clicking Stop PLC the ...

Page 51: ...min rights are granted click the icon again and then click PLC Configuration 3 The System Configuration dialog box is displayed Click the Startup tab select the Start the PLC with the basic system service checkbox and the Start the RTE basic systemservice when booting checkbox and then click OK Setting item Meaning Start the RTE basic systemservice when booting The RTE system service is started wh...

Page 52: ...k Scheduler to delay the start timing of PLC The procedure for checking the CODESYS scheduler version is as follows 1 Start Windows Explorer and open C Windows System32 drivers 2 Right click the CmpDrvSchedulerAMP sys file and then click Properties 3 Click Details tab If you want to start the PLC automatically when the CODESYS scheduler version is 3 5 10 10 perform the following settings a and b a...

Page 53: ...lick Enable Note To cancel the PLC auto start right click the Auto Start task and on the menu click Disable b Changing the PLC configuration 1 Click the CODESYS Control RTE V3 icon in notification area on the taskbar The icon is hidden by default and you must click to find it Then click PLC Configuration ...

Page 54: ...d then click PLC Configuration 3 The System Configuration dialog box is displayed Click the Startup tab select only the Start the PLC with the basic system service checkbox and then click OK Make sure that you clear the Start the RTE basic systemservice when booting checkbox Note To cancel the PLC auto start clear Start the PLC with the basic system service checkbox and then click OK Then PLC will...

Page 55: ...ting up device configuration shows the selected device name 2 Click Scan network to display the Select Device window In the Select Device window select the device you want to connect to and click OK 3 After the device is connected click the Online menu and on the menu click Login Alternatively click the login icon on the toolbar ...

Page 56: ...iguration shows the selected device name 2 In the Communication Settings window click Gateway On the menu click Add new gateway to open a window for adding a new gateway 3 In the Select Device window select the device you want to connect to and click OK Enter IP Address and Port for the new device and click OK Note that if you specify localhost for IP Address you can connect to a device connected ...

Page 57: ...k on a line where you want to set a breakpoint and on the menu click New Breakpoint 2 The Breakpoint Properties window is displayed Under Hit Count select a break condition Select Enable breakpoint immediately and click OK 3 Click the Debug menu and on the menu click Start Alternatively click the start icon on the toolbar 4 The program stops at the line with the breakpoint ...

Page 58: ...running 1 Enter a value example FALSE in Prepared value while the program is running In the body the value is shown as TRUE FALSE 2 Click the Debug menu and on the menu click Write values Alternatively press Ctrl F7 3 At the next cycle the Value is changed to the value shown as Prepared value example FALSE ...

Page 59: ...red Text Language suitable for numerical calculation and logical expression Ladder Diagram Language that describes logic circuits Function Block Diagram Graphical language that combines multiple functions into one Sequential Function Chart Language that describes the chronological order of the control Continuous Function Chart Graphical programming language based on FBD For details about each prog...

Page 60: ...he online help CODESYS Visualization 1 Creating a visualization object 1 To add a visualization object right click Application in the Devices window and on the menu click Add Object Visualization 2 The Add Visualization window is displayed Select the Active checkbox for VisuSymbols System and then click Add After the visualization is added the ToolBox window appears 3 In the ToolBox window click L...

Page 61: ...operties window you can change the settings of the Lamp For example by clicking Position Variable you can specify a variable output to the Lamp Running an object 1 Build login and then run the object Whenever the variable is switched between FALSE and TRUE the created Lamp turns on or off accordingly ...

Page 62: ...k menu on Application in the Devices window click Add Object CNC program In the following the project created in 4 2 Configuration for Using Servo Amplifiers and Servo Motors is used 2 The Add CNC program window is displayed Select Din66025 for Implementation and SMC_CNC_REF for Compile mode Then click Add ...

Page 63: ... upper left corner of the window an auxiliary line is shown Moreover if you click an icon with a line and dots B in the following figure the acceleration deceleration and constant velocity sections of the track created by the G code are shown color coded Note that if you make changes in either the G code or the Graphic Editor the other is automatically updated B A Deceleration Constant velocity Ac...

Page 64: ...gs in the Devices window to display a window for CNC settings 2 Click the Path preprocessors tab to display a list of Available function blocks Select the function block you want to use and then click The function block is registered under Active function block instances ...

Page 65: ...ered function block and click Parameters The Parameter editor window for the function block is displayed Set up the parameters as required For details about G codes CNC and SoftMotion refer to the following topic in the online help Add ons SoftMotion ...

Page 66: ...set and reset PLC initialization For details about each reset action refer to the following topic in the online help CODESYS Development System Reference User Interface Commands Online For information about the behavior of remanent variables at each reset action refer to the following topic in the online help CODESYS Development System Reference Programming Variable Types and special Variables Rem...

Page 67: ...This Page Intentionally Left Blank ...

Page 68: ...CAT CONNECTION 4 1 CHAPTER 4 CONFIGURATION OF EtherCAT CONNECTION This chapter explains how to configure EtherCAT Use the procedure that fits your needs When I O modules are used When servo amplifiers and servo motors are used ...

Page 69: ... EtherCAT devices This procedure uses I O modules EH IOCA from Hitachi Industrial Equipment Systems Co Ltd as an example 1 Adding EtherCAT masters 1 Right click on Device in the Devices window shows the selected device name On the menu click Add Device 2 The Add Device window is displayed Select EtherCAT Master EtherCAT Master Click Add Device and then click Close ...

Page 70: ... click Device Repository 2 The Device Repository window is displayed Install the configuration file for the device you want to connect In this example click Install 3 The Install Device Description window is displayed Select the ESI file EtherCAT Slave Information File you obtained beforehand and click Open ...

Page 71: ...When installation is complete EH IOCA is added to the list of installed devices Confirm that the device has been added to the list and click Close 5 Right click on EtherCAT_Master EtherCAT Master in the Devices window On the menu click Add Device ...

Page 72: ...splayed Select EH IOCA and then click Add Device EH_IOCA EH IOCA is added under EtherCAT_Master EtherCAT Master in the Devices window Repeat this step for all the EtherCAT slaves you want to add Click Close after you confirm that the EtherCAT slaves were successfully added ...

Page 73: ... example an I O module is added to an EtherCAT slave Right click on Empty1 Empty under EH_IOCA EH IOCA On the menu click Plug Device Repeat this action for each EtherCAT slave according to your needs 2 In the Plug Device window select the I O module you want to plug in Y16 is selected as an example Click Plug Device ...

Page 74: ...4 CONFIGURATION OF EtherCAT CONNECTION 4 7 3 Y16 is added under EH_IOCA EH IOCA Add a plugged device to Empty2 Empty and subsequent slaves according to your needs ...

Page 75: ... See 3 1 4 Starting PLC and start the PLC If the PLC is not connected See Steps 1 and 2 in 3 1 5 Running a PLC program and connect the PLC 1 Double click EtherCAT_Master EtherCAT Master in the Devices window to display a window for the EtherCAT_Master configuration 2 In Source Address MAC under EtherCAT NIC Setting in the General tab enter the MAC address of the LAN port used for EtherCAT Alternat...

Page 76: ...g for the EtherCAT master 1 Double click EtherCAT_Master EtherCAT Master in the Devices window to display a window for EtherCAT_Master configuration 2 For Cycle Time under Distributed Clock in the General tab specify 4000 µs default setting Note The interval of the task MainTask might be automatically changed when the value of Cycle Time is changed For information about how to configure the cycle ...

Page 77: ...ed EtherCAT_Master configuration window Note The interval of the task might be automatically changed when the value of Cycle Time is changed in 1 Cycle time setting for the EtherCAT master If you change the cycle time setting of the EtherCAT master check the interval setting of the task and reconfigure the setting if necessary If you want an I O module to be controlled using a different cycle time...

Page 78: ...e click EH_IOCA EH IOCA under EtherCAT_Master EtherCAT Master in the Devices window Then click EtherCAT I O Mapping As an example a UINT variable is allocated to Output Alternatively you can click and specify a variable you have already created You can also allocate a BOOL variable to each Bit of the module you configured If you do so however you cannot use the UNIT variable allocated above ...

Page 79: ...ured in EtherCAT I O Mapping 3 After you declare a variable for a device confirm that the variable you declared for the device has been successfully allocated If a strikethrough value is shown under Address the variable has not been allocated In such cases double click the icon under Mapping to allocate the variable ...

Page 80: ...lly the icons beside the devices become green In the Devices window icons can be shown beside devices and modules These icons are shown when the configuration is not consistent with the connected modules Moreover icons are sometimes shown even after you confirm that the connection of the devices and modules is OK If this happens log in to the PLC click Online Cold reset and run the PLC again Then ...

Page 81: ...add EtherCAT devices This procedure uses servo amplifiers ADVA R5MSEC and servo motors ADMA R5MF111 from Hitachi Industrial Equipment Systems Co Ltd as an example 1 Adding EtherCAT masters 1 Right click on Device in the Devices window shows the selected device name On the menu click Add Device 2 The Add Device window is displayed Select EtherCAT Master EtherCAT Master Click Add Device and then cli...

Page 82: ... click Device Repository 2 The Device Repository window is displayed Install the configuration file for the device you want to connect In this example click Install 3 The Install Device Description window is displayed Select the ESI file EtherCAT Slave Information File you obtained beforehand and click Open ...

Page 83: ...RATION OF EtherCAT CONNECTION 4 16 4 When installation is complete HITACHI AC SERVO DRIVES ADV Series is added to the list of installed devices Confirm that the device has been added to the list and click Close ...

Page 84: ...HITACHI AC SERVO DRIVES ADV Series and then click Add Device Then ADVA_EC HITACHI AC SERVO DRIVES ADV Series is added under EtherCAT_Master EtherCAT Master in the Devices window Repeat this step for all the EtherCAT slaves you want to add In the following figure Add Device was clicked twice to add two devices Click Close after you confirm that the EtherCAT slaves were successfully added ...

Page 85: ...s to connect In this example an Axis is added to an EtherCAT slave Right click on ADVA_EC HITACHI AC SERVO DRIVES ADV Series On the menu click Add SoftMotion CiA402 Axis Repeat this action for each EtherCAT slave according to your needs 2 If the following message dialog box appears click OK ...

Page 86: ...4 CONFIGURATION OF EtherCAT CONNECTION 4 19 3 The SM_Drive_GenericDSP402 you selected is added under ADVA_EC HITACHI AC SERVO DRIVES ADV Series In the following figure two devices were added ...

Page 87: ... See 3 1 4 Starting PLC and start the PLC If the PLC is not connected See Steps 1 and 2 in 3 1 5 Running a PLC program and connect the PLC 1 Double click EtherCAT_Master EtherCAT Master in the Devices window to display a window for the EtherCAT_Master configuration 2 In Source Address MAC under EtherCAT NIC Setting in the General tab enter the MAC address of the LAN port used for EtherCAT Alternat...

Page 88: ...ng for the EtherCAT master 1 Double click EtherCAT_Master EtherCAT Master in the Devices window to display a window for EtherCAT_Master configuration 2 For Cycle Time under Distributed Clock in the General tab specify 4000 µs default setting Note The interval of the task MainTask might be automatically changed when the value of Cycle Time is changed For information about how to configure the inter...

Page 89: ...specify 4000 µs default setting for Interval If EtherCAT_Master EtherCAT_Task is inserted under the task you must specify the same value as Cycle Time in the aforementioned EtherCAT_Master configuration window Note The interval of the task might be automatically changed when the value of Cycle Time is changed in 1 Cycle time setting for the EtherCAT master If you change the cycle time setting of t...

Page 90: ...te PDO for your needs PDOs are defined on a per EtherCAT slave basis For details about the PDOs refer to the user s manual of the EtherCAT slave you use 1 Double click ADVA_EC HITACHI AC SERVO DRIVES ADV Series in the Devices window to display a window for EtherCAT slave configuration 2 Click Process Data clear the checkboxes selected under Select the Outputs and Select the Inputs and select the c...

Page 91: ...onse frequency of the PID control and gain parameters Repeat this action for each EtherCAT slave according to your needs Parameters are defined on a per EtherCAT slave basis For details about the parameters refer to the user s manual of the EtherCAT slave you want to use 1 Double click ADVA_EC HITACHI AC SERVO DRIVES ADV Series in the Devices window to display a window for the EtherCAT slave confi...

Page 92: ...Velocity ramp type In this example default values are used If CNC is used If CNC is used in your program the function block that starts with SMC_ControlAxisBy must be used for the axis control To use this function you must define the upper limits of the velocity acceleration and deceleration under Limits for CNC SMC_ControlAxisBy in the above screen 3 Click Scaling Mapping to configure Scaling In ...

Page 93: ...fy the cause 1 Read the user s manual of the slave device and check whether the symptom is listed in the manual If yes troubleshoot according to the description in the manual 2 Start the CODESYS development environment and check the PLC log For information about the PLC log refer to the following topic in the online help CODESYS Development System Reference User Interface Object Object Device and ...

Page 94: ...d setting up alarm events when you use OPC AE This chapter describes the setup procedure necessary for using OPC 1 Using OPC Classic OPC DA AE In addition to adding OPC objects you must configure DCOM See 5 2 Adding OPC Objects and 5 3 DCOM Settings Moreover configure the following items according to your needs OPC server setting CODESYS offers OPC Config a tool for setting up the OPC server and t...

Page 95: ... configuration object to disclose variables to the OPC client 1 In the right click menu on Application in the Devices window click Add Object Symbol configuration 2 The Add Symbol Configuration window is displayed Click Add If you want to use OPC UA select Support OPC UA Features ...

Page 96: ...5 CONFIGURATION FOR USING OPC 5 3 3 Select the variables you want to disclose to the OPC client You can select variables after you build the PLC program If you want to use OPC UA also select Constants ...

Page 97: ...n Notes 1 Follow the setup procedure only when you use OPC Classic If you use OPC UA instead it is not necessary to do so 2 Follow the setup procedure on both the local device and the OPC client PC 5 3 1 DCOM security settings 1 Sign in to the computer using an administrator account Administrator 2 Start the Component Services in the following steps If the OS is Windows Embedded Standard 7 click S...

Page 98: ...s follows Select Enable Distributed COM on this computer Specify Connect for Default Authentication Level Note On the OPC client PC specify None for Default Authentication Level Specify Identify for Default Impersonation Level This completes the DCOM configuration on the OPC client PC Click OK and proceed to 5 3 2 Firewall settings ...

Page 99: ... ANONYMOUS LOGON select all Allow checkboxes and then click OK 6 The Launch and Activation Permission window is displayed Click Edit Limits For Permission for Everyone select all Allow checkboxes and then click OK 7 In the My Computer Properties window click Apply and then click OK If the DCOM configuration on the whole computer dialog box is displayed click Yes ...

Page 100: ...5 7 8 Select My Computer DCOM Config to expand trees and right click on CoDeSysOPCDA On the menu click Properties 9 The CoDeSysOPCDA Properties window is displayed Select the General tab and specify Connect for Authentication Level ...

Page 101: ...GURATION FOR USING OPC 5 8 10 Select the Location tab and then select Run application on this computer 11 Select the Security tab Under Launch and Activation Permissions and Access Permissions select Customize ...

Page 102: ... Select Users and Groups window is displayed Click Advanced Click Search Now Select Everyone under Search results and then click OK In the Select Users and Groups window click OK For Permission s for Everyone select all Allow checkboxes and then click OK 13 Also for Access Permissions add Everyone and select all Allow checkboxes in the same way as in Step 12 ...

Page 103: ...rding to the system security requirements Setting Users granted with access rights Everyone All users INTERACTIVE Local access users NETWORK Remote access users SYSTEM Service applications Specific domain group All users belonging to the specific domain group Specific user name Specific user 14 Select the Identity tab and select The interactive user 15 Click Apply and then click OK ...

Page 104: ...d click Control Panel If the OS is Windows 10 right click Start and click Control Panel from the menu 3 The Control Panel window appears Click System and Security 4 The System and Security window appears Click Windows Firewall 5 The Windows Firewall window appears Click Advanced 6 The Windows Firewall with Advanced Security window is displayed Click Inbound Rules or Outbound Rules In the Actions p...

Page 105: ...zard is displayed Select This program path Click Browse select the following file and then click Next C Program Files x86 3S CODESYS CODESYS OPC Server 3 WinCoDeSysOPC exe 9 The Action window of New Inbound Rule Wizard is displayed Select Allow the connection and then click Next ...

Page 106: ...eckboxes and then click Next 11 The Name window of New Inbound Rule Wizard is displayed Enter the rule name and then click Finish 12 Confirm that the rule just created is registered in Inbound Rules in the Windows Firewall with Advanced Security window Then close the window 13 Close the Windows Firewall window ...

Page 107: ...This Page Intentionally Left Blank ...

Page 108: ... general purpose I O from applications running on the CODESYS runtime environment If you use this functionality you can input signals from and output signals to external devices Seven input and eight output external general purpose I O are available for a user Monitoring functionality 2 Monitoring the CODESYS runtime environment You can use a watchdog timer on HF W100E IoT to monitor whether the C...

Page 109: ...RAS library interface Table 6 2 shows a list of RAS library functions Table 6 2 List of RAS Library Functions No Function name Functionality 1 GendoControlN Controls the output of the external general purpose outputs 2 GetGendiN Acquires the status of the external general purpose inputs NOTE If the RAS features on HF W are not functioning the RAS library cannot be used for control If the RAS libra...

Page 110: ...e bit allocation is the same as usiOutput as shown in Table 6 3 If the parameter is to be controlled set the bit to 1 Otherwise set the bit to 0 Table 6 3 Bit Allocation of usiOutput and usiMask for GendoContorlN bit0 output1 bit1 output2 bit2 output3 bit3 output4 bit4 output5 bit5 output6 bit6 output7 bit7 output8 Return value If this function completes successfully the function returns RET_TRUE ...

Page 111: ...line show the transition of the general purpose output1 Figure 6 2 Operation Example of the External General Purpose Output1 Program example For an example of a program using this function see 6 2 3 Examples of using the RAS library NOTE Do not use this function if you are using the RAS library in the HF W RAS features to control the external general purpose I O In the presence of contention cause...

Page 112: ... 0 is stored to the corresponding bit and 1 otherwise Table 6 5 Bit Allocation of pusiInput for GetGendiN bit0 input1 bit1 input2 bit2 input3 bit3 input4 bit4 input5 bit5 input6 bit6 input7 bit7 Not used Return value If this function completes successfully the function returns RET_TRUE 0x01 If this function terminates with an error the function returns a value as follows Table 6 6 Return Value fro...

Page 113: ... obtained 3 List of enumeration types in the RAS library The following table shows a list of enumeration types defined in the RAS library Table 6 7 List of Enumeration Types in the RAS Library Tag name Definition Value Description W2KRAS_ERROR W2KRAS_INVALID _PARAMETER 0x2001 There is an error in the specified arguments W2KRAS_INTERNAL _ERROR 0x2007 An internal error has been generated W2KRAS_RESO...

Page 114: ...nstall the RAS library in the library repository Add the RAS library to the library manager 1 Installing the RAS library in the library repository If the RAS library has been installed at least once this step is not necessary In that case go to 2 Adding the RAS library to the library manager 1 Double click Library Manager in the Devices window 2 Click Add library in Library Manager ...

Page 115: ...RAS FEATURES IN HF W100E IoT 6 8 3 The Add Library dialog box appears Click Advanced 4 The Add Library dialog box appears Click Library Repository 5 The Library Repository dialog box appears Click Install ...

Page 116: ...ile in the C Program Files HIoTRAS Library folder and click Open 7 Confirm that CmpHIoTRAS is added in System SysLibs Click Close This completes installation of the RAS library Click the close button at the upper right corner of the Add Library dialog box to close the dialog box ...

Page 117: ...S IN HF W100E IoT 6 10 2 Adding the RAS library to the library manager 1 Double click Library Manager in the Devices window 2 Click Add library in Library Manager 3 The Add Library dialog box appears Click Advanced ...

Page 118: ...stem SysLibs CmpHIoTRAS and then click OK Note that you can use the search bar to search the libraries 5 If the following library is shown in library manager the library was added successfully CmpHIoTRAS Hitachi Industry Control Solutions Ltd Asterisks denote the version information ...

Page 119: ...state USIINT dwDO_port Specifies the output state for the external general purpose outputs USIINT dwDO_cmd Specifies which external general purpose outputs to control USIINT dwDI_port Variable used for acquiring the input state of the external general purpose inputs DWORD dwResult_out Result of the external general purpose output DWORD dwResult_in Result of the external general purpose input Funct...

Page 120: ...se input Figure 6 3 Example of External General Purpose I O Control Program PLC_PRG declaration part PROGRAM PLC_PRG VAR uiState INT usiOutput USINT usiMask USINT usiInput USINT dwResult_out DWORD dwResult_in DWORD END_VAR PLC_PRG body IF uiState 0 THEN uiState 1 GENDO output usiOutput 1 usiMask 1 dwResult_out GendoControlN usiOutput usiMask GENDI input dwResult_in GetGendiN ADR usiInput END_IF ...

Page 121: ...cally retriggers the watchdog timer 2 The CODESYS monitor service periodically checks if a timeout is generated by the watchdog timer A watchdog timer timeout is generated when the WDT control component is unable to retrigger and the time in the watchdog timer is less than the timeout threshold 1 3 When a timeout occurs the CODESYS monitor service infers that some sort of error occurred in the COD...

Page 122: ...monitor NOTE When the monitoring functionality is used Not used is selected for Watchdog timer setting in the RAS Setup window in the HF W RAS features factory setting If Automatic retrigger or Retriggered by application program is selected the monitoring functionality cannot function For information about the RAS Setup window see 3 1 3 Using the RAS Setup window in the HF W100E RAS FEATURES MANUA...

Page 123: ...d On the menu click Run as administrator If the OS is Windows 10 click Start and then click Windows Accessories from the list of applications right click Notepad On the menu click More Run as administrator If the User Account Control window is displayed click Yes 2 Notepad starts Click the File menu and on the menu click Open 3 Select the CoDeSysControl cfg file in C Program Files 3S CODESYS CODES...

Page 124: ...k Control Panel from the menu 2 After the Control Panel window opens click System and Security 3 After the System and Security window opens click Administrative Tools 4 After the Administrative Tools window opens double click Services 5 In the Services window double click HIoTRASService The HIoTRASService Properties dialog box opens 6 Change Startup type to Manual click Apply and then click OK The...

Page 125: ...l component CmpHWdtControl as a loading component Component CmpHWdtControl Note The number added after Component is an index and different depending on the environment When you add CmpHWdtControl add 1 to the index of the last component and use that value as the index for the CmpHWdtControl The lines that start with semicolon in the CoDeSysControl cfg file are commented out and therefore disabled ...

Page 126: ... 19 b Starting the monitor service 1 Follow the Steps 1 to 5 in b Stopping the monitor service in 1 Disabling the CODESYS runtime environment monitor 2 Change Startup type to Automatic click Apply and then click OK Then restart the PC ...

Page 127: ...watchdog timer timeout occurs using the following procedure 1 Use the OpenEvent Windows API function to get the handle to the event object If an event object is not created by executing the OpenEvent function retry the function until the event object is created 2 Use the WaitForSingleObject or WaitForMultipleObject Windows API function to monitor whether the event object is in the signaled state T...

Page 128: ...01 HIoTRAS_APP Information Timeout action is completed successfully 1100 HIoTRAS_APP Warning Initialization of watchdog timer monitoring service terminates with an error The service has been started with default value 1200 HIoTRAS_APP Error Initialization of watchdog timer monitoring service terminates with an error The service could not been started 2100 HIoTRAS_APP Error Execution of timeout act...

Page 129: ...ced Restart the HF W forcibly NOTE If you want to set the action at the time of time out to Codesys Stop or Codesys Restart you must set the startup setting of the CODESYS runtime environment to Start the PLC with the basic system service For information about how to configure the startup setting see 6 3 6 Changing the startup setting If this option is not selected for the startup setting the CODE...

Page 130: ...t is opened enter the timeout threshold 0 to 62 and press the Enter key Enter 63 seconds minus the timeout for the timeout threshold For example if you want to set the timeout to 20 seconds enter 43 64 seconds minus 20 seconds The current value is displayed as Current value If you just press Enter without entering a value the current value is kept Then move to Step 5 ...

Page 131: ...ompleted successfully The operation completed successfully is displayed 5 Next enter the action at the time of time out 0 to 6 and press Enter The current value is displayed as Current value If you just press Enter without entering a value the current value is kept If you press Enter again the command exits ...

Page 132: ...lete successfully The operation completed successfully is displayed When Press any key to continue is displayed press any key to exit the batch file Then restart the device If you do not launch the batch file as administrator ERROR Access is denied is displayed If this message is displayed run the command as administrator ...

Page 133: ...Stop or Codesys Restart 1 Click the CODESYS Control RTE V3 icon in notification area on the taskbar The icon is hidden by default and you must click to find it Then click PLC Configuration 2 If a window is displayed to indicate that admin rights are required click OK to obtain the admin rights If the User Account Control window is displayed click Yes When the admin rights are granted click the ico...

Reviews: