


-96-
Model G0853 (Mfd. Since 07/18)
Test
Piece
1
2
3
4
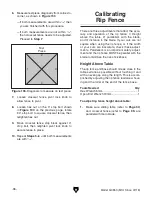
Figure 193. Diagonals to measure on test piece.
6. Measure test piece diagonally from corner-to-
corner, as shown in
Figure 193.
— If both measurements are within
1
⁄
16
", then
you are finished with this procedure.
— If both measurements are not within
1
⁄
16
",
then crosscut fence needs to be adjusted.
Proceed to
Step 7.
7. Loosen crosscut fence pivot lock knob to
allow fence to pivot.
8. Loosen hex nut on the 0° stop bolt shown
in
Figure 190 on the previous page, rotate
90° stop bolt to square crosscut fence, then
retighten hex nut.
9. Move crosscut fence stop block against 0°
stop bolt, then retighten pivot lock knob to
secure fence in place.
10. Repeat Steps 5–6 until both measurements
are with
1
⁄
16
".
Calibrating
Rip Fence
There are three adjustments that affect the accu-
racy and operation of the rip fence: 1) Height
above the table, 2) parallelism with the blade,
and 3) distance to the blade. If your cuts are not
square when using the rip fence, or if the width
of your cuts are inaccurate, check these adjust-
ments. Parallelism is an important safety adjust-
ment and the rip fence MUST be parallel with the
blade to minimize the risk of kickback.
Height Above Table
The rip fence and base should ride as close to the
table surface as possible without touching it and
with an even gap along the length. This is accom-
plished by adjusting the rip fence leadscrew hous-
ing and the roller at the end of the fence base.
Tools Needed
Qty
Hex Wrench 5mm .............................................. 1
Open-End Wrench 19mm .................................. 1
To adjust rip fence height above table:
1. Make sure sliding table (refer to Page 94)
and crosscut fence (refer to
Page 95) are
parallel with main blade.
Summary of Contents for G0853
Page 24: ...22 Model G0853 Mfd Since 07 18 5mm Hardware Recognition Chart...
Page 140: ......


