


Model G0853 (Mfd. Since 07/18)
-73-
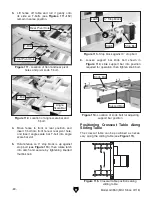
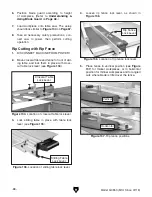
5. Install knob bolts shown in Figure 147.
Figure 147. Locations of knob bolts.
Pivot Knob
Angle
Scale Knob
If the crosscut fence moves during cutting,
kickback could occur and cause serious
personal injury. Always make sure crosscut
fence is properly secured before using it.
8. Set flip stop according to length of workpiece
you want to cut off to left of blade.
9. Load workpiece onto crosscut table. The setup
should look similar to
Figures 145–146 on
Page 72.
10. Take all necessary safety precautions, con-
nect saw to power, then perform cutting
operation.
6. Pivot crosscut fence to desired angle, making
sure end of fence is clear of blade so it will
not be cut during operation.
7. Tighten both knob bolts to secure setting.
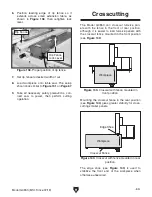
Miter Cutting with Miter Fence
1. DISCONNECT MACHINE FROM POWER!
2. Install miter fence on sliding table, as shown
in
Figure 148.
3. Position miter fence at desired angle for cut
and lock in place.
4. Position flip stop at length of workpiece to be
cut off to left of blade.
5. Load workpiece onto sliding table.
6. Take all necessary safety precautions, con-
nect saw to power, then perform cutting
operation.
Figure 148. Miter fence installed on sliding table.
Flip Stop
Miter
Gauge
Miter
Fence
Fence
Bracket
Fence
Clamp
Hold-Down
Summary of Contents for G0853
Page 24: ...22 Model G0853 Mfd Since 07 18 5mm Hardware Recognition Chart...
Page 140: ......


