Appendix
Appendix
- 1
- 1
14 -
14 -
•
•
Restoring the Master Drive to a Prev
Restoring the Master Drive to a Prev
ious State (for Recovery V
ious State (for Recovery V
olume only)
olume only)
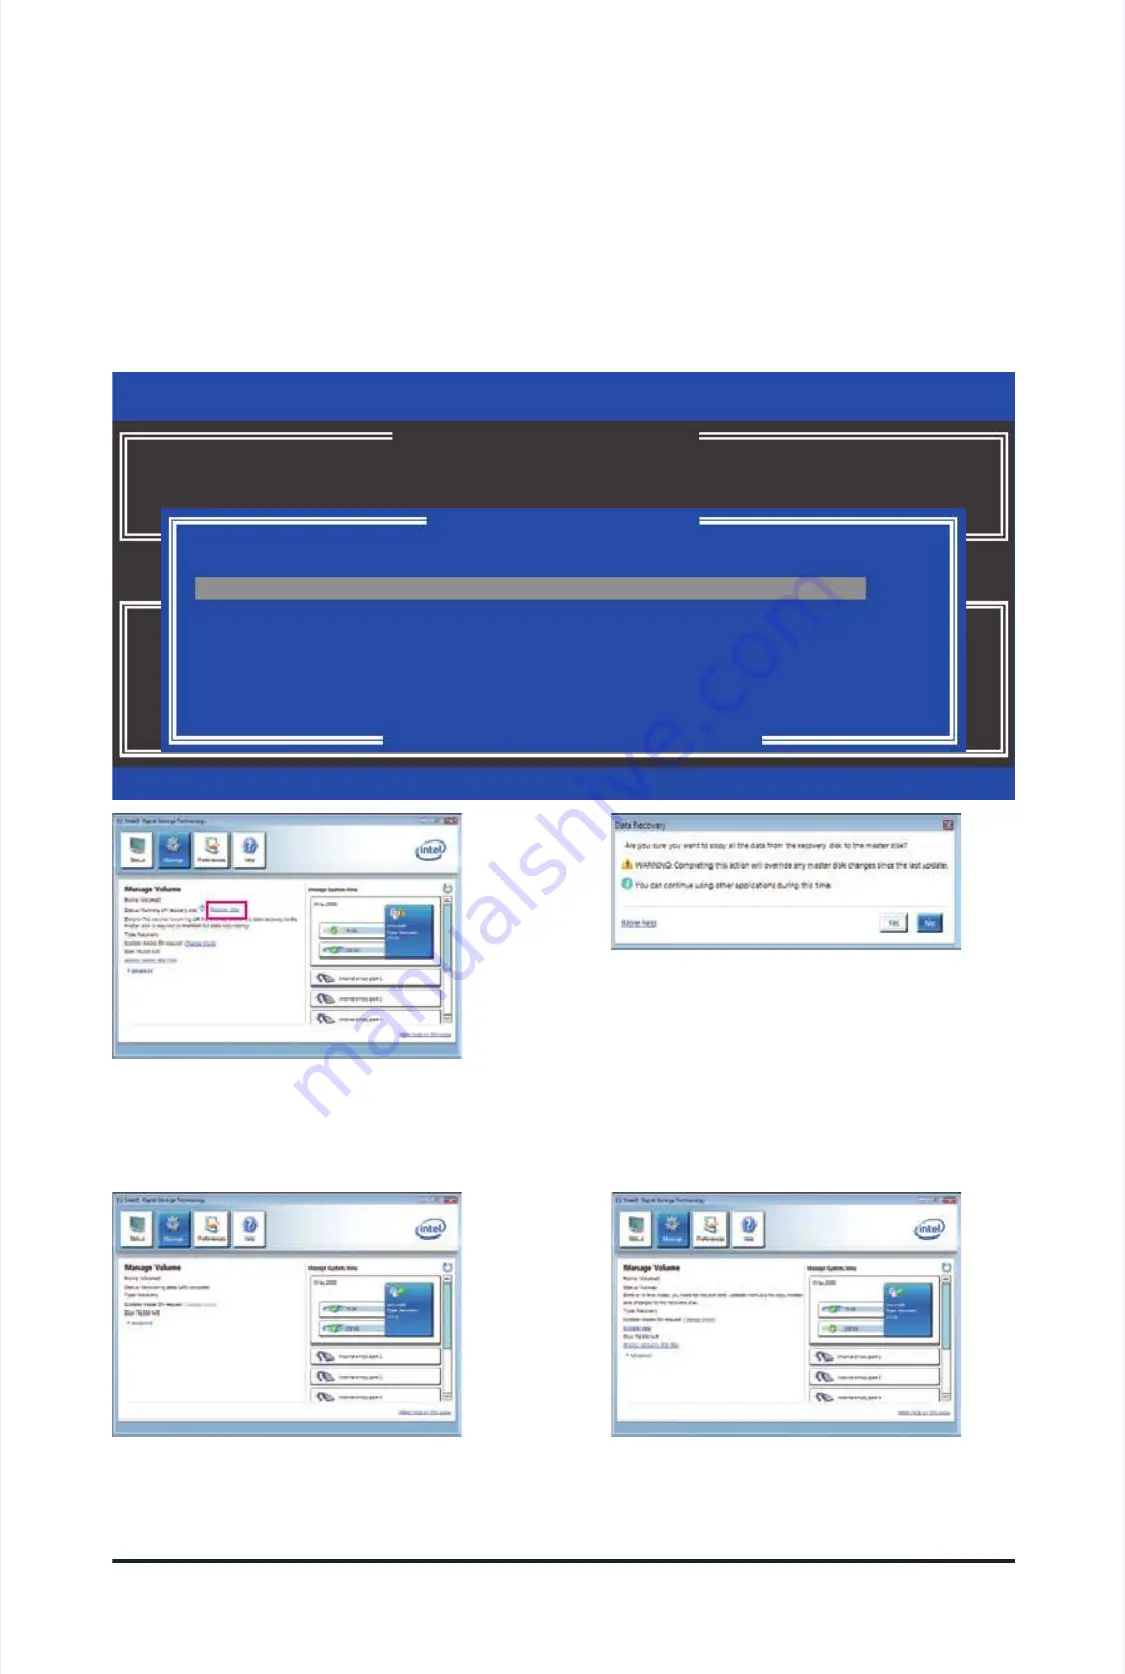
When two hard drives are set to Recovery Volume in Update on Request mode, you can restore the master
When two hard drives are set to Recovery Volume in Update on Request mode, you can restore the master
drive data to the last backup state when needed. For example, in case the master drive detects a virus, you
drive data to the last backup state when needed. For example, in case the master drive detects a virus, you
can restore the recovery drive data to the master drive.
can restore the recovery drive data to the master drive.
Step 1:
Step 1:
Select
Select
4. Recovery Volume Options
4. Recovery Volume Options
in the
in the
MAIN MENU
MAIN MENU
of the RAID Conguration Utility. On the
of the RAID Conguration Utility. On the
RECOV-
RECOV-
ERY OPTIONS
ERY OPTIONS
menu, select
menu, select
Enable Only Recovery Disk
Enable Only Recovery Disk
to show the recovery drive in the operating sys-
to show the recovery drive in the operating sys-
tem. Follow the on-screen instructions to complete and exit the RAID Conguration Utility.
tem. Follow the on-screen instructions to complete and exit the RAID Conguration Utility.
Intel(R) Rapid Storage Technology - option ROM - 9.5.0.1037
Intel(R) Rapid Storage Technology - option ROM - 9.5.0.1037
Copyright(C) 2003-09
Copyright(C) 2003-09
Intel Corporation.
Intel Corporation.
All Rights
All Rights
Reversed.
Reversed.
Choose the RAID level:
Choose the RAID level:
RAID0: Stripes data (performance).
RAID0: Stripes data (performance).
RAID1: Mirrors data (redundancy).
RAID1: Mirrors data (redundancy).
Recovery: Copies data between a master and a recovery disk.
Recovery: Copies data between a master and a recovery disk.
RAID10: Mirrors data and stripes the mirror.
RAID10: Mirrors data and stripes the mirror.
RAID5: Stripes data and parity.
RAID5: Stripes data and parity.
[
[
hi
hi
]-select
]-select
[ESC]-Previou
[ESC]-Previou
s
s
Menu
Menu
[ENTER]-Select
[ENTER]-Select
[ HELP ]
[ HELP ]
[ RECOVERY VOLUME OPTIONS ]
[ RECOVERY VOLUME OPTIONS ]
1.
1.
Enable
Enable
Only
Only
Recovery
Recovery
Disk
Disk
2.
2.
Enable
Enable
Only
Only
Master
Master
Disk
Disk
[
[
SELECT RECOVERY VOLUME
SELECT RECOVERY VOLUME
]
]
[
[
hi
hi
]-Up/Down
]-Up/Down
[SPACE]-Selects
[SPACE]-Selects
[ENTER]-Done
[ENTER]-Done
Name
Name
Level
Level
Capacity
Capacity
Status
Status
Bootable
Bootable
Volume0
Volume0
Recovery(OnReq)
Recovery(OnReq)
111.7GB
111.7GB
NeedsUpdate
NeedsUpdate
Y
Y
es
es
Select a Recovery volume to do the operation.
Select a Recovery volume to do the operation.
Step 2:
Step 2:
Go to the
Go to the
Manage
Manage
menu
menu
of the Intel Rapid Stor-
of the Intel Rapid Stor-
age Technology utility and click
age Technology utility and click
Recover data
Recover data
in
in
Manage Volume
Manage Volume
.
.
The
The
Status
Status
item on the left of the screen dis-
item on the left of the screen dis-
plays the rebuild
plays the rebuild
progress.
progress.
Step 3:
Step 3:
Click
Click
Yes
Yes
to begin the data recovery.
to begin the data recovery.
Step 4:
Step 4:
After the recovery volume is completed
After the recovery volume is completed
, the
, the
Sta-
Sta-
tus
tus
will display as
will display as
Normal
Normal
.
.
Summary of Contents for GA-P55A-UD3P
Page 32: ...H Ha ar rd dw wa ar re e I In ns st ta alllla at tiio on n 3 32 2 ...
Page 62: ...B BI IO OS S S Se et tu up p 6 62 2 ...
Page 84: ...U Un niiq qu ue e F Fe ea at tu ur re es s 8 84 4 ...
Page 132: ...Appendix Appendix 132 132 ...
Page 133: ... 1 13 33 3 A Ap pp pe en nd diix x ...
Page 134: ...Appendix Appendix 134 134 ...


