background image

29

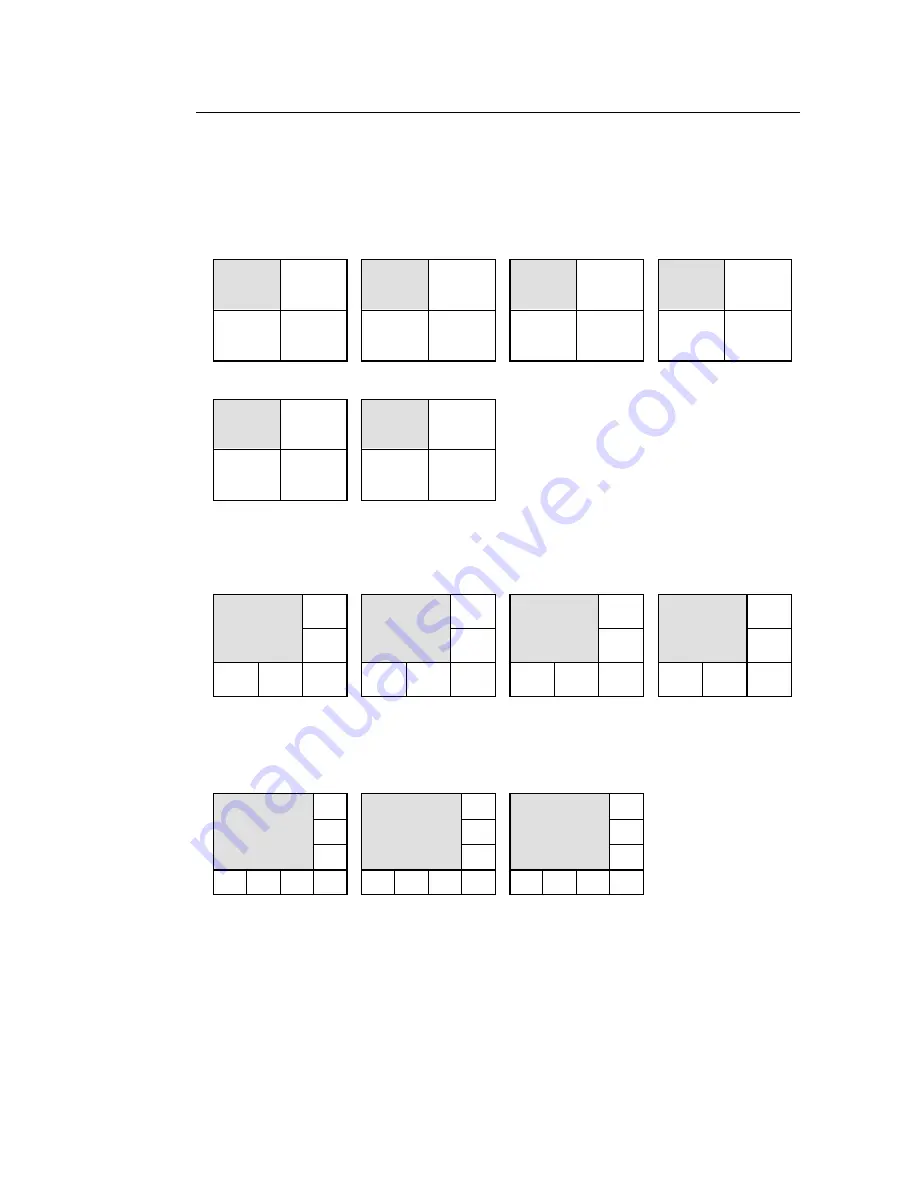
4-5-2. Channel Groups

Default channel groups for each split screen pattern are as indicated below. BL in figures
below indicates black screen displayed at that position. If no video is input, screen will be
black. To change channels assigned to positions within any selected group, see sec. ‘6-2.
Split Position’.

u


4-Split (6 channel groups available)

u


5+1-Split (4 channel groups available)

u


7+1-Split (3 channel groups available)

(Continued following page.)

A

1

2

3

4

B

5

6

7

8

C

9

10

11

12

D

13

14

15

16

E

BL

BL

BL

BL

F

BL

BL

BL

BL

(Where BL = Black only displayed.)

A

2

1

3

4

5

6

B

8

7

9

10

11

12

C

14

13

15

16

BL

BL

D

BL

BL

BL

BL

BL

BL

(Where BL = Black only displayed.)

C

BL

BL

BL

BL

BL

BL

BL

BL

B

10

11

9

12

13

14

15

16

A

2

3

1

4

5

6

7

8

(Where BL = Black only displayed.)

Summary of Contents for CDR-16T

Page 1: ...CBC EUROPE LIMITED Digital RECORDER CDR 16T 1ST EDITION OPERATION MANUAL...

Page 2: ...result of this consideration ensure no other equipment is located or installed closer than 5cm to any unit Fuse If a fuse blows replace it with one the same rating as indicated below with unit power...

Page 3: ...KS CDR 16T 1 36GB 72GB or 180GB internal hard drive model depending on purchase SCSI Termination Connector 1 For connection to SCSI connector if no external drives connected Or to last SCSI connector...

Page 4: ...11 3 2 1 RS 232C Connector 11 3 2 2 Remote Connector 12 3 2 3 Alarm Connector 14 3 2 4 SCSI Connector 16 4 Basic Operation 17 4 1 Power ON OFF 17 4 2 Resetting to Factory Defaults 18 4 3 Screen Displa...

Page 5: ...Regarding Timelapse Update Mode Setting 58 6 3 6 Regarding Trigger Setting 62 6 3 7 Regarding Continuous Record Setting 63 6 4 Timer Program 66 6 5 Auto Seq Time 69 6 6 Title Settings 70 6 7 Date Tim...

Page 6: ...Auto Backup ON OFF 118 9 6 2 Auto Backup Program Relationship 119 9 6 3 Changing Auto Backup Disk 121 9 6 4 Auto backup Memory Function 123 9 6 5 Auto Backup Interrupt 125 9 7 Timer Auto Backup 126 9...

Page 7: ...onitor as a split display Motion adaptive JPEG compression record selectable compression rates record quality settings alarm record real time NTSC 60 PAL 50 fields sec and multiple record mode setting...

Page 8: ...acter generator allows title ID line of up to 16 alphanumeric characters to be displayed for each camera input depending on display mode RS 232C interface for computer command control of most operatio...

Page 9: ...etting in related alarm menu is to LEVEL See sec 6 9 1 Alarm Settings Continued following page CD R 1 6T D igital R ec order FWD R E V CD R 1 6T D igital R ec order FWD R E V CD R 1 6T D igital R ec o...

Page 10: ...Display Operations CH channel button Used to select camera displayed at main position in split pattern when in SPLIT mode See sec 4 5 3 Changing Main Position Camera ZOOM button Used for x2 zoom in of...

Page 11: ...iated at button Or Used to move between menu parameters when in MENU mode Drive cover thumbscrew Used to open drive cover to access internal drives indicated with dotted lines at and Turn thumbscrew c...

Page 12: ...io See sec 6 11 Other Settings RCA pin jack cables are the same type used for most consumer stereo equipment MONITOR OUT Used to view live cameras or playback video on connected monitor RS 232C Used f...

Page 13: ...rm input connection 25 pin D sub connector female Note connector lock screws are inch type See sec 3 2 3 Alarm Connector for pin assignments and other details FAN Used to air cool unit to prevent over...

Page 14: ...in A m phenol F U S E PU SH SER No 13 1 2 16 15 3 6 10 7 8 9 1 1 14 2 1 CAM ER A O U T A U TO IN M ON ITO R O UT IN R S 2 3 2C OUT AU DIO L R SCSI A R EM OTE AL ARM Y C 1 2 4 5 75 AC 100 240 V 50 6 0H...

Page 15: ...y made when configuring the CDR 16T for remote control Control via RS 232C connector requires use of command and request codes given in the RS 232C appendix of this manual T4 0A S CS I 68pin A m pheno...

Page 16: ...D number other than 0 no repeat numbers Consult drive manual for ID setting procedure at drive unit If ID settings are wrong operations cannot be properly performed Termination Connector The last exte...

Page 17: ...e of a PC AT type IBM IBM format computers that use straight wired type cables Cable wiring may differ for other computer models Consult your CBC supplier if you need a differently wired cable CDR 16T...

Page 18: ...split 34 ADJUST IN 16 CAMERA 15 12 1 2 split 35 ADJUST OUT 17 CAMERA 16 16 split 36 GND 18 DIAL A see page following 37 GND 19 DIAL B see page following u Cable Connector Control Signals Pin core DC 3...

Page 19: ...n 18 Rotate right DIAL B pin 19 DIAL A pin 18 Note DIAL A and DIAL B signal interval must be T 2ms see T above and have a 90 phase difference between them u REMOTE IN Circuit Pins 1 19 21 27 and pin 3...

Page 20: ...M IN8 21 FAN ALARM MAKE 9 ALARM IN9 22 FAN ALARM COM 10 ALARM IN10 23 HDD ALARM MAKE 11 ALARM IN11 24 HDD ALARM COM 12 ALARM IN12 25 GND 13 ALARM IN13 Resistor Output pin Open collector 7406 TTL max 2...

Page 21: ...ch respective camera 1 16 Input signal pulse width must be more than 100ms u ALARM IN Circuit Pins 1 16 ALARM IN u ALARM OUT Circuit Pins 19 24 ALARM OUT Choose resistor value according to type of LED...

Page 22: ...r terminal 51 TERM PWR Power terminal 18 TERM PWR Power terminal 52 TERM PWR Power terminal 19 N C 53 N C 20 GND Ground 54 GND Ground 21 ATN Message request 55 ATN Receive message request 22 GND Groun...

Page 23: ...take Settings in operational memory are backed up by an internal lithium battery having an approx life span of approx 5 years at 25 C Battery will have to be replaced when the BACKUP ERROR message ap...

Page 24: ...tching ON power Connected monitor will display MEMORY CLEAR message while factory default settings are being restored 4 3 Screen Display 4 3 1 Full Screen A basic full screen display example is given...

Page 25: ...VERT will be displayed here instead of camera title See sec 6 1 Protect to set covert cameras Operational Status Shows CDR 16T current operational status Where Display Description REC Unit is recordin...

Page 26: ...SHOT One shot record See sec 6 3 3 One Shot Record CONT Continuous record alarm rec mode set to OFF See sec 6 3 1 Continuous Record A LAST Continuous record alarm rec mode set to LAST CHANNEL A SWIT C...

Page 27: ...unter can be set to count up or count down mode See sec 6 8 Display Mode for details on counter operation settings Alarm Index If playback view shows alarm index of image currently monitor displayed i...

Page 28: ...k covert or black and number 1 16 of camera currently monitor displayed Note that these titles cannot be changed and user set camera titles name text lines cannot be displayed during split display Cha...

Page 29: ...fter search is complete See sec 7 1 Date Time Search and sec 7 2 Index List Search TIMER PROGRAM Programmed recording cannot start or stop when settings are being made in TIMER PROGRAM Finish making s...

Page 30: ...ecorded material for currently selected camera CAMERA SELECT 1 16 will be monitor displayed Push any CAMERA SELECT 1 16 button to lit to view recorded material for that camera If no recorded material...

Page 31: ...ec to appear The figure below illustrates how zoom will occur Note that the last zoom set area for selected camera will be expanded approx x2 size Dotted line in figure below shows default zoom area C...

Page 32: ...LIVE view channels only How long individual cameras are displayed before switchover to next camera occurs dwell time can be user set in sec 6 5 Auto Seq Time Verify LV PB to lit for live view mode th...

Page 33: ...o flashing indication Push button for required channel group while SPLIT is flashing Available channel groups are shown in sec 4 5 2 Channel Groups following To change between live view mode and playb...

Page 34: ...sec 4 5 2 Channel Groups following Areas marked in gray indicate the main position in the pattern Camera displayed at this position can be changed with CH button See sec 4 5 3 Changing Main Position...

Page 35: ...oup see sec 6 2 Split Position u 4 Split 6 channel groups available u 5 1 Split 4 channel groups available u 7 1 Split 3 channel groups available Continued following page A 1 2 3 4 B 5 6 7 8 C 9 10 11...

Page 36: ...BL Where BL Black only displayed A 1 2 3 4 5 6 7 8 9 10 B 11 12 13 14 15 16 BL BL BL BL Where BL Black only displayed A 2 3 4 5 6 7 8 9 10 11 12 13 B 15 16 BL BL BL BL BL BL BL BL BL BL 1 14 Where BL...

Page 37: ...ll be saved on channel group exit Next time channel group is displayed most recently made user assignment will appear at main position u Example 1 Channel group A main position is changed from CH1 to...

Page 38: ...ra 6 playback for new main position camera Next time any 4 split screen group is recalled the group will be displayed with the new playback channel assignment just made appearing at the main position...

Page 39: ...ntil LV PB SPLIT or any camera select number button is pushed to change view mode Notes The following positions will be displayed as black during auto sequence Inputs where no video is input no signal...

Page 40: ...CH9 YES OFF 5 sec CH9 CH10 YES OFF 3 sec CH10 CH11 YES OFF 5 sec CH11 CH12 YES OFF 0 sec CH12 Group C Auto Sequenced CH13 YES OFF 0 sec Black CH14 YES ON 3 sec Black CH15 NO OFF 5 sec Black CH16 NO OF...

Page 41: ...ing auto sequence Switchover will occur based on dwell time settings set for full screen channels See sec 6 5 Auto Seq Time u Example 2 LV PB to unlit for playback 4 split channel group A selected Mai...

Page 42: ...arm indexes see sec 7 2 Index List Search Important If TIMER program has been selected at REC PROGRAM in the FUNCTION menu pushing REC will not start record operation For information on timed record o...

Page 43: ...yback will start at the beginning of the recorder timeline u To Stop Playback Start Jog Search of Recorded Contents Push JOG SHTL once to lit PLAY goes unlit Playback stops Turn jog shuttle dial right...

Page 44: ...sub menu from this menu Procedure 1 dial ENTER Turn jog shuttle dial to move selection cursor in menu to required item Push ENTER to go to sub menu or exit Procedure 2 arrow buttons ENTER Push arrow b...

Page 45: ...ns to move selection cursor in menu to required item Push ENTER to go to sub menu RECORD PROGRAM NO 1 REC MODE CONTINUOUS QUALITY NORMAL AUDIO OFF REC CHANNEL NORM 4 FAST 2 TIMELAPSE MODE 0 10SEC UPDA...

Page 46: ...ation menu ENTER again to return to previous menu Inputs parameter settings and returns user to previous menu Starts action i e format No action performed WARNING on screen Returns user to previous me...

Page 47: ...or in menu to required sub menu Push ENTER to go to that sub menu Procedure 2 arrow buttons ENTER Push arrow buttons to move selection cursor in menu to required sub menu Push ENTER to go to sub menu...

Page 48: ...s To access MAIN menu push MENU Bottom indicator should light and MAIN menu below should appear on monitor See sec 5 1 Accessing MAIN Menu for information on making menu selections Note MENU mode cann...

Page 49: ...MODE Allows user to make settings related to how and where information is displayed at observation monitors See sec 6 8 Display Mode ALARM LOSS SENSOR Allows user to make settings related to alarm in...

Page 50: ...word is input u Special Button Functions Button Description CH1 CH13 Goes to sub menu CH1 CH9 Used to input password 6 1 Protect See sec 5 1 Accessing MAIN Menu for information on making menu selectio...

Page 51: ...s to reset defaults KEY PROTECT Sets which front panel buttons are locked out disabled from use OFF All front panel buttons can be used Factory setting CONTROL Control group buttons only shown below l...

Page 52: ...view or playback of any panel selected camera Other positions will display cameras assigned in this menu Live at main and playback at other positions and vise versa display is possible Not supported b...

Page 53: ...and exit Or move to EXIT and push ENTER to cancel settings just made and return to MAIN menu u Regarding Live Playback Mixed Display Patterns If main position in any live channel group is changed fro...

Page 54: ...ec 6 3 2 Pre Alarm Record ONE SHOT One shot record See sec 6 3 3 One Shot Record QUALITY Sets record quality level to one of the four settings below SUPER Best resolution on playback HIGH High resolut...

Page 55: ...ere as they are the same For all recording modes Refer to sec 6 3 Record Programming previous Where AUDIO record OFF No audio input or no audio record performed MONO Mono audio input and recorded STER...

Page 56: ...ord playback impossible depending on the number of camera channels being recorded See sec 6 3 4 Regarding Record Channel Setting and 6 3 5 Regarding Timelapse Update Mode Setting following regarding u...

Page 57: ...nu accessed at following ALARM QUALITY Sets record quality level alarm recording Settings to one of the four listed in sec 6 3 Record Programming previously TRIGGER Sets which type of input trigger wi...

Page 58: ...tting following regarding unit operation Where TOTAL ALARM REC Sets total time camera record is performed before and after alarm signal input Setting range is up to 19 min 59 sec Note that min total t...

Page 59: ...ALARM REC 10M 0S PRE ALARM REC 4M 0S If CH2 goes to alarm status u Example 2 TOTAL ALARM REC 10M 0S PRE ALARM REC 4M 0S If CH2 goes to alarm status then CH9 goes to alarm status Not recording Record...

Page 60: ...amming previous Where INTERVAL Sets fixed time interval between take of each video capture shot Selectable 1 240 fields For example if you set 50 FIELDS one frame of video from alarm channel will be c...

Page 61: ...shots Alarm record will be as below 6 3 4 Regarding Record Channel Setting REC channel settings in the record program sets frequency of update for each camera channel or whether the camera channel ski...

Page 62: ...t to FAST is 7 and number of FAST channels set cannot exceed the number of NORM SENS channels set WARNING monitor displayed if allowable number of FAST channels is exceeded If no video exists no input...

Page 63: ...as shown below u Example 3 FAST CH1 CH6 NORM CH2 CH5 SKIP CH7 CH16 Record interval TIMELAPSE MODE 0 10 sec In this case 1 and 6 will be updated and view recorded more often than the NORM mode cameras...

Page 64: ...main the same Also less drive space will be required to record cameras that are still powered ON Important UPDATE MODE record interval cannot be selected if any channels are set to FAST or SENS in REC...

Page 65: ...08SEC 0 12SEC 0 20SEC 0 40SEC 0 60SEC 0 80SEC 1 00SEC 2 00SEC 3 00SEC 4 00SEC 5 00SEC 6 00SEC 7 00SEC 8 00SEC 9 00SEC 10 00SEC 15 00SEC 20 00SEC Important If a setting highlighted in gray is used the...

Page 66: ...if cameras are powered OFF or ON the record interval for each camera will still remain the same as shown below Available UPDATE Refresh Time Settings Note UPDATE MODE settings that can be selected in...

Page 67: ...annels 1FLD 2SEC 15FLD 1SEC 1 4 Channels 1FLD 3SEC 10FLD 1SEC 1FLD 4SEC 9FLD 1SEC 1FLD 5SEC 8FLD 1SEC 1 6 Channels 1FLD 6SEC 7FLD 1SEC 1 8 Channels 1FLD 7SEC 6FLD 1SEC 1 10 Channels 1FLD 8SEC 5FLD 1SE...

Page 68: ...ill still be displayed according to setting made in ALARM LOSS SENSOR menu see sec 6 9 Alarms Where Sets input trigger used for each channel Same type input does not have to be applied to all channels...

Page 69: ...mode sets record response upon alarm input from one or more cameras Important If ALARM REC MODE is set to LAST CHANNEL SWITCHOVER ALL CHANNEL or PRIORITY you must also make settings in TRIGGER sub me...

Page 70: ...e than the number of non alarm channels or if more than 7 channels are in alarm at the same time If PRIORITY alarm record cannot be performed setting will automatically change to ALL CHANNEL Setting w...

Page 71: ...by CDR 16T If the settings shown in the menu example on the previous page are made response will be as shown below Sensor device 2 inputs alarm CH5 camera recorded for five seconds real time CH6 came...

Page 72: ...are both set to record from 8 30 a m to 9 a m line 1 setting has higher priority and settings there will be used for record operation during this time Day Sets which day s recording occurs Selectable...

Page 73: ...e TIMER menu no percentage is shown here because PRE ALARM and ONE SHOT recording are dependent on alarm input Important This use rate is a general percentage Do not set programs to fill 100 of disk s...

Page 74: ...tage is listed in HDD parameter field Likewise for ONE SHOT mode u In the Case of the Program Set Above Recording starts from Monday at 8 30 a m 1ST priority using line 1 settings until 5 30 p m At 5...

Page 75: ...ted If any channel set to 0 sec result will be the same as when channel is skipped no display Setting range is 0 30 sec See sec 4 4 2 Auto Sequence for switchover example Important A dwell time settin...

Page 76: ...e turn dial and push ENTER to select c Cursor select character in table at top will also appear at cursor selected character position d Repeat steps b and c to make title e Move to SET and push ENTER...

Page 77: ...adjust time reference For all recorders when multiple units configured See sec 3 2 2 Remote Connector for pin assignment tables MASTER Master unit outputs a pulse at each 00 sec count to other config...

Page 78: ...splayed during playback After recording information displayed during playback cannot be turned ON OFF ERR display shown in sec 4 3 1 Full Screen cannot be set ON OFF or be repositioned in this menu ER...

Page 79: ...hen set to ON will display this setting at one position user set only ALARM Sets camera alarm indication display on or not on Split screen view when set to ON will display this setting at each camera...

Page 80: ...mber ON OFF on monitor display output Also sets whether superimposed data displayed in count up or count down mode Available selections are as shown below Available selections are as shown below ON CO...

Page 81: ...eposition item c Repeat steps a and b for all items you want to reposition d Push ENTER to save settings and return to DISPLAY MODE menu u Special Button Functions Button Description Selects display i...

Page 82: ...by pulse input LOW level pulse signal initiates alarm condition Setting at below resets alarm SENSOR INPUT Sets the type of alarm input accepted by the CDR 16T LEVEL Sensor alarm response initiated by...

Page 83: ...d ALARM DISPLAY is set to ON BUZZER Sets buzzer sound upon alarm input ON OFF ALARM OUT In addition to the ALM LOSS and SEN ON OFF settings made here there are also two other settings available that e...

Page 84: ...creen display of each alarm channel Example CH1 and CH2 alarm occurrence times overlap Display changes between channels every 1sec during alarm overlap interval u STAY Display locks on last channel in...

Page 85: ...3 will remain displayed until CH4 alarm newest alarm is reset 3 displayed alarms have been reset This alarm bumps the first reset alarm off display CH3 Alarm input Normal Operation CH1 full screen CH1...

Page 86: ...y is reached Pressing record button again will once more start record from the beginning of the HDD timeline and currently recorded material on HDD will be over written END ALARM Used to warn user tha...

Page 87: ...d if ID has an asterisk next to it Cursor select asterisk marked ID and push ENTER to access sub menu for related drive Select setting in sub menu and push ENTER again to return to this menu Sub menu...

Page 88: ...playback operations PB USE ONLY Hard disk can only be used for playback and search operations Cannot be used for record operations PB REC USE Hard disk can be used for playback search and record opera...

Page 89: ...ss FORMAT HDD sub menu Sub menu can be accessed if ID has an asterisk next to it Cursor select asterisk marked ID and push ENTER to access sub menu for related drive Select YES NO in sub menu and push...

Page 90: ...revious menu u Note the following important points concerning formatting disks Once format process is started it cannot be stopped Formatting any hard disk will erase any and all data contained on tha...

Page 91: ...menu cursor select ID 7 and move cursor down to ID 8 on page 2 Page 2 will be automatically displayed To return to page one cursor select ID 8 on page 2 and move cursor up to ID 7 on page 1 Settings a...

Page 92: ...rom hard disk Cursor select YES and push ENTER to erase disk and return to previous menu To return to previous menu without erasing disk cursor select NO and push ENTER Important If disk cannot be era...

Page 93: ...or computer control communication Selectable as 1200 2400 4800 9600 19200 or 38400bps AUDIO SET Used to select audio level input to CDR 16T MIC Mic audio input and recorded LINE Line audio input and r...

Page 94: ...oftware version currently used by CDR 16T Up to 16 characters SENSOR CARD If installation detected at power ON DETECTED displayed If installation not detected at power ON NONE displayed DVD If install...

Page 95: ...ed material by inputting a specific date and time See sec 7 1 Date Time Search INDEX LIST SEARCH Accesses sub menu that allows user to search for alarm index by inputting the type of alarm to search f...

Page 96: ...y Mode POWER ON OFF LOG Accesses unit power ON OFF log Shows date day and time for each time power is switched ON or OFF at the unit See sec 7 4 Power ON OFF Log for details on this function USER BACK...

Page 97: ...mands Important If no hard disk has been assigned for playback use PB USE ONLY PB REC USE in menu DATE TIME SEARCH mode cannot be performed DATE TIME SEARCH mode cannot be accessed when CDR 16T is in...

Page 98: ...video Loss Video loss occurred during recording S Sensor Alarm input from sensor card occurred during recording R Record start Time point where recording started M Manual Alarm manually initiated REC...

Page 99: ...network control see sec Appendix RS 232C Control Commands Important If no hard disk has been assigned for playback use PB USE ONLY PB REC USE in menu DATE TIME SEARCH mode cannot be performed DATE TI...

Page 100: ...r the type of alarms you do not want to search for Pushing sets cursor selected letter ON OFF Example to only search for alarm input A and video loss L alarms change code to A L See below for a list o...

Page 101: ...image reVersion Image returns to video loss channel during record To preview alarms in the index list scroll turn dial through alarm items you wish to see u To View Alarm Video Push ENTER to exit sear...

Page 102: ...point currently cursor selected 7 3 HDD Information 7 3 1 All Connected HDD This menu contains information concerning connected hard disks Settings cannot be changed via this menu To change STATUS set...

Page 103: ...Cannot record or playback this disk while formatting HDD ERROR Hard disk has a possible defect Verify error at HDD INFORMATION sub menu for this drive See sec 7 3 2 Specified HDD Format reformat disk...

Page 104: ...Shows ID number assigned to hard disk MODEL NAME Shows hard disk model name number VENDOR NAME Shows hard disk manufacturers name REC TIME Shows min record time possible for hard disk Time shown here...

Page 105: ...n from no 1 when 100 events are exceeded Event 101 overwrites previous data at no 1 to no 2 etc When accessed POWER ON OFF display will appear as shown below Where Shows number of currently displayed...

Page 106: ...ess and View power ON OFF log Push front panel FUNC button to access FUNCTION menu With FUNCTION menu displayed select POWER ON OFF LOG to open display shown previous Note FUNCTION menu cannot be open...

Page 107: ...ied at other times stop start Important If start and stop times are the same 09 00 09 00 it will always be daytime and only day settings can be applied Camera and SENSE TERM Shows current SENSE TERM t...

Page 108: ...t from low to high in ten steps 1 10 where 10 is the highest min motion required to trigger alarm and 1 the lowest SAMPLING Used to set interval between luminance level checks If luminance change dete...

Page 109: ...nd marker blocks OFF B Turn dial to skip the next 7 markers C Push turn dial right to turn the next 9 marker blocks OFF Turning right at the end of the line 16th marker will automatically move cursor...

Page 110: ...ial to skip the remaining 7 markers on this line L Repeat steps J and K M Move cursor to SET and push ENTER to input marker block settings and return to SENSOR menu u Special Button Functions Button D...

Page 111: ...ks During User Backup or see 9 6 3 Changing Auto Backup Disk regarding disk changes 9 1 DVD Option Information The DVD option consists of a DVD drive installed to your CDR 16T and one 1 DVD RAM disk u...

Page 112: ...s information on capacity operation and status See sec 9 2 1 Assigning DVD Use FORMAT DVD Accesses a sub menu used to format the DVD RAM disks before use See sec 9 3 Formatting DVD CLEAR EVENT Accesse...

Page 113: ...sed ASSIGN DVD USE settings determine how your DVD option is used during operations as well as giving the user information on the operational status of the DVD RAM option Information displayed in the...

Page 114: ...d to access CLEAR EVENT sub menu Sub menu can be accessed if an asterisk is next to it Cursor select asterisk mark and push ENTER to access sub menu Select YES NO in sub menu and push ENTER again to r...

Page 115: ...To change the value push the button u To Format DVD Verify STATUS to NOT ASSIGNED DUE ERROR or EVENT ERROR Access ASSIGN DVD USE sec 9 2 1 Assigning DVD Use previous to PB REC USE or PB USE ONLY And c...

Page 116: ...g format must be restarted after power is ON If you are formatting disk to correct previous operational problem and problem still exists after formatting change to a new disk Important Reformatting an...

Page 117: ...has started it cannot be stopped DVD Disk Should Be Cleared When a User wants to erase all data from DVD disk b Disk errors occur STATUS is EVENT ERROR Where u To Clear DVD Verify STATUS to NOT ASSIG...

Page 118: ...on is used during operations as well as giving the user information on the operational status of the DVD RAM option Information displayed in the menu should be as indicated below when this sub menu is...

Page 119: ...stop point of HDD data and camera CH to be recorded BACKUP SIZE Informs user size required for backup based on start stop information FREE CAPACITY Informs user how much space is available free on DV...

Page 120: ...ER BACKUP DVD menu Note Items below POWER ON OFF LOG in the function menu will not be displayed unless the DVD option is installed in your CDR 16T Move cursor to START then push ENTER Start date time...

Page 121: ...ow USER BACKUP DVD DATE TIME CH START 03 05 2001 10 10 10 MON 1 END BACKUP SIZE 0 0K BYTE FREE CAPACITY 4 4G BYTE 4 4G BYTE START CONTINUE STOP CLEAR EXIT 03 06 2001 10 10 10 TUE Image B JOG CONT TL 0...

Page 122: ...n monitor At this time all images on the hard disk between start point image A to end point image B will be recorded to the DVD RAM disk Start point Stop point Image A Image B Hard disk After backup i...

Page 123: ...ge disk turn thumbscrew on access panel counter clockwise to access disk in drive unit Push DVD drive EJECT button to open drive tray The disk used in the DVD option is double sided The CHANGE DVD mes...

Page 124: ...CDR 16T and applied to CDR 16T operations See sec 9 5 User Select Backup previous 9 6 1 Auto Backup ON OFF After selecting an item for backup BACKUP is displayed on the RECORD screen when the optiona...

Page 125: ...t record to occur Continuous Recording Mode Camera CHs will be recorded to configured HDDs regardless of alarm occurrence or not DVD RAM disk will be recorded immediately after an alarm ends Timelapse...

Page 126: ...pre alarm interval HDD record complete Start of another alarm will not stop backup record See sec 6 3 2 Pre Alarm Record previous for details on preset time and alarm period Alarm begins Alarm begins...

Page 127: ...d When the above message is displayed the user has the option of either changing the DVD RAM disk to continue backup recording or canceling the recording and stopping the backup recording u To Continu...

Page 128: ...ecorded Note If backup is manually stopped record will not restart at next alarm occurrence Backup record must be manually reset to ON Important Note the following regarding AUTO BACKUP If loop record...

Page 129: ...the backup disk Remember Disk must be changed or events on disk cleared before and or when event number reaches 100 DVD INFORMATION MODEL NAME DVD RAM DRIVE VENDOR NAME MATSUSHITA CAPACITY 4 4G BYTE...

Page 130: ...M DRIVE VENDOR NAME MATSUSHITA CAPACITY 4 4G BYTE STATUS PB REC USE BACKUP ENABLE WAITING 0 POINT RECORD TERM START 08 23 2001 21 24 30 MON END 08 23 2001 21 24 35 MON SET EXIT Continued following pag...

Page 131: ...before maximum capacity reached for example u To interrupt Auto Backup Verify CDR 16T in normal operation mode Main sub menus not displayed Push FUNC button to open Function menu Move cursor to DVD I...

Page 132: ...n display for No 1 and No 3 set ups See sec 6 3 Record Programming previous for details on making RECORD programs Next open TIMER PROGRAM menu from MAIN menu At position1 set REC PRG to BKUP If auto s...

Page 133: ...NTINUOUS BKUP is displayed after line 8 The following two settings can be made here for any program in the timer list that is to continuous data can be set ALL All HD record backed up ALARM Only alarm...

Page 134: ...g or canceling the recording and stopping the backup recording u To Continue Backup When CHANGE DVD message is displayed backup record is paused at last record point To change disk turn thumbscrew on...

Page 135: ...ote Backup recording will automatically resume if power is lost while B mark indicated at counter line However there may be some corruption of final image data at power loss and you will lose not be a...

Page 136: ...SET then push ENTER button to switch playback operation to DVD Display returns to FUNCTION menu or Move cursor to EXIT then push ENTER button to cancel playback drive select setting just made Note DVD...

Page 137: ...ormed searches via RS 232C or control see sec Appendix RS 232C Control Commands u To Search DVD Index Verify CDR 16T is in normal operation mode then push FUNC button to display FUNCTION menu Move cur...

Page 138: ...roup of alarm events INDEX Sets cursor selected alarm selection characters ON OFF SEARCH selected Starts search function CANCEL selected Cancels search function ENTER Index list alarm point Exits sear...

Page 139: ...t function setting currently made WAITING Displays number of current indexes recorded to disk 100 maximum possible DVD INFORMATION MODEL NAME DVD RAM DRIVE VENDER NAME MATSUSHITA CAPACITY 4 4G BYTE ST...

Page 140: ...ll stop Pressing Record button again will begin recording over previously recorded material u END ALARM Used to warn user that record operations are at the end of the DVD disk DVD disk address if moni...

Page 141: ...s See sec 6 1 Protect Verify cameras are connected at rear panel Verify cameras are assigned for recording in menus See sec 6 3 4 Regarding Record Channel Setting Verify hard disk has been properly fo...

Page 142: ...has a possible defect Format reformat disk If STATUS is still HDD ERROR after format reformat of disk contact hard disk supplier Cannot record or playback this disk if HDD ERROR status See sec 6 10 2...

Page 143: ...e pulse max 24VDC 40 mA Alarm 25 pin D sub 1 ea female Inputs TTL negative pulse make contact more than 100ms Outputs Make contact max 24VDC 100mA RS 232C 9 pin D sub 1 ea male Alarm Function Alarm di...

Page 144: ...ity Approx 5 hours LOW Quality Approx 6 hours 50 minutes When accessory 36GB internal hard drive installed and record 60 fields sec Audio OFF PAL SUPER Quality Approx 3 hours 05 minutes HIGH Quality A...

Page 145: ...1 5 3 6 10 7 8 9 1 1 14 2 1 C A M E R A O U T A U T O I N M O N I T O R O U T I N R S 2 3 2C O U T A U D I O L R S C S I A R E M O TE A LA R M Y C 1 2 4 5 PO W ER Z O O M C H ST O P JO G S H T L C O N...

Reviews: