


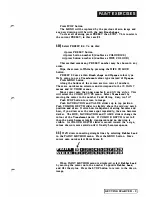


PAI NT
E X E RC I S ES
7)
Move the VALUE slider. This adds blackness to the colour
selected by the HUE slider. If HUE is on
green,
then moving
SA TURA TION will gradually change colour from green to khaki
to black. Adding blackness gives more earthy, tertiary colours.
8)
By now, your screen is probably full of experimental squiggles.
To clear the screen, select the next preset, PRESET
0 1 .
To do
this,
i) press PRESET button
ii) press DRAW LOCK button (doubles as
next
PRESET
selector)
The screen should be completely black ready for more drawing
and preset number should show
0 1 .
If y o u wanted t o return to the
previous
preset,
00,
i) press PRESET button
ii) press DRAW button (doubles as
previous
PRESET selector)
We will stay with PRESET 01 for the moment. The PRESETS
change selections in the MENUS and console controls. PRESETS
do this for you instantly and accura tely for any possible
combination of menu selections. It is not necessary to display any
menu, as long as you know the effect of the PRESET. There are
1 00
factory PRESETS
stored in the CVI and a list of them
appears a t the end of this section.
9)
Drawing now will produce random coloured car shapes. Rate
of randomness is set by the RATE 1 slider. At minimum setting,
colour will change slowly as you continue drawing. Notice that
by drawing fast, the car shapes are not joined. This is the Dots
Pain t Method and simulates tapping ra pidly on the GRAPHICS
PAD. The car is the current
Brush shape.
Try a different
Brush shape.
P ress MENU button.
The blue and wh ite menu is displayed. This particular menu
should be the PAINT MENU, the main menu for paint effects. If
some other menu has already been selected, press the MENU
button until the PAINT MENU is displayed. Touching the
GRAPHICS
PAD now produces a little round ball. This is the
Cu rsor
a n d can be moved around to make selections.
Move the cursor onto the number
1
opposite
B rush shape
and
l i f t
your stylus
Off
the
GRAPHICS PAD.
The display will change
to
t
he
BRUSH SHAPE
menu. Here are 54 different
Brush shapes
to choose from. Position the cursor over the
Brush shape
desired
and lift the stylus from the GRAPHICS PAD. The chosen
Brush
shape will appear in the large box at the top left-hand corner.
-
GETTING STARTED
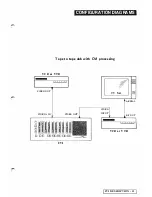
Summary of Contents for CVI
Page 1: ...r e User Manual Computer Video Instrument...
Page 4: ...Startea 2 Video Melius...
Page 102: ...33 Quad mirror Slow scan across L J _J...
Page 103: ......
Page 104: ...56 Under over stencil 57 Under over catch up 58 Push to freeze...
Page 105: ...60 L J _JI L...
Page 106: ...80 Under over texture wipe L J _J...
Page 107: ...L J _Jd r...
Page 197: ...RS232C Port ControI 1 Rev 7 Software Update 1...
Page 268: ...Glossary 1 Index 5...
Page 282: ......


