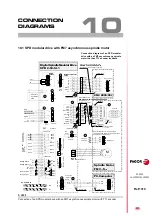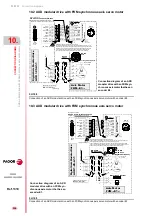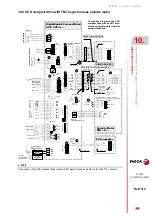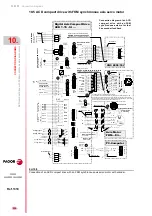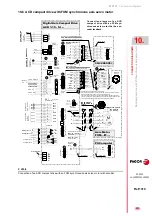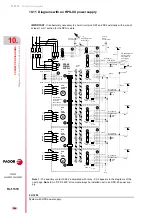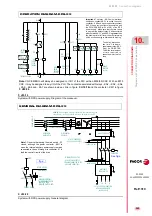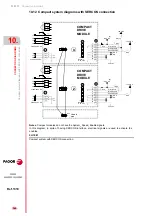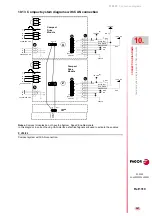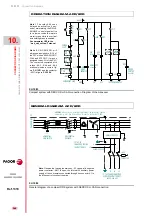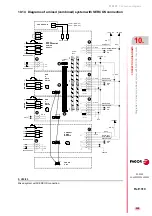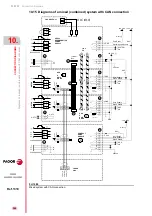
Connection diagrams
CON
N
ECTION DIAGRAMS
El
ectri
cal cabin
et. Dia
grams
10.
335
DDS
HARDWARE
Ref.1310
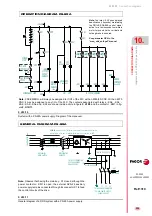
Brake control
In some applications (e.g. the vertical Z axis on a milling machine) a elec-
tromechanical holding brake is used on the rotor of the motor.
Hence, the brake holds the rotor when loses voltage at its terminals. When
the machine is out of service, the brake locks up the vertical Z axis to keep
it from falling due to gravity.
Remember that
The control circuits of compact drives as well as RPS, XPS and PS-25B4
power supplies are powered at 24 V DC by an internal auxiliary power sup-
ply. PS-65A power supplies will need an external APS-24 auxiliary power
supply to power them because they do not have one integrated into them.
In compact drives and power supplies, the auxiliary power supply must be
powered at
single-phase
400-460 V AC. But not RPS power supplies; they
must be powered at
three-phase
400-460 V AC.
Closing the main power switch - S1 must take two phases to connector X1
when using compact drives or an APS-24 as auxiliary power supply of the
PS-65A and to connector X3 when using XPS or PS-25B4 power supplies.
In the case of RPS power supplies, there are three phases instead of two
and they must go to connector X1.
Opening of contactor - KM1 does not remove the supply of power to the
auxiliary power supply in any case. But opening the main switch - S1 does
and the 24 V DC are maintained until the stop takes place.
WARNING.
This brake must never be used to brake moving axes. It must
only be used to hold or lock vertical axes that have been stopped previous-
ly !
NOTE.
The reaction time of a brake integrated into an axis feeding
FAGOR motor may vary between 7 ms and 97 ms depending on the mod-
el.
MANDATORY.
While the brake is locking the vertical axis motor, the motor
must be kept with torque. See parameter GP9 in chapter 13 of the
“man_dds_soft.pdf” manual.
MANDATORY.
When powering the machine up, the brake must never be
released until the system assumes control of that axis. See the TV100 vari-
able in chapter 13 of the “man_dds_soft.pdf” manual.
INFORMATION.
It is necessary to install external protection fuses in the
power lines of the auxiliary power supply. They are internally integrated into
the main power supply.
i
Summary of Contents for DDS
Page 1: ...DRIVE DDS Hardware manual Ref 1310...
Page 6: ...I 6 DDS HARDWARE Ref 1310...
Page 9: ......
Page 10: ......
Page 11: ......
Page 12: ......
Page 16: ...16 Ref 1310 DDS HARDWARE...
Page 30: ...1 DESCRIPTION 30 Description DDS HARDWARE Ref 1310...
Page 94: ...2 POWER SUPPLIES 94 Power supplies DDS HARDWARE Ref 1310...
Page 188: ...3 DRIVE MODULES 188 Drive modules DDS HARDWARE Ref 1310...
Page 204: ...4 AUXILIARY MODULES 204 Auxiliary modules DDS HARDWARE Ref 1310...
Page 232: ...SELECTING CRITERIA 5 232 Selection criteria DDS HARDWARE Ref 1310...
Page 266: ...7 CABLES 266 Cables DDS HARDWARE Ref 1310...
Page 312: ...8 INSTALLATION 312 Installation DDS HARDWARE Ref 1310...
Page 326: ...9 FUNCTIONAL SAFETY 326 Functional safety DDS HARDWARE Ref 1310...
Page 354: ...10 CONNECTION DIAGRAMS 354 Connection diagrams DDS HARDWARE Ref 1310...
Page 378: ...12 SALES REFERENCES 378 Sales references DDS HARDWARE Ref 1310...
Page 384: ...13 COMPATIBILITY 384 Compatibility DDS HARDWARE Ref 1310...
Page 385: ......

