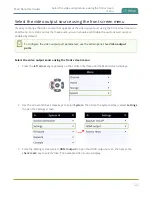
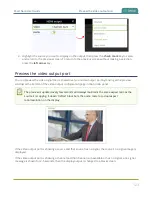
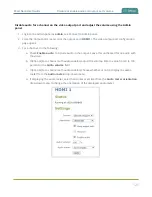
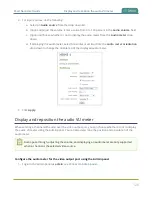
background image

Pearl Nano User Guide

Connect a USB status light

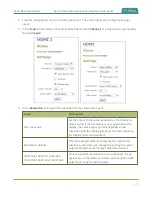
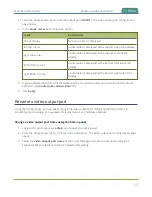
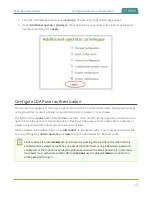
5. (Optional) Choose the keyboard key combination to toggle between keyboard layouts if multiple

languages are selected:

Ctrl+Shift

or

Alt+Shift

.

6. Click

Apply

.

What's next?

Connect your USB keyboard to a USB port on Pearl Nano and learn about keyboard shortcuts, see

External keyboard shortcuts

.

Connect a USB status light

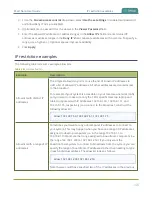
Pearl Nano supports connection of an external USB status light to visually indicate the status of recording
and streaming.. You can connect a USB status light directly to the USB port on Pearl Nano.

The following USB status lights are supported:

l

Kuando BusyLight models: UC Alpha and UC Omega

l

Delcom Products USB HID single color and multi-color signal indicators

The status light is activated as soon as it is connected to a USB port on Pearl Nano and flashes once.

Table 24

Status light indicator

Light

Description

Solid off

Pearl Nano is not currently recording or streaming.

Solid on

Recording or streaming is in progress.

Flashing

Rapid flashing (approximately five blinks per second)
commences five minutes before a scheduled event
begins.

Slow flashing (approximately two blinks per second)
indicates that an error occurred during recording or live
streaming.

131

Summary of Contents for Pearl Nano

Page 1: ...Epiphan Pearl Nano User Guide Release 4 14 2 June 7 2021 UG125 03 and 2021 Epiphan Systems Inc ...

Page 2: ...BE ACCURATE AT TIME OF WRITING BUT ARE PRESENTED WITHOUT WARRANTY OF ANY KIND EXPRESS OR IMPLIED USERS MUST TAKE FULL RESPONSIBILITY FOR THEIR APPLICATION OF ANY PRODUCTS LIMITATION OF LIABILITY UNDER NO CIRCUMSTANCES SHALL EPIPHAN BE LIABLE FOR ANY INCIDENTAL SPECIAL CONSEQUENTIAL EXEMPLARY OR OTHER INDIRECT DAMAGES THAT RESULT FROM THE USE OF OR THE INABILITY TO USE THIS PRODUCT OR THE INFORMATI...

Page 3: ...ate of purchase Technical support Epiphan s products are backed by our professional support team You can reach our team several ways l Email support epiphan com l Live chat from our support site https www epiphan com support l Phone toll free at 1 877 599 6581 or call 1 613 599 6581 Gather as much information about your problem as you can before you contact us so we can help you better including l...

Page 4: ...vent with the option to mute the audio and display an event paused image for as long as the event is paused Live channel RTSP stream transport option We added a new RTSP TCP transport protocol option that advertises only TCP as the transport for RTSP This is useful if you re network connection is lossy and would benefit from the error checking and packet loss retransmission that TCP performs Keybo...

Page 5: ...The FTP server option has been retired With data security becoming ever more crucial we decided to remove the option to configure Pearl Nano as an FTP server ...

Page 6: ... Vesa mounting the device 30 User interfaces and remote access 32 The front panel control interface 33 About the front screen and control key interface 33 The front screen Channel view 37 The front screen menu and control keys 38 Record and stream using the control keys 39 Dim the front screen and control interface 41 Set the front screen timeout 42 Set a PIN security code 43 One Touch streaming a...

Page 7: ...s 85 Disable the network discovery port 86 Configure network security 88 Configure 802 1x network security and manage user certificates 88 Manage CA and self signed certificates 90 Configure HTTPS 91 Configure date and time 94 View the current date and time settings 94 Configure a time server 95 Manually set the date time and zone 96 Configure device info name description and location 98 Format th...

Page 8: ...ntication 142 Restrict viewers by IP address 144 IP restriction examples 146 Configuration presets 149 About configuration presets 149 Configuration preset considerations 151 Configuration groups 153 The Factory default configuration preset and Factory reset 154 Create a configuration preset 156 Apply a configuration preset using the Admin panel 157 Apply a configuration preset using the front scr...

Page 9: ...ng 201 Custom layout configuration 204 About the custom layout editor 204 Move and size items in the layout editing area 205 Audio source selection and saving edits 207 Resize and position items using percents or pixels 207 Open the custom layout editor for a channel 214 Configure a custom layout for a channel 215 Rename a layout 217 Set the background color 218 Add an image to a layout 219 Upload...

Page 10: ...65 Change HTTP and RTSP streaming port values 267 Disable and enable direct channel streaming 268 Viewing a channel s live broadcast stream 270 View the live broadcast URL using a web browser 271 View the streaming URL using a media player 273 Streaming to servers CDNs and other devices 276 Set up an RTMP or RTMPS push stream 276 Set up an SRT stream using rendezvous mode 278 Set up an SRT stream ...

Page 11: ...recorded files 334 Automatic file transfers 336 About Automatic File Upload AFU 336 Set the channel to include in AFU 337 Enable AFU schedule and set options 339 Configure AFU to FTP server parameters 342 Configure AFU to SFTP server parameters 344 Configure AFU to RSync server parameters 346 Configure AFU to CIFS server parameters 348 Configure AFU to SCP client parameters 349 Configure AFU to AW...

Page 12: ... event 386 Panopto registration 387 Enable CMS and register with Panopto 387 Disable CMS and disconnect from Panopto 390 Panopto recording and webcasting setup 392 About Panopto recording and webcasting 392 Setup Panopto authentication for ad hoc events 395 Set Panopto ad hoc event parameters 398 Set the extend Panopto CMS event interval 398 Enable mute and display image on pause 400 Disable low d...

Page 13: ...8 Storage capacity and maintenance 440 PART 7 Troubleshooting 444 Diagnostic tools 444 Connectivity status results 446 Run diagnostic tests using the Admin panel 447 Troubleshooting Quick Reference 449 Remove black bars matte from the video 453 Use a specific EDID for the video input port 456 Previous releases and features 459 External keyboard shortcuts 460 Software license 462 ...

Page 14: ...e Admin panel The Integration section of this guide details how to register and set up Pearl Nano as a remote recording and streaming device for Kaltura and Panopto For information about using Pearl Nano s RS 232 API HTTP API and HTTPS API with third party applications refer to the Pearl System API Guide About this Guide After the introductory section and quick start the next chapter describes the...

Page 15: ...re up to two audiovisual sources and arrange them in a custom layout with transparent images and backgrounds Upgradable 4K HDMI and 12G SDI options coming soon Capture audio from dedicated XLR USB and RCA audio ports as well as from SDI HDMI and network video sources SRT and RTSP Stream to Content Distribution Networks CDNs worldwide using modern protocols SRT HLS and MPEG DASH At the same time yo...

Page 16: ...Systems CMSs and can be registered as a video remote recorder resource for seamless lecture capture Network security compliance with 802 1x protocols passwords and certificate authentication means an easier setup for IT friendly live streaming over enterprise networks Pearl Nano is HTTPS enabled for secure administration and control over the LAN and supports secure live streaming protocols like SR...

Page 17: ...ted and the LED indicator does not light Front screen display Used for confidence monitoring and for displaying the front screen menu system and device information Control keys Used to navigate the front screen menu system and select options when configuring system parameters using the front screen menu system Recording control key Glows red when the device is recording Flashing means that user ac...

Page 18: ... 3 0 UAC port for connection of external hard drives flash drives USB microphones or supported USB status light indicators Can be used to connect a USB mouse or keyboard when the local console feature is enabled USB UVC devices are not supported HDMI OUT An HDMI video output port see Video output ports for details PoE RJ 45 Ethernet Auto sensing gigabit Ethernet 10 100 1000 Base T network port wit...

Page 19: ...ft right audio inputs See AV inputs XLR Two XLR professional line level 4 dBu balanced unbalanced jacks that can function as a stereo pair left right or as two mono inputs See AV inputs SD card and SATA M 2 2280 SSD storage To record video using Pearl Nano you need to install a storage medium Pearl Nano has a standard SD card slot on the front panel that you can use as well as a SATA M 2 2280 SSD ...

Page 20: ...ll the SSD Pearl Nano no longer detects a previously installed SD card Ensure recordings are downloaded from the SD card before installing the SSD When you install a SATA M 2 SSD Pearl Nano no longer detects the SD card slot and the SD card option is removed from the Admin panel s Configuration menu When the storage medium is full new recordings overwrite the oldest recordings If you re using Pear...

Page 21: ...city see SD card and SATA M 2 2280 SSD storage Pearl Nano comes shipped with an AC DC power adapter and a registration card that contains brief instructions to connect Pearl Nano to the network login to the Admin panel and format an SD card The instructions in this quick start provide more details Starting up Pearl Nano is pre configured with a no fuss Auto channel which makes it possible to conne...

Page 22: ...Pearl Nano and to your network If your network supplies PoE power then you can skip the next step to connect the power adapter Pearl Nano will power up using the power from the Ethernet cable 4 Connect the power adapter cable and finger tighten the screw ring securely Then plug the other end into a power source If your network supplies PoE power then you can skip this step 5 Wait for the power up ...

Page 23: ...card The easiest way to do that is using the front screen menu and the control key interface on the front panel of Pearl Nano If you want to format the SD card using the Admin panel you need the IP address of your Pearl Nano and an admin computer connected to the same network See My network IP address and access to the Admin panel After the SD card is installed and formatted for the EXT4 format si...

Page 24: ...Format SD card screen 5 Optional Highlight Quick format and press the check mark key to toggle the switch on or off 6 Highlight Format card and press the check mark to start the process The formatting in progress screen appears and the LED beside the SD slot starts flashing 7 When the screen indicates formatting is complete and the LED is solid off press the check mark to return to the previous sc...

Page 25: ...le using the Admin panel The SD card uses the EXT4 format and you cannot manually transfer recordings off the SD card directly to iOS or Windows systems Instead download your recording using the Admin panel 1 Open a web browser on the admin computer and go to the IP address of your Pearl Nano and log in see My network IP address and access to the Admin panel 2 From the Channel menu in the Admin pa...

Page 26: ... Nano and that the network uses DHCP If your network requires you to assign Pearl Nano a static IP address instead of using DHCP to obtain one contact your network administrator and see Connect using persistent static IP address Obtain the IP address of Pearl Nano and access the Admin panel 1 Press the left arrow key repeatedly on the control key interface until the System status screen appears 2 ...

Page 27: ... have a video source connected and an SD card installed and formatted you can fine tune Pearl Nano to your exact requirements Take a look at topics such as l What is a channel l Custom layout configuration l What is streaming l Selecting an audio source l Video output ports l Automatic file transfers When you re done setting up your Pearl Nano make sure to back up the system configuration using th...

Page 28: ...and down arrow keys on the control key interface to adjust the volume Each press changes the volume by 10 to a maximum volume of 100 Turn the volume all the way down to mute You can also adjust the volume using the front screen menu when you select System Controls Headphone volume Increasing the volume to 100 may cause you to hear distortion that is not actually present in the audio signal being r...

Page 29: ...ed 0 to 9 dBFS Yellow 9 to 18 dBFS Green 18 dBFS and lower The VU meter appears in several different places so you can visually check audio levels l Front screen On the channel view and on each of the video input screens l Admin Panel On the audio input source s configuration page when you select the input source from the Inputs menu You can also add the VU meter to appear on the video output port...

Page 30: ...urces using the Admin panel see Assign audio sources to an input This table offers some guidelines for adjusting the gain of the XLR and RCA analog audio input ports as well as the USB port Add the suggested gain to the audio input to get an average signal to register at a nominal level in the VU meter i e where the green bars change to yellow The actual amount of gain needed depends on the streng...

Page 31: ...t to use for the layout and click Save 4 Optional Adjust the gain for an audio input source Select the input port from the Inputs menu and adjust the amount of gain on the configuration page for the audio input port Click Save when you re done For more details see Adjust audio gain and delay Connecting microphones to the XLR line level inputs The XLR analog audio input ports on Pearl Nano are prof...

Page 32: ...e 5 Pearl Nano Input Ports Input port Qty Details SDI1 1 Linear PCM audio video input Supports 3G SDI video input Upgradable 12G SDI option coming soon HDMI 2 1 Linear PCM audio video input non HDCP protected DVI I using an adapter is single link Supports 1920 1080 full HD video input Upgradable 4K option coming soon USB 3 0 2 Linear PCM audio inputs on the rear panel accept non HDCP protected con...

Page 33: ...rted Other embedded HDMI audio configurations are not supported 3 In the Admin panel XLR RCA includes audio signals from the XLR audio pair and the RCA audio pair by default You can disable one or the other using the Admin panel see Assign audio sources to an input Only content that is not HDCP protected is captured from HDMI and SDI sources If you are using DVI2PCIe cards with your Pearl Nano DVI...

Page 34: ...RGB 4 4 4 YCRCB 4 2 2 YCRCB 4 4 4 SDI RGB 4 BNC4 4 YCRCB 4 2 2 Interlacing Yes Maximum cable length for 3G SDI 300 ft Maximum cable length for USB 3 0 6 ft Audio inputs Analog audio inputs 2 XLR pro line level 4 0 dBu up to 12 3 VRMS 24 dBu balanced unbalanced mono or L R stereo pair 1 RCA consumer line level 10 dBV L R stereo pair Connectors 2 XLR female 2 RCA female Digital audio inputs4 1 SDI5 ...

Page 35: ...Profile levels 3 0 3 1 3 2 4 0 4 1 5 1 Bitrate 1 to 50 Mbps selectable Bitrate control Constant Hardware accelerated video encoding Optional Video scaling Software and hardware Key frames 1 2 s and 1 s up to 5 s in 1 second intervals Audio processing Compression MP3 AAC and PCM Sampling rate MP3 22 kHz 44 kHz 48 kHz AAC 16 kHz 22 kHz 44 kHz 48 kHz PCM 22 kHz 44 kHz 48 kHz Bitrate 64 to 320 kbps MP...

Page 36: ... HTTP HTTPS stream for iPad iPhone and iPod Touch Stream encryption and authentication SRT 128 bits 192 bits or 256 bits AES encryption negotiated and configurable passphrase HLS push MD5 SHA 256 and SHA 512 MPEG DASH MD5 SHA 256 and SHA 512 RTMPS encryption plus CA certificate negotiation Resolution ranges Recorded 480p to 1920 1200p Streamed 480p to 1920 1200p HDMI output ports 480p to 1920 1200...

Page 37: ...le USB status light optional supported models Kuando BusyLight models UC Alpha and UC Omega Delcom Products USB HID single color and multi color signal indicators Recording and storage Record formats AVI MOV MP4 and MPEG TS File upload formats JPEG PNG SD card Up to 512 GB7 8 File system for SD card EXT4 Internal storage SATA M 2 2280 SSD storage7 M Key connector File transfer protocols FTP SFTP S...

Page 38: ...TLS EAP TLS PEAP HTTP HTTPS NTP PTP FTP SFTP SCP AWS S3 Network discovery Announce UPnP SAP Network security 802 1x EAP methods PEAP EAP TLS EAP TTLS Administration and control Admin panel Local web UI for full administration On screen display and mobile UI for confidence monitoring administration and control Local Admin panel access using an external monitor and a USB mouse or keyboard connected ...

Page 39: ...stron driver Yes See https applicationmarket crestron com epiphan Integrations Content Management Systems Kaltura Panopto Cloud access and management Epiphan Cloud AC DC power adapter Model SYS1588 3012 Input power rating 90 to 240 VAC 1 5 ARMS 47 to 63 Hz Output power rating 12 VDC 2 5 A 30 W Active efficiency average 87 7 Efficiency 10 load 86 5 No load consumption 0 1 W Power adapter manufactur...

Page 40: ...014 35 EU Low Voltage Directive Directive 2011 65 EU RoHS Time synchronization NTP TIME RFC 868 PTP v1 IEEE 1588 2002 V1 Country of origin Made in Taiwan 1 Upgradable 12G SDI coming soon 2 HDCP compliant 3 One of the video sources you connect can be either an RTSP or an SRT source however you cannot connect more than one of these sources at the same time 4 Digital audio is de embedded from the dig...

Page 41: ...Brno Czech Republic Optimum CPU performance Pearl Nano is a dedicated single channel video encoder recorder and hardware streaming device however there s a limit to the number of concurrent tasks the onboard CPU can perform efficiently The number of concurrent tasks depends on many factors like the number of video sources what frame rate and bitrate is used for the channel if the video output port...

Page 42: ... CPU usage from the front screen menu repeatedly press the left arrow key on the control interface until the Menu screen displays Use the arrow and check mark keys to select System and then select Device information to display the Device information screen 29 ...

Page 43: ...h Hungarian Polish Romanian Slovak and Russian Important considerations l Use only alphanumeric and diacritic characters in metadata descriptions The whole metadata string is refused if any special currency or mathematical symbol appears in the description You must remove the offending characters before Pearl Nano will accept the description see Add or remove channel metadata l Do not include any ...

Page 44: ...Pearl Nano User Guide Vesa mounting the device Do not insert screws longer than the recommended 5mm Using longer screws can damage the device 31 ...

Page 45: ...d user interface that s primarily used to perform system set up and administrative tasks for your Pearl Nano You can access the Admin Panel using an internet browser on a computer or tablet that s connected to the same local Ethernet network as your Pearl Nano or locally using a USB mouse keyboard and monitor connected directly to Pearl Nano See About the Admin panel Start and stop recording strea...

Page 46: ... screen menu To select the video source for the output port using the front screen when local console is enabled see Select the video output source using the front screen menu To start and stop scheduled and ad hoc events for Kaltura and Panopto using the front panel control interface see Stop start scheduled CMS events using the front screen menu About the front screen and control key interface P...

Page 47: ...face to cycle through the different views You can use the control keys to change views on the front screen and navigate the front screen menu Pressing the check mark key selects a highlighted menu option The Record and Stream control keys on the front panel are used to start and stop recording or streaming respectively Their color and brightness change under different conditions Table 8 Front pane...

Page 48: ...top and start streaming the channel l Glows solid white when a stream is configured for the channel l Glows solid blue when the channel is actively streaming l Flashes blue on off if there is an error while streaming l Solid off white when no stream is configured for the channel or when Pearl Nano is powered off A default No Signal screen appears if no video sources are connect to Pearl Nano for t...

Page 49: ...st unlock the screen to access the different views on the front screen and to start stop streaming or recording using the Record and Stream control keys A virtual keyboard for entering the PIN appears on the front screen however you can connect an external USB keyboard if Pearl Nano is configured to allow that Related links The front screen Channel view The front screen menu and control keys Recor...

Page 50: ...e front screen for the Channel view Item Description 1 Channel resolution and frame rate 2 Channel name 3 Preview of the channel video source used for confidence monitoring If no video source is connected or there is no video signal the default No Signal screen displays 4 Recording indicator and timer The recording timer shows the length of time that recording has been in progress If dashes appear...

Page 51: ... source appears on the HDMI OUT port The control key interface on the front panel lets you change views on the front screen and navigate the front screen menu If you don t see the front screen menu displayed on the front screen press the left arrow key or the right arrow key on the control key interface to cycle through the different views Pressing the left arrow key is mentioned throughout the us...

Page 52: ... menu like temporarily dimming the front screen and control keys when you select System Controls Front screen Just press any key on the front panel of Pearl Nano to restore the screen and key luminance Record and stream using the control keys Simply press the Record control key on Pearl Nano s front panel to easily start and stop recording a channel The Record control key glows solid red and the r...

Page 53: ... the Channel view increments while streaming is in progress When you re done press the Stream control key again to stop streaming If multiple streams are configured for the channel pressing the Stream control key starts and stops all streams at the same time A stream must already be configured for the channel If no stream is configured dashes display in place of the streaming timer and the Stream ...

Page 54: ...ould set an inactivity timeout and automatically dim the screen and control keys using the Admin panel see Set the front screen timeout Dim the front screen and control interface using the front screen menu 1 Press the left arrow key repeatedly on the control key interface until the Menu screen displays 2 Use the arrow and check mark keys to select System Then from the System screen select Control...

Page 55: ...ally the front screen is always on for easy monitoring However you can set the front screen to shut off after a given amount of time To re enable the front screen after it times out and shuts off simply press any key on the front panel of Pearl Nano Set the front screen timeout using the Admin panel 1 Login to the Admin panel as admin see Connect to Admin panel 2 From the Configuration menu select...

Page 56: ...all times when the system is on 4 Click Apply Set a PIN security code You can set a 4 to 12 digit PIN code to protect the front screen of Pearl Nano from unauthorized access By default the PIN is not set If a PIN is configured users are prompted to enter the PIN code whenever l You power on or restart Pearl Nano l Pearl Nano recovers from timeout mode see Set the front screen timeout 43 ...

Page 57: ...N security code Set a front screen PIN security code using the Admin panel 1 Login to the Admin panel as admin see Connect to Admin panel 2 From the Configuration menu select Front screen The front screen configuration page opens 44 ...

Page 58: ...treaming and recording The One Touch feature lets you control both streaming and recording at the same time with press of a single button Once enabled simply press either the Stream control key or the Record control key on the front panel of Pearl Nano to start stop streaming and recording the channel The Record control key glows solid white when an SD card or SATA M 2 2280 SSD is installed and th...

Page 59: ... and recording starts Streaming and recording are On Press Stream or Record Streaming and recording stops Streaming is started using the Admin panel and recording is Off Press Stream Streaming stops Streaming is started using the Admin panel and recording is Off Press Record Recording starts and streaming continues Recording is started using the Admin panel and streaming is Off Press Stream Stream...

Page 60: ...ee SD card and SATA M 2 2280 SSD storage and Streaming to servers CDNs and other devices Enable One Touch control One Touch streaming and recording control is disabled by default You can enable and disable One Touch control using the Admin panel or from the front screen menu on Pearl Nano Enable or disable One Touch control using the Admin panel 1 Login to the Admin panel as admin see Connect to A...

Page 61: ...interface until the Menu screen displays 2 Use the arrow and check mark keys to select System Then from the System screen select Controls to open the Controls screen 3 From the Controls screen use the arrow keys to highlight One Touch control and press the check mark key to toggle the switch on or off 48 ...

Page 62: ...el l Enable local console access to the Admin panel l Connect using a DNS based service discovery l Connect using persistent static IP address For information about remote access to the cloud version of the Admin panel see Remote login to the Admin panel For information about integrating Pearl Nano with Content Management Systems CMSs like Panopto and related administrator tasks see Integration Ab...

Page 63: ...gure channel encoding add video and audio sources customize the layout perform confidence monitoring record the channel and more 2 Inputs menu The available video and audio input ports on your Pearl Nano are listed Select a port to open the configuration and status page for that port 3 Output ports menu The output ports available on your Pearl Nano are listed Select a 50 ...

Page 64: ...currently logged in user displays beside the icon You can access the Admin panel using these methods l Any web browser see Connect to Admin panel l Using a connected USB mouse keyboard and monitor see Enable local console access to the Admin panel l Remotely using Epiphan Cloud see Remote login to the Admin panel Connect to Admin panel You can access the Admin panel several ways The most common wa...

Page 65: ...ou don t know the password contact your Pearl system administrator For a first time log in as an administrator level user you re prompted to assign passwords to the admin operator and viewer accounts Record the passwords for future reference Optionally you can connect to your Pearl system using the following methods l For networks with DHCP you can Connect using a DNS based service discovery l For...

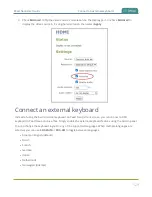
Page 66: ...nabled You cannot use the HDMI pass through port for local console Optionally you can disable whether or not users must login to the Admin panel when they access the local console Login is enabled by default You can also change the layout of the built in and external keyboards to any of the supported languages If you select multiple languages you can toggle between languages using Ctrl Shift or Ct...

Page 67: ...ternal keyboard The External keyboard configuration page opens 3 Select Local console as the Keyboard application and click Apply 4 Optional Check a different keyboard language layout or multiple language layouts The default layout is American English 5 Optional Choose the keyboard key combination to toggle between keyboard layouts if multiple languages are selected Ctrl Shift or Alt Shift 6 From ...

Page 68: ...ptional Check Disable authentication if you don t want users to have to use their credentials to login before using the local console to access the Admin panel on Pearl Nano 9 Under Settings select Local console in the Source drop down menu 10 Click Apply Enable local console using the front screen menu 1 Press the left arrow key repeatedly on the control interface until the Menu screen displays 5...

Page 69: ...n To return to the previous screen without making a selection press the left arrow key What s next Connect your USB mouse keyboard and connect an HDMI monitor to the output port that has local console enabled to access the local console directly from Pearl Nano Connect using a DNS based service discovery Pearl Nano uses DNS based messages to advertise details about itself including its host name W...

Page 70: ...Access the Admin panel of Pearl Nano using DNS discovery 1 Find the system s serial number that s printed on a label attached to the device TIP The serial number also appears on the Device information screen from the front screen menu Use the arrow keys and check mark to navigate the front screen menu and select System Device information 2 Enter the following string into the address bar of your we...

Page 71: ...orkstation computer with access rights to modify your network settings is required Pearl Nano static IP address defaults are l IP Address 192 168 255 250 l Netmask 255 255 255 252 l Username admin l Password your admin password by default there is no password assigned Access the Admin panel using the persistent static IP address 1 Establish an Ethernet connection between Pearl Nano and the worksta...

Page 72: ...he Admin panel If you don t know the password contact your Pearl system administrator For a first time log in as an administrator level user you re prompted to assign passwords to the admin operator and viewer accounts Record the passwords for future reference 6 From the Configuration menu click Networking 7 Click use a static address and enter a static IP address and network settings you want for...

Page 73: ...the Epiphan Cloud User Guide About device management with Epiphan Cloud Epiphan Cloud is your remote management and control center for all your Pearl Nano devices All you need is a free Epiphan Cloud account After you pair Pearl Nano with your Epiphan Cloud account you can access Pearl Nano from anywhere there s an Internet connection You can even invite others to join your team for easy remote ac...

Page 74: ...d access Epiphan Cloud is where you go to remotely manage and control all your Pearl Nano devices Access is enabled on Pearl Nano by default All you need to do is pair Pearl Nano to your free Epiphan Cloud account for access to your device over the Internet You can disable Epiphan Cloud access on Pearl Nano from the front screen or using the Admin panel and enable it again later Access is enabled ...

Page 75: ...able Epiphan Cloud access using the front screen menu 1 Press the left arrow key repeatedly on the control interface until the Menu screen displays 2 Use the arrow and check mark keys to select System Then from the System screen select Settings to open the Settings screen 62 ...

Page 76: ... Cloud using Pearl Nano s device ID paring code To manually pair Pearl Nano in Epiphan Cloud using Pearl Nano s pairing code see the Epiphan Cloud online user guide You can unpair from Epiphan Cloud using the Admin panel or directly within Epiphan Cloud Each time you unpair Pearl Nano the device ID pairing code changes value When you pair Pearl Nano again a new instance of the Pearl Nano with a di...

Page 77: ...instances in Epiphan Cloud Pair and unpair Pearl Nano using the Admin panel 1 Login to the Admin panel as admin see Connect to Admin panel 2 From the Configuration menu select Epiphan Cloud The Epiphan Cloud status page opens The pairing code device ID for Pearl Nano is shown as well as a link to pair the device 3 Select Click to pair The Epiphan Cloud login page opens in a new tab https go epipha...

Page 78: ...d 6 In the Admin panel the status of Pearl Nano updates to paired on the Epiphan Cloud status page 7 To unpair Pearl Nano using the Admin panel select Unpair on the Epiphan Cloud status page Get the pairing code for Pearl Nano using the front screen menu 65 ...

Page 79: ...em Then from the System screen select Settings to open the Settings screen 3 From the Settings screen select Epiphan Cloud to open the Epiphan Cloud screen a If Pearl Nano is not currently paired to Epiphan Cloud the pairing code displays on screen b If Pearl Nano is paired to Epiphan Cloud the screen changes to show the name of the team the device is paired to and the name assigned to the paired ...

Page 80: ...sion of the Admin panel uses the same login credentials as the locally accessed web version The URL of the local web version of the Admin panel are not the same as the URL of the cloud version An Epiphan Cloud Pro plan is only required to access the cloud version Before you begin l Make sure Pearl Nano is paired to your Epiphan Cloud account see Pair and unpair from Epiphan Cloud l Upgrade to one ...

Page 81: ...e three dots at the far right in the device s row and select Remote login 4 From the Device Details page click Remote login in the header bar A new tab with the cloud Admin panel login opens in your browser See The Admin panel for instructions to use the interface or to access the local web version 68 ...

Page 82: ...ce of your Pearl Nano Topics include l Configure network settings l Configure network security l Configure date and time l Configure device info name description and location l Video output ports l Connect an external keyboard l Connect a USB status light l Configuration presets l User administration l Status and monitoring For information about integrating Pearl Nano with Content Management Syste...

Page 83: ...l Nano The following table lists the default incoming and outgoing network ports that Pearl Nano uses Do not block traffic over these ports If you want Pearl Nano to operate properly make sure that your firewall is configured to open these ports Blocking a port will cause the service that uses that port to fail It is possible to use the Admin panel to change the default ports that are used for som...

Page 84: ...r chooses RTSP UDP it will negotiate 4 random UDP ports two for audio and two for video The port range is dependent on the OS of the client video player and can change with updates to that OS 1900 UDP UPnP server for UPnP discovery if enabled See Stream using UPnP Random in range 50000 to 65000 TCP UPnP media server if enabled Each time the UPnP server is started a random TCP port in this range is...

Page 85: ...m Network You can also see the IP address when you navigate to the System status screen using the front panel control interface Table 14 Network Information Item Description Options MAC Address A media access control address MAC address is a unique identifier for the network interface The value is read only and cannot be changed You may need to share this value with your system administrator Curre...

Page 86: ... left arrow key repeatedly on the control key interface until the Menu screen displays 2 Use the arrow and check mark keys to select System Then from the System screen select Network to open the Network screen 3 From the Network screen use the arrow keys to scroll down the list to see all the network parameters like the MAC address 73 ...

Page 87: ...ont panel control interface TIP Using the front screen menu you can choose to apply a configuration preset that contains a static network IP See Configuration presets Only IPv4 addresses are supported Pearl Nano does not support IPv6 Configure a static IP address using the Admin panel 1 Login to the Admin panel as admin see Connect to Admin panel 2 From the Configuration menu select Network The Ne...

Page 88: ...ame system server DNS server translates human readable hostnames into corresponding IP addresses Specify the system s IP address if you don t have a DNS server on your network This value cannot be blank unless you are using DHCP MTU Size The maximum transmission unit MTU specifies the maximum packet size for transfer on the network The default value is 1500 which is the largest value allowed by Et...

Page 89: ...m the Network screen use the arrow keys to highlight DHCP and press the check mark key to toggle the switch off The network addresses disappear from the screen 4 Use the arrow and check mark keys to select IP address The screen to enter a static IP address opens 5 Use the arrow and check mark keys to enter a static IP address then select Set IP address If you leave the IP address screen without se...

Page 90: ...tings which clear all your custom settings See Perform a factory reset l Load a configuration preset file that uses DHCP networking See Apply a configuration preset using the Admin panel or Apply a configuration preset using the front screen menu l Change the network settings manually using either the front screen menu or the Admin panel Manually select DHCP as the network type using the Admin pan...

Page 91: ...on the network The default value is 1500 which is the largest value allowed by Ethernet at the network layer It s best for all nodes in your network to use the same value Only change this value if you know that other nodes use a different value 4 Reboot Pearl Nano when prompted From the Configuration menu select Maintenance and click Reboot Now on the maintenance page 5 After the system has finish...

Page 92: ...work to open the Network screen 3 From the Network screen use the arrow keys to highlight DHCP and press the check mark key to toggle the switch on The DHCP acquired network addresses appear on the screen 4 Reboot Pearl Nano to apply the network changes Return to the System screen and use the down arrow key to scroll down until Reboot appears Then select Reboot using the check mark key and select ...

Page 93: ... record with any changes to Pearl Nano s IP address or FQDN DHCP Option 81 is disabled by default Important considerations l The DHCP server must support Option 81 for this feature to work l DHCP should be enabled and setup before enabling DHCP Option 81 see Configure DHCP l You need the FQDN of your Pearl system for this procedure Consult your network administrator if you don t have that informat...

Page 94: ...ver DDNS to ensure that whenever the DHCP server changes Pearl Nano s IP address Pearl Nano informs the DDNS to update it s domain name records That way you can keep using Pearl Nano s FQDN without worry The DDNS feature is useful if your DHCP server doesn t support Option 81 Custom DDNS servers dyndns org and noip com are supported Table 17 DDNS Fields Label Description Options Provider Choose if...

Page 95: ...he hostname to use for this Pearl Nano in the DDNS server records Pearl Nano s serial number is the default hostname External IP detection server name If your DDNS provider uses an external IP detection server you must provide that server s name External IP detection server path If your DDNS provider uses an external IP detection server you must provide that server s path Use SSL for external IP d...

Page 96: ...mple mypearl The default hostname is the serial number of Pearl Nano 7 If your DDNS provider uses an external IP detection server enter the External IP detection server name and External IP detection server path 8 Check User SSL for external IP detection if you want to use that feature with an external IP detection server 9 Optional Change the Update period in seconds 10 Click Apply 11 Reboot Pear...

Page 97: ...ue and is not currently assigned on Pearl Nano see Network ports used by Pearl Nano Change the HTTP HTTPS port values using the Admin panel 1 Login to the Admin panel as admin see Connect to Admin panel 2 From the Configuration menu select Security The Security configuration page opens 3 Under HTTPS configuration change the default HTTP and HTTPS port numbers Click Apply when you re done Secure co...

Page 98: ...sing the diagnostic tools contact your network administrator and provide them with the IP address and MAC address of your Pearl Nano otherwise contact Epiphan Video support for assistance Perform network diagnostics using the Admin panel 1 Login to the Admin panel as admin see Connect to Admin panel 2 From the Configuration menu select Network The Network configuration page opens 3 In the Network ...

Page 99: ...arl Nano systems using multicast DNS mDNS The network discovery port on Pearl Nano is port 5557 and is enabled by default Important considerations l You cannot connect to the Admin panel using a DNS based service discovery if you disable the network discovery port see Connect using a DNS based service discovery Disable the network discovery port using the Admin panel 1 Login to the Admin panel as ...

Page 100: ...Pearl Nano User Guide Disable the network discovery port 87 ...

Page 101: ... the Admin panel Supported EAP methods include l PEAP default l EAP TLS l EAP TTLS Important considerations l If TLS authentication is used on the network then you need to get a user certificate and a user private key from the network administrator and upload those to Pearl Nano as part of this procedure l Before you proceed with this setup check that the network server s signed CA certificate app...

Page 102: ...nal Check Verify server s identity 5 Choose an Authentication method if you selected EAP TTLS as the EAP method The authentication method is automatically selected if PEAP or EAP TLS is the EAP method Table 18 Authentication methods EAP method Authentication method PEAP EAP MSCHAPv2 EAP TLS TLS EAP TTLS EAP MSCHAPv2 TLS PAP 6 Enter the network access User name and Password to use for this device A...

Page 103: ...n add more CA signed and self signed certificates using the Admin panel as well as delete any certificates that you ve uploaded You cannot delete any of the built in CA certificates that came preloaded on Pearl Nano Security certificates must be PEM encoded When using the Epiphan Video self signed certificate with Pearl Nano l Your web browser may warn of an untrusted certificate when you try to a...

Page 104: ...loaded click Choose File and select the certificate you want to delete from the list Then click Delete When you re done click Apply 6 Reboot Pearl Nano when prompted After the system has finished rebooting log back in to the Admin panel as admin and verify that all changes were applied Configure HTTPS You can configure Pearl Nano to use HTTPS for secure local network access to the Admin panel as w...

Page 105: ... include the private key or be separate files If you attempt to access the web based Admin panel using a web browser and the required security certificate isn t found in the list of certificates loaded on Pearl Nano a warning message appears stating that the device isn t trusted You can choose whether to proceed and connect to Pearl Nano s web based Admin panel without the security certificate aut...

Page 106: ... included in the list of certificates on Pearl Nano when you try and connect to Pearl Nano using a web browser you ll receive a warning that the device isn t trusted 6 Click Apply when you re done 7 Reboot Pearl Nano when prompted After the system has finished rebooting log back in to the Admin panel as admin and verify that all changes were applied If you need to delete the certificate you upload...

Page 107: ...rent date and time settings l Configure a time server l Manually set the date time and zone View the current date and time settings You can view the current date and time settings of Pearl Nano using the Admin panel To manually set the date time and time zone using the Admin panel see Manually set the date time and zone To change the server used for synchronizing time see Configure a time server V...

Page 108: ...s the Network Time Protocol NTP server from the National Research Council of Canada by default You can change to a different time server using the Admin panel Contact your system administrator for the time synchronization server settings you should use The following table lists the time server types that Pearl Nano supports Table 20 Supported time server types Label Description Options NTP Network...

Page 109: ...own a If NTP is selected enter the IP address or server name for the NTP server in the Server IP Address field b If PTP v1 is selected choose a multicast address for the PTP v1 server from the PTP domain field Table 21 PTP multicast addresses PTP Domain Description Default PTP at multicast address 224 0 1 129 Alternative 1 PTP at multicast address 224 0 1 130 Alternative 2 PTP at multicast address...

Page 110: ...ation menu click Date and Time The Date and Time configuration page opens 3 Enter the current date in the Date field using the format yyyy mm dd and enter the current time in the Time field using the format hh mm ss 4 Select a time zone from the Time Zone field 5 Click Apply 97 ...

Page 111: ...t for Pearl Nano is used for the folder name instead of Pearl s serial number For Kaltura and Panopto the device name you set here for Pearl Nano appears as the registered name for this device Configure the device name description and location using the Admin panel 1 Login to the Admin panel as admin see Connect to Admin panel 2 From the Configuration menu click Info The system information page op...

Page 112: ... when the SD card is formatted The Ubuntu formatted SD card cannot be used to transfer files to iOS or Windows systems Use a USB memory device to manually transfer files instead Format the SD card using the Admin panel 1 Insert the SD card into the SD card slot on the front panel 2 Login to the Admin panel as admin see Connect to the Admin panel 3 From the Configuration menu select SD Card The SD ...

Page 113: ... to open the Format SD card screen 3 Optional Highlight Quick format and press the check mark key to toggle the switch on or off 4 Highlight Format card and press the check mark key to start the process The formatting in progress screen appears and the LED beside the SD slot starts flashing 5 When the screen indicates formatting is complete and the LED is solid off press the check mark key to retu...

Page 114: ...begin Gather the tools you need l 1 Phillips screwdriver l 0 Phillips jeweler s screwdriver l Optional a pair of tweezers Install and format the SATA M 2 2280 SSD 1 Disconnect the power cable and ensure Pearl Nano is powered off If Pearl Nano uses PoE power from the connected RJ 45 Ethernet cable ensure you disconnect the Ethernet cable from Pearl Nano Permanent damage to the SSD and or Pearl Nano...

Page 115: ... post Align the notch on the SSD with the post hole 7 With your other hand use the 0 Phillips screwdriver to reinstall the post screw and secure the SSD in place TIP Use the tweezers to pick up the screw if it falls behind the SSD 8 Reinstall the SSD slot cover plate and power up Pearl Nano The SSD is formatted automatically the first time you power on Please be patient while formatting completes ...

Page 116: ... include l Configure audio ports for stereo or mono l Assign audio sources to an input l Adjust audio gain and delay l Mute audio For details about the audio inputs see AV inputs Configure audio ports for stereo or mono The two XLR professional line level inputs are configured as a stereo pair by default XLR 1 left and XLR 2 right Using the Admin panel you can configure these ports to function as ...

Page 117: ...input port on Pearl Nano Parameters that are listed only once apply to both ports Configure audio ports as stereo or mono using the front screen 1 Repeatedly press the left arrow key on the control interface until the Menu screen displays 2 Use the arrow and check mark keys to select Inputs Then from the Inputs screen select XLR RCA Audio to open the XLR RCA Audio screen 104 ...

Page 118: ...ht and RCA left right audio sources appear under the label XLR RCA Audio You can assign one or both audio sources to XLR RCA Audio Choosing one audio source for the shared input disables the other audio source This means that when you select XLR RCA Audio as the audio source using the custom layout editor only the audio source you assign to XLR RCA Audio is used Both audio sources are assigned by ...

Page 119: ...d click Apply Assign the audio source to an input using the front screen 1 Press the left arrow key repeatedly on the control interface until the Menu screen displays 2 Use the arrow and check mark keys to select Inputs Then from the Inputs screen select XLR RCA Audio to open the XLR RCA Audio screen 106 ...

Page 120: ...can cause audio to become de synchronized such as the length of audio cables or the configuration of your equipment The audio delay feature helps you adjust audio coming from external sources so that your video and audio sources are synchronized when captured streamed and recorded You can apply from 300 ms to 300 ms of delay to any audio source from the front screen menu or using the Admin panel B...

Page 121: ...input devices You should add the suggested gain to the audio input to get an average signal to register at a nominal level in the VU meter i e where the green bars change to yellow The actual amount of gain needed depends on the strength of the original audio signal Table 22 Audio input port gains guidelines Audio source Input port Gain Mobile phone or other consumer line level device XLR Add 6 to...

Page 122: ...ge for the audio source opens 3 In the Input Gain field select the amount of gain to apply to the audio source 4 In the Audio delay field enter a value between 300 and 300 ms A positive value adds delay to the audio signal A negative value adjusts the audio to start earlier 5 Click Apply Adjust the gain and delay for an audio source using the front screen 1 Repeatedly press the left arrow key on t...

Page 123: ...o screen highlight Audio delay and press the check mark key to display options 4 Highlight the amount of delay you want using the up and down arrow keys then press the check mark key to select and return to the previous screen To return to the previous screen without making a selection press the left arrow key 5 To adjust the gain from the XLR RCA Audio screen highlight Gain and press the check ma...

Page 124: ... the audio input ports that share internal processing and the results of applying mute Table 23 Muting audio inputs that share resources Audio input Admin panel Shared audio input resources Results XLR RCA Audio XLR left right RCA left right In stereo mode Both XLR ports left and right are muted Both RCA ports left and right are muted In mono mode XLR RCA audio Left muted Both the XLR 1 left and R...

Page 125: ... audio source muted then click Apply Mute an audio source using the front screen 1 Press the left arrow key repeatedly on the control interface until the Menu screen displays 2 Use the arrow and check mark keys to select Inputs Then from the Inputs screen select XLR RCA Audio to open the XLR RCA Audio screen 112 ...

Page 126: ...l Nano User Guide Mute audio 3 From the XLR RCA Audio screen press the down arrow key repeatedly until Mute appears on screen and is highlighted 4 Press the check mark key to toggle the switch on or off 113 ...

Page 127: ... Video output port resolution l Set up the video output port using the Admin panel l Set up and enable MultiViewer l Select the video output source using the front screen menu l Preview the video output port l Disable the video output port l Disable or enable audio and output port volume l Display and reposition the audio VU meter l Rename a video output port l Mirror the video output port display...

Page 128: ... change the video output to a different resolution then back to Same as source l When using the video output port for confidence monitoring some delay can be expected For a 1080p video source the average delay on the video output port is approximately 100 ms For a 1080p channel the average delay on the video output port is approximately 300 ms The actual amount can vary depending on the setup l If...

Page 129: ...a variety of other resolutions through Set up the video output port using the Admin panel You can send a channel or a video source to the video output port using the Admin panel You can also adjust the video output resolution aspect ratio and choose to include audio The video output port frame rate is set automatically to the channel s configured frame rate for that video source When outputting a ...

Page 130: ...e resolution as the channel or video source If that resolution is not supported by the display the video output port will negotiate a new resolution with the display generally this ends up being the display s default resolution Destination default This is the default value Each display has a preferred resolution and when you choose this setting the video output port will use the display s default ...

Page 131: ...or vertical from the Audio meter orientation drop down menu to change the orientation of the displayed audio meter 7 For an input source do the following a Select an Audio source from the drop down list b Optional Adjust the volume Enter a value from 0 to 100 percent in the Audio volume field c Optional Choose whether or not to display the audio meter from the Audio meter drop down d If displaying...

Page 132: ...ate of channel recordings and live streams No audio signal present at the output port but audio meters do display for channels and video sources that have embedded audio signals Use the Admin panel to choose which video sources appear in the pre configured MultiViewer grids and to set the video output port resolution You can enable MultiViewer for the output port using the Admin panel the front sc...

Page 133: ...ion for the video output port and then click Apply Value Description Destination default This is the default value Each display has a preferred resolution and when you choose this setting the video output port will use the display s default resolution 1024 768 1280 720 1280 960 1360 768 1400 1050 1920 1080 Choose a specific resolution for the output port Enable MultiViewer using the front screen m...

Page 134: ...m the System screen select Settings to open the Settings screen 3 From the Settings screen select HDMI output to open the HDMI output screen then press the check mark key to select Video The available video sources display 4 Highlight MultiViewer then press the check mark key to select and return to the previous screen To return to the previous screen without making a selection press the left arro...

Page 135: ...nabled by default To configure the video output port parameters use the Admin panel See Video output ports Select the video output source using the front screen menu 1 Press the left arrow key repeatedly on the control interface until the Menu screen displays 2 Use the arrow and check mark keys to select System Then from the System screen select Settings to open the Settings screen 3 From the Sett...

Page 136: ... window at the bottom of the video output configuration page in the Admin panel The preview is updated every few seconds and always maintains the same aspect ratio as the source it is copying It doesn t reflect black bars the audio meter or actual aspect ratio resolution on the display If the video output port is showing a source and that source has no signal the source s no signal image is displa...

Page 137: ... port and then click Apply Disable or enable audio and output port volume If you re displaying a channel as the source for your video output port audio for that channel is also encoded and sent over the port by default You can disable the audio on the output port using the Admin panel You can also adjust the volume of the audio on the video output port using the Admin panel Disabling the audio on ...

Page 138: ...annel do the following a Check Enable audio to include audio in the output Leave this unchecked for no audio with the video b Optional For a channel with audio enabled adjust the volume Enter a value from 0 to 100 percent in the Audio volume field c Optional For a channel with audio enabled choose whether or not to display the audio meter from the Audio meter drop down menu d If displaying the aud...

Page 139: ...ientation drop down to change the orientation of the displayed audio meter 5 Click Apply Display and reposition the audio VU meter When sending a channel with audio over the video output port you can choose whether or not to display the audio VU meter using the Admin panel You can also determine the position and orientation of the audio meter Audio pass through adjusting the volume and displaying ...

Page 140: ... right side of the display 4 If you ve selected a location for the audio meter you can also select an orientation horizontal or vertical in the Audio meter orientation field 5 Click Apply Rename a video output port Using the Admin panel you can easily change the video output port default name from HDMI 1 to something more suitable For example Projector Output or Confidence Monitor Change a video o...

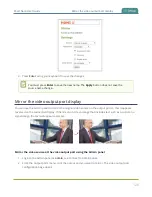
Page 141: ... to mirror the original video source on the output port so that it appears reversed on the connected display If there s an on screen image that includes text such as a custom no signal image the text will appear reversed Mirror the video source at the video output port using the Admin panel 1 Login to the Admin panel as admin see Connect to Admin panel 2 From the Output ports menu click the output...

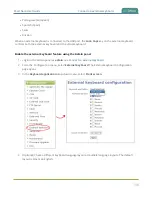
Page 142: ...f using the built in virtual keyboard on Pearl Nano s front screen you can connect a USB keyboard to Pearl Nano and use that Simply enable the external keyboard feature using the Admin panel You can change the keyboard layout to any of the supported languages When multiple languages are selected you can use Ctrl Shift or Ctrl Alt to toggle between languages l American English default l Dutch l Fre...

Page 143: ...nd the virtual keyboard Enable the external keyboard feature using the Admin panel 1 Login to the Admin panel as admin see Connect an external keyboard 2 From the Configuration menu select External keyboard The External keyboard configuration page opens 3 In the Keyboard application drop down menu select Front screen 4 Optional Check a different keyboard language layout or multiple language layout...

Page 144: ...tus light directly to the USB port on Pearl Nano The following USB status lights are supported l Kuando BusyLight models UC Alpha and UC Omega l Delcom Products USB HID single color and multi color signal indicators The status light is activated as soon as it is connected to a USB port on Pearl Nano and flashes once Table 24 Status light indicator Light Description Solid off Pearl Nano is not curr...

Page 145: ...es There are three Pearl Nano user levels l Administrator l Operator l Viewer No password is assigned to the user accounts by default The first time you login to the Admin panel using the administrator level account you re prompted to set passwords for all three user accounts The Pearl administrator can change passwords at any time using the Admin panel see Change user passwords You cannot change ...

Page 146: ...s The default user name used to log in to Pearl Nano is operator Operators can to do the following l Configure inputs l Control recordings start and stop l Rename download and delete recordings l Perform network diagnostics If an operator does not have the privileges to apply a particular configuration in the Admin panel the Apply button appears grayed out in color and is not selectable Administra...

Page 147: ... administrator privileges to operators Table 25 User privileges in the Admin panel Action or Menu Option viewer operator admin View channel output ü ü ü Channel Operations View channel configuration ü ü Rename a channel ü Configure stream channel ü Configure stream sources ü Publish a stream ü Configure channel metadata ü View recorded files list ü ü Rename recorded files ü ü Download recorded fil...

Page 148: ...ü Enable CMS and register ü Disable CMS or deregister ü Configure CMS settings and default event parameters ü Start stop scheduled events Admin panel ü ü Create ad hoc events Admin panel ü ü View the Events page ü ü System Configuration Operations View system configuration ü ü Format the SD card ü Configure Automatic File Upload AFU ü Select External USB drive behavior ü Cancel USB file transfers ...

Page 149: ...l ü Enable disable Epiphan Cloud feature ü Upgrade Firmware ü View System Information ü ü Network Diagnostics Bandwidth test ü ü Connectivity status ü ü Domain name resolution ü ü Ping ü ü Probe ü ü Trace route ü ü Change user passwords The admin operator and viewer level user accounts have no assigned password by default The first time you access the Admin panel using the administrator level acco...

Page 150: ...sers are automatically logged out when a password changes Viewers may need to refresh their browser window or press play in their media player Change the admin password when there is no live stream in progress Changing the admin password while live streaming disrupts the stream for viewer level users Change a user account password using the Admin panel 1 Login to the Admin panel as admin see Conne...

Page 151: ...min password and you have remote support enabled on the system contact Epiphan Support to request a remote password reset If remote support is disabled you must return the system to Epiphan for password recovery Contact Epiphan support Alternatively you can regain access to Pearl Nano if you apply the factory default configuration preset using the front screen menu see Apply a configuration preset...

Page 152: ... logs you in using the same user account the next time you log in to Pearl Nano You must log out of the Admin panel then log back in using a different user account Log in using a different user account 1 In the Admin panel select the logout icon at the top right corner of the screen A new log in screen appears Some browsers may require you to click twice before the you are logged out 2 Enter the c...

Page 153: ...ut for a channel Configure remove rename and publish a stream for a channel Configure channel metadata Upload download and delete media files Input configuration Add and rename video and audio inputs Network configuration Configure network address Configure 802 1x and manage CA certificates Enable and disable DHCP Option 81 Configure Dynamic DNS DDNS Reboot Pearl Nano Configuration presets control...

Page 154: ...trol Enable disable Epiphan Cloud feature for remote control and remote login Video output configuration Maintenance configuration Upgrade firmware Apply configuration presets2 Enable remote support Reboot device Admin panel Restore factory configuration Configure the device name location and description 1 Only configuration presets that don t include the System group are allowed 2 Allow operators...

Page 155: ... in as either an admin or an operator and do not have their own private profiles Any LDAP users with the name admin operator or viewer are ignored and the local accounts are used instead When enabled LDAP authentication is an alternative to the regular system user names and passwords You may still login as admin operator or viewer using the passwords for those accounts LDAP replaces the local view...

Page 156: ...he Configuration menu select Security The Security configuration page opens 3 In the LDAP authentication section check Enable LDAP authentication Uncheck the check box to disable LDAP authentication 4 In the Server address port field enter the server IP address and optional port for your LDAP server For example 192 168 1 101 389 5 In the Connection encryption drop down choose the type of encryptio...

Page 157: ... logged in as the operator Users must have the member or unqueMember attribute for the specified group to be granted Operator access If left blank LDAP is not supported for Operators but can still be used for Administrators and Viewers 11 In the Viewers group DN field specify the distinguished name of the group users must be part of to be logged in as a viewer Users must have the member or unqueMe...

Page 158: ...llow IP s list as an exception to a rule in the allow list If your viewer account has a password your viewers must connect to the system from a computer or gateway with a permitted IP address and must also supply the user name viewer and password before they can view the broadcast To restrict access by IP address you need to know the IP addresses or range of addresses for your viewers By default a...

Page 159: ...oadcast For example if your system is accessible on your local area network LAN and you want to make sure only the CEO s specific desktop laptop and tablet computers with IP Addresses 192 168 1 50 192 168 1 51 and 192 165 1 75 respectively can connect to the broadcast construct the following allow list Allow 192 168 1 50 192 168 1 51 192 168 1 75 Allow list with a range of IP addresses Sometimes y...

Page 160: ...ith a range of IP addresses distinct IP addresses and an exception Building on the previous examples consider a situation where you want the CEO s computers 192 168 1 50 192 168 1 51 192 168 75 and all boardroom computers 192 168 1 200 192 168 1 250 to access the broadcast with the exception of the public boardroom computer 192 168 1 211 Use both allow and deny lists to create the rule as follows ...

Page 161: ...of IP addresses Consider a situation where you want every computer on the network to access the broadcast with the exception of the CEO s desktop laptop and tablet computers Additionally boardroom computers should not be permitted with the exception of the cafeteria computer IP address 192 168 1 222 The deny list is an exception list for the allow list So to craft the rule described above we need ...

Page 162: ...guration preset About configuration presets Configuration presets are groups of settings that get applied to the system leaving other important settings intact They make it easy to manage multiple Pearl Nano systems in shared spaces like a studio and ensures a consistent setup each time you go to use your Pearl Nano Configuration presets let you quickly apply settings so you can reconfigure Pearl ...

Page 163: ...l Nano in advance of a conference and create custom channel configuration presets for several different keynote speakers each with a different setup and then apply them later when you need them For example you could create two configuration presets called Session 1 and Session 2 Each session could include things like custom backgrounds images and logos channels and layouts metadata streaming setti...

Page 164: ...rded files continue to upload even after the new configuration preset is applied if AFU is not yet complete but the channels reflect the newly loaded session s background file name and presenter name Configuration preset considerations There are important considerations that you should know before you start using configuration presets including l Access to presets and privacy considerations l The ...

Page 165: ...out the front screen The front screen configuration group includes the PIN security setting for the front screen It s possible to apply a preset that effectively locks out all further use of the front screen If this happens use the Admin panel to reset or disable the PIN see Set a PIN security code Recording and streaming states The channel configuration group includes recording and streaming stat...

Page 166: ...the resource instance that is still registered in Kaltura see Reassign a registered resource If you apply a configuration preset to set up a replacement Pearl Nano with the settings from a Pearl Nano that is currently registered with Kaltura the replacement Pearl Nano assumes the identity of the registered resource However you risk having two active Pearl Nano resources with the same identity whic...

Page 167: ...MS Include CMS settings for integrations i e Kaltura and Panopto Epiphan Cloud Epiphan Cloud pairing and encoder selection information Front screen Front screen PIN settings Output ports All configuration settings for the output ports The Factory default configuration preset and Factory reset Administrators can apply the default factory configuration preset to Pearl Nano which resets most of the s...

Page 168: ...uration preset to Pearl Nano you can l Apply a configuration preset using the Admin panel l Apply a configuration preset using the front screen menu A reboot is required to apply the factory default configuration preset To perform a factory reset see Perform a factory reset Operators who are assigned certain administrative level privileges can apply the Factory default configuration preset and per...

Page 169: ... presets that include network or system settings require a system reboot when applied Important considerations l Configuration preset file names should be unique and should not contain or symbols l If you try to save a configuration preset but one or more of the related image files is missing an error message is displayed You ll be unable to save the preset until the missing files are restored or ...

Page 170: ...computer and then import it to another Pearl Nano see Export and import configuration presets and you can Apply a configuration preset using the Admin panel Apply a configuration preset using the Admin panel When you apply a configuration preset the system settings for all included configuration groups are updated Other settings on the system are not affected For example if you apply a preset that...

Page 171: ...of the configuration preset name The term all means all groups are included Otherwise groups are listed individually You may apply multiple presets one after another If you apply two or more configuration presets that include a particular configuration group the settings for that group from the last applied preset are the active settings In short last in wins Apply a configuration preset using the...

Page 172: ...unresponsive for a short time while it applies these EDIDs to the video grabbers Apply a configuration preset using the front screen menu 1 Press the left arrow key repeatedly on the control key interface until the Menu screen displays 2 Use the arrow and check mark keys to select System Then from the System screen scroll down using the arrow key and select Configuration preset to open the Configu...

Page 173: ...he down arrow key to scroll down until Reboot appears Then select Reboot using the check mark key and select Reboot now when prompted Export and import configuration presets You can download configuration presets to your local computer then upload and apply the preset to another Pearl Nano system or save the configuration preset as a backup of your current configuration Either way it s a simple tw...

Page 174: ...the Configuration presets section click the Download button next to the configuration preset you want to export The configuration preset file with extension preset is saved to your admin workstation in your browser s download folder Import a configuration a preset using the Admin panel 1 Login to the Admin panel as admin see Connect to Admin panel 2 From the Configuration menu click Maintenance Th...

Page 175: ...tion preset using the Admin panel or Apply a configuration preset using the front screen menu Update a configuration preset To update a configuration preset and add or remove different configuration groups using the Admin panel you simply creating a new configuration preset with the same name so that it overwrites the existing one Update a configuration preset using the Admin panel 1 Login to the ...

Page 176: ...e the existing configuration preset with the new one Delete a configuration preset You can delete all configuration presets at once by doing a factory reset or you can delete individual configuration presets from the Maintenance page You cannot delete the Factory default configuration preset Delete a configuration preset using the Admin panel 1 Login to the Admin panel as admin see Connect to Admi...

Page 177: ...Guide Delete a configuration preset 2 From the Configuration menu select Maintenance The maintenance page opens 3 Click Delete beside the configuration preset that you want to delete and then click OK when prompted 164 ...

Page 178: ... the front panel LEDs on Pearl Nano see Front and back view of Pearl Nano Monitoring audio and VU sensitivity You can connect headphones to the 3 5 mm audio jack on the front panel of Pearl Nano and monitor audio for the channel To monitor audio for the channel make sure the Channel view is displaying on the front screen The audio you hear depends on the channel s custom layout That s because you ...

Page 179: ...BFS Green 18 dBFS and lower You can also monitor the audio VU meters for all audio inputs from the Audio inputs screen If you don t see the Audio inputs screen displayed on the front screen press the left arrow key on the control key interface to cycle through the different views Confidence monitoring using the front screen Have complete confidence about what you re capturing streaming and recordi...

Page 180: ... displayed using colored bars l RED 0 to 9 dBFS l Yellow 9 to 18 dBFS l Green 18 dBFS and lower If an error occurs while streaming or recording an error message appears in the header bar and the word Error replaces the related timer in the footer At the same time the Stream or Record control key on the front panel of Pearl Nano visibly flashes You can also monitor a specific video input from the f...

Page 181: ...o and VU sensitivity View system status using the front screen menu Find the serial number check the installed firmware version of your Pearl Nano and more on the System Status screen using the front screen and control key interface The System Status screen displays basic system information that s useful when first setting up your Pearl Nano If you don t see the System status screen displayed on t...

Page 182: ...rently loaded on Pearl Nano Uptime How long Pearl Nano has been powered on displayed as hh mm CPU load The current amount of CPU load SD card or SSD The amount of storage available SD card only displays if a SATA M 2 2280 SSD is not installed When an SSD is installed the field displays SSD instead of SD card USB storage Displays the amount of storage available on a USB storage device that is conne...

Page 183: ...ings for a channel View system information using the Admin panel 1 Login to the Admin panel as admin see Connect to Admin panel 2 From the Configuration menu click Info The system information page opens The Bitrate Actual bitrate values show the total of the video bitrate plus audio bitrate View network status Get useful status information about your Pearl Nano network connection from the Network ...

Page 184: ...u can see the 802 1x network connection status when you run the Connectivity status diagnostic using the Admin panel and from the front screen menu when you select System Network Connectivity Status The status can display as either passed failed or disabled If you attempt to connect to a network that isn t 802 1x enabled when 802 1x is configured on Pearl Nano a consistent 802 1x status failed sta...

Page 185: ...and uptime of encoder services l Stream information and URLs l Channel preview l Active network connections More encoder information can be found on the Info page from the Configuration menu see View system information using the Admin panel View the status information for a channel using the Admin panel 1 Login to the Admin panel as admin see Connect to Admin panel 3 From the Channels menu click a...

Page 186: ...s using the Admin panel View the video output port status using the Admin panel 1 Login to the Admin panel as admin see Connect to Admin panel 2 From the Output port menu click the output port HDMI The video output port configuration page opens Table 34 Possible video output status messages Message Description Disabled This video output port is disabled in the configuration Display is not connecte...

Page 187: ...ile transfer progress You can view basic Automatic File Upload AFU and file transfer information from the front screen menu or using the Admin panel The Admin panel displays a history of uploaded files which persists until either Pearl Nano is restarted or the list is manually cleared You can also cancel file uploads manually using the Admin panel For more information see Manage the AFU queue and ...

Page 188: ...er status using the front screen menu 1 Press the left arrow key repeatedly on the control key interface until the Menu screen displays 2 Use the arrow and check mark keys to select Storage Then from the Storage screen select File transfer to open the File transfer screen 175 ...

Page 189: ...ess b Use the arrow keys to highlight Copy to USB drive and press the check mark key to view the Copy to USB drive progress View scheduled CMS events and history Using the Admin panel select the Events menu to see up to 90 days of upcoming scheduled events and up to 90 days of ongoing and completed events for this Pearl Nano resource Click the page arrows at the bottom of each list to navigate thr...

Page 190: ...synchronization with Kaltura s scheduling server an error appears on the Events page when you refresh the schedule Configure the time settings on Pearl Nano to match the time and zone of Kaltura s scheduling server see Configure date and time When CMS is enabled on Pearl Nano an Events screen is added to the screens you can view on the front screen If you don t see the Events screen on the front s...

Page 191: ...w scheduled CMS events and history When an event is scheduled the Event screen updates with the event name and a countdown timer Five minutes before the scheduled event the event name and timer on the Events screen turn red 178 ...

Page 192: ...g and recording This section covers how to set up a channel and customize the layout so that you can capture stream and record exactly what you want how you want Whether that s a simple channel with a single video and audio source or multiple video and audio sources in a custom picture in picture layout Topics include l What is a channel l Channel layout examples l Channel configuration l Custom l...

Page 193: ... using the layout editor There are many creative ways to customize a channel in Pearl Nano Easily combine multiple video sources to the same layout for picture in picture or side by side layouts using the convenient custom layout editor You can add text overlays and effects like transparent logos and lower thirds Customize a channel with images company information corporate colors and time stamps ...

Page 194: ...editor add one video source to the layout and allow the channel to automatically use the current signal resolution Then add a text overlay to the layout and drag it where you want it to appear on screen One video source a slideshow presentation in this case with a green background matte To get this look Using the custom layout editor select a background color and add your video source to the layou...

Page 195: ...e manually set the channel s encoding frame size to 1920 1080 Then go to configuration page for the HDMI video input with the slideshow and set the Scaling value making sure you maintain the same aspect ratio i e 1360 738 Back on the layout editor add the logo to the layout and move it into position For the second video source use the Crop tool to crop the second source to a square aspect ratio an...

Page 196: ...as you connect your video source to the port it appears automatically in the auto channel s custom layout Changing the auto channel s frame rate or deleting the auto channel will change the frame rate used at the output port for that video input Deleting the auto channel forces the video output port to use the original frame rate of the video input source l If you delete the auto channel it will r...

Page 197: ...riority is used Priority Connector Type 1 HDMI with HDMI Audio SDI with SDI Audio The auto channel uses a source until that source no longer has a signal Then it switches to the next highest priority signal If all the connected sources lose signal at the same time i e for example is SDI loses video signal and no other video signal is found no change is made and the auto channel continues to use th...

Page 198: ...sing Pearl Nano with a Content Management System see About Panopto recording and webcasting Topics include l Configure an auto channel l Add video sources l Add an audio source to a layout l Rename a channel l Preview a channel l Add or remove channel metadata l Configure encoding l Codecs and file format compatibility l Configure video encoding l Configure audio encoding Configure an auto channel...

Page 199: ... channel For important information about changing the channel name see Rename a channel Add video sources You can add up to two video sources to the custom layout for your channel using the custom layout editor If more than one video source is added to a channel we recommend configuring the channel encoding to use a fixed resolution as the frame size instead of automatically using the resolution o...

Page 200: ...el and click Layouts The custom layout editor opens 3 Below the Layout editing area click Add new item and select Video Source The Source settings appear 4 Under Source settings select either a video input or a channel in the Source drop down menu 5 Under Source settings select a video input in the Source drop down menu The selected video source appears in the layout editing area 187 ...

Page 201: ... picture in picture or add other items like logos and images you can click and drag the video sources that appear in the item list beneath Add new item and change their order Items that are higher up the list appear over top items that are lower down the list However to scale a video source to appear smaller than the full frame size you must manually change the encoding of the video input and scal...

Page 202: ...fine grained size control Using percents Specify a whole number followed by a percent sign e g 4 in any of the manual positioning fields See Resize and position items using percents or pixels for more information Using pixels If you need to specify an exact amount in pixels rather than percent you can type a pixel value in any of the positioning value squares followed by the characters px e g 56px...

Page 203: ...ping on that layout Before going live always check the volume levels for the layout and adjust the volumes at audio sources to avoid clipping see Adjust audio gain and delay l If audio encoding is not configured for a channel no audio signal is processed or sent with the video content when recording streaming or confidence monitoring see Configure audio encoding l If an audio source is added to a ...

Page 204: ...ame field blank When you save Pearl Nano will automatically repopulate the name field with the default name You can include certain international characters in channel names Pearl Nano supports common character sets for Western and Central European languages Nordic languages and Russian Channel names should not include special characters slashes or spaces For a complete list see International char...

Page 205: ...he Status page Important considerations l Some web browsers disable auto playback of videos with audio In those cases the audio for the channel being previewed is muted by default l HTML5 does not support PCM audio encoding If PCM audio encoding is configured for a channel audio does not play in the preview link for the channel l PCM audio encoding at 48 kHz is not supported A live broadcast previ...

Page 206: ...e channel including stream information such as the bitrate frame size streaming and preview links as well as the state of the services on Pearl Nano This feature is not available using the local console on Pearl Nano 1 Login to the Admin panel as admin see Connect to Admin panel 2 From the Channel menu select the channel and click Status The Status page opens and a live preview snapshot appears be...

Page 207: ...lly from right to left across the bottom of the media player window Use only alphanumeric and diacritic characters in metadata descriptions The whole metadata string is refused if any special currency or mathematical symbol appears in the description You must remove the offending characters before Pearl Nano will accept the description Add or remove channel meta data using the Admin panel 1 Login ...

Page 208: ...y even provide better sound quality at a similar sample bitrate Supported sampling bitrate values are 16 22 44 and 48K kHz Setting the channel bitrate to match the audio source s bitrate provides the best sound quality and avoids audio resampling Most digital signals HDMI or SDI sources use 48 kHz Most digital signals HDMI or SDI sources use 48 kHz audio For analog signals 44 kHz provides a good q...

Page 209: ...signals 44 kHz provides a good quality audio sample The Flash FLV plugin must be installed for your web browser to play back audio that s encoded as PCM Web browsers that use Flash FLV do not support 48 kHz PCM audio Format compatibility Not all streaming and recording protocols support all combinations of video and audio codecs The following table lists any video audio codec compatibility conside...

Page 210: ...esolution l Key frame interval How often a key frame that contains all the pixels is sent when streaming The longer the key frame interval the smaller the video file size and vice versa l Limit frame rate You can limit the frame rate for the channel l Bitrate If using the H 264 video codec you can increase or decrease image quality by increasing or decreasing the channel s Bitrate value Video with...

Page 211: ...et Pearl Nano downscale the video For example if the input video signal resolution is 1920 1080 a 16 9 aspect ratio and the channel s frame size is set to 1280 720 Pearl Nano downscales the video and streams records the channel at the lower frame size using less bandwidth and producing smaller recorded files You can add black bars around your video source by adjusting the frame size For example if...

Page 212: ...overall system load affects the ability for the device to process pixels l available network bandwidth l the source and stream frame size resolution l the type of motion that is captured and l number of users accessing the stream When adjusting the frame rate you may need to try different values to achieve the best outcome Bitrate In general higher bitrates mean higher image quality but more bandw...

Page 213: ... option for standard definition broadcasts High This is the default Choose this option when video is viewed for broadcast and disk storage applications particularly for high definition television application such as Blu ray disk storage format and HDTV broadcast service 3 Configure the frame size do the following a Uncheck Use current signal resolution as the frame size Enabling Use current signal...

Page 214: ... high bitrate 6 Click Apply Configure audio encoding If your channel includes audio sources in any of the layouts then AAC 48 kHz is set as the default audio codec for the channel You can choose a different audio codec for a channel using the Admin panel The following table lists the supported audio codecs and bitrates Table 39 Supported Audio codecs and bitrates Value Description AAC The AAC defa...

Page 215: ... ll need to use a media player to preview your channel PCM Pulse Code Modulation PCM is a standard for digital audio in computer and other devices such as digital telephone systems Most digital signals HDMI or SDI sources use 48 kHz audio Matching the encoded level with the source level provides the best sound quality by avoiding audio resampling Flash FLV doesn t support 48 kHz PCM audio When sel...

Page 216: ... combined so that when you listen to the streamed or recorded audio the same blended sound comes through both the left and right channels If you have only one mono analog input use the left XLR RCA 1 jack and select mono encoding to have the same sound come from both the left and right channels If stereo sound is chosen the sound will only come through on the left channel 6 From the Audio bitrate ...

Page 217: ...ut editor for a channel l Configure a custom layout for a channel l Rename a layout l Set the background color l Add an image to a layout l Upload or remove an image using the Media page l Add a text overlay l Custom system variables for text overlays l Crop a video source About the custom layout editor The custom layout editor gives you full control of the size and position of images video source...

Page 218: ...g area The currently selected item is presented in full color Unselected items appear transparent To change the settings for an item click an item in the item list that appears below the layout editing area The settings for that item appears Move and size items in the layout editing area You can use the mouse to click and drag images and text overlays into position or you can type values into the ...

Page 219: ...g the mouse 2 Using the keyboard 3 Using the manual positioning values with percents 4 Using the manual positioning values with pixels To use the mouse Click and drag to move the item Click and drag the round red and white handles to resize an image for text overlays just use the padding settings Using this method you can make quick changes that are in increments of approximately 5 of the width or...

Page 220: ...o where you ll find the Save button If an Auto channel is selected as a video source then Auto A audio is selected by default You can have multiple audio sources in a layout The audio sources are mixed together at the same volume level as one another When setting the audio gain for your channel add all your audio sources to your layout first then set level of gain for your audio sources appropriat...

Page 221: ...values ensure the suffix is added to your value i e 20 When entering pixel values ensure the suffix px is added to your value i e 200px A layout item s total pixel dimensions are a reflection of your channel s frame size as configured in your encoding settings see Configure encoding Unchecked boxes are grayed out in color and are not directly editable but dynamically change their values to reflect...

Page 222: ...orizontal axis I e the item is displaced 20 or 200px to the right 3 If using percents this value is the item s percentage of total width on the layout s horizontal axis I e the item takes up 60 of the layout s width represented by a thin red bar above the percent box If using pixels this value is the item s width in pixels with a maximum pixel width i e frame size identified in your channel s enco...

Page 223: ... or number of pixels from the top downward on the layout s vertical axis I e the item is displaced 10 or 200px from the top down Resize layout items The easiest way to resize a layout item is to use the center adjustment boxes annotated as 3 and 6 in the image above on each of the horizontal and vertical axes to set your item s width and height respectively You can also use your mouse cursor to se...

Page 224: ...originally set the width of an item to 50 of the layout area or 960 pixels assuming your item has a maximum width of 1920 pixels in this example with no values entered in the left and right adjustment boxes i e the left and right boxes are deselected the item automatically centers itself in the layout area with the left and right percents at 25 each remember percents are used by default in the lay...

Page 225: ...ng the layout editor l You can reposition images and video sources by entering values into the left right and top bottom adjustment boxes identified as 2 4 and 5 7 respectively in the Adjustment boxes for item resizing and positioning table The values entered into these boxes represent a portion of the total percentage or pixels of the layout s width or height l Alternatively you can position your...

Page 226: ...ht adjustment box automatically sets itself to 0 to reflect that there is no more room remaining to maneuver the image along the horizontal axis any further Alternatively you could reposition the image in the exact same way by instead setting the right percent box to 0 Example 2 vertical positioning using pixels To position your layout item along the vertical axis enter a percent or pixel value in...

Page 227: ...r keyboard or any combination Here s an example of using pixels and percents to created a custom layout with two video sources and a background image The slideshow video source is scaled and the presenter s video source is cropped in this example Open the custom layout editor for a channel 1 Login to the Admin panel as admin see Connect to Admin panel 214 ...

Page 228: ...ngs like add multiple audio sources crop and reposition video sources that are scaled smaller than the channel s frame size For examples of how to get different channel layouts see Channel layout examples Configure a custom layout for a channel using the Admin panel 1 Login to the Admin panel as admin see Connect to Admin panel 2 From the Channel menu select a channel and click Layout The custom l...

Page 229: ...for a channel 3 Add another item to the layout like an image See Add an image to a layout for instructions to add an image to a layout 4 Click and drag the red and white handles on the corners of the image to re size it in the layout editor area 216 ...

Page 230: ... custom layout editor to resize video inputs on Pearl Nano Use the scaling option on the video inputs configuration page instead see Configure a video input source Rename a layout You can rename a layout using the custom layout editor You can include certain international characters in layout names Pearl Nano supports common character sets for Western and Central European languages Nordic language...

Page 231: ...used space in a layout using the custom layout editor For example you can add a color from your corporate color scheme Set a background color matte for a layout using the Admin panel s custom layout editor 1 Login to the Admin panel as admin see Connect to Admin panel 2 From the Channel menu select the channel and click Layout The custom layout editor opens 3 Click the drop down arrow next to the ...

Page 232: ...e is too large or if an image exists with the same name using drag and drop The file will be replaced with the new image you upload Any image without the proper file extension appears in the layout editor but doesn t display in the actual video output For instance a PNG image with the file extension bmp or an invalid file extension such as png2 are examples of improper file extensions If your uplo...

Page 233: ...5 Your picture appears in the Picture settings preview and is added to the layout area 6 In the layout area use the mouse the keyboard or the manual position value fields to position and resize your image For background images click and drag to fill the full layout area For more details see About the custom layout editor 220 ...

Page 234: ...d new item and change their order Items that are higher up the list appear over top items that are lower down the list 8 Click Save Upload or remove an image using the Media page You can customize a channel by adding pictures as backgrounds overlays or transparent overlays Image files formats supported include PNG and JPEG The maximum supported image size is 4096 2160 No warning or error message i...

Page 235: ...include special characters slashes or spaces l Uploading an image of the same name overwrites the existing image l Any image without the proper file extension appears in the layout editor but doesn t display in the actual video output For instance a PNG image with the file extension bmp or an invalid file extension such as png2 are examples of improper file extensions Upload or remove an image usi...

Page 236: ...te and time in to layouts in your channel You can add text to any layout using the custom layout editor The following tables lists shortcut codes that you can enter and the resulting content that appears on screen Table 41 Overlay text shortcut codes Item Shortcut code Example date format yyyy mm dd F 2019 01 26 date format mm dd yy D 01 26 19 year G 2019 month 01 m 01 month Jan b Jan month Januar...

Page 237: ...racters in text overlays Pearl Nano supports common character sets for Western and Central European languages Nordic languages and Russian For a complete list see International character support Add a text overlay using the custom layout editor 1 Login to the Admin panel as admin see Connect to Admin panel 2 From the Channel menu select the channel and click Layout The custom layout editor opens 3...

Page 238: ... appear behind 4 In the Text field type what you want to appear in the text overlay Include Overlay text shortcut codes as needed Press Tab or click outside the text field to refresh the preview in the custom layout editor For example if you enter A B d G Live streaming channel Auto A The resulting text is displayed 5 Select the Font Font size and Text color You can also change the default Line sp...

Page 239: ...text box To resize the text box use the padding fields to add space above below and on either side of the text 7 In the layout editing area click and drag to move the overlay text box or enter values in the manual position value fields along the side and bottom of the layout area 8 Click Save Custom system variables for text overlays Using HTTP or RS 232 APIs you can create your own custom system ...

Page 240: ...sure the number of characters doesn t change The RS 232 SET command syntax in this case is VAR SET name value for example VAR SET gpsvar1 N103 68201 W765 29712 where name is gpsvar1 and value is N103 68201 W765 29712 There are no limits for the frequency of system variable commands using RS 232 However only one command can be issued at a time HTTP system variable commands are issued at a frequency...

Page 241: ...d can help to conserve the overall amount of processing CPU usage for your Pearl Nano Crop a source using the Admin panel s custom layout editor 1 Login to the Admin panel as admin see Connect to Admin panel 2 From the Channel menu select the channel and click Layout The custom layout editor opens 3 Select a video source from the items list The Source settings appears 4 Click Crop Your video sourc...

Page 242: ...ve selected an aspect ratio you can alter the size by dragging the red handles When you have selected a size you can change its position by dragging the box l The number boxes allow you to make precise crops Click the text boxes and enter a number to determine how many pixels of distance from the edge that line is drawn You can also erase the px after the number and type in to manipulate the box u...

Page 243: ...size and position without changing its shape 6 Click OK to close the crop window 7 Click Save You can also manipulate the crop box using keyboard controls You can move the crop box using the arrow keys and holding Ctrl or Shift while resizing the box keeps the aspect ratio of the box constant Hold Shift and use the arrow keys to move one side of the box while leaving the other in the same location...

Page 244: ...an imported image in Pearl Nano and even another Pearl Nano device Topics include l About connecting video and audio sources l Tested RTSP based IP cameras l Connect an RTSP source l Connect an SRT stream as an input l Preview a video source using the Admin Panel l Rename an input port l Configure a video input source l Add a custom No Signal image For instructions to configure an audio input and ...

Page 245: ...ources coming from the Ethernet network such as SRT and RTSP need to be added manually to appear in the Inputs menu When a network source is added as an input a corresponding audio source is automatically added to the list of audio sources for your channels even if there is no audio See Add an audio source to a layout When a video source is connected the system automatically detects and adjusts th...

Page 246: ...compatible with all Ethernet based IP cameras and other RTSP sources The cameras listed in the following table represent a sample of common third party cameras that have been tested to work with Pearl Nano Information such as URL syntax default credentials and audio streaming capability specific to each camera is included The URL syntax refers to the additional piece of text that needs to be inclu...

Page 247: ...n During testing the Panasonic AW HE40 did not consistently synchronize its time with Pearl Nano Connect an RTSP source You can connect a single RTSP source such as an IP camera or another Pearl Nano system to your Pearl Nano over a network using the Admin panel For a list of tested cameras and their URL syntax see Tested RTSP based IP cameras RTSP video encoding is supported with H 264 video code...

Page 248: ...tamps of an RTSP source and Pearl Nano tend to gradually go out of sync If there s a 2500 3000 ms difference between the timestamp of your RTSP source and Pearl Nano a no signal image displays and your RTSP source won t stream audio Re connect your RTSP source to reset any time synchronization issues Connect an RTSP source using the Admin panel 1 Login to the Admin panel as admin see Connect to Ad...

Page 249: ...a custom No Signal image 6 Click Apply to save your settings and connect your RTSP source After your RTSP source is connected you can view basic video and audio signal information and packet loss statistics for the source under the Status header at the top of the page Any warnings or errors associated with your RTSP stream are also displayed on this page 236 ...

Page 250: ...ransport SRT is a low latency protocol used to stream over the Internet to SRT destinations decoders such as CDNs and other SRT decoders such as a Pearl Nano You can configure Pearl Nano as an SRT destination decoder and ingest an SRT stream as a video input that you can add to the custom layout for recording and streaming Up to one of the video inputs you configure for Pearl Nano can be from an S...

Page 251: ...ezvous mode see Set up an SRT stream using rendezvous mode l For caller listener modes you must know which mode the SRT source uses and configure the SRT input on Pearl Nano to use the corresponding mode For example if the SRT source is in caller mode then the input must be in listener mode For an example SRT stream using caller listener modes see Set up an SRT stream using caller and listener mod...

Page 252: ...e encoder ip address and port could be another Pearl Nano device sending an SRT stream ii Optional In the Source port field enter the port number for this device to use for SRT traffic b If Listener mode is selected enter the Port number for this device to use for SRT traffic See Network ports used by Pearl Nano to determine available ports c If Rendezvous mode is selected enter the URL of the SRT...

Page 253: ...nter that here 6 Click Apply We recommend using the default latency value for an initial test stream After you perform a test stream you can determine the Quality of Service QoS and calculate the latency requirements To set the SRT stream latency see Adjust latency and view the SRT stream status Preview a video source using the Admin Panel You can preview the images captured from your video source...

Page 254: ...ce the channel name will update automatically to match Sometimes it s helpful to configure the input port name to match the data it s capturing so that it s clear what the channel is capturing Alternately you can change the channel s name see Rename a channel You can include certain international characters for video and audio input port names Pearl Nano supports common character sets for Western ...

Page 255: ...d video sources don t usually need configuration but you can change some of the video settings using the Admin panel including l HDMI and DVI video settings l SDI video settings For details to configure networked video sources on your Pearl Nano like RTSP and SRT see l Connect an RTSP source l Connect an SRT stream as an input Open the configuration page for an input source using the Admin panel 1...

Page 256: ...n Scaling Use this setting to scale the video input source This is useful when adding multiple video sources in a custom layout such as picture in picture or side by side The frame size selected for the video source is also what gets sent out the HDMI OUT port when you select the video input as the output source Image This menu allows you to choose a custom no signal image for the channel 243 ...

Page 257: ... the signal disappears SDI video settings The following options are available for signals via the SDI port Value Description Scaling Use this setting to scale the video input source This is useful when adding multiple video sources in a custom layout such as picture in picture or side by side The frame size selected for the video source is what gets sent out the HDMI OUT port Image This menu allow...

Page 258: ...gs in early or if you are experiencing delays you could indicate the start time or expected resolution time using the no signal image Before you can specify a custom No Signal image for an input port on Pearl Nano you must upload it see Upload or remove an image using the Media page Set the no signal image for an input port using the Admin panel 1 Login to the Admin panel as admin see Connect to A...

Page 259: ...l Nano User Guide Add a custom No Signal image 6 Test that the No Signal image is correctly applied by disconnecting your source and previewing the channel s containing said source see Preview a channel 246 ...

Page 260: ...ng options include unicast multicast SRT HLS MPEG DASH RTMP SAP UPnP and more Topics include l What is streaming l Viewing a channel s live broadcast stream l Directly sharing channel stream URLs with viewers l Suggested stream settings l Streaming a channel direct to viewers l Streaming to servers CDNs and other devices l Streaming to a media player or smart TV For instructions on how to use Pear...

Page 261: ...live over a local TCP based network or streaming to a CDN over the Internet how much bandwidth do you have available and is live streaming security a concern Pearl Nano can stream to a CDN or media server using any of the following streaming protocols l SRT push l HLS push l MPEG DASH push l RTMP RTMPS push l RTSP A channel can support multiple streams That means you can stream a channel to multip...

Page 262: ...oser the server is to the user the faster the content is delivered Streaming your content through a CDN allows you to stream any time anywhere regardless of the viewing device and you don t have to worry about maintaining your own video streaming servers on site Streaming content to a multicast IP address is different than streaming to a CDN Multicasting lets you directly share the stream with mul...

Page 263: ...etwork equipment that supports multicasting and is usually used on high bandwidth corporate LANs and not on Internet based architectures Multicasting is what s typically used to stream video and audio to an IP TV or set top box playlist If you re streaming over a Gigabit Ethernet network to a 10 100 Mbps set top box that is dropping frames you can limit the stream s bandwidth see Set up traffic sh...

Page 264: ... is streamed by sending your content to Epiphan s CDN For a list of Epiphan s preferred CDN providers see https www epiphan com partners cdn partners Streaming to multiple destinations Pearl Nano supports streaming to multiple destinations A stream uses the channel s encoding settings Therefore all streams you create for the channel have the same encoding settings Directly sharing channel stream U...

Page 265: ...t connections using User Datagram Protocol UDP transport and additional error checking Low latency SRT is particularly good for real time two way communications between a remote guest and a local on site host You can configure Pearl Nano as an SRT source encoder and stream video using SRT You can also configure Pearl Nano as an SRT decoder and ingest SRT streams as video inputs Up to one of the vi...

Page 266: ...r and Listener l Rendezvous mode is the easiest to setup and usually doesn t need any intervention from your IT administrator for the SRT stream from the source to traverse the firewall to the destination The SRT source and destination devices must use the same SRT port value see Set up an SRT stream using rendezvous mode l Caller and Listener modes work together to establish the SRT connection be...

Page 267: ...ee Set AES encryption and a passphrase for SRT Secure streaming Secure streaming is a great option for confidential content such as corporate meetings or internal employee training There are several ways to secure your live stream with Pearl Nano l Stream to a CDN or media server over the Internet using Secure Reliable Transport SRT l Stream to a CDN or media server over the Internet using Real Ti...

Page 268: ...ate without any noticeable image degradation The following table provides suggested settings to maximize your video quality while minimizing system resource usage when streaming video content from your Pearl Nano Table 44 Suggested stream settings for video Option Setting Codec H 264 Video encoding preset Hardware accelerated Video encoding profile High Key frame interval 2 sec1 Limit frame rate 3...

Page 269: ...5 Suggested stream settings for slides Option Setting Codec H 264 Video encoding preset Hardware accelerated Video encoding profile High Key frame interval 2 sec Limit frame rate 30 Bitrate 1000 kbps for HD 2000 kbps for Full HD Audio format AAC 44 KHz 256 ...

Page 270: ...g their media player Use these direct streaming methods for only a small number of viewers because each viewer uses the full stream bandwidth and consumes resources on Pearl Nano For more information about using an HTTP stream see Share a live broadcast stream HTTP HTTPS or RTSP RTSP Viewers can copy and paste the URL of the RTSP stream into a media player and watch the stream on the local network...

Page 271: ... the viewer s LAN for them to access and view the stream using serial discovery If HTTPS is configured for Pearl Nano the live broadcast URL will start with https instead of http If Pearl Nano is behind a firewall and you want to share a stream with remote viewers you need to set up port forwarding on your network Consult with your network administrator Table 47 URL options Access Method URL Forma...

Page 272: ...s UDP which is a connectionless transport protocol that does minimal error checking for less delay when transporting packets UDP is suitable for use with stable low loss networks l RTSP TCP Uses TCP as the transport protocol Use TCP if you re network connection is lossy and would benefit from the error checking and packet loss retransmission that TCP performs Retrieve the stream URL for your viewe...

Page 273: ... from port 80 is redirected to HTTPS port 443 HTTP Live Stream HLS supports the H 264 codec and MP3 or AAC audio encoding Audio and video are sent as a series of small files called media segment files You can set the segment duration as well as define the playlist size using the Admin panel By default the segment duration is 9 seconds and the playlist size is 3 When live broadcasting a channel usi...

Page 274: ...DAP authentication as configured on Pearl Nano A viewer password or LDAP authentication that is configured on Pearl Nano is still needed to access the HLS stream s playlist Try enabling this option if your viewer is unable to access the HLS stream when a viewer password or LDAP authentication is configured on Pearl Nano 6 Click Apply 7 To share the HLS pull URL with viewers click Status from the C...

Page 275: ... pass global autentication using LDAP credentials or the viewer global password if there is one and must meet the local channel settings come from an allowed IP address See Configure LDAP user authentication for more information on LDAP configuration Restrict viewers for a channel using the Admin panel 1 Login to the Admin panel as admin see Connect to Admin panel 3 From the Channel menu select th...

Page 276: ...e global settings and remove all access control for a channel by selecting Use these settings and leaving all the fields blank 6 Optional Enter the allow and deny IP addresses for viewers of this channel See Restrict viewers by IP address for details about allow and deny lists 7 Click Apply Restrict viewers by IP address Pearl Nano permits you to restrict which computers can access broadcasts by b...

Page 277: ...pply the user name viewer and password before they can view the broadcast To restrict access by IP address you need to know the IP addresses or range of addresses for your viewers By default all IP addresses are allowed to connect to the broadcast If a user attempts to connect to the stream from a disallowed IP address access is denied If there s an attempt to connect using a web browser the messa...

Page 278: ...68 1 51 and 192 165 1 75 respectively can connect to the broadcast construct the following allow list Allow 192 168 1 50 192 168 1 51 192 168 1 75 Allow list with a range of IP addresses Sometimes you ll want a range of computer IP addresses to connect to your system This may happen when you have one range of IP addresses assigned to desktop computers i e in the range 192 168 1 1 to 192 168 1 100 ...

Page 279: ... boardroom computers 192 168 1 200 192 168 1 250 to access the broadcast with the exception of the public boardroom computer 192 168 1 211 Use both allow and deny lists to create the rule as follows Allow 192 168 1 200 192 168 1 250 192 168 1 50 192 168 1 51 192 168 1 75 Deny 192 168 1 211 Both lists can have multiple ranges and multiple distinct IP addresses provided they are separated by commas ...

Page 280: ...ers in the local subnet then deny specific sub ranges including two groups of boardroom computers ensuring the cafeteria computer s IP address is not in the deny list Allow 192 168 1 1 192 168 1 250 Deny 192 168 1 200 192 168 1 221 192 168 1 223 192 168 1 250 192 168 1 50 192 168 1 51 192 168 1 75 Change HTTP and RTSP streaming port values You can use the Admin panel to configure a specific stream...

Page 281: ...t be higher than 500 for HTTP In the case of RTSP streaming this value is ignored 4 Set the RTSP Streaming port to specify which port to use when you are streaming live video via RTSP This value along with the URL is used by viewers to access the broadcast The default for channel one is 554 5 Click Apply Disable and enable direct channel streaming The channel streaming URLs are enabled by default ...

Page 282: ...disable all viewer formats including HTTP HTTPS RTSP HLS and UPnP Disable or enable the channel streaming URLs using the Admin panel 1 Login to the Admin panel as admin see Connect to Admin panel 2 From the Channel menu select a channel and click Streaming The streaming page opens 3 Beneath Streams for viewers uncheck Enabled to disable direct streaming of channels to viewers using the channel s s...

Page 283: ...r passwords To stream video outside your LAN using the channel s live broadcast streams you must configure port forwarding on your router Consult with your Network Administrator The live broadcast stream URLs for a channel are available from the Channel menu in the Admin panel when you select Status The audio and video codecs configured for the channel affect which live broadcast formats are liste...

Page 284: ...sing a web browser You can share a channel s live broadcast URL with viewers so they can watch your live stream using their favorite web browser Your viewers must be on the same network as Pearl Nano to watch a live broadcast using the channel s live broadcast URL If the channel you re streaming is configured with 48 kHz audio some web browsers may not work In this case we recommend viewing the ch...

Page 285: ... HTTPS is enabled on Pearl Nano replace http with https in the URL of the stream Share the live broadcast URL with viewers 1 Login to the Admin panel as admin or operator see Connect to Admin panel 2 From the Channel menu select the channel and click Status You can copy the Live broadcast URL and share that with your viewers 3 Alternatively open the Info page to get the live broadcast URL From the...

Page 286: ...wers so they can watch your live stream using their favorite media player like VLC Your viewers must be on the same network as Pearl Nano to watch a channel stream using a stream URL The different stream types available for channels include RTSP MPEG TS and Flash streams see Viewing a channel s live broadcast stream The URL contains either the IP address of Pearl Nano or the serial number see The ...

Page 287: ...panel 2 From the Channel menu select the channel and click Status You can copy the Live broadcast URL and share that with your viewers View the channel s stream URL using a VLC 1 Launch a media player 2 Click the Media tab and select Open Network Stream from the drop down menu 3 Enter the stream URL In this example the serial number method is shown rtsp local 554 stream sdp 274 ...

Page 288: ...Pearl Nano User Guide View the streaming URL using a media player 4 Press Play to watch the stream in the media player window 275 ...

Page 289: ...ils to configure multicast streaming see Multicast streaming Streaming a channel to CDNs and multicast streaming is available only when the H 264 codec is configured as the channel encoding see Configure video encoding Set up an RTMP or RTMPS push stream Real Time Messaging Protocol RTMP is this the most common way to stream to a CDN including to Facebook Live and YouTube Use Real Time Messaging P...

Page 290: ...5 Enter the URL of the ingestion point provided by the CDN or media server l For RTMP push enter rtmp followed by the rest of the URL for example rtmp server ip address port etc l For RTMPS enter rtmps followed by the rest of the URL for example rtmps server ip address port etc 6 Enter the Stream name which also is called a stream key by some CDNs 7 Optional Enter a User name and Password The CDN ...

Page 291: ...and destination devices is to use rendezvous mode In rendezvous mode both the SRT source and destination device are ready to establish the SRT connection as soon as an SRT stream starts Typically no intervention is needed from your IT administrator to traverse a firewall in rendezvous mode However you can switch to SRT caller and listener modes if you experience difficulties streaming through a fi...

Page 292: ...o All traffic received at Firewall B that s addressed to 168 112 1 1 on port 20000 passes through the firewall directly to Destination B 203 0 113 10 because of the port number What s needed for this setup l The public IP address of Source A e g 198 51 100 20 and the public IP address of Destination B e g 168 0 113 10 l The SRT streaming port that Source A is configured to use e g port 20000 279 ...

Page 293: ...is dedicated for the exchange of SRT control and recovery packets between the source and destination Ensure that the total SRT stream bitrate i e the bandwidth required for the stream plus the recovery bandwidth overhead is less than the network bandwidth you have available Set up Pearl Nano as a streaming source in rendezvous mode using the Admin panel 1 Login to the Admin panel as admin see Conn...

Page 294: ...itial test stream After you perform a test stream you can determine the Quality of Service QoS and calculate the latency requirements To set the SRT stream latency see Adjust latency and view the SRT stream status 10 Optional In the Recovery bandwidth overhead field adjust the value of the bandwidth that s dedicate for SRT control and recovery packets The default value is 25 11 Optional Rename the...

Page 295: ...ure that one device is a Listener and the other is a caller The device you set as the caller or listener is arbitrary If the destination device is set as the listener and is ingesting multiple SRT sources then all your SRT source devices must be set as callers In the following example a Pearl Nano is setup as SRT Source A 192 168 1 10 and another Pearl Nano is setup as SRT Destination B 203 0 113 ...

Page 296: ...t value that was configured on SRT Destination B using the Admin panel when the SRT stream was added as a video input source using the Admin panel e g port 3000 l The public IP address of the firewall An easy way to get the public IP address is to use a web browser and do a Google search for What is my IP address e g 168 112 1 1 l The IT administrator in charge of the firewall must open a port for...

Page 297: ...urce and destination Ensure that the total SRT stream bitrate i e the bandwidth required for the stream plus the recovery bandwidth overhead is less than the network bandwidth you have available Set up Pearl Nano as a streaming source in caller listener mode using the Admin panel 1 Login to the Admin panel as admin see Connect to Admin panel 2 From the Channel menu select the channel and click Str...

Page 298: ...if the SRT destination requires AES encryption These settings must match the encryption settings of the destination device see Set AES encryption and a passphrase for SRT 8 Optional If the SRT destination has a required security Passphrase along with the AES encryption you can enter that here 9 Optional In the Latency field adjust the amount of latency to apply to the stream The default value is 1...

Page 299: ...nel you can adjust the latency to improve the Quality of Service QoS of the stream and reduce the number of dropped packets During the SRT stream you can view the stream statistics using the Admin panel and adjust the amount of latency based on the packet loss and Round Trip Time RTT SRT stream statistics are provided on the streaming configuration page for a channel when Pearl Nano is configured ...

Page 300: ...all for SRT to be effective and a value above 20 indicates a network with 100 packet loss Ensure the measured buffer is less than or equal to the latency value you use Table 51 Suggested SRT latency values Packet loss RTT mul tiplier Recovery bandwidth overhead Minimum SRT latency for RTT 20 ms is 1 3 33 60 is 3 4 25 80 is 7 5 20 100 is 10 6 17 120 These values are from the SRT Deployment Guide Fo...

Page 301: ...s 4 Click Apply We recommend testing your settings Start the SRT stream and use the stream statistics to evaluate the effect the latency and recovery bandwidth overhead values have on the packet loss of the stream Set AES encryption and a passphrase for SRT You can configure your Secure Reliable Transport SRT streams to use 128 bits 192 bits or 256 bits AES encryption using the Admin panel You can...

Page 302: ...nel menu select the channel with the SRT stream to configure and click Streaming The Streaming configuration page opens 3 Click the arrowhead beside the SRT stream name to reveal the stream settings In this example the name of the SRT stream is Stream 1 4 Check Encryption and choose the Key length 5 In the Passphrase field enter the passphrase using alphanumeric characters if required 6 Click Appl...

Page 303: ...protocol that sends video and audio content over the network in small media segments that get reassembled at the streaming destination Media segments stream over HTTP port 80 or port 443 for HTTPS which are typically open for network access As such the content can easily traverse firewalls with little to no IT involvement Pearl Nano can send a single resolution and bitrate HLS stream as an HTTP PO...

Page 304: ...security and authentication credentials are required to stream to the ingestion server consult the ingestion server provider Important considerations l Only a single resolution and bitrate stream is supported l Set H 264 as the video encoding for the channel that s streaming l Fragmented MP4 is not supported l If the HLS ingestion server requires a custom user agent name add that to the HLS stream...

Page 305: ...estion server provider 7 In the Method field select POST or PUT This selection must match the requirements of the ingestion server 8 In the Segment duration field enter the length of the media segment in seconds The default duration is six seconds Fractions and periods are not supported 9 In the Playlist size field enter the number of ts segment files in each segment The default playlist size is s...

Page 306: ...els on Pearl Nano must be configured for H 264 and AAC audio codec to stream using MPEG DASH Pearl Nano supports MD5 SHA 256 and SHA 512 hashing algorithms to authenticate the stream MPEG DASH uses an MPEG2 TS transport stream container with a configurable media segment duration as well as a configurable DASH list size for reassembling the media segments at the ingestion server Because MPEG DASH f...

Page 307: ...ion server provider for what value to use Media segment template Use this field to specify the name of the media segment file that Pearl Nano sends to the ingestion server Check with the ingestion server provider for what value to use DASH MPD upload period Set the duration as an integer in seconds The acceptable range is from 1 to 999 seconds The default value is 60 seconds Fractions and periods ...

Page 308: ...ream 1 To see the settings click the stream name 4 In the URL field enter the URL of the destination server that is ingesting the stream For example http p ep721023 i akamaientrypoin net 722223 hlsQualification my_video m3u8 5 Optional Enter a Username and Password if required for this stream Get this from the ingestion server provider 6 In the Method field select POST or PUT This selection must m...

Page 309: ...he stream The initialization template also provides the bitrate resolution and codec e In the Media segment template field enter the naming format used for the names of media segments For example chunk Number 05d ts f Enter the DASH MPD upload period as an integer in seconds The default is 60 seconds 10 Click Apply 11 When you re ready to start streaming this channel click Start Set up an RTSP ann...

Page 310: ...he CDN or media server l Select the Transport type as either UDP or TCP Consult your CDN provider to find out which transport protocols the CDN supports l The CDN User name and Password if required The CDN provider assigns a user name and password to authenticate the publisher Contact the CDN provider for your log in credentials 7 Click Apply 8 To start streaming click Start or click Start all to ...

Page 311: ...a stream using an XML profile from the CDN 1 Login to the Admin panel as admin see Connect to Admin panel 2 From the Channel menu select the channel and click Streaming The Streaming configuration page opens 3 Click New stream and select Use profile XML 4 Select the XML file that was provided by your CDN provider then click OK The new stream is created using the default name Stream 1 and the confi...

Page 312: ...p streaming to a CDN After your stream to a CDN is configured on the channel you can start and stop streaming using the Admin panel the front screen control key interface or the front screen menu When you use the front screen menu you can also modify the URL of a chosen stream Start and stop streaming using the Admin panel 1 Login to the Admin panel as admin see Connect to Admin panel 2 From the C...

Page 313: ...eams that are configured for the channel 4 Click Stop at the top right corner to stop that stream or click Stop all at the top of the page to stop streaming for all streams that are configured for the channel Start and stop streaming using the front screen menu 1 Press the left arrow key repeatedly on the control key interface until the Menu screen displays 2 Use the arrow and check mark keys to s...

Page 314: ...rk key and modify the stream destination s URL Start and stop streaming using the Stream control key on the front panel Simply press the Stream control key on Pearl Nano s front panel to easily start and stop streaming a channel The Stream control key glows solid blue and the streaming timer on the Channel view increments while streaming is in progress When you re done press the Record control key...

Page 315: ...Pearl Nano User Guide Start and stop streaming to a CDN 302 ...

Page 316: ...al signs smart TVs and other digital media players over a local network using UPnP see Stream using UPnP MPEG TS streams using RTP UDP push When you configure an MPEG TS stream using RTP UDP push you have the option to enable SAP and multicast over a local network at the same time Before configuring your channel for MPEG TS streaming ensure the following codecs are configured l Video H 264 l Audio...

Page 317: ... over a local network When this is enabled and a multicast IP address is configured your stream is displayed in the playlist of the local media player b Enter a multicast IP address in the SAP announcement IP field If your media player is configured to receive multicast streams from an IP address that is different from the default address 224 2 127 254 you may need to contact your system administr...

Page 318: ... configuration in the figure shown above rtp 226 10 24 32 7000 To view the stream when SAP announce has been set and the stream is advertised on a media player set top box or Smart TV refer to Viewing with Session Announcement Protocol SAP MPEG TS streams using UDP push When you configure an MPEG TS stream using UDP push you have the option to enable SAP and multicast over a local network at the s...

Page 319: ...ck SAP announcement to enable advertising your stream over a local network When this is enabled and a multicast IP address is configured your stream is displayed in the playlist of the local media player b Enter a multicast IP address in the SAP announcement IP field If your media player is configured to receive multicast streams from an IP address that is different from the default address 224 2 ...

Page 320: ...32 7000 To view the stream when SAP announce has been set and the stream is advertised from a media player set top box or Smart TV refer to Viewing with Session Announcement Protocol SAP If you re streaming to 10 100 Mbps set top boxes over Gigabit Ethernet and you notice frames are dropping you can limit the bandwidth of the stream see Set up traffic shaping Multicast streaming using RTP UDP You ...

Page 321: ...audio and video ports must be 2 6 Click Apply An SDP file is generated 7 From the channel s Status page click the SDP file to download it Provide the SDP file name and location if prompted 8 Share the file with your viewers and when you re ready to start streaming select Start Set up traffic shaping If you re multicasting to set top boxes that have 10 100 Mbps interfaces on the same Gigabit Ethern...

Page 322: ...he minimum value we recommend for the bandwidth limit bitrate is 14 Mbps Important considerations l Traffic shaping works for the local switch Switches connected to the local switch don t respect the policy l If the channel encoding bitrate is set to a value that s less than 4 Mbps and traffic shaping is enabled the minimum bandwidth limit does not drop below than 4 Mbps l If the channel encoding ...

Page 323: ...5 Check Limit bandwidth The default bitrate is set to auto 6 Optional Set the Limit bandwidth rate and enter a bitrate value from 4 000 kbps to 95 000 kbps 7 Click Apply Viewing with Session Announcement Protocol SAP When SAP Announce is configured for a stream that uses UDP streaming the stream is advertised over the local network Local viewers can view the stream using a software or hardware med...

Page 324: ... advertised in the media player s playlist 2 Ensure the SAP announcement IP is a multicast IP address Some media players for example Exterity receivers listen for SAP announcements on a specific multicast address 239 255 255 255 If your audience is using Exterity to view your stream you must change the SAP announcement IP address to 239 255 255 255 3 Launch a media player and play the streams a Us...

Page 325: ...Pearl Nano User Guide Viewing with Session Announcement Protocol SAP 312 ...

Page 326: ...ast SDP file session description file directly see Viewing with Session Announcement Protocol SAP To stream video outside of your LAN use a CDN or configure port forwarding on your router Refer to your Network Administrator Network configuration is beyond the scope of this guide Stream using UPnP Using the Universal Plug and Play UPnP networking protocol Pearl Nano can be discovered and can stream...

Page 327: ...at the device level including setting a share name l Enable UPnP for the channel Streams and MPEG TS recorded files must use the supported codecs H 264 with MP3 or AAC audio Having a viewer password could prevent the ability to use UPnP Enable UPnP for the device using the Admin panel 1 Login to the Admin panel as admin see Connect to Admin panel 3 From the Configuration menu click UPnP The UPnP c...

Page 328: ...e streamed Enable UPnP for a channel using the Admin panel After you enable UPnP for the device to allow live stream and recorded file sharing you need to enable sharing for the channel 1 For a channel you are live streaming do the following a From the Channel menu select the channel and click Streaming The Streaming configuration page opens b Check Share via UPnP and click Apply You can now brows...

Page 329: ...ix it click here The UPnP service will start when you click Apply 2 For a channel you are recording do the following a From the Channel menu select the channel and click Recording The channel s recording page opens b Under Recorder Setup select change The recording setup options opens c Check Share via UPnP and click Apply You can now browse for your server from your digital media player 316 ...

Page 330: ... sharing for security You can disable UPnP access for a channel s live stream recordings or for the whole system Disable UPnP for a channel using the Admin panel 1 For the channel s live streams do the following a From the Channel menu select the channel and click Streaming The Streaming configuration page opens b Uncheck Share via UPnP and click Apply 2 For the channel s recordings do the followi...

Page 331: ...h Universal Plug and Play UPnP UPnP uses MPEG TS over HTTP with the H 264 codec and MP3 or AAC audio encoding or no audio You can only access live streams or recordings that meet these requirements For security reasons UPnP access to live streams and recorded files is disabled by default To enable UPnP see Enable UPnP Some players cannot access the stream or saved recordings if a viewer password i...

Page 332: ...m which they were recorded Windows Media Player shows the recorder files side by side with the channels and other digital media players show the recorded files in a file tree format see below For information on how to stream UPnP see Stream using UPnP Change UPnP device name You can configure the UPnP server name that appears for your Pearl Nano By default if you leave the server name field blank ...

Page 333: ...SD card and SATA M 2 2280 SSD storage Topics include l About recording l Record a channel l Configure recording settings file size and type l Restart recording to a new file l Manage recorded files l Automatic file transfers For instructions on how to use Pearl Nano s front screen to start stop scheduled recordings for a CMS event see Stop start scheduled CMS events using the front screen menu For...

Page 334: ...s interrupted while Pearl Nano is actively recording the recorded file could become corrupted and be unplayable You can set the maximum recording time or file size limit using the Admin panel The default recording limits are set to 30 minutes or 500 MB whichever comes first When the time or file size limit is reached the current recording is saved and a new recording file starts automatically with...

Page 335: ...o available space left in the SD card or M 2 SSD new recordings fail and do not overwrite recordings in the AFU queue l The SD card is formatted for Ubuntu systems and is not compatible with Windows and Mac devices To download recordings see Manage recorded files l We recommend using large capacity SD cards such as 256 GB or a large capacity M 2 SSD when using Pearl Nano with a CMS Do not schedule...

Page 336: ...by Pearl Nano we recommend using a newer media player Record a channel Using the Admin panel you can start and stop recording a channel as well as configure recording settings for the channel You can also start and stop recording using the Record control key on the front panel of Pearl Nano or another interface like Epiphan Cloud In the Admin panel the channel number turns red to indicate it s rec...

Page 337: ...not active there are no active sources for the channel Check your inputs to ensure signals are working as expected Start and stop recording using the Record control key on the front panel Simply press the Record control key on Pearl Nano s front panel to easily start and stop recording a channel The Record control key glows solid red and the recording timer on the Channel view increments while rec...

Page 338: ...ace until the Menu screen displays 2 Use the arrow and check mark keys to select Channel Then from the Channel screen select Recording to open the Recording screen 3 From the Recording screen use the arrow keys to highlight Start and press the check mark key start recording When you re done highlight Stop and press the check mark key to stop recording 325 ...

Page 339: ...en swap in a smaller SD card you must change the file size limit to a smaller size using the Admin panel if the file size limit is bigger than the SD card l Recording with a file size limit that exceeds the size of the SD card will corrupt the SD card l Newer recordings overwrite oldest recordings when the amount of free space on the SD card is less than the configured recording file size limit l ...

Page 340: ...l the difference between MP4 files and MP4 Fragmented files from the file name because both use the mp4 extension l MPEG TS Choose for UPnP playback Does not support PCM audio encoding l MOV A progressive version of MOV Generally used for playback on Mac OS This type of MOV has the best compatibility with video players and editors Filename prefix Specifies how the recordings are named Recording fi...

Page 341: ...s l Time limit Select a value from 5 minutes to unlimited l Size limit Select a value from the listed options The range depends on the size of the SD card or M 2 SSD installed in Pearl Nano l File type AVI MPEG TS MOV MP4 or MP4 Fragmented 5 Optional Enter a prefix for the recordings All new recorded files for this channel or recorder will be prefixed using the text you enter 6 Optional Check the ...

Page 342: ...ording that s in progress to save to a file and continue recording in a new file from that point forward without any loss of content This is useful if you need to download a recording since you cannot download recordings that are in progress Restart recording to a new file using the Admin panel 1 Login to the Admin panel as admin see Connect to Admin panel 2 From the Channel menu select Recording ...

Page 343: ...al recordings to transfer or delete using the Admin panel Topics include l View list of recorded files l Download recorded files manually l Join recorded files together l Rename recorded files l Delete recorded files For information about automatic file transfers see Automatic file transfers View list of recorded files You can view all the recordings for the channel using the Admin panel View the ...

Page 344: ...oaded until it has finished recording 4 If there are no recordings a message indicates there are no recorded files for this channel or recorder Download recorded files manually You can manually download recordings using the Admin panel Files you download are saved to your connected admin computer This feature is not available using the local console on Pearl Nano Download recordings to your admin ...

Page 345: ...ining the selected recordings What s next To free up space for new recordings consider deleting recordings off of Pearl Nano see Delete recorded files Join recorded files together After recording files on Pearl Nano you can join two or more files together This is useful when a recording exceeds the maximum recording time limit and the recording is split into multiple files You can use the third pa...

Page 346: ...Users JoesComputer downloads Program_A_May11_16 24 56 avi i C Users JoesComputer downloads Program_A_May11_12 26 14 avi c copy C Users JoesComputer Desktop Concatenated_File avi 5 After completing the process you will be able to access your new file in the location you specified The file moves straight from the first video into the second without a pause You can this process to join multiple files...

Page 347: ... filename extension i e avi so you do not need to include it when renaming the file Delete recorded files You can delete recordings using the Admin panel You can delete one file at a time select multiple files for the channel and delete those or you can delete all recordings for the channel Deleted recordings cannot be recovered Delete recordings using the Admin panel 1 Login to the Admin panel as...

Page 348: ... OK when prompted b To delete multiple recordings check the check box beside the recordings you want to delete then click Delete Selected Click OK when prompted c To delete all recordings for the channel click Delete All and click OK when prompted The list may not update immediately You can refresh the list by reloading the Recording page for channels or the recorder settings page for recorders 33...

Page 349: ...l Configure AFU to CIFS server parameters l Configure AFU to SCP client parameters l Configure AFU to AWS S3 parameters l Configure AFU to WebDav server parameters l AFU or copy to USB To view and manage the USB file transfer queue manage the AFU queue and view the AFU upload logs l Manage USB file transfer queue l Add recordings to an AFU queue l View the AFU log l Manage the AFU queue l View AFU...

Page 350: ... do not overwrite files that were previously uploaded A new file is uploaded l If the connection is lost during the transfer the transfer automatically restarts when the connection is reestablished l If recorded files are selected for upload while the AFU is at maximum upload capacity or when the AFU is unavailable they are added to an upload queue Files and their relevant information are displaye...

Page 351: ...If AFU is not enabled for the channel the following message appears in the Automatic File Upload configuration page Set the channel to include in the AFU schedule using the Admin panel 1 Login to the Admin panel as admin see Connect to Admin panel 2 From the Channel menu select Recording The Recording page opens 3 Under Recorder Setup select change The recorder settings open 338 ...

Page 352: ...g the Admin panel By default recorded video files are uploaded as soon as recording stops However you can schedule file uploads to only occur during a specific period of time every 24 hours Recordings that end within the configured time period automatically upload right away Recordings that end outside the upload time period are queued up and upload when the scheduled upload time period is reached...

Page 353: ... from local storage on Pearl Nano when the upload completes Mark file as downloaded Change the color of the file in the recording list to show the files are downloaded This only applies if the files are not deleted after upload is complete Create a subfolder for channel Save the downloaded files into a folder using the channel name Create a subfolder for device Save the downloaded files into a fol...

Page 354: ...onal Enter a remote path If no path is specified the files are copied to the root folder of the destination file system 5 Optional Check any optional parameter to select it For example you can check Mark file as downloaded and Create a subfolder for each channel 6 To schedule AFU check File upload schedule and select a start time and an end time in the Start upload and Stop upload fields to define...

Page 355: ...to SCP client parameters l Configure AFU to AWS S3 parameters l Configure AFU to WebDav server parameters l AFU or copy to USB Configure AFU to FTP server parameters You can automatically upload recordings to an FTP server when you select FTP as the AFU protocol transfer type using the Admin panel The following table describes the parameters to configure for AFU to an FTP server Table 56 FTP Autom...

Page 356: ...an FTP server using the Admin panel 1 From the Automatic File Upload configuration page select FTP Client as the protocol transfer type 2 Specify the target Server address If your system is configured with DHCP or has a valid DNS configuration see Configure DHCP you can use the server s fully qualified domain name instead of the IP address 3 Specify the Server Port used for the target FTP server T...

Page 357: ...erver Server port The port used by the target SFTP server Standard port is 22 Login Username for the SFTP server Password Password for the SFTP user Use temp file Causes files to be named with part extension on the server during active upload When the upload completes the file is renamed to the appropriate extension mov mp4 or avi Prerequisites l The channel is already added for AFU see Set the ch...

Page 358: ...ord in the Password field The characters are masked with dots Alternatively you can choose to use a private key instead of a password for authentication 6 Select Use temp file to name files with a temporary filename extension part on the server until upload is complete For secure file transfer you can upload an SSH identity for your Pearl Nano This key must be trusted by the destination server Det...

Page 359: ...t your uploaded key against the secure server 8 Click Apply Configure AFU to RSync server parameters You can automatically upload recordings to an RSync server when you select RSync as the AFU protocol transfer type using the Admin panel The following table describes the parameters to configure for AFU to an RSync server Table 58 RSync Automatic File Upload Configuration Parameters Name Descriptio...

Page 360: ... upload to an RSync server using the Admin panel 1 From the Automatic File Upload configuration page select RSync Client as the protocol transfer type 2 Specify the target Server address If your system is configured with DHCP or has a valid DNS configuration see Configure DHCP you can use the server s fully qualified domain name instead of the IP address 3 Specify the Server module This is the nam...

Page 361: ...your CIFS server Server address The IP address or fully qualified domain name of the CIFS server Server share The name of the shared folder on the CIFS server Domain The CIFS server s Windows domain or Work Group name Needed if the server is part of Active Directory or a Domain Controller Login Username for the CIFS server Password Password for the CIFS user Use temp file Causes files to be named ...

Page 362: ...ork administrator 5 If the system is in a different domain than the server or if it is part of Active Directory enter the Domain name of the CIFS server 6 Specify a username for the CIFS Server in the Login field The user must have write permissions for the share folder 7 Specify the password for the user in the Password field the value is masked by dots 8 Select Use temp file to name files with a...

Page 363: ...he channel to include in AFU l AFU is enabled and the parameters configured see Enable AFU schedule and set options Configure AFU upload to an SCP client using the Admin panel 1 From the Automatic File Upload configuration page select SCP Client as the protocol transfer type 2 Specify the target Server address If your system is configured with DHCP or has a valid DNS configuration see Configure DH...

Page 364: ...al Set up SSH identity for SCP and SFTP clients If no identity is uploaded or to upload a new identity overwrites the old identity a Click Choose File and navigate to select the private key file from your hard drive then click Open b Click Upload to upload the file The system accepts RSA keys for SSH 1 DSA ECDSA EC25519 and RSA for SSH 2 Keys must be in OpenSSH format c Optional Use the Test your ...

Page 365: ... Key The Secret Sccess Key is part of your access key for your AWS account and is a required parameter i e bHaprXUenFEMI K6MANVG cPxDfiBYEXAMPLEKEY Session Token The temporary security token provided by the AWS Security Token Service STS that allows access to your AWS account for authorized users Prerequisites l You must have read and write privileges for your AWS account before you can setup AFU ...

Page 366: ...ield enter the temporary token you got from the AWS Security Token Service STS 5 Click Apply Configure AFU to WebDav server parameters You can automatically upload recordings to a WebDav server when you select WebDav as the AFU protocol transfer type using the Admin panel The following table describes the parameters to configure AFU to a WebDav server Table 62 WebDav Automatic Upload Configuration...

Page 367: ...requisites l The channel is already added for AFU see Set the channel to include in AFU l AFU is enabled and the parameters configured see Enable AFU schedule and set options Configure AFU upload to a WebDav server using the Admin panel 1 From the Automatic File Upload configuration page select WebDav Client as the protocol transfer type 2 Specify the target Server address If your system is config...

Page 368: ...st be formatted with one of the following file systems l FAT16 l FAT32 l XFS l EXT2 l EXT3 l EXT4 l NTFS We do not recommend using a USB hub to connect more than one USB device to Pearl Nano at a time for file transfers Only one copy or move to USB operation is permitted at a time Topics include l AFU to a USB storage device l Do a one time copy move all recordings to USB storage device l Manually...

Page 369: ... Drive as the protocol transfer type Table 63 If your Automatic File Upload setting conflicts with your new USB device setting a message is displayed Click the fix it link and click Apply The fix it link disables any other type of automatic file upload you have configured When you are done with USB uploads return to the Automatic File Upload configuration page and reconfigure your AFU settings 2 O...

Page 370: ...ss creates a sub folder for the channel into which the files are copied within the subfolder for the serial number if that option is also selected remove after copying If checked the file s are removed after being copied to the USB drive Checking this box makes the transfer a move instead of a copy mark file as downloaded If checked the files that are downloaded are marked with a downloaded icon w...

Page 371: ...evice into the USB port on Pearl Nano File transfer starts automatically 6 Follow the steps to Safely eject USB storage device when the activity light on the USB storage device stops flashing If your USB device doesn t have activity indicators a Check the Recording list for the channel to verify if there are files that have yet to be copied b Safely eject USB storage device when you are satisfied ...

Page 372: ... system they came from create subfolder for the channel If checked the transfer process creates a sub folder for the channel into which the files are copied within the subfolder for the serial number if that option is also selected File already exists Choose the action to take if a file with the same name already exists in the copy location l replace default l skip l rename Manually copy recorded ...

Page 373: ...xternal drive to copy the files to the USB drive b Click Move Selected to external drive to move the files and delete them off of Pearl Nano In this example the first file is currently recording and cannot be downloaded 6 Follow the steps to Safely eject USB storage device when you re done View file transfer status and cancel file copy to a USB device During a file transfer to an External USB driv...

Page 374: ...he option to cancel only appears while the file transfer is in progress The file that is highlighted in green is currently being transferred View available USB storage space When you insert a USB storage device into a USB port and select an External USB Drive action other than ignored i e manual copy automatic copy etc the total and free space are calculated and displayed in the Admin panel When y...

Page 375: ... the USB storage listed Safely eject USB storage device When you re done saving recordings to the USB storage device you can safely eject it using the link at the bottom of the Admin panel page Safely eject the USB storage device using the Admin panel 1 Login to the Admin panel as admin see Connect to Admin panel 2 At the bottom of the menus panel click eject and click OK when prompted 362 ...

Page 376: ...on and progress are displayed A history of file transfers displays until either Pearl Nano is restarted or the list is manually cleared External USB storage must be configured for the USB file transfer status to display View USB file transfer status delete files in the queue or cancel file uploads using the Admin panel 1 Login to the Admin panel as admin see Connect to Admin panel 2 From the Confi...

Page 377: ...recorded files to an AFU queue using the Admin panel Before you can add a previously recorded file the channel must be enabled for AFU and at least one new recording must have been queued This feature is not available using the local console on Pearl Nano Add an existing recording to an AFU queue using the Admin panel 1 Login to the Admin panel as admin or operator see Connect to Admin panel 2 Fin...

Page 378: ...sing the Admin panel If you want to view the AFU status see View AFU and file transfer progress View the AFU log using the Admin panel 1 Login to the Admin panel as admin see Connect to Admin panel 2 From the Configuration menu select Automatic File Upload The Automatic File Upload configuration page opens 3 Click Show log of automatic file upload The log page opens If no logs are present the page...

Page 379: ...nd file transfer progress see View AFU and file transfer progress Emptying the AFU queue does not cancel an AFU transfer View the AFU queue and remove files from the queue using the Admin panel 1 Login to the Admin panel as admin see Connect to Admin panel 2 From the Configuration menu click Automatic File Upload If there are files to be uploaded they appear in the queue 3 To remove a file from th...

Page 380: ...age Pearl Nano with Kaltura and Panopto as well as how to record and stream Topics include l Kaltura registration l Panopto registration l Kaltura recording and webcasting setup l Panopto recording and webcasting setup l CMS recording and webcasting control For information about using the Pearl Nano RS 232 and HTTP HTTPS APIs see the Pearl System API Guide ...

Page 381: ...nabled use the Admin panel to register Pearl Nano as an encoder resource for Kaltura After Pearl Nano is registered you can assign it a unique name that appears in the list of resources when creating an event in Kaltura s MediaSpace The default name includes the serial number of Pearl Nano to ensure the name is unique If more than two other resources are already registered with the same name you r...

Page 382: ...SION CONTENT_INGEST_BASE CONTENT_INGEST_UPLOAD CONTENT_MANAGE_ BASE cuePoint MANAGE CONTENT_MANAGE_SCHEDULE CAPTURE_DEVICE_ PERMISSION CONTENT_INGEST_REFERENCE_MODIFY LIVE_STREAM_ADD Important considerations for user session application tokens l Pearl Nano uploads all events scheduled and ad hoc to the user account ID associated with the user token l All event recordings scheduled and ad hoc uploa...

Page 383: ...ct to Admin panel 2 From the Configuration menu click CMS The Content management system configuration menu opens 3 From the Choose CMS drop down select Kaltura and then click Apply 4 In the Authorization method field select the authorization method and do one of the following a If you select Administrator secret enter your Kaltura Partner ID and Administrator secret that you got from Kaltura b If ...

Page 384: ...e enabled on Pearl Nano before the event is scheduled to end that event will start automatically after the events schedule is refreshed on Pearl Nano see View scheduled CMS events and history Existing events that are already associated with the device do not lose their association when CMS is disabled As soon as you re enable Kaltura CMS on Pearl Nano you can record and stream events as usual CMS ...

Page 385: ...nnel resets to 64 GB Check to ensure this value does not exceed the maximum recording space allowed for the installed SD card and change the value to avoid unintentionally overwrite existing recordings For more information about setting the recording file size limit see Configure recording settings file size and type Disable Pearl Nano as a resource or deregister from Kaltura using the Admin panel...

Page 386: ...Kaltura a warning message appears when you try to apply the new resource name to Pearl Nano l If there s only one other registered resource with that name you re prompted to choose whether or not to take over the events for that other resource If you do take them over Kaltura transfers all scheduled events from that other device over to Pearl Nano l If more than two other resources are already reg...

Page 387: ... name you re prompted to choose whether or not to take over the events for that other resource If you do take them over Kaltura transfers all scheduled events from that other device l If more than two other resources are already registered with the same resource name in Kaltura registration fails You re prompted to choose a different resource name and to try registering Pearl Nano again This works...

Page 388: ...rce registration you can perform this procedure to reregister your Pearl Nano using the same resource name to take over the resource instance that is still registered in Kaltura Before you begin you should already have l A Kaltura instance created l Access to the Kaltura Management Console KMC l Your Kaltura partner ID l Your Kaltura administrator secret Enable Pearl Nano as a resource and registe...

Page 389: ...r ID and Administrator secret that you got from Kaltura 5 Change the Resource name to the resource name of the Pearl Nano you are replacing and click Register device 6 When you re prompted to take over the events from the existing resource with that same name click Yes 376 ...

Page 390: ... events start and end automatically No manual intervention is required After the event ends the recording automatically uploads Back up recordings for each channel are also saved locally on Pearl Nano An SD card or SATA M 2 2280 SSD must be installed to record events If the network connection or the CMS goes down during an event Pearl Nano continues to record locally and uploads the recording when...

Page 391: ...ause CMS recordings and webcasts To use the front screen on Pearl Nano to start and stop events see Stop start scheduled CMS events using the front screen menu Default Kaltura encoding settings are applied automatically to the channel when Kaltura is enabled which override the existing encoding settings If you manually change the encoding settings using the Admin panel after Kaltura is enabled the...

Page 392: ...t the status of that event appears as Skipped on the Events page in the Admin panel l If the time and zone settings of Pearl Nano are out of synchronization with Kaltura s scheduling server an error appears on the Events page and you re prompted to reconfigure the time settings on Pearl Nano see Configure date and time l Do not use AFU or configure recording file size type and other channel record...

Page 393: ...ne later in Kaltura after the recording has uploaded Select channels for event views using the Admin panel 1 Login to the Admin panel as admin see Connect to Admin panel 2 From the Configuration menu click CMS The Content management system configuration menu opens 3 Under VOD event channels uncheck Enabled to disable the channel for VOD events or leave it checked to enable using the channel for VO...

Page 394: ...that event If the primary URL stream fails for any reason Kaltura automatically switches over to the backup URL Set up the channel and URLs for scheduled webcasting events using the Admin panel 1 Login to the Admin panel as admin see Connect to Admin panel 2 From the Configuration menu click CMS The Content management system configuration menu opens 3 Under the Live stream event channel section th...

Page 395: ...ption Session title This assigns a default title for ad hoc events Default variables specify the current date and time as the title using the format yyy mm dd hh mm This default title can be changed when an ad hoc event is created Event owner This assigns an owner to ad hoc events created using Pearl Nano Owner suffix Enter a suffix to be automatically applied to the Event owner field when users a...

Page 396: ...onsiderations l Before you start recording we recommend that you enter the event parameters you want associated with ad hoc events using the Admin panel However users can modify or add this metadata later using the Kaltura Management Console l CMS must be enabled and Pearl Nano registered with Kaltura to create ad hoc events using the Admin panel Set default ad hoc event parameters using the Admin...

Page 397: ...he Admin panel you can set the amount of time the event is extended to 5 10 or 15 minute intervals Events cannot be extended beyond the start of the next scheduled event Set the extend Kaltura CMS event interval using the Admin panel 1 Login to the Admin panel as admin see Connect to Admin panel 2 From the Configuration menu click CMS The Content management system configuration menu opens 3 Under ...

Page 398: ... frequently can impact performance We recommend setting an interval of no less than 120 seconds once every 2 minutes The longest interval supported is 604800 seconds once a week Change how often Pearl Nano polls Kaltura for the latest event information 1 Login to the Admin panel as admin see Connect to Admin panel 2 From the Configuration menu click CMS The Content management system configuration ...

Page 399: ...led the backup stream see Set up channel and URLs for Kaltura webcasting events You can configure Pearl Nano to send an RTMPS stream instead using the Admin panel Configure Pearl Nano to send an RTMPS stream using the Admin panel 1 Login to the Admin panel as admin see Connect to Admin panel 2 From the Configuration menu click CMS The Content management system configuration menu opens 3 Under Live...

Page 400: ... Nano a default name is assigned that includes the serial number of Pearl Nano This name appears in the list of remote recorders in Panopto You can change the remote recorder name using the Admin panel Before you begin you need l Your Panopto service URL for example https myorg hosted panopto com l A Panopto generated registration key for the remote recorder l The Epiphan API key from Panopto is r...

Page 401: ...e field before you register Pearl Nano Changes after Pearl Nano is registered do not appear in Panopto Enable Pearl Nano as a remote recorder and register with Panopto using the Admin panel 1 Login to the Admin panel as admin see Connect to Admin panel 2 From the Configuration menu click CMS The Content management system configuration page opens 3 From the Choose CMS drop down select Panopto and t...

Page 402: ...Enable CMS and register with Panopto Changing Panopto s device name for Pearl Nano does not change the name that is assigned to Pearl Nano in the Device info fields see Configure device info name description and location 389 ...

Page 403: ...casting event is missed the stream does not automatically start when the connection is re established A new webcasting event should be created Revoking the registration key and deleting Pearl Nano as a remote recorder is performed in Panopto see Panopto s documentation for instructions If you delete Pearl Nano in Panopto all scheduled and recurring events that were associated with Pearl Nano are p...

Page 404: ...from Panopto using the Admin panel 1 Login to the Admin panel as admin see Connect to Admin panel 2 From the Configuration menu click CMS The Content management system configuration menu opens 3 To disconnect Pearl Nano select none from the Choose CMS drop down and then click Apply 391 ...

Page 405: ...iles automatically upload to the event owner s folder in Panopto A back up recording of the channel is also saved locally on Pearl Nano If the network connection or the CMS goes down during an event Pearl Nano continues to record locally and uploads the recording when network connectivity resumes You can start and stop events earlier than the scheduled time as well as pause an event using the Admi...

Page 406: ... front screen menu Encoding settings Default Panopto encoding settings are applied automatically to the channel when Panopto is enabled which override the existing encoding settings If you manually change the encoding settings using the Admin panel after Panopto is enabled the settings revert back to the default Panopto settings when a scheduled or ad hoc event starts You can change the channel re...

Page 407: ...n re establishes l If Pearl Nano loses power while a scheduled event is being recorded the recording stops If Pearl Nano is powered back on before the scheduled end time for the event recording of the scheduled event restarts automatically and a second recording is created When the event ends both files are uploaded to Panopto l If Pearl Nano was unavailable on the network or powered down and miss...

Page 408: ...ith Panopto You must create a new API client ID and add a URL redirect for Pearl Nano s Admin panel in Panopto for ad hoc event authentication to work Before you begin you need l Admin access to Panopto l A Pearl Nano remote recorder that s registered with Panopto Important considerations l Record all API client IDs and secret keys that are generated in Panopto somewhere safe The ID and key cannot...

Page 409: ...ients and then click Create a new API Client The Create API Client page opens b From the Create API Client page enter a unique name for the Pearl Nano API client in the Client Name field If a client already exists in Panopto with that name choose a different name c In the Client Type field select JavaScript Web Application then click Create API Client 396 ...

Page 410: ... Client that you just created b In the Allowed Redirect URLs field enter http device_ip admin events where device_ip is the IP address of Pearl Nano If Pearl Nano is configured for https enter https instead of http c In the URL Type field select Redirect URL d Click Add URL The Admin panel URL redirect appears in the Allowed URL list 5 Login to the Admin panel as admin see Connect to Admin panel 6...

Page 411: ...anged when an ad hoc event is created Pearl Nano must be connected to Panopto for this procedure to work Enter Panopto ad hoc event parameters using the Admin panel 1 Login to the Admin panel as admin see Connect to Admin panel 2 From the Configuration menu click CMS The Content management system configuration menu opens 3 Under Unscheduled ad hoc events enter the information you want associated w...

Page 412: ...event interval using the Admin panel 1 Login to the Admin panel as admin see Connect to Admin panel 2 From the Configuration menu click CMS The Content management system configuration menu opens 3 Under Settings select the Extend event time interval from the drop down list and click Apply 399 ...

Page 413: ...able mute and display image on pause Enable mute and display image on pause Using the Admin panel you can set up Pearl Nano to automatically mute the audio and display an event paused image while a Panopto event is paused 400 ...

Page 414: ...move paused segments from webcasts The complete webcast recording including the time the event was paused is retained Enable mute and display image on pause using the Admin panel 1 Login to the Admin panel as admin see Connect to Admin panel 2 From the Configuration menu click CMS The Content management system configuration menu opens 3 Under Settings check Display Event paused image and mute on p...

Page 415: ... alerts Disable low disk space Panopto alerts Pearl Nano sends a low disk space alert to Panopto when the amount of internal storage space on the device is low You can disable the low disk space alerts that Pearl Nano sends to Panopto using the Admin 402 ...

Page 416: ...opto alerts using the Admin panel 1 Login to the Admin panel as admin see Connect to Admin panel 2 From the Configuration menu click CMS The Content management system configuration page opens 3 Under Settings uncheck Low disk space alert and click Apply at the bottom of the page to disable sending these alerts to Panopto 403 ...

Page 417: ...Pearl Nano User Guide Disable low disk space Panopto alerts 4 To enable this feature again simply check Low disk space alert and click Apply 404 ...

Page 418: ...at are longer than the capacity of Pearl Nano to store the recording on it s local drive We recommend using large capacity SD cards such as 256 GB or a large capacity SATA M 2 SSSD when using Pearl Nano with a CMS Topics include l Start stop scheduled CMS events using the Admin panel l Extend or pause CMS recordings and webcasts l Stop start scheduled CMS events using the front screen menu l Creat...

Page 419: ...ss The webcast ends but the RTMP stream that was created automatically on Pearl Nano is not deleted from the channel s Streaming page Use the Admin panel to manually delete the webcast stream instance from the channel s Streaming page Start a scheduled CMS event using the Admin panel From the Admin panel select the Events menu and click Start beside the scheduled event on the Events page Stop a sc...

Page 420: ...nabled on Pearl Nano an Events screen is added to the screens you can view on the front screen If you don t see the Events screen on the front screen press the left arrow key or the right arrow key on the control key interface to cycle through the different views When an event is scheduled the Event screen updates with the event name and a countdown timer Five minutes before the scheduled event th...

Page 421: ...led or recurring session is created The encoding settings are applied automatically to the channel on Pearl Nano l After the event ends recordings automatically upload to the CMS It may take a while for content to show up in Kaltura s media lists depending on how busy the Kaltura CMS system is at that time Recordings are associated with the user account that scheduled the event l If network connec...

Page 422: ...select the button to add the specified amount of time to the current event Events cannot be extended beyond the start of the next scheduled event For Panopto events you can also pause active recordings and webcasts from the front screen or using the Admin panel An extra pause button appears on the Events screen You can also setup Pearl Nano to mute the audio and display an event paused image to le...

Page 423: ...e mute and display image on pause Extend or pause an event using the Admin panel 1 From the Admin panel select the Events menu and then click the button to extend the current event In this example the button adds 5 minutes each time it is pressed 2 If this is a Panopto event you can select Pause to pause the current event When paused the button changes to Resume When you re ready to continue selec...

Page 424: ...on changes to Resume When you re ready to continue select Resume Create ad hoc events using the Admin panel You can create and start an ad hoc recording or webcast using the Admin panel Pearl Nano must be registered with your CMS to create ad hoc events see Integration You must authenticate using your CMS login credentials before you can enter the ad hoc event details and start the event Contact y...

Page 425: ...2019 07 04 13 22 Description Enter a description of the event Tags Add Kaltura search tags separated by commas For example tag1 tag2 tag3 Category Add a Kaltura category Duration Select the event duration in minutes from the drop down list or enter a value using your keyboard Select a value from 5 to 240 minutes or enter a value using your keyboard Event type Choose either VOD Video on Demand Live...

Page 426: ...er For ad hoc events Pearl Nano ignores a user s presets that are set in Panopto As a result ad hoc recordings automatically upload to the user s default folder as originally assigned by Panopto Duration Select the event duration in minutes from the drop down list or enter a value using your keyboard Select a value from 5 to 240 minutes or enter a value using your keyboard Event type Choose either...

Page 427: ...ount is not active your CMS has blocked your account If login to the CMS is denied the account you entered may not exist or may not have access rights to create an ad hoc event using Pearl Nano Contact your CMS administrator for CMS related login and account issues 4 Click Start event now when you re ready to start recording or Live streaming Or click Cancel When you re done creating ad hoc events...

Page 428: ...r URL for example https myorg hosted panopto com Manually logout of an ad hoc session with Panopto using the Admin panel 1 From the Events menu click Events The Events page opens 2 Click Logout beside your login user name 3 To close the authentication session with the Panopto server open a new tab in the same browser that you used to login and go to https PanoptoServerURL Panopto Pages Auth Logout...

Page 429: ...oad period Then click Apply at the bottom of the page Upload the local Panopto webcast recording By default Pearl Nano always records a Panopto webcasting event locally and uploads that recording when the webcast ends Once uploaded the Panopto server uses the local recording from Pearl Nano instead of the original webcast You can disable this feature using the Admin panel An SD card or a SATA M 2 ...

Page 430: ...nopto webcast recording 3 Under Settings check Upload the webcast recording and click Apply at the bottom of the page to always upload the local recording of webcasting events or uncheck Upload the webcast recording to disable the feature 417 ...

Page 431: ...est ones Pearl Nano administrators and operators can use the Admin panel to manually download and delete channel recordings For more details about managing recordings see Manage recorded files Download recordings for a channel using the Admin panel 1 Login to the Admin panel as admin or operator see Connect to Admin panel 2 From the Events menu click the arrow icon beside the event to see which ch...

Page 432: ... one of the following l To delete a single recording click the X icon to the right of a recording and click OK when prompted l To delete multiple recordings check the check box beside the recordings you want to delete and click OK when prompted l To delete all recordings for the selected channel click Delete Selected and click OK when prompted 419 ...

Page 433: ...l Nano User Guide Recover channel backup recordings The list may not update immediately You can refresh the list by reloading the Recording page for channels or the recorder settings page for recorders 420 ...

Page 434: ...oothly using the latest firmware updates and maintenance features Topics include l Power down and system restart l Backup your Pearl Nano setup l Perform a factory reset l Firmware upgrade l Support l Register your device l Storage capacity and maintenance ...

Page 435: ...ng the front screen menu l Power off the device by removing the power adapter cable attached to the rear panel of Pearl Nano Reboot the device using the Admin panel 1 Login to the Admin panel as admin see Connect to Admin panel 2 From the Configuration menu click Maintenance The maintenance page opens 3 Under the Maintenance section select Reboot Now and click OK when prompted Reboot the device us...

Page 436: ...ow key repeatedly on the control key interface until the Menu screen displays 2 Use the arrow and check mark keys to select System Then from the System screen scroll down using the arrow key and select Reboot 3 Press the check mark key to select Reboot now when prompted 423 ...

Page 437: ...on presets are the perfect way to backup your Pearl Nano setup so that you can reapply it later without worrying if someone changes your settings or does a factory reset You can create a configuration preset from the Configuration menu when you select Maintenance see Configuration presets 424 ...

Page 438: ...locally saved media files and recordings from Pearl Nano Consider applying a factory default configuration preset if you want to preserve your uploaded media files configuration presets and channel recordings see Configuration presets Perform a factory reset using the Admin panel 1 Login to the Admin panel as admin see Connect to Admin panel 2 From the Configuration menu select Maintenance The mai...

Page 439: ...il the Menu screen displays 2 Use the arrow and check mark keys to select System Then from the System screen select Settings to open the Settings screen 3 From the Settings screen select Factory reset to open the Factory reset screen 4 Select Factory reset using the check mark key to reset to the factory settings 426 ...

Page 440: ...tenance server option is checked on the Maintenance page of the Admin panel You can also manually check for updates If your Pearl Nano has internet access Don t miss out on any feature enhancement Register your Pearl Nano device and be eligible to download firmware updates see Register your device When Enable connection to maintenance server is checked the built in firmware update mechanism checks...

Page 441: ...m the System screen scroll down using the arrow key and select Reboot 3 Press the check mark key to select Reboot now if prompted Update the firmware If your Pearl Nano has internet access the easiest way to install a firmware update is to use the download link that s provided when you check for new firmware If you have a Pearl Nano firmware file that was provided to you by Epiphan Video you can i...

Page 442: ...dules It s good practice to make a backup of your current configuration before applying a firmware update so that you can revert to the previous firmware if needed see Create a configuration preset You should also clear your web browser s cache after the update is complete Perform a firmware update using the Admin panel 1 Login to the Admin panel as admin see Connect to Admin panel 2 Optional Save...

Page 443: ... see Connect to Admin panel 8 From the Configuration menu select Firmware Upgrade The firmware upgrade page opens Verify that the firmware version is the expected new version If in the rare occasion the firmware update fails the front screen reports the failure Please collect system information such as the serial number of Pearl Nano the previous firmware version if known and the new firmware vers...

Page 444: ...in the Admin panel We recommend performing the BIOS update whenever they become available to ensure optimum performance of your device The BIOS Upgrade section appears on the Firmware Update page only when your Pearl Nano system requires a BIOS update Perform a BIOS update using the Admin panel 1 Login to the Admin panel as admin see Connect to Admin panel 2 Optional Save a copy of the current sys...

Page 445: ...hat the BIOS update is in progress appears on the front screen Do not interrupt power to the system during the BIOS update 5 When the BIOS update is complete a message lets you know that Pearl Nano is going to reboot Wait for the system to restart 432 ...

Page 446: ...he 7 Connect to the Admin panel and login as admin see Connect to Admin panel 8 From the Configuration menu select Info and confirm that the date of the BIOS has updated You can also confirm that the latest BIOS is installed on Pearl Nano when the section called BIOS Upgrade no longer appears on the Firmware Upgrade page in the Admin panel 433 ...

Page 447: ... during a remote session For more information about service plans see www epiphan com supportplan To contact Epiphan support l Email support epiphan com l Online chat www epiphan com support Monday to Friday between 9am and 5pm Eastern l Call 1 877 599 6581 613 599 6581 From time to time Epiphan support may ask you for logs from your system Follow the instructions to download the log files and all...

Page 448: ...to remotely access Pearl Nano to help you troubleshoot issues and reset lost admin passwords Your network must allow access to the Epiphan maintenance server which has the domain name epiphany epiphan com Pearl Nano must be able to resolve this domain name to connect to the Epiphan maintenance server for remote support Remote support uses ports 22 and 30 Ensure that these ports are opened to allow...

Page 449: ...intenance page opens 3 Check Enable remote support to enable incoming connections from Epiphan Systems 4 Check Enable connection to maintenance server to enable outgoing links to the Epiphan maintenance server epiphany epiphan com 5 Click Apply 6 Test that Pearl Nano can access the maintenance server a From the Configuration menu select Network b In Network Diagnostics enter epiphany epiphan com a...

Page 450: ...pport off for your Pearl Nano using the Admin panel Disabling remote support removes the ability for Epiphan to reset a lost admin password on your Pearl Nano If you forget the admin password and remote support feature is off you will need to return the system to Epiphan for reprogramming Disable remote support for your Pearl Nano using the Admin panel 1 Login to the Admin panel as admin see Conne...

Page 451: ...Pearl Nano handy when you register The serial number appears on a sticker attached to the bottom of the device You can also see the serial number using the front screen menu when you select System Device Information The banner to register your device appears on the Firmware update page in the Admin panel If your system is registered or there are no firmware updates are available you will not see a...

Page 452: ...Pearl Nano User Guide Register your device 439 ...

Page 453: ... files from the SD card using the Admin panel Pearl Nano also has local storage for internal processes and 6 GB of that space is allocated for uploaded media like image files that you add to your channel layout You can see how much space you have for media files from the Media menu using the Admin panel Topics include l Check storage capacity l Check media storage capacity Check storage capacity U...

Page 454: ... panel as admin or operator see Connect to Admin panel 2 Using the Admin panel view the Internal Storage section at the bottom of the menu panel The bar will be mostly green if there is lots of space left or mostly red if storage space is nearly full If no SD card or SSD is installed the following appears Check storage capacity from the front screen Press the left arrow key repeatedly on the contr...

Page 455: ...n menu A USB storage device must be connected to see the USB storage appear Check media storage capacity Pearl Nano has 6GB of internal storage that s allocated for uploaded media like image files that you add to a channel layout You can see how much space you have for media files using the Admin panel Check media storage capacity using the Admin panel 1 Login to the Admin panel as admin or operat...

Page 456: ...Pearl Nano User Guide Storage capacity and maintenance 2 From the Configuration menu select Media The Media configuration page opens with the amount of capacity listed at the top of the page 443 ...

Page 457: ...sirable see Configuration presets Diagnostic tools Diagnostic tools are available to help you troubleshoot your Pearl Nano setup and network connection You can run them using the Admin panel The Connectivity status diagnostic is also available using the front screen menu see Available diagnostic tools l Connectivity status Display the status of critical network connections and features like 802 1x...

Page 458: ...n also be accessed from the front screen menu when you select System Network Connectivity status The following table describes what the colored icons in the results indicate Table 69 Diagnostic test result icons Icon Description The diagnostic test result is okay This can also mean that a specific feature is enabled on Pearl Nano The feature or option is disabled on Pearl Nano The diagnostic test ...

Page 459: ...dress for Pearl Nano see Configure a static IP address Captive portal Check for connectivity issues caused by a Captive portal An okay result can indicate several conditions l No captive portal is detected and Pearl Nano can successfully reach the Internet l A captive portal is detected and Pearl Nano can successfully reach the public Internet Internet Check if Pearl Nano is connected to the Inter...

Page 460: ...S servers l mDNS Run diagnostic tests using the Admin panel Using the Admin panel you can access useful diagnostic tools from the Configuration menu when you select Network Available diagnostic tools l Connectivity status Display the status of critical network connections and features like 802 1x see Connectivity status results l Ping Test if Pearl Nano can reach a specified destination server on ...

Page 461: ... Admin panel as admin see Connect to Admin panel 2 From the Configuration menu select Network The Network configuration page opens 3 In the Network diagnostics section select the diagnostic test to run from drop down a If Connectivity status is selected the results display after you click Start b If Ping is selected enter the destination server IP address or domain name before clicking Start c If ...

Page 462: ...ptured SDI audio contains audible clicking sound or other audio distortions upon playback Ensure audio sample rate is set to 48 kHz Lower sample rates i e 32 kHz and 44 kHz can sometimes cause audio distortion When previewing a channel using the Live broadcast link or the preview link in the Admin panel some web browsers do not play audio The Flash FLV plugin must be installed for your web browser...

Page 463: ...miere Pro does not currently support fragmented mp4 files Before editing in Adobe Premiere Pro convert the clip to progressive mp4 format Run the file through ffmpeg or a third party software such as Handbrake to preserve both audio and video output Image quality is poor or insufficient The following tips can help improve image quality 1 Ensure the source resolution is used as the output or record...

Page 464: ...is dropping frames If you re streaming to set top boxes that have 10 100 Mbps interfaces on the same Gigabit Ethernet and you notice frames are dropping you can limit the bandwidth of the stream using traffic shaping to adapt for lower bandwidth set top boxes and prevent frame drops see Set up traffic shaping Recording won t start If recording will not start check the Disk Status Information to se...

Page 465: ... your MP4 file is created with MP3 audio you will not hear the audio during playback in QuickTime 10 Choose a different audio encoding when recording MP4 files or use a different media player to playback the recording I can t hear the audio in VLC or the video won t play VLC version 3 0 3 won t play audio for MP4 fragmented files In VLC s Input Codecs settings page you can try increasing the file ...

Page 466: ...ult uses the aspect ratio of the video input source when the output is streamed If the input video signal doesn t match the encoded frame aspect ratio of the channel bars are added to the sides or top and bottom of the encoded stream when the output is streamed and recorded If you see bars on your output but would rather have the image fill the whole screen you can change the output frame size to ...

Page 467: ...For example l Input signal resolution is 720 480 a 3 2 aspect ratio l encoded resolution is 1280 800 a 16 10 aspect ratio that is wider than the input resolution Borders are added to the left and right of the image to preserve the narrower ratio of the input 454 ...

Page 468: ... to Admin panel 2 To determine the input port name of the video source that s used in the channel select the channel from the Channel menu and click Layout The custom layout page opens 3 Once you have determined the name of the video input source select the input port for that video source under Inputs menu 4 Make note of the input signal resolution 5 From the Channel menu click Encoding for the c...

Page 469: ...ine what video signal it needs to send to Pearl Nano Usually the video input ports on Pearl Nano correctly emulate a monitor for the connected video source However there are times when you may need to upload a custom EDID like when your source uses a custom set of display properties When you upload a custom EDID to an input port on Pearl Nano you can force the port to supply a specific resolution ...

Page 470: ... page for that source scroll to the EDID upload section and click Choose FIle 4 Browse to the location where the custom EDID file was saved and select it then click open 5 Select upload When the upload is complete the page updates to reflect success or failure Restore factory default EDID When you no longer want a custom EDID assigned to an input port you can restore the input port to use the fact...

Page 471: ...e video input port 2 From the Inputs menu select the source you want to restore The source configuration page opens 3 Scroll to the EDID section and select restore 4 When the default EDID is applied the page updates to reflect success or failure 458 ...

Page 472: ...ntroduced in previous product releases Release 4 12 1 l One Touch control of streaming and recording l Upload local webcast recordings to Panopto l Pre configured stream URLs for Kaltura webcasts l Schedule CMS event uploads Release 4 14 0 l Inaugural release of Pearl Nano ...

Page 473: ...rt streaming the channel and toggle start stop streaming shift I Open the system information screen Events screen shift C Create a new ad hoc event shift S Start stop the current event Enter When it is the last text field on a screen press Enter to move to next screen if available or start an action on the current screen Space bar Initiate a button action accept text entered into a text field and ...

Page 474: ...box Select and initiate a control button action when only one button appears on screen When the last text field on a screen is highlighted press Space bar to move to the next screen if available or start an action on the current screen Esc Cancel unapplied changes on the current screen and return to the previous screen ...

Page 475: ...ment Agreement means this Epiphan Systems Inc Software License API means an application programming interface Documentation means the technical publications delivered to You with the Software relating to the installation and operation of the Software and or Hardware such as reference user installation and technical guides and release notes Epiphan means Epiphan Systems Inc Epiphan Hardware Product...

Page 476: ...de free software i e software licensed under the GNU Lesser General Public License or other free software licenses for which the applicable free software license may also require that the source code for such free software be made available to those receiving only executable versions of such free software If the source code for any free software distributed with the Software is not provided with t...

Page 477: ...R S RESELLERS OR DISTRIBUTORS NEITHER LICENSOR NOR ANY OF ITS AFFILIATES NOR ANY OF ITS OR THEIR LICENSORS SUPPLIERS SUBCONTRACTORS RESELLERS AND OR DISTRIBUTORS MAKE ANY REPRESENTATIONS OR PROVIDE ANY CONDITIONS AND OR WARRANTIES ABOUT THE SUITABILITY OF THE EPIPHAN HARDWARE PRODUCTS SOFTWARE SERVICES AND OR DOCUMENTATION NEITHER LICENSOR NOR ANY OF ITS AFFILIATES NOR ANY ITS OR THEIR LICENSORS S...

Page 478: ...or may terminate this Agreement immediately by providing You with written notice if a You are in material breach of any provision of this Agreement which breach if capable of being cured is not cured within thirty 30 days after Licensor gives You written notice thereof or b You have committed a non curable material breach of this Agreement Upon termination You shall destroy all copies of the Softw...

Page 479: ...s requiring fail safe performance such as in the operation of nuclear facilities aircraft navigation systems air traffic control or direct life support machines Licensor its licensors suppliers subcontractors resellers and distributors specifically disclaim any express or implied representations warranties and or conditions for such uses 12 U S Government End Users The Software and Documentation a...

Page 480: ...ovisions of this Agreement and such remaining provisions shall be reformed only to the extent necessary to make them enforceable under such circumstances This Agreement shall be governed by the laws of the Province of Ontario and the laws of Canada applicable therein No choice or conflict of laws rules of any jurisdiction shall apply to this Agreement You shall only be entitled to bring any action...

Page 481: ...m FCC CAUTION Changes or modifications not expressly approved by the party responsible for compliance could void the user s authority to operate the equipment Note This equipment has been tested and found to comply with the limits for a Class A digital device pursuant to part 15 of the FCC Rules These limits are designed to provide reasonable protection against harmful interference when the equipm...

Page 482: ... except as stated in Epiphan s Privacy Statement or compensation to the person sending the submission The user acknowledges the originality of any submission communicated to Epiphan and accepts responsibility for its accuracy appropriateness and legality Third Parties and Links to Third Party Web Sites Mention of non Epiphan Systems Inc products or services on their website or this document site i...

Page 483: ...easonable attorneys fees incurred in connection with the arbitration in such an amount as may be determined by the arbitrator All decisions of the arbitrator shall be final and binding on both parties and enforceable in any court of competent jurisdiction Notwithstanding this application may be made to any court for a judicial acceptance of the award or order of enforcement Notwithstanding the for...

Page 484: ... and 2021 Epiphan Systems Inc ...

Reviews: