


TROUBLESHOOTING:
GENERAL
The troubleshooting section of the Owner’s Manual
is a guide to diagnose problems. Read the service
manual before performing any work. Improper re-
pair and/or maintenance could result in death or se-
rious injury.
The following checklist of possible operating troubles
and their probably causes will be helpful in keeping
your motorcycle in good operating condition. More than
one of these conditions may be causing trouble and
should be carefully checked.
ENGINE
Starter Does not Operate or Does
Not Turn Engine Over.
1. Engine run switch in OFF position.
2. Ignition switch is not ON.
3. Discharged battery or loose or corroded con-
nections (solenoid chatters)
4. Clutch lever not squeezed against handlebar
or transmission not in neutral.
5. Blown fuse.
Engine Turns Over But Does Not
Start or Starts Hard.
1. Fuel tank is empty.
2. Discharged Battery or loose or damaged bat-
tery terminal connections.
3. Spark Plugs are loose, defective, fouled, have
improper gap, or not according to specification.
4. Spark plug coils are defective, have loose con-
nection, or wiring in bad condition and short-
ing.
5. Engine oil too heavy (winter operation).
6. No output from ECM. See dealer.
7. Clogged fuel filter. See dealer.
8. Inadequate fuel pressure in fuel lines. Possible
leak. See dealer.
146
TROUBLESHOOTING
Summary of Contents for EBR 1190RS 2013
Page 1: ...2013 EBR OWNERS MANUAL EBR 1190RS MODEL Part Number C1000 2B6 1 ...
Page 3: ...3 ...
Page 23: ...TABLE OF CONTENTS Notes 23 ...
Page 24: ...TABLE OF CONTENTS Notes 24 ...
Page 36: ...VEHICLE IDENTIFICATION NUMBER EBR 1190RS MODELS 36 ...
Page 39: ...NOTES 39 ...
Page 42: ...Table 5 Drivetrain Table 6 Cooling System Table 7 Liquid Capacities Table 8 Sprocket teeth 42 ...
Page 43: ...Table 9 Transmission Gear Ratios Table 11 Tires Table 10 Bulb Chart 43 ...
Page 44: ...Table 12 Dimensions Table 13 Weights 44 ...
Page 64: ...Table 15 64 ...
Page 66: ...Figure 24 Upshift Pattern Figure 25 Downshift Pattern 66 ...
Page 71: ...Maximum Fill Level is at Bottom of Baffle Figure 29 71 ...
Page 84: ...Figure 34 Seat Fasteners Seat removal 4 T 30 screws 84 ...
Page 92: ...92 Notes ...
Page 93: ...93 Notes ...
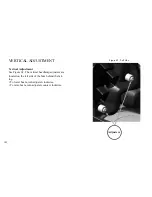
Page 116: ...Figure 52 Adjustment Measurement 35 mm Adjustment Distance 116 ...
Page 117: ...117 Notes ...
Page 176: ...176 ...
Page 177: ...177 ...
Page 178: ...178 ...


