


SAFE OPERATING
MAINTENANCE
Perform the service and maintenance operations as
indicated in the regular service interval table. Lack
of regular maintenance at the recommended inter-
vals can affect the safe operation of your motorcycle,
which could result in death or serious injury.
Good maintenance creates a safe motorcycle. A careful
check of certain equipment must be made after periods
of storage. Also, frequently inspect the motorcycle be-
tween the regular service intervals to determine if addi-
tional maintenance is necessary.
Check the following items:
1. Tires for correct pressure, abrasion or cuts.
2. Drive chain for wear or damage
3. Brakes, steering and throttle for responsiveness and
freedom from binding.
4. Brake fluid level and condition. Hydraulic lines and
fittings for leaks. Also check brake pads and discs
for wear.
5. Cables for fraying or crimping and free operation.
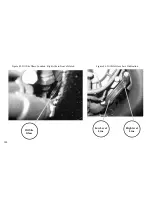
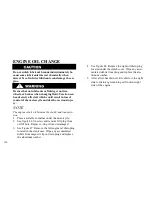
6. Engine oil level.
7. Engine coolant level.
8. Clutch fluid level and condition. Hydraulic lines
and fittings for leaks.
9. Headlamp, tail lamp, brake lamp, and directional
lamp operation.
BREAK-IN MAINTENANCE
NOTE
New Motorcycle initial service is required to keep
your new motorcycle warranty in force and make sure
the emissions system operates properly.
After a new motorcycle has been ridden its first 620
miles (1000 kilometers) take it to an authorized EBR
Dealer to have an initial service performed.
If it is impossible to take it to a dealer at the mileage
intervals noted, the owner should:
1. Give the following outlined items attention or ar-
range to have the motorcycle serviced.
2. Take the motorcycle to a dealer for more complete
service as soon as possible.
We recommend a Dealer perform the initial service.
103
MAINTENANCE
Summary of Contents for EBR 1190RS 2013
Page 1: ...2013 EBR OWNERS MANUAL EBR 1190RS MODEL Part Number C1000 2B6 1 ...
Page 3: ...3 ...
Page 23: ...TABLE OF CONTENTS Notes 23 ...
Page 24: ...TABLE OF CONTENTS Notes 24 ...
Page 36: ...VEHICLE IDENTIFICATION NUMBER EBR 1190RS MODELS 36 ...
Page 39: ...NOTES 39 ...
Page 42: ...Table 5 Drivetrain Table 6 Cooling System Table 7 Liquid Capacities Table 8 Sprocket teeth 42 ...
Page 43: ...Table 9 Transmission Gear Ratios Table 11 Tires Table 10 Bulb Chart 43 ...
Page 44: ...Table 12 Dimensions Table 13 Weights 44 ...
Page 64: ...Table 15 64 ...
Page 66: ...Figure 24 Upshift Pattern Figure 25 Downshift Pattern 66 ...
Page 71: ...Maximum Fill Level is at Bottom of Baffle Figure 29 71 ...
Page 84: ...Figure 34 Seat Fasteners Seat removal 4 T 30 screws 84 ...
Page 92: ...92 Notes ...
Page 93: ...93 Notes ...
Page 116: ...Figure 52 Adjustment Measurement 35 mm Adjustment Distance 116 ...
Page 117: ...117 Notes ...
Page 176: ...176 ...
Page 177: ...177 ...
Page 178: ...178 ...