


BATTERY: GENERAL
Type
Your motorcycle uses a permanently sealed, mainte-
nance free, Lithium-Ion battery. All batteries are
shipped pre-charged and ready to be put into service. Do
not attempt to open the battery for any reason.
Batteries, battery posts, terminals and related ac-
cessories contain lead and lead compounds, and oth-
er chemicals known to the State of California to
cause cancer, and birth defects or other reproduc-
tive harm. Wash hands after handling.
Never remove warning label attached to top of bat-
tery. Failure to read and understand all precautions
contained in warning, could result in death or serious
injury.
Voltmeter Test
The voltmeter test provides a general
indicator of battery condition. Check the voltage of the
battery to verify that it is in a charged condition. If the
open circuit (disconnected) voltage reading is below 12.3
V, charge the battery and then re-check the voltage.
Cleaning and Inspection
Battery top must be clean and dry. Dirt and electrolyte on the
battery can cause battery to self-discharge.
1. Clean battery.
2. Clean cable connectors and battery terminals using a wire
brush or fine grit sandpaper to remove any oxidation.
3. Inspect and clean the battery screws, clamps and cables.
Check for breakage, loose connections and corrosion.
Do not burn or incinerate battery. Battery may
explode, and toxic fumes and materials are creat-
ed causing personal injury or death.
136
Summary of Contents for EBR 1190RS 2013
Page 1: ...2013 EBR OWNERS MANUAL EBR 1190RS MODEL Part Number C1000 2B6 1 ...
Page 3: ...3 ...
Page 23: ...TABLE OF CONTENTS Notes 23 ...
Page 24: ...TABLE OF CONTENTS Notes 24 ...
Page 36: ...VEHICLE IDENTIFICATION NUMBER EBR 1190RS MODELS 36 ...
Page 39: ...NOTES 39 ...
Page 42: ...Table 5 Drivetrain Table 6 Cooling System Table 7 Liquid Capacities Table 8 Sprocket teeth 42 ...
Page 43: ...Table 9 Transmission Gear Ratios Table 11 Tires Table 10 Bulb Chart 43 ...
Page 44: ...Table 12 Dimensions Table 13 Weights 44 ...
Page 64: ...Table 15 64 ...
Page 66: ...Figure 24 Upshift Pattern Figure 25 Downshift Pattern 66 ...
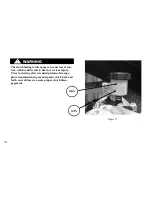
Page 71: ...Maximum Fill Level is at Bottom of Baffle Figure 29 71 ...
Page 84: ...Figure 34 Seat Fasteners Seat removal 4 T 30 screws 84 ...
Page 92: ...92 Notes ...
Page 93: ...93 Notes ...
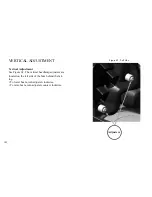
Page 116: ...Figure 52 Adjustment Measurement 35 mm Adjustment Distance 116 ...
Page 117: ...117 Notes ...
Page 176: ...176 ...
Page 177: ...177 ...
Page 178: ...178 ...


