


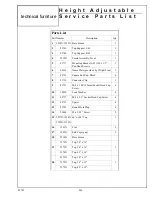
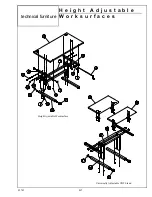


80954LX
L o c k i n g
C o m p a r t m e n t s
( c o n t . )
technical furniture
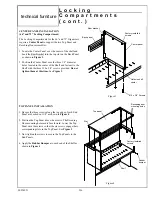
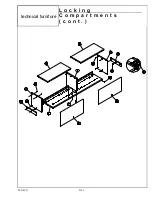
TOP PANEL INSTALLATION
(72” Locking Compartment)
1. Two
Top Panels
are required, installed one at a time.
Be sure the three screws along the top edge of each End
Panel and on both sides of the Center Panel are backed
out 1/8” as shown in
Figure 2
.
2. Position one Top Panel above the six upper screws,
three on one End Panel and three on the Center Panel.
The Receding Door mounting holes must face foward.
Lower the Top Panel onto the screws so that the six
screws engage their corresponding slots in the Top
Panel. See
Figure 5
.
3. Repeat this procedure with the second Top Panel. Now
tighten the screws to secure the Top Panels to the End
Panels and the Center Panel to the Shelf.
4. Apply the four
Rubber Bumpers
to each end and
center of the Shelf as shown in
Figure 5
.
Figure 5
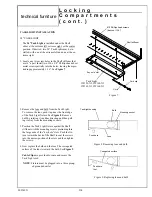
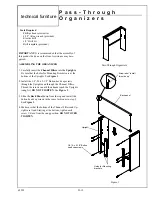
RECEEDING DOOR INSTALLATION
1. Place one Receeding Door assembly face up on top
of the Locking Compartment. See
Figure 6
. Posi-
tion the two
Door Track
hinges against the front
flange of the Top Panel. The Door edges must be
aligned with the outer surfaces of the End Panels.
Align the slots in the Door Track Hinges with the six
holes in the front flange of the Top Panel. Install and
tighten six #8 Phillips head sheet metal screws into
the Door Track Hinges to secure them. See note be-
low on 72”/66” doors.
To operate the Receeding Door, grasp the lower edge
of the door panel near the center and pull the door all
the way toward you. Carefully lower the door to the
closed position. Reverse this procedure to open the
door.
NOTE
: Never allow the Receeding Door to slam
closed. Personal injury or damage to the
unit may result.
NOTE
: The
72” and 66”
Locking Compartments
require
two
Receeding Doors. To eliminate
left and right hand tops, extra door mounting
holes have been provided. Use the outer set
of three holes on both left and right compart-
ments.
D-7
Receding door
mounting holes
Top panel
Shelf
Rubber
bumper
Center panel
Factory installed
screws
Slot
Figure 6
Front flange
Receeding door
Door track hinge
#8 Phillips head
screws
End panel
Door track
Summary of Contents for LINX
Page 1: ...Modular Furniture LINX Modular Furniture Installation manual...
Page 24: ...84913 Bolt on Peninsula P e n i n s u l a B o l t o n technical furniture...
Page 41: ...R e t r o f i t K i t N o v a c o n t 86270 technical furniture A 34...
Page 51: ...84571 Triangular Connector T r i a n g u l a r C o n n e c t o r technical furniture A 44...
Page 53: ...84252 85217 Conference End C o n f e r e n c e E n d technical furniture A 46...
Page 56: ...81071 B C o n f e r e n c e T a b l e technical furniture A 49...
Page 57: ...84085 Posting Shelf P o s t i n g S h e l f technical furniture A 50...
Page 58: ...81046 Storage Shelf S t o r a g e S h e l f technical furniture A 51...
Page 78: ...80954LX L o c k i n g C o m p a r t m e n t s c o n t technical furniture D 11...
Page 112: ...85089 W h i t e P e g A n d B i n B o a r d s c o n t technical furniture E 12...
Page 119: ...85082 F a b r i c T e c h W a l l c o n t technical furniture E 19...
Page 122: ...85093 C o r n e r L a m i n a t e H o o k O n S h e l v e s c o n t technical furniture E 22...


