


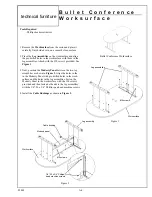

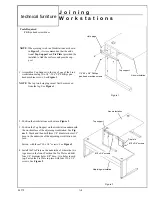


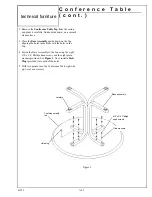

5. Remove the Top and attach the
Double Faced Tape
Strips
to the Top Supports. Next, remove the backing
from the Tape Strips and carefully lower the Top back
into position. See
Figure 4
.
CAUTION!
Once the Top is in position, do not at-
tempt to lift the Top to reposition it as
it will tear the Double Faced Tape apart
rendering it unusable.
4. Place the Top/Corner Support
over the Top Supports.
Make sure that the Worksurfaces and edges are flush
and adjust the
Leveler
if necessary.
Note
: Tape cure time is 24 hours.
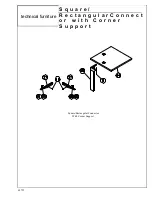
69735
Figure 4
Top/Corner support
Double faced tape
Top support
technical furniture
S q u a r e /
R e c t a n g u l a r C o n n e c t
o r w i t h C o r n e r
S u p p o r t
A-12
Summary of Contents for LINX
Page 1: ...Modular Furniture LINX Modular Furniture Installation manual...
Page 24: ...84913 Bolt on Peninsula P e n i n s u l a B o l t o n technical furniture...
Page 41: ...R e t r o f i t K i t N o v a c o n t 86270 technical furniture A 34...
Page 51: ...84571 Triangular Connector T r i a n g u l a r C o n n e c t o r technical furniture A 44...
Page 53: ...84252 85217 Conference End C o n f e r e n c e E n d technical furniture A 46...
Page 56: ...81071 B C o n f e r e n c e T a b l e technical furniture A 49...
Page 57: ...84085 Posting Shelf P o s t i n g S h e l f technical furniture A 50...
Page 58: ...81046 Storage Shelf S t o r a g e S h e l f technical furniture A 51...
Page 78: ...80954LX L o c k i n g C o m p a r t m e n t s c o n t technical furniture D 11...
Page 112: ...85089 W h i t e P e g A n d B i n B o a r d s c o n t technical furniture E 12...
Page 119: ...85082 F a b r i c T e c h W a l l c o n t technical furniture E 19...
Page 122: ...85093 C o r n e r L a m i n a t e H o o k O n S h e l v e s c o n t technical furniture E 22...


