12
ENGLISH
3
NOTES:
• Be sure to turn on the power before opening
and closing the disc tray.
• Do not strike on the button with a pencil, etc.
ENGLISH
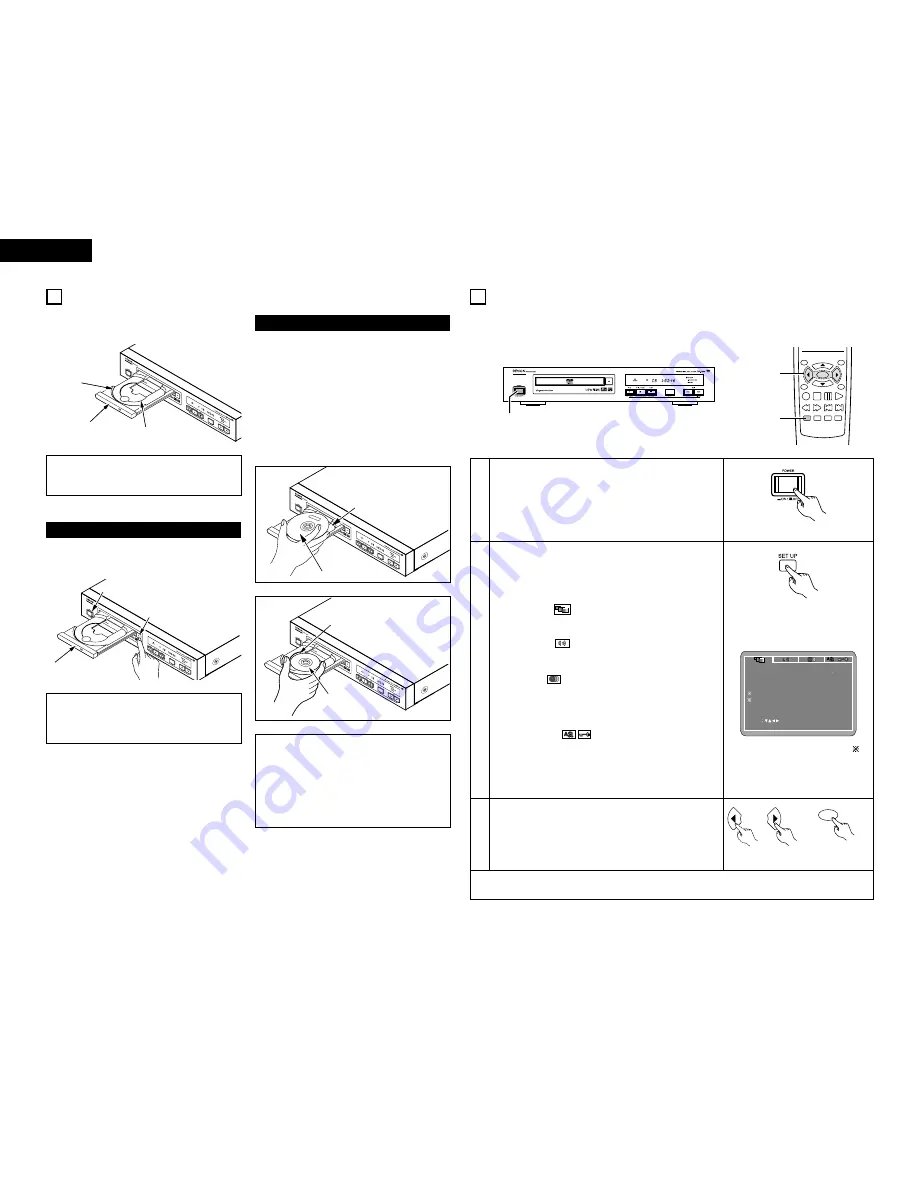
8
CHANGING THE DEFAULT SETTINGS
1
2
In the stop mode, press the SETUP button.
• The setup (default settings) screen appears.
NOTE:
• For some menus, the initial values can be changed during
playback.
VIDEO SETUP
Use this to set the DN-V200/DN-V300's screen mode.
(TV aspect, TV type and AV1 video output.)
AUDIO SETUP
Use this to set the DN-V200/DN-V300's audio output mode.
(Digital and LPCM output settings.)
DISC SETUP
Use this to set the language to be used when playing the
disc.
If the set language is not offered on that disc, the discs
default language is set.
SYSTEM SETUP
On-screen display language setting: The initial settings
screen’s language setting, etc., the viewing restriction level
and playback of adult DVDs you do not want children, etc., to
see can be restricted. The number of initial setting items can
be increased.
Use the
0
and
1
cursor buttons to select the desired
setting item.
Select “VIDEO SETUP”. (See page 13, 14.)
Select “AUDIO SETUP”. (See page 14, 15.)
Select “DISC SETUP”. (See page 15, 16.)
Select “SYSTEM SETUP” (See page 17, 18.)
VIDEO SETUP
TV ASPECT
VIDEO OUT
SLIDE SHOW
TV TYPE
VIDEO MODE
SET TV ASPECT
SET ENT E R BUTTON
SELECT
4 3 PS
MULTI
S-VIDEO
AUTO
5 SEC
✽
To exit the setup mode
Press the RETURN or SETUP button.
Remote control unit
2
Make the initial settings to suit your usage conditions before starting playback.
The initial settings are retained until they are next changed, even if the power is turned off.
TOP MENU
/PBC
MENU
RETURN
ANGLE
DISPLAY STOP STILL /PAUSE
PLAY
RC-963
ENTER
SETUP NTSC/PAL ZOOM SLIDE SHOW
SLOW/SEARCH
SKIP
3
2
1
Turn on the power.
• Press the power button, the power indicator lights and the
power turns on.
Main unit
ENTER
Remote control unit
7
LOADING DISCS
2
Set discs in the disc tray with the labeled (printed)
side facing up.
8 cm disc guide
12 cm disc guide
Disc tray
NOTE:
• Do not move the DN-V200/DN-V300 while a disc
is playing. Doing so may scratch the disc.
(1) Opening and Closing the Disc Tray
q
Turn on the power.
w
Press the OPEN/CLOSE button.
Disc tray
OPEN/CLOSE button
(2) Loading Discs
Figure 1
Outer disc tray
12 cm disc
Figure 2
Inner disc tray
8 cm disc
NOTES:
• If your foreign object is caught in the disc tray
during closing, simply press the OPEN/CLOSE
button again and the tray will open.
• Do not press the disc tray in by hand when the
power is off. Doing so will damage it.
• Do not place foreign objects in the disc tray.
Doing so will damage it.
• Pick up the disc carefully so as not to touch the
signal surface and hold it with the labeled side
facing up.
• With the disc tray fully open, set the disc in the disc
tray.
• Set 12 cm discs in the outer tray guide (Figure 1), 8
cm discs in the inner tray guide (Figure 2).
• Press the OPEN/CLOSE button. The disc is
automatically loaded.
• The disc tray can also be closed automatically to
load the disc by pressing the PLAY button.
For the display of items marked “
”,
see page 13.
Remote control unit
POWER button


