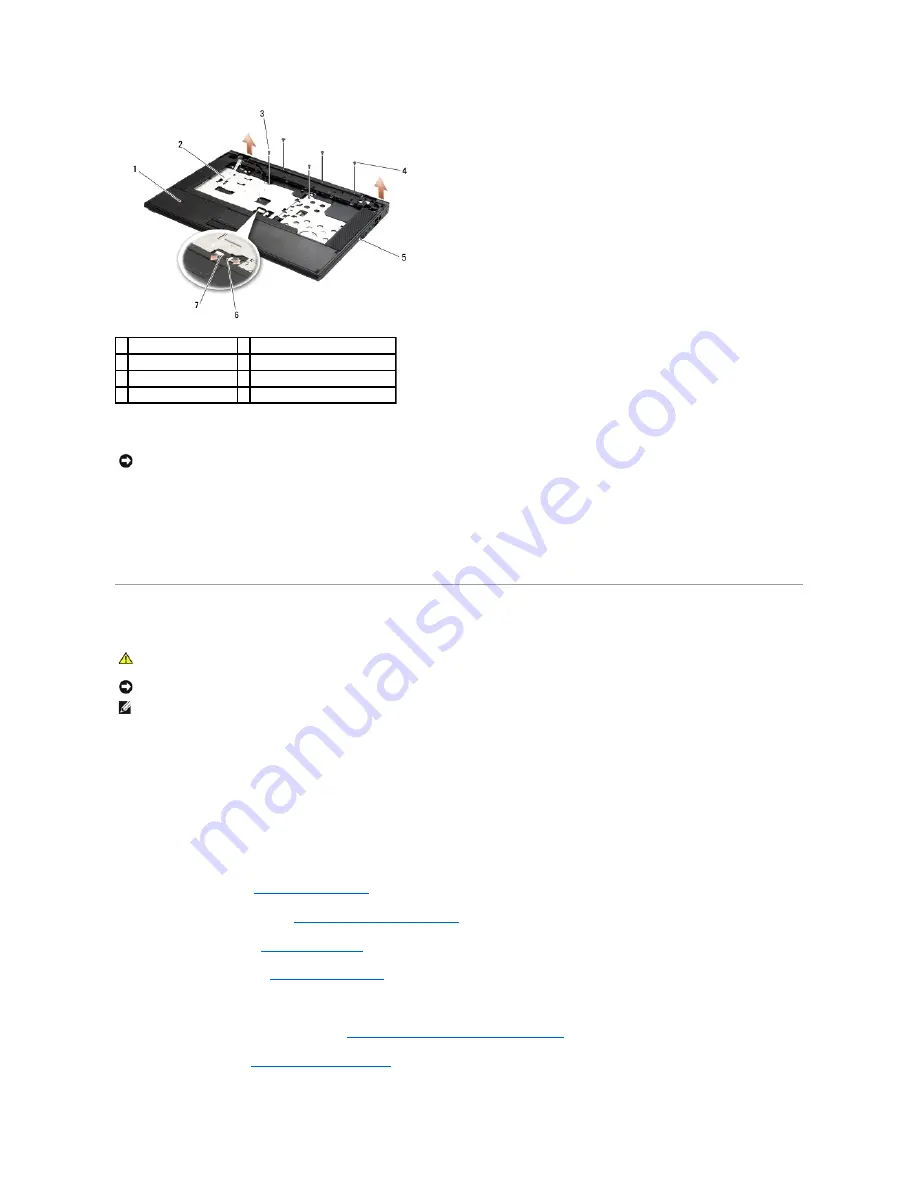
12.
Be sure that all screws securing the palm rest are removed.
13.
Gently pry the palm rest from the bottom of the computer.
14.
Before separating the palm rest assembly from the bottom of the computer, carefully remove the speaker and touchpad wires from the system board.
15.
Remove the palm rest assembly from the computer.
Replacing the E5500 Palm Rest
1.
Carefully reconnect the speaker and touchpad cables to the system board
2.
Align the palm rest with the computer base and gently snap it into place.
3.
Replace the nine M2.5 x 8-mm bottom screws.
4.
Replace the two M2.5 x 5-mm screws on the top of the computer securing the metal plate.
5.
Replace the three M2 x 3-mm screws at the top of the palm rest near the display.
6.
Replace the optical drive (
Replacing the Optical Drive
).
7.
Replace the display assembly (see
Replacing the E5500 Display Assembly
).
8.
Replace the keyboard (see
Replacing the Keyboard
).
9.
Replace the hinge cover (see
Replacing the Hinge Cover
).
10.
Close the display and turn the computer over.
11.
Replace the bottom of the base assembly (see
Replacing the E5500 Bottom of the Base Assembly
).
12.
Follow the procedures in
After Working on Your Computer
.
1 palm rest
2 dashboard LED board connector
3 M2.5 x 5-mm screws (2) 4 M2 x 3-mm screws (3)
5 computer base
6 touch pad connector
7 speaker connector
NOTICE:
Do not use force to separate the palm rest from the computer. If you encounter resistance, gently flex or apply pressure to the palm rest, or
move along the edge, working away from the area of resistance, until the palm rest is free.
CAUTION:
Before you begin the following procedure, follow the safety instructions that shipped with your computer. For additional safety best
practices information, see the Regulatory Compliance Homepage on www.dell.com at: www.dell.com/regulatory_compliance.
NOTICE:
Ensure that the touch pad cable and the speaker cable are properly routed before snapping the palm rest into place.
NOTE:
This procedure assumes that you have completed the removal procedure first.
Summary of Contents for E5400 - Latitude - Core 2 Duo 2.4 GHz
Page 30: ......
Page 44: ...Back to Contents Page ...
Page 52: ...Back to Contents Page ...
Page 56: ...13 Follow the procedures in After Working on Your Computer Back to Contents Page ...


