background image

8.

Remove the display assembly (see 

Removing the E5500 Display Assembly

).  


9.

Remove the optical drive (see 

Removing the Optical Drive

).  


10.

Remove the palm rest (see 

Removing the E5500 Palm Rest

).  


11.

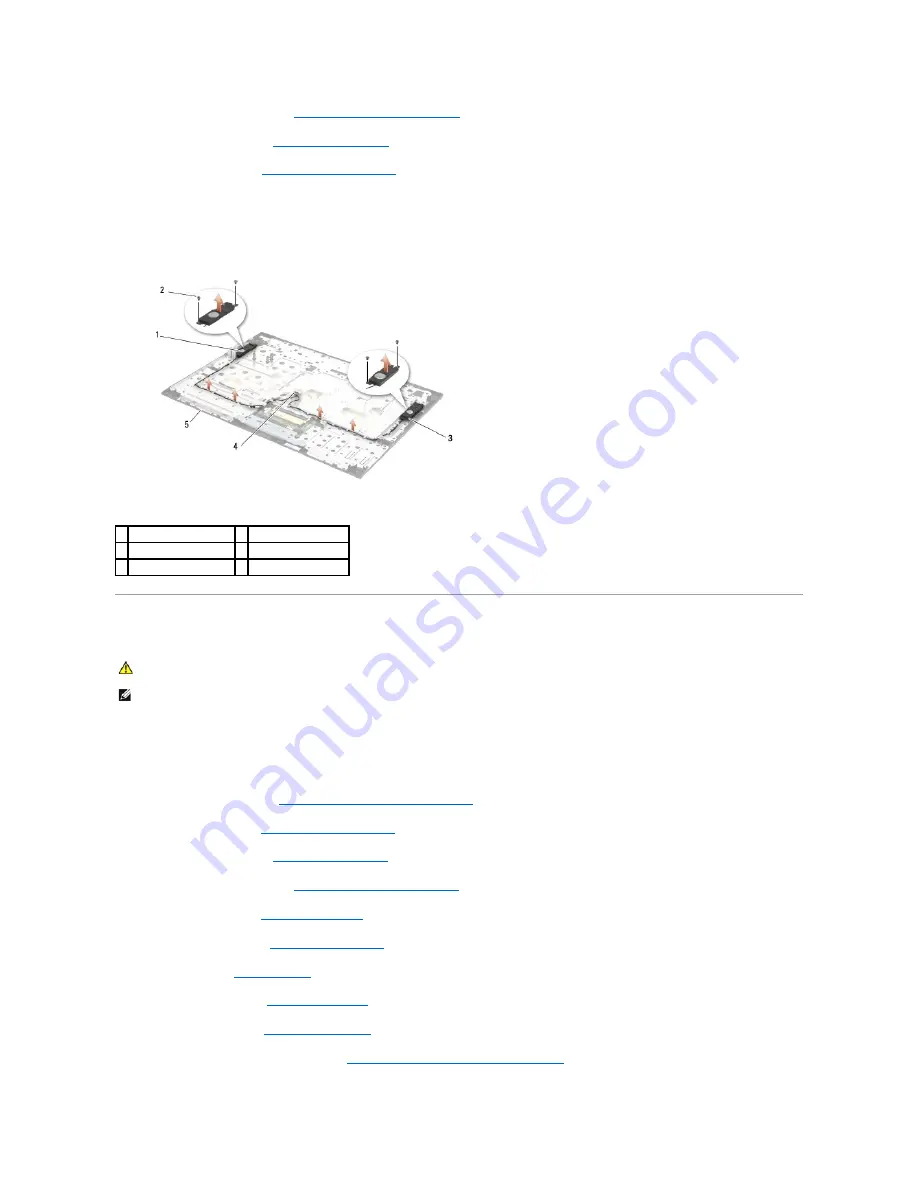
Remove the two M2 x 3-mm screws that secure the each of the right and left speaker assemblies to the palm rest of the computer.  


12.

Carefully remove the cable assembly from the cable guides.  


13.

Remove the speaker assembly.


Replacing the E5500 Speaker Assembly  


1.

Align the guide holes in the speaker assembly with the guide posts on the palm rest of the computer, then lower the right and left speaker assemblies 
into place.  


2.

Replace the four M2 x 3-mm screws that secure the right and left speaker assemblies to the base of the computer.  


3.

Replace the system board (see 

Replacing the E5500 System Board Assembly

).  


4.

Replace the palm rest (see 

Replacing the E5500 Palm Rest

).  


5.

Replace the optical drive (see 

Replacing the Optical Drive

).  


6.

Replace the display assembly (see 

Replacing the E5500 Display Assembly

).  


7.

Replace the keyboard (see 

Replacing the Keyboard

).  


8.

Replace the hinge cover (see 

Replacing the Hinge Cover

).  


9.

Replace the fan (see 

Replacing the Fan

).  


10.

Replace the WLAN card (see 

Replacing a WLAN Card

).  


11.

Replace the hard drive (see 

Replacing the Hard Drive

).  


12.

Replace the bottom of the base assembly (see 

Replacing the E5500 Bottom of the Base Assembly

).  


1  left speaker assembly 

2  M2 x 3-mm screws (4) 

3  right speaker assembly  4  speaker connector 

5  base 


CAUTION: 

Before you begin the following procedure, follow the safety instructions that shipped with your computer. For additional safety best 

practices information, see the Regulatory Compliance Homepage on www.dell.com at: www.dell.com/regulatory_compliance.


NOTE: 

This procedure assumes that you have completed the removal procedure first.

Summary of Contents for E5400 - Latitude - Core 2 Duo 2.4 GHz

Page 1: ...sta start button logo are either trademarks or registered trademarks of Microsoft Corporation in the United States and or other countries Other trademarks and trade names may be used in this document to refer to either the entities claiming the marks and names or their products Dell Inc disclaims any proprietary interest in trademarks and trade names other than its own Models PP32LA and PP32LB May...

Page 2: ...ottom of the base assembly toward the left side of the computer and lift it up Replacing the E5400 Bottom of the Base Assembly CAUTION Before you begin any of the procedures in this section follow the safety instructions that shipped with your computer For additional safety best practices information see the Regulatory Compliance Homepage on www dell com at www dell com regulatory_compliance 1 E54...

Page 3: ...e back of the computer until it is fully seated 2 Replace the single M2 5 x 8 mm screw securing the bottom of the base assembly 3 Follow the procedures in After Working on Your Computer Back to Contents Page CAUTION Before you begin any of the procedures in this section follow the safety instructions that shipped with your computer For additional safety best practices information see the Regulator...

Page 4: ...t support dell com NOTE The color of your computer and certain components may appear differently than shown in this document CAUTION Before you begin any of the procedures in this section follow the safety instructions that shipped with your computer For additional safety best practices information see the Regulatory Compliance Homepage on www dell com at www dell com regulatory_compliance NOTICE ...

Page 5: ...ur Computer 1 Connect any external devices such as a port replicator battery slice or cool slice and replace any cards such as an ExpressCard or SD memory card 2 Connect any telephone or network cables to your computer 3 Replace the battery Slide the battery into the battery bay until it clicks into place 4 Connect your computer and all attached devices to their electrical outlets 5 Turn on your c...

Page 6: ... reboots 9 Remove the flash BIOS update program CD from the drive Flashing the BIOS From the Hard Drive 1 Ensure that the AC adapter is connected to an electrical outlet that the main battery is properly installed and that a network cable is attached 2 Start the computer 3 Locate the latest BIOS update file for your computer at support dell com 4 Click Download Now to download the file 5 If the Ex...

Page 7: ...ose if the Download Complete window appears The file icon appears on your desktop and is titled the same as the downloaded BIOS update file 9 Double click the file icon on the desktop and follow the instructions on the screen Back to Contents Page ...

Page 8: ... board 2 Position the coin cell battery on the system board CAUTION Before you begin any of the procedures in this section follow the safety instructions that shipped with your computer For additional safety best practices information see the Regulatory Compliance Homepage on www dell com at www dell com regulatory_compliance 1 E5400 coin cell battery 2 coin cell battery cable connector 1 E5500 co...

Page 9: ...he bottom of the base assembly see Replacing the E5400 Bottom of the Base Assembly or Replacing the E5500 Bottom of the Base Assembly 4 Follow the procedures in After Working on Your Computer Back to Contents Page ...

Page 10: ... cam screw 2 ZIF socket NOTICE To ensure maximum cooling for the processor do not touch the heat transfer areas on the processor heat sink The oils in your skin can reduce the heat transfer capability of the thermal pads NOTICE When removing the processor module pull the module straight up Be careful not to bend the pins on the processor module CAUTION Before you begin the following procedure foll...

Page 11: ... Replace the fan see Replacing the Fan 5 Replace the bottom of the base assembly see Replacing the E5400 Bottom of the Base Assembly or Replacing the E5500 Bottom of the Base Assembly 6 Follow the procedures in After Working on Your Computer Back to Contents Page NOTE The pin 1 corner of the processor module has a triangle that aligns with the triangle on the pin 1 corner of the ZIF socket 1 ZIF s...

Page 12: ...ne up and secure the processor heat sink with the screw closest to the front of the computer 1 Align the five captive screws on the processor heat sink with the screw holes on the system board and secure the screws Tighten the four numbered CAUTION Before you begin the following procedure follow the safety instructions that shipped with your computer For additional safety best practices informatio...

Page 13: ... Replace the fan see Replacing the Fan 3 Replace the bottom of the base assembly see Replacing the E5400 Bottom of the Base Assembly or Replacing the E5500 Bottom of the Base Assembly 4 Follow the procedures in After Working on Your Computer Back to Contents Page ...

Page 14: ... display cable connector 6 Carefully remove the display cable by moving it away from the metal and plastic cable guide tabs 7 Turn the computer over Disconnect the antenna cables from their cards and remove them by moving them out of the cable guides on the bottom of the computer 8 Slide the antenna cables through the hole in the palm rest 9 Remove the antenna cables from the cable guides on the t...

Page 15: ...uter 5 Insert the antenna cables into the cable guides where they were originally placed 1 M2 5 x 8 mm bottom screws 2 1 display cable connector 2 M2 5 x 5 mm top screws 4 3 display assembly 4 antenna cables 2 CAUTION Before you begin the following procedure follow the safety instructions that shipped with your computer For additional safety best practices information see the Regulatory Compliance...

Page 16: ...move the hinge cover see Removing the Hinge Cover 3 Remove the keyboard see Removing the Keyboard 4 Remove the display assembly see Removing the E5400 Display Assembly 5 Starting at the middle bottom of the display panel use your fingers to separate the bezel from the top cover then lift the inside edges to separate the remainder of the bezel 1 antenna cables CAUTION Before you begin the following...

Page 17: ...emoving the E5400 Display Bezel 6 Remove the four M2 5 x 5 mm screws two per side that secure the display hinges to the display cover Replacing the E5400 Display Hinges CAUTION Before you begin the following procedure follow the safety instructions that shipped with your computer For additional safety best practices information see the Regulatory Compliance Homepage on www dell com at www dell com...

Page 18: ...keyboard see Removing the Keyboard 4 Remove the display assembly see Removing the E5400 Display Assembly 5 Remove the display bezel see Removing the E5400 Display Bezel 6 Remove the M2 5 x 5 mm screw from the display inverter 7 Disconnect the two display inverter connectors 8 Lift the display inverter out of the display assembly NOTE This procedure assumes that you have completed the removal proce...

Page 19: ...board see Removing the Keyboard 4 Remove the display assembly see Removing the E5400 Display Assembly 5 Remove the display bezel see Removing the E5400 Display Bezel 6 Remove the display inverter see Removing the E5400 Display Inverter 7 Remove the eight M2 x 3 mm screws four on each side of the display panel from the display hinge panels CAUTION Before you begin the following procedure follow the...

Page 20: ... Remove the hinge cover see Removing the Hinge Cover 3 Remove the keyboard see Removing the Keyboard 4 Remove the four M2 5 x 5 mm screws from the display hinges 5 Remove the display assembly see Removing the E5400 Display Assembly 6 Remove the display bezel see Removing the E5400 Display Bezel 7 Remove the display inverter see Removing the E5400 Display Inverter 8 Remove the display panel see Rem...

Page 21: ...ase assembly see Removing the E5400 Bottom of the Base Assembly 3 Remove the hinge cover see Removing the Hinge Cover 4 Remove the keyboard see Removing the Keyboard 5 Remove the display cable from the system board by pulling on the blue tab next to the display cable connector 1 display panel 2 display cable connector 3 display cable CAUTION Before you begin the following procedure follow the safe...

Page 22: ...enna cables from the cable guides on the top of the computer 10 Remove the two M2 5 x 8 mm screws on the top of the computer that secure the metal hinges 11 Remove the two M2 5 x 8 mm screws that secure the hinges located on the bottom of the computer 12 Lift the display and hinge assembly out of the computer Replacing the E5500 Display Assembly 1 display cable 2 antenna cables 1 M2 5 x 8 mm botto...

Page 23: ...er 2 Remove the hinge cover see Removing the Hinge Cover 3 Remove the keyboard see Removing the Keyboard 4 Remove the display assembly see Removing the E5500 Display Assembly 5 Starting at the middle bottom of the display panel use your fingers to separate the bezel from the top cover then lift the inside edges to separate the remainder of the bezel CAUTION Before you begin the following procedure...

Page 24: ... assembly see Removing the E5500 Display Assembly 5 Remove the display bezel see Removing the E5500 Display Bezel 6 Remove the four M2 5 x 8 mm screws two per side and the two M2 x 3 mm screws one per side that secure the display hinges to the display cover 1 display bezel NOTICE Removal of the bezel from the top cover requires extreme care to avoid damage to the bezel CAUTION Before you begin the...

Page 25: ...over 3 Remove the keyboard see Removing the Keyboard 4 Remove the display assembly see Removing the E5500 Display Assembly 5 Remove the display bezel see Removing the E5500 Display Bezel 6 Remove the M2 5 x 5 mm screw from the display inverter 7 Disconnect the two display inverter connectors 1 M2 5 x 8 mm screws 4 2 M2 x 3 mm screws 2 3 hinge CAUTION Before you begin the following procedure follow...

Page 26: ...r see Removing the Hinge Cover 3 Remove the keyboard see Removing the Keyboard 4 Remove the display assembly see Removing the E5500 Display Assembly 5 Remove the display bezel see Removing the E5500 Display Bezel 1 E5500 top cover 2 display connector 3 M2 5 x 5 mm screw 4 display inverter connector 5 display inverter NOTICE Removal of the bezel from the top cover requires extreme care to avoid dam...

Page 27: ...f the Base Assembly 9 Follow the procedures in After Working on Your Computer E5500 Display Cable Removing the E5500 Display Cable 1 Follow the instructions in Before Working on Your Computer 2 Remove the hinge cover see Removing the Hinge Cover 3 Remove the keyboard see Removing the Keyboard 4 Remove the display assembly see Removing the E5500 Display Assembly 1 M2 x 3 mm screws 8 on display hing...

Page 28: ...zel 5 Replace the display assembly see Replacing the E5500 Display Assembly 6 Replace the keyboard see Replacing the Keyboard 7 Replace the hinge cover see Replacing the Hinge Cover 8 Close the display and turn the computer over 9 Replace the bottom of the base assembly see Replacing the E5500 Bottom of the Base Assembly 10 Follow the procedures in After Working on Your Computer Back to Contents P...

Page 29: ...nector to the system board connector 4 Replace the bottom of the base assembly see Replacing the E5400 Bottom of the Base Assembly or Replacing the E5500 Bottom of the Base Assembly 5 Follow the procedures in After Working on Your Computer Back to Contents Page CAUTION Before you begin the following procedure follow the safety instructions that shipped with your computer For additional safety best...

Page 30: ......

Page 31: ... safety instructions that shipped with your computer For additional safety best practices information see the Regulatory Compliance Homepage on www dell com at www dell com regulatory_compliance CAUTION Do not touch the metal housing of the hard drive if you remove the hard drive from the computer while the drive is hot NOTICE To prevent data loss turn off your computer before removing the hard dr...

Page 32: ... E5500 Bottom of the Base Assembly 4 Follow the procedures in After Working on Your Computer 5 Install the operating system drivers and utilities for your computer as needed For more information see the Setup and Quick Reference Guide that shipped with your computer or on support dell com Back to Contents Page ...

Page 33: ...Computer Back to Contents Page CAUTION Before you begin any of the procedures in this section follow the safety instructions that shipped with your computer For additional safety best practices information see the Regulatory Compliance Homepage on www dell com at www dell com regulatory_compliance NOTICE The hinge cover is fragile and can be damaged if extreme force is used Exercise care when remo...

Page 34: ...e Removing the Hinge Cover 8 Remove the keyboard see Removing the Keyboard 9 Remove the display assembly see Removing the E5400 Display Assembly 10 Remove the optical drive see Removing the Optical Drive 11 Remove the palm rest see Removing the E5400 Palm Rest 12 Remove the coin cell battery connector refer to Removing the Coin Cell Battery 13 Remove the system board see Removing the E5400 System ...

Page 35: ... E5400 Bottom of the Base Assembly 13 Follow the procedures in After Working on Your Computer Removing an E5500 I O Card 1 Follow the procedures in Before Working on Your Computer 2 Remove the bottom of the base assembly see Removing the E5400 Bottom of the Base Assembly 3 Remove the hard drive see Removing the Hard Drive 4 Remove the WLAN card see Removing a WLAN Card 5 Remove the hinge cover see...

Page 36: ...ay Assembly 6 Replace the keyboard see Replacing the Keyboard 7 Replace the hinge cover see Replacing the Hinge Cover 8 Replace the WLAN card seeReplacing a WLAN Card 9 Replace the hard drive see Replacing the Hard Drive 10 Replace the bottom of the base assembly see Replacing the E5500 Bottom of the Base Assembly 11 Follow the procedures in After Working on Your Computer Back to Contents Page 1 s...

Page 37: ...ocedures in this section follow the safety instructions that shipped with your computer For additional safety best practices information see the Regulatory Compliance Homepage on www dell com at www dell com regulatory_compliance NOTICE The key caps on the keyboard are fragile easily dislodged and time consuming to replace Exercise care when removing and handling the keyboard NOTE Lift the keyboar...

Page 38: ...e of the keyboard to snap into place 3 Replace the M2 x 3 mm screws that hold the keyboard in place 4 Replace the hinge cover see Replacing the Hinge Cover 5 Follow the procedures in After Working on Your Computer Back to Contents Page ...

Page 39: ...ew securing the LED Dashboard and remove it from the computer Replacing the E5400 LED Dashboard 1 Place the LED Dashboard on to the palm rest 2 Replace the M2 x 3 mm screw to secure the LED Dashboard 3 Gently connect the LED Dashboard cable to the system board using the tab close the cable s connector CAUTION Before you begin any of the procedures in this section follow the safety instructions tha...

Page 40: ...r see Removing the Hinge Cover 3 Remove the keyboard see Removing the Keyboard 4 Remove the LED Dashboard by lifting it from the bottom right side 5 Carefully loosen the LED Dashboard cable by sliding it away from the metal tab 6 Disconnect the cable to the motherboard by gently pulling on the tab near cable s connector Replacing the E5500 LED Dashboard CAUTION Before you begin any of the procedur...

Page 41: ...placing the left side under the plastic placeholder and ensure the plastic post comes through the hole in the LED Dashboard The right side of the LED Dashboard should be resting on the plastic placeholder just under it 4 Replace the keyboard see Replacing the Keyboard 5 Replace the hinge cover see Replacing the Hinge Cover 6 Follow the procedures in After Working on Your Computer Back to Contents ...

Page 42: ...move the bottom of the base assembly see Removing the E5400 Bottom of the Base Assembly or Replacing the E5400 Bottom of the Base Assembly 4 Use your fingertips to carefully spread apart the securing clips on each end of the memory module connector until the memory module pops up 5 Remove the memory module from the connector NOTE Memory modules purchased from Dell are covered under your computer w...

Page 43: ...n information To confirm the amount of memory installed in the computer l In the Microsoft Windows XP operating system right click the My Computer icon on your desktop and click Properties General l In Microsoft Windows Vista click Start Help and Support Dell System Information CAUTION Before you begin any of the procedures in this section follow the safety instructions that shipped with your comp...

Page 44: ...Back to Contents Page ...

Page 45: ...cures the modem card 5 Press the modem card edge closest to the back of the computer until it loosens 6 Lift up the modem card by the tab to fully remove it from the connector 7 Turn the modem card over hold it while removing its cable and remove it from the computer CAUTION Before you begin any of the procedures in this section follow the safety instructions that shipped with your computer For ad...

Page 46: ...he bottom of the base assembly see Replacing the E5400 Bottom of the Base Assembly or Replacing the E5500 Bottom of the Base Assembly 6 Follow the procedures in After Working on Your Computer Back to Contents Page NOTICE The connectors are keyed to ensure correct insertion If you feel resistance check the connectors on the card and on the system board and realign the card NOTICE To avoid damage to...

Page 47: ...he M2 5 x 8 mm screw to secure the optical drive to the system board 3 Replace the bottom of the base assembly see Replacing the E5400 Bottom of the Base Assembly or Replacing the E5500 Bottom of the Base Assembly 4 Follow the procedures in After Working on Your Computer Back to Contents Page CAUTION Before you begin any of the procedures in this section follow the safety instructions that shipped...

Page 48: ...eyboard see Removing the Keyboard 7 Remove the display assembly see Removing the E5400 Display Assembly 8 Remove the optical drive see Removing the Optical Drive 9 Remove the 13 M2 5 x 8 mm screws from the bottom of the computer 10 Remove the four M2 5 x 5 mm screws on the top of the computer securing the metal plate 11 Remove the three M2 x 3 mm screws that secure the top of the computer near the...

Page 49: ...rd see Replacing the Keyboard 9 Replace the hinge cover see Replacing the Hinge Cover 10 Replace the processor heat sink see Replacing the Processor Heat Sink 11 Replace the fan see Replacing the Fan 12 Replace the WLAN card see Replacing a WLAN Card 1 palm rest 2 dashboard LED board connector 3 M2 5 x 5 mm screws 4 4 M2 x 3 mm screws 3 5 computer base 6 touch pad connector 7 speaker connector NOT...

Page 50: ...e the keyboard see Removing the Keyboard 7 Remove the display assembly see Removing the E5500 Display Assembly 8 Remove the optical drive see Removing the Optical Drive 9 Remove the nine M2 5 x 8 mm screws from the bottom of the computer 10 Remove the two M2 5 x 5 mm screws on the top of the computer securing the metal plate 11 Remove the three M2 x 3 mm screws that secure the top of the computer ...

Page 51: ...9 Replace the hinge cover see Replacing the Hinge Cover 10 Close the display and turn the computer over 11 Replace the bottom of the base assembly see Replacing the E5500 Bottom of the Base Assembly 12 Follow the procedures in After Working on Your Computer 1 palm rest 2 dashboard LED board connector 3 M2 5 x 5 mm screws 2 4 M2 x 3 mm screws 3 5 computer base 6 touch pad connector 7 speaker connec...

Page 52: ...Back to Contents Page ...

Page 53: ...Cover 8 Remove the keyboard see Removing the Keyboard 9 Remove the display assembly see Removing the E5400 Display Assembly 10 Remove the optical drive see Removing the Optical Drive 11 Remove the palm rest see Removing the E5400 Palm Rest 12 Remove the two M2 x 3 mm screws that secure the touch pad cover and remove it 13 Carefully remove the cable assembly from the cable guides 14 Remove the four...

Page 54: ...ttom of the base assembly see Replacing the E5400 Bottom of the Base Assembly 16 Follow the procedures in After Working on Your Computer Removing the E5500 Speaker Assembly 1 Follow the instructions in Before Working on Your Computer 2 Remove the bottom of the base assembly see Removing the E5400 Bottom of the Base Assembly 3 Remove the hard drive see Removing the Hard Drive 4 Remove the WLAN card...

Page 55: ...oard Assembly 4 Replace the palm rest see Replacing the E5500 Palm Rest 5 Replace the optical drive see Replacing the Optical Drive 6 Replace the display assembly see Replacing the E5500 Display Assembly 7 Replace the keyboard see Replacing the Keyboard 8 Replace the hinge cover see Replacing the Hinge Cover 9 Replace the fan see Replacing the Fan 10 Replace the WLAN card see Replacing a WLAN Card...

Page 56: ...13 Follow the procedures in After Working on Your Computer Back to Contents Page ...

Page 57: ...Removing a WLAN Card 5 Remove the fan see Removing the Fan 6 Remove the processor heat sink see Processor Heat Sink 7 Remove the hinge cover see Removing the Hinge Cover 8 Remove the keyboard see Removing the Keyboard 9 Remove the display assembly see Removing the E5400 Display Assembly 10 Remove the optical drive see Removing the Optical Drive 11 Remove the palm rest see Removing the E5400 Palm R...

Page 58: ... the system setup program see the Dell Technology Guide on your computer or at support dell com Removing the E5500 System Board Assembly 1 Follow the instructions in Before Working on Your Computer 2 Remove the bottom of the base assembly see Removing the E5400 Bottom of the Base Assembly 3 Remove the hard drive see Removing the Hard Drive 4 Remove the WLAN card see Removing a WLAN Card CAUTION Be...

Page 59: ...ide of the system board into the base of the computer at an angle until the connectors on the system board are aligned with the holes on the base of the computer then carefully lower the system board into place and into the I O board connector 3 Replace the three M2 5 x 5 mm screws on the system board 4 Connect the serial I O cable to the connector on the system board 5 Replace the palm rest see R...

Page 60: ...ur Computer 15 Flash the BIOS see Flashing the BIOS 16 Enter the system setup program to update the BIOS on the new system board with the computer Service Tag For information on the system setup program see the Dell Technology Guide on your computer or at support dell com Back to Contents Page NOTE If you use a BIOS update program media to flash the BIOS press F12 before inserting the media in ord...

Page 61: ...mark of Intel Corporation in the U S and other countries Blu ray Disc is a trademark of the Blu ray Disc Association Microsoft Windows Windows Vista and Windows Vista start button logo are either trademarks or registered trademarks of Microsoft Corporation in the United States and or other countries Other trademarks and trade names may be used in this document to refer to either the entities claim...

Page 62: ...ight Pattern Problem Description Suggested Resolution No memory modules are detected l If two or more memory modules are installed remove the modules see Removing a Memory Module then reinstall one module see Replacing a Memory Module and restart the computer If the computer starts normally continue to install additional memory modules one at a time until you have identified a faulty module or rei...

Page 63: ...oard keyboard display memory hard drive etc During the assessment answer any questions that appear If failures are detected during the Pre boot System Assessment write down the error code s and contact Dell Support If the Pre boot System Assessment completes successfully the following message appears Booting Dell Diagnostic Utility Partition Press any key to continue 3 Press any key to start the D...

Page 64: ...ostics Main Menu left click with the mouse or press Tab and then Enter to select the test you want to run see Dell Diagnostics Main Menu 10 After all tests have completed close the test window to return to the Dell Diagnostics Main Menu 11 Close the Main Menu window to exit the Dell Diagnostics and restart the computer 12 Remove the Drivers and Utilities media from the optical drive Dell Diagnosti...

Page 65: ...f devices in the system This typically can take 10 to 20 minutes NOTE The Express Test requires no interaction on your part Run Express Test first to increase the possibility of tracing a problem quickly Extended Test Performs a thorough check of devices in the system This typically can take 1 hour or more NOTE The Extended Test periodically requires your input to answer specific questions Custom ...

Page 66: ...down the exact message This message may help support personnel diagnose and fix the problem s l If an error message occurs in a program see the program s documentation Battery Problems Drive Problems Ensure that Microsoft Windows recognizes the drive Windows XP l Click Start and click My Computer Windows Vista l Click Start and click Computer If the drive is not listed perform a full scan with you...

Page 67: ...ee the Dell Technology Guide on your computer or at support dell com You can also search for the keyword standby in Windows Help and Support for information on power management modes Hard drive problems Run Check Disk Windows XP 1 Click Start and click My Computer 2 Right click Local Disk C 3 Click Properties Tools Check Now 4 Click Scan for and attempt recovery of bad sectors and click Start Wind...

Page 68: ...ce manufacturer Lockups and Software Problems The computer does not start up Check the diagnostic lights See Power Problems Ensure that the power cable is firmly connected to the computer and to the electrical outlet The computer stops responding Turn the computer off If you are unable to get a response by pressing a key on your keyboard or moving your mouse press and hold the power button for at ...

Page 69: ...ed to run the software See the software documentation for information l Ensure that the program is installed and configured properly l Verify that the device drivers do not conflict with the program l If necessary uninstall and then reinstall the program Back up your files immediately Use a virus scanning program to check the hard drive floppy disks CDs or DVDs Save and close any open files or pro...

Page 70: ...s turned up and that the sound is not muted Disconnect headphones from the headphone connector Sound from the speakers is automatically disabled when headphones are connected to the computer s front panel headphone connector Eliminate possible interference Turn off nearby fans fluorescent lights or halogen lamps to check for interference Run the Hardware Troubleshooter See Hardware Troubleshooter ...

Page 71: ...ternal monitor 1 Shut down your computer and connect an external monitor to the computer 2 Turn on the computer and the monitor and adjust the monitor brightness and contrast controls If the external monitor works the computer display or video controller may be defective Contact Dell Support Back to Contents Page CAUTION Before you begin any of the procedures in this section follow the safety inst...

Page 72: ...he Base Assembly or Removing the E5500 Bottom of the Base Assembly 4 Remove the M2 x 3 mm screw that secures the WLAN card 5 Remove the WLAN card out of its system board connector at a 45 degree angle Replacing a WLAN Card CAUTION Before you begin any of the procedures in this section follow the safety instructions that shipped with your computer For additional safety best practices information se...

Page 73: ...Assembly or Replacing the E5500 Bottom of the Base Assembly 4 Follow the procedures in After Working on Your Computer Back to Contents Page NOTICE The connectors are keyed to ensure correct insertion If you feel resistance check the connectors on the card and on the system board and realign the card NOTICE To avoid damage to the WLAN card never place cables under the card NOTE This procedure assum...

Reviews: