background image

Installing network connected machine’s driver

Windows

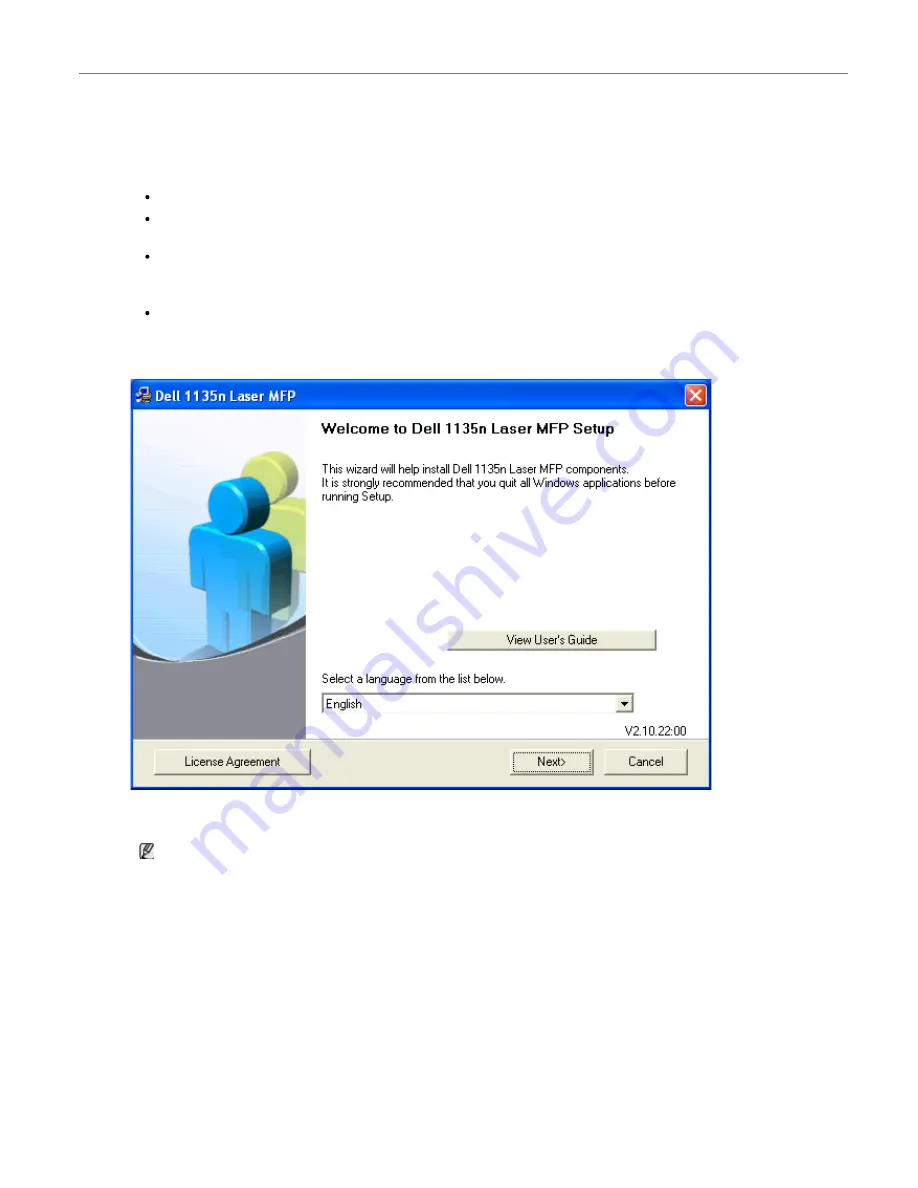
You can set up the machine driver, follow the steps below.
This is recommended for most users. All components necessary for machine operations will be installed.

1. 

Make sure that the machine is connected to the network and powered on.

2. 

Insert the supplied software CD into your CD/DVD drive.

The software CD should automatically run and an installation window appear.
If the installation window does not appear, click 

Start

 and then 

Run

. Type X:\

Setup.exe

, replacing “X”

with the letter which represents your drive. Click 

OK

.

If you use Windows Vista, Windows 7 and Windows 2008 Server R2 click 

Start

 > 

All programs

 >

Accessories

 > 

Run

.

Type X:\

Setup.exe

 replacing “X” with the letter which represents your drive and click 

OK

.

If the 

AutoPlay

 window appears in Windows Vista, Windows 7 and Windows 2008 Server R2, click 

Run

Setup.exe

 in 

Install or run program

 field, and click 

Continue

 or 

Yes

 in the 

User Account Control

windows.

3. 

Click 

Next

.

If necessary, select a language from the drop-down list.

4. 

Select 

Typical installation for a network printer

. Then, click 

Next

.

The Custom Installation allows you to select the machine’s connection and choose individual component to
install. Follow the guide on the window.

Summary of Contents for 1135 Mono Laser

Page 1: ...ows Server are registered trademarks of Microsoft Corporation in the United States and or other countries Adobe and Acrobat Reader are either registered trademarks or trademarks of Adobe Systems Incorporated in the United States and or other countries Other trademarks and trade names may be used in this document to refer to the entities claiming the marks and names of their products Dell Inc discl...

Page 2: ...Multi Functional Printer User s Guide www dell com support dell com ...

Page 3: ...help Follow directions explicitly Operating environment Warning Do not use if the power cord is damaged or if the electrical outlet is not grounded This could result in electric shock or fire Do not bend or place heavy objects on the power cord Stepping on or allowing the power cord to be crushed by a heavy object could result in electric shock or fire Do not place anything on top of the machine w...

Page 4: ...o stack up in the paper output tray It could cause damage to the machine Use care to avoid paper cuts when replacing paper or removing jammed paper You may get hurt This machine s power interception device is the power cord To switch off the power supply remove the power cord from the electrical outlet Installation Moving Warning Do not place the machine in an area with dust humidity or water leak...

Page 5: ...r Keep the power cable and the contact surface of the plug clean from dust or water This could result in electric shock or fire To clean and operate the machine follow the user s guide provided with the machine Otherwise it can cause damage to the machine Do not remove any covers or guards that are fastened with screws The machine should only be repaired by Dell service technician Supply usage Cau...

Page 6: ...rstanding the Status LED Introducing the useful buttons Turning on the machine Machine overview Front view This illustration may differ from your machine depending on its model 1 Document feeder cover 6 Front door handle 11 Document output tray 16 Scanner glass 2 Document feeder width guides 7 Handle 12 Control panel 17 Scan unit ...

Page 7: ...d a This button is used when you close the scan unit Rear view This illustration may differ from your machine depending on its model 1 Network port 5 Power receptacle 2 USB port 6 Rear door 3 Telephone line socket 7 Rear door handle 4 Extension telephone socket EXT Control panel overview 1 ID Copy You can copy both sides of an ID Card such as a driver s license to a single side of paper See ID car...

Page 8: ... on the screen showing the current job that the user can stop or resume 18 Power You can turn the power on and off See Power button Understanding the Status LED The color of the status LED indicates the machine s current status Status Description Off The machine is off line The machine is in power saver mode When data is received or any button is pressed it switches to on line automatically Green ...

Page 9: ... cartridges will not be covered under the machine warranty Check the message on the display Follow the instructions in the message or refer to troubleshooting part See Understanding display messages If the problem persists call for service All printing errors will appear in the Printer Status Monitor program window If the problem persists call for service Introducing the useful buttons Menu button...

Page 10: ...o country Caution Gives users information to protect the machine from possible mechanical damage or malfunction Do not touch the green underside of the toner cartridge Footnote Provides additional more detailed information on certain words or a phrase a pages per minute Cross reference Guides users to a reference page for the additional detailed information See Finding more information Finding mor...

Page 11: ......

Page 12: ...ed across the sheet of paper and can then be taped together to form a poster See Printing posters You can use preprinted forms with plain paper SeeUsing overlay Save time and money To save paper you can print multiple pages on one single sheet of paper See Printing multiple pages on one sheet of paper This machine automatically conserves electricity by substantially reducing power consumption when...

Page 13: ...fax reports according to the setting IPv6 This machine supports IPv6 Features by Model The machine is designed to support all of your document needs from printing and copying to more advanced networking solutions for your business Some features and optional goods may not be available depending on models or countries Features by model include FEATURES Dell 1135n Print Duplex 2 sided printing manual...

Page 14: ...e Quick Install Guide first and follow the steps below 1 Select a stable location Select a level stable place with adequate space for air circulation Allow extra space to open covers and trays The area should be well ventilated and away from direct sunlight or sources of heat cold and humidity Do not set the machine close to the edge of your desk or table Printing is suitable for altitudes under 1...

Page 15: ...date Utility This program helps you to update printer s firmware SetIP Use this program to set your machine s TCP IP addresses Macintosh Printer driver Use this driver to take full advantage of your machine s features Scanner driver TWAIN driver is available for scanning documents on your machine SetIP Use this program to set your machine s TCP IP addresses Linux Unified Linux Driver Use this driv...

Page 16: ...E 9 2 9 3 10 0 10 1 10 2 10 3 11 0 11 1 32 64 bit Mandrake 10 0 10 1 32 64 bit Mandriva 2005 2006 2007 2008 2009 32 64 bit Ubuntu 6 06 6 10 7 04 7 10 8 04 8 10 32 64 bit SuSE Linux Enterprise Desktop 9 10 32 64 bit Debian 3 1 4 0 5 0 32 64 bit CPU Pentium IV 2 4 GHz Intel Core 2 RAM 512 MB 1024 MB Free HDD space 1 GB 2 GB It is necessary to claim swap partition of 300 MB or larger for working with...

Page 17: ...etup exe replacing X with the letter which represents your CD DVD drive and click OK If the AutoPlay window appears in Windows Vista Windows 7 or Windows 2008 Server R2 click Run Setup exe in Install or run program field and click Continue or Yes in the User Account Control windows 3 Click Next If necessary select a language from the drop down list 4 Select Typical installation for a local printer...

Page 18: ...ine and interface in use 5 After the installation is finished a window asking you to print a test page appears If you choose to print a test page select the checkbox and click Next Otherwise just click Next and skip to step 7 6 If the test page prints out correctly click Yes If not click No to reprint it 7 Click Finish If the printer driver does not work properly follow the steps below to repair o...

Page 19: ... icon a display window will pop up 15 For Mac OS X 10 3 select the USB tab For Mac OS X10 4 click Default Browser and find the USB connection For Mac OS X 10 5 10 6 click Default and find the USB connection 16 For Mac OS X 10 3 if Auto Select does not work properly select Dell in Printer Model and your machine name in Model Name For Mac OS X 10 4 if Auto Select does not work properly select Dell i...

Page 20: ... have any difficulties consult the on screen help that is available through your system menu or can otherwise be called from the driver package Windows applications such as Unified Driver Configurator or Image Manager Installing the driver in the text mode If you do not use the graphical interface or have been unable to install the driver you have to use the driver in the text mode Follow the step...

Page 21: ...a select Control Panel Hardware and Sound Printers For Windows 7 select Control Panel Hardware and Sound Devices and Printers For Windows Server 2008 R2 select Control Panel Hardware Devices and Printers 4 Right click your printer icon 5 For Windows XP 2003 2008 Vista selet click Properties For Windows 7 and Windows Server 2008 R2 from context menus select the Printer properties If Printer propert...

Page 22: ...ons folder System Preferences and click Print Fax 3 Select the printer to share in the Printers list 4 Select Share this printer Setting up a client computer 1 Install your printer driver See Macintosh 2 Open the Applications folder System Preferences and click Print Fax 3 Press the icon A display window showing the name of your shared printer appears 4 Select your machine and click Add ...

Page 23: ...mine the altitude where you are 1 High 1 2 High 2 3 High 3 4 Normal 1 Ensure that you have installed the printer driver with the provided software CD 2 You can launch Printer Settings Utility from the Start menu select Programs or All Programs Dell Dell Printers your printer driver name Printer Settings Utility 3 Click Setting Altitude Adjustment Select the appropriate value from the dropdown list...

Page 24: ...stem Setup appears and press OK 3 Press the left right arrow until Machine Setup appears and press OK 4 Press the left right arrow until Clock Mode appears and press OK 5 Press the left right arrow to select the other mode and press OK 6 Press Stop Clear to return to ready mode Changing the default mode Your machine is preset to Copy mode You can switch this default mode between Fax mode and Copy ...

Page 25: ... speaker volume only when the telephone line is connected Entering characters using the number keypad As you perform various tasks you may need to enter names and numbers For example when you set up your machine you enter your name or your company s name and the fax number Entering alphanumeric characters 1 When you are prompted to enter a letter locate the button labeled with the character you wa...

Page 26: ...ady mode When PC printing you can also turn on or off toner save mode in the printer properties Using the power saving feature When you are not using the machine for a while use this feature to save power 1 Press Menu on the control panel 2 Press the left right arrow until System Setup appears and press OK 3 Press the left right arrow until Machine Setup appears and press OK 4 Press the left right...

Page 27: ...Sound Devices and Printers For Windows Server 2008 R2 select Control Panel Hardware Devices and Printers 3 Right click your machine 4 For Windows XP 2003 2008 Vista press Printing Preferences For Windows 7 and Windows Server 2008 R2 from context menus select the Printing Preferences If Printing Preferences item has mark you can select other printer drivers connected with selected printer 5 Click P...

Page 28: ... can set the amount of time the machine will wait 1 Press Menu on the control panel 2 Press the left right arrow until System Setup appears and press OK 3 Press the left right arrow until Machine Setup appears and press OK 4 Press the left right arrow until Job Timeout appears and press OK 5 Enter the time using left right arrow or numeric keypad 6 Press OK to save the selection 7 Press Stop Clear...

Page 29: ...ine quality option Booklet printing Poster printing Multiple pages per sheet Fit to page printing Reduce and enlarge printing Different source for first page Watermark Overlay Double sided printing manual supported Basic printing Your machine allows you to print from various Windows Macintosh or Linux applications The exact steps for printing a document may vary depending on the application you us...

Page 30: ...er the Dell AnyWeb Print too will save your time for screen captured images or printing the image Click Start All programs Dell Printers Dell AnyWeb Print Download the latest version to link the website where the tool is available for the download Canceling a print job If the print job is waiting in a print queue or print spooler cancel the job as follows 1 Click the Windows Start menu 2 For Windo...

Page 31: ...Preferences Using a Presets setting The Presets option which is visible on each preferences tab except for Dell tab allows you to save the current preferences settings for future use To save a Presets item 1 Change the settings as needed on each tab 2 Enter a name for the item in the Presets input box 3 Click Add When you save Presets all current driver settings are saved If you click Add the Add ...

Page 32: ...eet of paper You can select the number of pages to print on a single sheet of paper To print more than one page per sheet the pages will be reduced in size and arranged in the order you specify You can print up to 16 pages on one sheet 1 To change the print settings from your software application access Printing Preferences See Opening printing preferences 2 Click the Basic tab select Multiple Pag...

Page 33: ...et Printing option is not available for all paper sizes In order to find out the available paper size for this feature select the available paper size in the Size option on the Paper tab If you select an unavailable paper size this option can be automatically canceled Select only available paper paper without or mark 4 Click OK or Print until you exit the Print window 5 After printing fold and sta...

Page 34: ... when you want to check fine details on a small document 1 To change the print settings from your software application access Printing Preferences See Opening printing preferences 2 Click the Paper tab 3 Select the paper size you want from the Fit to page 4 Select the Size Source and Type in Paper Options 5 Click OK or Print until you exit the Print window Using watermarks The watermark option all...

Page 35: ...list and click Delete 4 Click OK or Print until you exit the Print window Using overlay An overlay is text and or images stored in the computer hard disk drive HDD as a special file format that can be printed on any document Overlays are often used to take the place of letterhead paper Rather than using preprinted letterhead you can create an overlay containing exactly the same information that is...

Page 36: ...elete from the Overlay List box 4 Click Delete 5 When a confirming message window appears click Yes 6 Click OK or Print until you exit the Print window Advanced Options Use the following Graphics options to adjust the print quality for your specific printing needs If the option is grayed out or not shown that option is not applicable with the printer language you are using 1 To change the print se...

Page 37: ...rs For Windows Server 2008 R2 select Control Panel Hardware Devices and Printers 3 Select your machine 4 Right click your machine and select Set as Default Printer For Windows 7 and Windows Server 2008 R2 If Set as default printer item has mark you can select other printer drivers connected with selected printer Printing to a file PRN You will sometimes need to save the print data as a file To cre...

Page 38: ...dvanced printing features provided by your machine Open an application and select Print from the File menu The machine name which appears in the printer properties pane may differ depending on the machine in use Except for the name the composition of the printer properties pane is similar to the following The setting options may differ depending on printers and Mac OS version The following pane ma...

Page 39: ...ng paper type Printer Settings Printer Settings tab provides Toner Save options Select Printer Settings from the drop down list under Orientation to access the following features Toner Save Selecting this option extends the life of your toner cartridge and reduces your cost per page without a significant reduction in print quality On Select this option to allow the printer to use less toner on eac...

Page 40: ...he Printing window appears allowing you to monitor the status of your print job To abort the current job click Cancel Printing files You can print many different types of files on your machine using the standard CUPS way directly from the command line interface The CUPS lpr utility allows you to do that But the drivers package replaces the standard lpr tool by a much more user friendly LPR GUI pro...

Page 41: ...hine port in this tab Driver This option allows you to view or select another machine driver By clicking Options you can set the default device options Jobs This option shows the list of print jobs Click Cancel job to cancel the selected job and select the Show completed jobs check box to see previous jobs on the job list Classes This option shows the class that your machine is in Click Add to Cla...

Page 42: ...lt settings for copying so that you can quickly and easily make a copy However if you want to change the options for each copy use the copy function buttons on the control panel If you press Stop Clear while setting the copy options all of the options you have set for the current copy job will be canceled and return to their default status after the machine completes the copy in progress Changing ...

Page 43: ...ow until Copy Feature appears and press OK 4 Press the left right arrow until Reduce Enlarge appears and press OK 5 Press the left right arrow until Custom appears and press OK 6 Press the left right arrow or numeric keypad to enter the copy size you want Pressing and holding the left right arrow allows you to quickly scroll to the number you want 7 Press OK to save the selection 8 Press Stop Clea...

Page 44: ... lid 4 Press OK on the control panel Your machine begins scanning the front side and shows Place Back Side and Press Start 5 Turn the original over and place it on the scanner glass where arrows indicate as shown then close the scanner lid 6 Press OK on the control panel to begin copying If the original is larger than the printable area some portions may not be printed If you don t press the OK bu...

Page 45: ...f images is automatically determined by the original image and the paper size This copy feature is available only when you place originals on the scanner glass 1 Press Copy on the control panel 2 Press Menu on the control panel 3 Press the left right arrow until Copy Feature appears and press OK 4 Press the left right arrow until Layout appears and press OK 5 Press the left right arrow until Clone...

Page 46: ... the left right arrow until Copy Collation appears and press OK 8 Press the left right arrow until On appears and press OK On Prints output in sets to match the sequence of originals Off Prints output sorted into stacks of individual pages 9 Press Stop Clear to return to ready mode 10 Press Start to begin copying One complete document will print followed by the second complete document Setting cop...

Page 47: ... to control the scanning process This feature can be used via the local connection or the network connection See Scanning with TWAIN enabled software SmarThru This program is the accompanying software for your machine You can use this program to scan images or documents This feature can be used via the local connection or the network connection See Smarthru WIA WIA stands for Windows Images Acquis...

Page 48: ... for Dell Scan and Fax Manager Password is the 4 digit number registered Password for Dell Scan and Fax Manager 7 Press the left right arrow until the application program you want appears and press OK Default setting is My Documents To add or delete the folder where the scanned file is saved add or delete the application program in Dell Scan and Fax Manager Properties Set Scan Button 8 Press the l...

Page 49: ...ecking this box allows you to preview applied scan options You can modify the options before scanning Default Allows you to go back to default options Change Port tab Local Scanner Select when your machine is connected via USB or LPT port Network Scanner Select when your machine is connected via network port Auto detection on the network Automatically detects your machine IP address Enter in your ...

Page 50: ...the Cancel button on the Scanner and Camera wizard Windows 7 1 Make sure that the machine is connected to your computer and powered on 2 Load originals face up into the document feeder or place a single original face down on the scanner glass See Loading originals 3 From the Start menu select Control Panel Hardware and Sound Devices and Printers 4 Click right button of mouse on device driver icon ...

Page 51: ...r scanning with network If a warning message appears click Change Port to select port If TWAIN UI appears from the Preference tab click Change Port to select port You can change the scanning machine by using the Change Port Local or Network Linux Scanning You can scan a document using the Unified Driver Configurator window Scanning 1 Double click the Unified Driver Configurator on your desktop 2 C...

Page 52: ... want to use one of the preset scan option settings select the option from the Job Type drop down list See Adding Job Type Settings Click Default to restore the default setting for the scan options 9 When you have finished click Scan to start scanning The status bar appears on the bottom left of the window to show you the progress of the scan To cancel scanning click Cancel 10 The scanned image ap...

Page 53: ...menu commands and tools to edit your scanned image Use the following tools to edit the image Tools Name Function Save Saves the image Undo Cancels your last action Redo Restores the action you canceled Scroll Allows you to scroll through the image Crop Crops the selected image area Zoom Out Zooms the image out Zoom In Zooms the image in Scale Allows you to scale the image size you can enter the si...

Page 54: ...Properties Shows the properties of the image For further details about the Image Manager application refer to the on screen help ...

Page 55: ...ted optional devices and features may differ according to your model Please check your model name See Features by Model Preparing to fax Before you send or receive a fax you need to connect the supplied line cord to the wall jack Refer to the Quick Install Guide how to make a connection The method of making a telephone connection is varies from one country to another Using a fax in your computer Y...

Page 56: ...Press Menu on the control panel 2 Press the left right arrow until System Setup appears and press OK 3 Press the left right arrow until Machine Setup appears and press OK 4 Press the left right arrow until Machine ID appears and press OK 5 Enter your name or the company name using the number keypad You can enter alphanumeric characters using the number keypad and include special symbols by pressin...

Page 57: ...pt Sending a fax to multiple destinations You can use the Multiple Send feature which allows you to send a fax to multiple locations Originals are automatically stored in memory and sent to a remote station After transmission the originals are automatically erased from memory You cannot send a color fax using this feature 1 Press Fax on the control panel 2 Load originals face up into the document ...

Page 58: ...ou that you are in ready mode and that a delayed fax is set Adding documents to a reserved delay fax job You can add additional documents to the delayed fax job which is saved in memory 1 Load the originals to be added and adjust document settings 2 Press Menu on the control panel 3 Press the left right arrow until Fax Feature appears and press OK 4 Press the left right arrow until Add pages appea...

Page 59: ...answers an incoming call and the caller can leave a message on the answering machine If the fax machine senses a fax tone on the line the machine automatically switches to Fax mode to receive the fax DRPD you can receive a call using the Distinctive Ring Pattern Detection DRPD feature Distinctive Ring is a telephone company service which enables an user to use a single telephone line to answer sev...

Page 60: ...using the DRPD option Distinctive Ring service must be installed on your telephone line by the telephone company To set up DRPD you will need another telephone line at your location or someone available to dial your fax number from outside To set up the DRPD mode 1 Press Fax on the control panel 2 Press Menu on the control panel 3 Press the left right arrow until Fax Setup appears and press OK 4 P...

Page 61: ...good results when using typical text based originals However if you send originals that are of poor quality or contain photographs you can adjust the resolution to produce a higher quality fax 1 Press Fax on the control panel 2 Press Menu on the control panel 3 Press the left right arrow until Fax Feature appears and press OK 4 Press the left right arrow until Resolution appears and press OK 5 Pre...

Page 62: ... ready mode Subsequent sent faxes will be forwarded to the specified fax machine Forwarding a received fax to another destination With this feature you can forward every fax you received to another destination When the machine receives a fax a fax is stored in the memory then the machine sends it to the destination you have set 1 Press Fax on the control panel 2 Press Menu on the control panel 3 P...

Page 63: ...r keypad For a two or three digit speed dial number press the first digit button s and then hold down the last digit button You can also search through memory for an entry by pressing Address Book See Searching Address Book for an entry Group dial numbers If you frequently send the same document to several destinations you can group these destinations and set them under a group dial number You can...

Page 64: ...ok on the control panel 3 Press the left right arrow until Search Dial appears and press OK 4 Press the left right arrow until Group Dial appears and press OK 5 Press the left right arrow until All appears and press OK 6 Press the left right arrow until the name and number you want appears You can search upwards or downwards through the entire memory in alphabetical order Searching sequentially th...

Page 65: ...x report automatically You can set the machine to print a report with detailed information about the previous 50 communication operations including time and dates 1 Press Fax on the control panel 2 Press Menu on the control panel 3 Press the left right arrow until Fax Setup appears and press OK 4 Press the left right arrow until Auto Report appears and press OK 5 Press the left right arrow until O...

Page 66: ...ion Redial Times You can specify the number of redial attempts If you enter 0 the machine will not redial Redial Term Your machine can automatically redial a remote fax machine if it was busy You can set an interval between attempts Prefix Dial You can set a prefix of up to five digits This number dials before any automatic dial number is started It is useful for accessing a PABX exchange ECM Mode...

Page 67: ...n the specified discard segment When the received fax contains pages larger than the paper in your machine and Auto Reduction has been turned on the machine will reduce the fax to fit on the existing paper and nothing will be discarded Junk Fax Setup This setting may not be available depending on your country Using this feature the system will not accept faxes sent from remote stations whose numbe...

Page 68: ... and dark images Original Type Improves the copy quality by selecting the document type for the current copy job Printing a report You can print a report on the machine s configuration or font list etc 1 Press Menu on the control panel 2 Press the left right arrow until System Setup appears and press OK 3 Press the left right arrow until Report appears and press OK 4 Press the left right arrow unt...

Page 69: ...t Copy Setup Restores all of the copy options to the factory default Scan Setup Restores all of the scan options to the factory default System Setup Restores all of the system options to the factory default Network Setup Restores all of the network options to the factory default Phone Book Clears all of the fax numbers entries stored in memory Sent Report Clears all records of sent faxes RCV Repor...

Page 70: ...n Fax Feature Darkness Resolution Multi Send Delay Send Priority Send Forward Secure Receive Add Page Cancel Job Fax Setup Sending Redial Times Redial Term Prefix Dial ECM Mode Send Report Image TCR Dial Mode Receiving Receive Mode Ring To Answer Stamp RCV Name RCV Start Code Auto Reduction Discard Size Junk Fax Setup DRPD Mode Change Default Resolution Darkness Auto Report Copy Feature Reduce Enl...

Page 71: ...ration Phone Book Send Report Sent Report Fax RCV Report Schedule Jobs JunkFax Report Network Info Maintenance CLR Empty Msg Supplies Life TonerLow Alert Serial Number Paper Stacking Clear Setting All Settings Fax Setup Copy Setup Scan Setup System Setup Network Setup Phone Book Sent Report RCV Report Network TCP IP IPv4 DHCP BOOTP Static TCP IP IPv6 IPv6 Activate DHCPv6 Config Ethernet Speed Clea...

Page 72: ...ing the supplies life If you experience frequent paper jams or printing problems check the number of pages the machine has printed Replace the corresponding parts if necessary 1 Press Menu on the control panel 2 Press the left right arrow until System Setup appears and press OK 3 Press the left right arrow until Maintenance appears and press OK 4 Press the left right arrow until Supplies Life appe...

Page 73: ...hine longer Cleaning the cabinet of the machine with cleaning materials containing large amounts of alcohol solvent or other strong substances can discolor or distort the cabinet If your machine or the surrounding area is contaminated with toner use a cloth or tissue dampened with water to clean it If you use a vacuum cleaner toner blows in the air and might be harmful Cleaning the outside Clean t...

Page 74: ...h a swab 5 Reinsert the toner cartridge and close the front door 6 Plug in the power cord and turn the machine on Cleaning the scan unit Keeping the scan unit clean helps ensure the best possible copies We suggest that you clean the scan unit at the start of each day and during the day as needed 1 Slightly dampen a soft lint free cloth or paper towel with water 2 Open the scanner lid 3 Wipe the su...

Page 75: ...r room light Dusty places A car for a long period of time An environment where corrosive gases are present An environment with salty air Handling instructions Do not touch the surface of the photosensitive drum in the cartridge Do not expose the cartridge to unnecessary vibrations or shock Never manually rotate the drum especially in the reverse direction this can cause internal damage and toner s...

Page 76: ...Explorer from Windows Enter the machine IP address http xxx xxx xxx xxx in the address field and press the Enter key or click Go 2 Your machine s Embedded website opens Embedded Web Service overview Information tab This tab gives you general information about your machine You can check things such as the machine s IP address remaining amount of toner ethernet information firmware version and so on...

Page 77: ...us of the machine the estimated level of toner remaining in the toner cartridge s and various other types of information 1 Printing Status The Printer Status Monitor displays the current status of the printer 2 Toner Level View the level of toner remaining in the toner cartridge s 3 Order Supplies Order replacement toner cartridge s online 4 Help me When error occurs Help me button appears You can...

Page 78: ...s Scan To Allows you to scan an image and save it to an application or folder email it or publish it on a web site Image Allows you to edit an image you have saved as a graphic file and send it to a selected application or folder email it or publish it on a web site Print Allows you to print images you have saved You can print images in black and white or color mode if your machine supports it For...

Page 79: ...d send it to the OCR program for text recognition Recommended scan option for OCR Resolution 200 or 300 dpi Image type grayscale or black white Web Scanning an image previewing it and publishing it on a web site using the specified file format for the image you want to publish Settings Customizing settings of Scan To basic functions Allows you to customize settings for Application E mail OCR and W...

Page 80: ...dow 1 Printers Configuration 2 Scanners Configuration 3 Ports Configuration To use the on screen help click Help 3 After changing the configurations click Exit to close the Unified Driver Configurator Printers configuration Printers configuration has the two tabs Printers and Classes Printers tab View the current system s printer configuration by clicking on the machine icon button on the left sid...

Page 81: ...ist Add Printer Allows you to add a new machines Remove Printer Removes the selected machine Set as Default Sets the current selected machine as a default machine Stop Start Stops starts the machine Test Allows you to print a test page to ensure the machine is working properly Properties Allows you to view and change the printer properties Classes tab The Classes tab shows a list of available mach...

Page 82: ...ass Refresh Renews the classes list Add Class Allows you to add a new machine class Remove Class Removes the selected machine class Scanners configuration In this window you can monitor the activity of scanner devices view a list of installed Dell machine devices change device properties and scan images ...

Page 83: ...and type of your scanner Properties Allows you to change the scan properties and scan a document Ports configuration In this window you can view the list of available ports check the status of each port and release a port that is stalled in a busy state when its users has terminated the job for any reason ...

Page 84: ...propriate port sharing mechanism that is used by Dell printer and scanner drivers The drivers talk to their devices via so called machine ports The current status of any machine port can be viewed via the Ports configuration The port sharing prevents you from accessing one functional block of the machine device while another block is in use When you install a new machine device onto your system it...

Page 85: ...bon paper or carbon backed paper Coated paper Onion skin or thin paper Wrinkled or creased paper Curled or rolled paper Torn paper Remove all staples and paper clips before loading Make sure any glue ink or correction fluid on the paper is completely dry before loading Do not load originals that include different sizes or weights of paper Do not load booklets pamphlets transparencies or documents ...

Page 86: ...gazine is thicker than 30 mm start copying with the lid open Be careful not to damage the scanner glass You may get hurt Do not put your hands on the scanner unit while closing the scanner lid The scanner lid may fall on your hands andcause injury Do not look the light from inside of the scanner while copying or scanning It is harmful to eyes In the document feeder Using the document feeder you ca...

Page 87: ...our machine are described in print media specifications See Print media specifications Desired outcome The print media you choose should be appropriate for your project Brightness Some print media are whiter than others and produce sharper more vibrant images Surface smoothness The smoothness of the print media affects how crisp the printing looks on the paper Some print media may meet all of the ...

Page 88: ...e lock 4 Paper width guide 1 With one hand press and hold the guide lock and with the other hand hold the paper length guide and support guide together Slide the paper length guide and support guide to locate them in the correct paper size slot 2 Flex or fan the edge of the paper stack to separate the pages before loading papers Insert the paper into the tray 3 After inserting paper into the tray ...

Page 89: ... you want to print facing down 4 Insert the tray back into the machine 5 When you print a document set the paper type and size for the tray For information about setting the paper type and size See Setting the default tray and paper If you experience problems with paper feeding check whether the paper meets the media specification Then try placing one sheet at a time in the manual tray See Print m...

Page 90: ...ay 1 and remove overlapping papers then try printing again When paper does not feed well while printing push the paper in manually until it starts feeding automatically 2 Squeeze the manual tray paper width guides and adjust them to the width of the paper Do not force them too much or the paper will bent resulting in a paper jam or skew 3 To print in application open an application and start the p...

Page 91: ...arency paper Envelope 75 to 90 g m2 20 to 24 lb envelope Preprinted 75 to 90 g m2 20 to 24 lb preprinted letterhead paper Cotton 75 to 90 g m2 20 to 24 lb cotton paper Recycled 75 to 90 g m2 20 to 24 lb recycled paper When you use recycled paper as a used paper printouts might be wrinkled Archive 70 to 90 g m2 19 to 24 lb If you need to keep the print out for a long period time such as archives se...

Page 92: ...e the fuser For the best print quality position margins no closer than 15 mm 0 59 inches from the edges of the envelope Avoid printing over the area where the envelope s seams meet Transparency To avoid damaging the machine use only transparencies designed for use in laser printers Transparencies used in the machine must be able to withstand machine s fusing temperature Place them on a flat surfac...

Page 93: ...hes wide or 127 mm 5 00 inches long In the software application set margins at least 6 4 mm 0 25 inches away from the edges of the material If media weight is over 160 g m2 43 lb try printing in the rear cover face up Letterhead Preprinted paper Single sided Double sided Tray1 Face down Face up Manual tray Face up Face down Letterhead Preprinted paper must be printed with heat resistant ink that w...

Page 94: ...ght arrow until System Setup appears and press OK 3 Press the left right arrow until Paper Setup appears and press OK 4 Press the left right arrow until Paper Type appears and press OK 5 Press the left right arrow to select the paper tray you want and press OK 6 Press the left right arrow to select the paper type you want 7 Press OK to save the selection 8 Press Stop Clear to return to ready mode ...

Page 95: ...tion will make the print speed slow 1 Press Menu on the control panel 2 Press the left right arrow until System Setup appears and press OK 3 Press the left right arrow until Maintenance appears and press OK 4 Press the left right arrow until Paper Stacking appears and press OK 5 Press the left right arrow until On appears and press OK 6 Press Stop Clear to return to ready mode Getting a small size...

Page 96: ...HTTP S IPSec See IPv6 Configuration Introducing useful network programs There are several programs available to setup the network settings easily in network environment For the network administrator especially managing several machines on the network is possible Before using the programs below set the IP address first Embedded Web Service Web server Embedded on your network machine which allows yo...

Page 97: ...from your computer If your machine has a control panel you can also change IP address using the machine s control panel In an office environment we recommend that you contact a network administrator to set this address for you IP setting using control panel 1 Connect your machine to the network with a network cable 2 Turn on the machine 3 Press Menu on the control panel 4 Press the left right arro...

Page 98: ...ay need to have this information assigned by a network manager before proceeding MAC Address Find the machine s MAC address from the Network Configuration Report and enter it without the colons For example 00 15 99 29 51 A8 becomes 0015992951A8 IP Address Enter a new IP address for your printer For example if your computer s IP address is 192 168 1 150 enter 192 168 1 X X is number between 1 and 2...

Page 99: ... and eject the installation CD ROM If necessary restart the computer s firewall You have successfully changed the IP address subnet mask and gateway IP setting using SetIP Program Linux SetIP program should be automatically installed during the printer driver installation 1 Print the machine s network configuration report to find your machine s MAC address 2 Open the opt Dell mfp share utils 3 Dou...

Page 100: ...h the letter which represents your drive Click OK If you use Windows Vista Windows 7 and Windows 2008 Server R2 click Start All programs Accessories Run Type X Setup exe replacing X with the letter which represents your drive and click OK If the AutoPlay window appears in Windows Vista Windows 7 and Windows 2008 Server R2 click Run Setup exe in Install or run program field and click Continue or Ye...

Page 101: ... 5 seconds then release Example IP Address is 13 121 52 104 To find a shared network printer UNC Path select Shared Printer UNC and enter the shared name manually or find a shared printer by clicking the Browse button If you cannot find your machine in network please turn off the firewall and click Update For Windows operating system Start Control Panel and start windows firewall and deactivate th...

Page 102: ...ons folder System Preferences and click Print Fax 12 Click Add on the Printer List For Mac OS X 10 5 10 6 click the icon a display window will pop up 13 For Mac OS X 10 3 select the IP Printing tab For Mac OS X10 4 click IP Printer For Mac OS X 10 5 10 6 click IP 14 Select Socket HP Jet Direct in Printer Type When printing a document containing many pages printing performance may be enhanced by ch...

Page 103: ...v6 Configuration TCP IPv6 is supported properly only in Windows Vista or higher If the IPv6 network seems to not be working set all the network setting to the factory defaults and try again See Restoring factory default settings To use the IPv6 network environment follow the next procedure to use the IPv6 address 1 Connect your machine to the network with a network cable 2 Turn on the machine 3 Pr...

Page 104: ...ested by a router DHCPv6 Addr Always use DHCPv6 regardless of router request DHCPv6 Off Never use DHCPv6 regardless of router request 6 Press OK Manual address configuration 1 Start a web browser such as Internet Explorer that supports IPv6 addressing as a URL See Connecting Embedded Web Service For IPv4 enter the IPv4 address http xxx xxx xxx xxx in the address field and press the Enter key or cl...

Page 105: ...opying mode scanner glass 50 dB A Copying mode document feeder 52 dB A Temperature Operation 10 to 32 C 50 to 90 F Storage unpacked 0 to 40 C 32 to 104 F Humidity Operation 20 to 80 RH Storage unpacked 10 to 80 RH a Sound Pressure Level ISO 7779 Configuration tested machine basic installation A4 paper simplex printing Electrical specifications Power requirements are based on the country region whe...

Page 106: ...es A5 148 x 210 mm 5 83 x 8 27 inches A6 105 x 148 mm 4 13 x 5 83 inches Envelope Envelope Monarch 98 x 191 mm 3 87 x 7 50 inches Not available in tray1 75 to 90 g m2 20 to 24 lb bond 1 sheet stacking Envelope No 10 105 x 241 mm 4 12 x 9 50 inches Envelope DL 110 x 220 mm 4 33 x 8 66 inches Envelope C5 162 x 229 mm 6 38 x 9 02 inches Envelope C6 114 x 162 mm 4 49 x 6 38 inches Thick paper Refer to...

Page 107: ...ement PostCard 4x6 Refer to the Plain paper section Not available in tray1 105 to 163 g m2 28 to 43 lb bond 1 sheet stacking Minimum size custom 76 x 127 mm 3 00 x 5 00 inches 60 to 163 g m2 16 to 43 lb bond Maximum size custom 216 x 356 mm 8 50 x 14 02 inches a If media weight is over 120 g m2 32 lb load a paper into the tray one by one b Maximum capacity may differ depending on media weight thic...

Page 108: ... 500 pages 2MMJP a Declared yield value in accordance with ISO IEC 19752 To replace a toner cartridge see Replacing the toner cartridge Depending on the options and job mode used the toner cartridge s lifespan may differ You must purchase supplies including toner cartridges in the same country where you purchased your machine Otherwise it will be incompatible with your machine since the system con...

Page 109: ... Refer to the pictures on the cartridge wrapping paper 6 Slowly shake the cartridge five or six times to distribute the toner evenly inside the cartridge It will assure maximum copies per cartridge If toner gets on your clothing wipe it off with a dry cloth and wash clothing in cold water Hot water sets toner into fabric Do not touch the green underside of the toner cartridge Use the handle on the...

Page 110: ...l System Setup appears and press OK 3 Press the left right arrow until Maintenance appears and press OK 4 Press the left right arrow until Supplies Life appears and press OK 5 Press the left right arrow until the item you want appears and press OK Supplies Info Prints the supply information page Total Displays the total number of pages printed ADF Scan Displays the number of pages scanned using th...

Page 111: ... In some cases white streaks or light printing will still occur even after you have redistributed the toner 1 Open the front door 2 Pull the toner cartridge out 3 Thoroughly roll the cartridge five or six times to distribute the toner evenly inside the cartridge If toner gets on your clothing wipe it off with a dry cloth and wash clothing in cold water Hot water sets toner into fabric Do not touch...

Page 112: ... document remove the jammed document slowly and gently To prevent document jams use the scanner glass for thick thin or mixed paper type originals 1 Remove any remaining pages from the document feeder 2 Open the document feeder cover 3 Gently remove the jammed paper from the document feeder If you see no paper in this area go to step 5 4 Close the document feeder cover Reload the pages you removed...

Page 113: ... right using both hands 1 scanner lid 7 Close the scanner lid Load the removed pages back into the document feeder Tips for avoiding paper curls 1 Open the rear door 2 Pull down the pressure lever on each side 1 Pressure lever Keep the rear cover opened during printing Only use when the printout has more than 20 mm curl ...

Page 114: ...ypes in a tray Use only recommended print media See Setting the paper size and type Ensure that the recommended side of the print media is facing down in the tray or facing up in the manual tray Clearing paper jams When a paper jam occurs a warning message appears on the display To resume printing after clearing paper jams you must open and close the front door To avoid tearing the paper pull the ...

Page 115: ...into place Printing automatically resumes In the manual tray 1 If the paper is not feeding properly pull the paper out of the machine 2 Open and close the front door to resume printing Inside the machine The fuser area is hot Take care when removing paper from the machine 1 Open the front door and pull the toner cartridge out lightly pushing it down 2 Remove the jammed paper by gently pulling it s...

Page 116: ... go to next step 2 Gently pull the paper out of the output tray If you do not see the jammed paper or if there is any resistance when you pull stop and go to the next step 3 Open the rear door 4 Pull the pressure levers down and remove the paper 1 Pressure lever If you do not see the jammed paper go to next step 5 Pull the fuser cover levers down and remove the paper Return the fuser cover levers ...

Page 117: ... The received fax data will be deleted Reconfirm junk fax setup See page 50 Line Busy The receiving fax machine did not answer or the line is already engaged Try again after a few minutes Line Error Your machine cannot connect with the receiving fax machine or has lost contact because of a problem with the phone line Try again If the problem persists wait an hour or so for the line to clear and tr...

Page 118: ...ct the service representatives Load media size in tray number There is no corresponding paper in the corresponding tray Load corresponding paper in the corresponding tray See Loading paper in the tray Memory Full Remove Job The memory is full Press the left right arrow to highlight Cancel or Start then press OK If you select Cancel the machine stops the fax job If you select Start the machine only...

Page 119: ... recommend using non genuine Dell toner cartridge such as refilled or remanufactured Dell cannot guarantee non genuine Dell toner cartridge s quality Service or repair required as a result of using non genuine Dell toner cartridges will not be covered under the machine warranty Replace new Fuser unit The life of the fuser unit has expired Replace the fuser unit with a new one Contact the service r...

Page 120: ...the maximum paper capacity of the tray See Print media specifications Make sure that you are using the correct type of paper See Print media specifications Remove paper from the tray and flex or fan the paper Humid conditions may cause some paper to stick together Multiple sheets of paper do not feed Different types of paper may be stacked in the tray Load paper of only one type size and weight Pa...

Page 121: ...roperly Disconnect the machine cable and reconnect it The connection cable between the computer and the machine is defective If possible attach the cable to another computer that is working properly and print a job You can also try using a different cable The port setting is incorrect Check the Windows printer setting to make sure that the print job is sent to the correct port If the computer has ...

Page 122: ...le to print Turn on Print As Image from the Acrobat printing options It will take longer to print when you print a PDF file as an image The print quality of photos is not good Images are not clear The resolution of the photo is very low Reduce the photo size If you increase the photo size in the software application the resolution will be reduced Before printing the machine emits vapor near the ou...

Page 123: ... machine may be dirty See Cleaning the inside Black background If the amount of background shading becomes unacceptable Change to a lighter weight paper See Print media specifications Check the environmental conditions very dry conditions or a high level of humidity higher than 80 RH can increase the amount of background shading Remove the old toner cartridge and install a new one See Replacing th...

Page 124: ...o try rotating the paper 180 in the tray Back of printouts are dirty Check for leaking toner Clean the inside of the machine See Cleaning the inside Solid Color or Black pages The toner cartridge may not be installed properly Remove the cartridge and reinsert it The toner cartridge may be defective Remove the toner cartridge and install a new one See Replacing the toner cartridge The machine may r...

Page 125: ... image is skewed Ensure that the original is face down on the scanner glass or face up in the document feeder Check that the copy paper is loaded correctly Blank copies print out Ensure that the original is face down on the scanner glass or face up in the document feeder Image rubs off the copy easily Replace the paper in the tray with paper from a new package In high humidity areas do not leave p...

Page 126: ...power is on then restart your computer The USB cable may be improperly connected or the power may be off Fax problems condition suggested solutions The machine is not working there is no display or the buttons are not working Unplug the power cord and plug it in again Ensure that there is power being supplied to the electrical outlet No dial tone Check that the phone line is properly connected Che...

Page 127: ...urther information on Windows error messages Common Linux problems condition Suggested solutions The machine does not print Check if the printer driver is installed in your system Open Unified Driver Configurator and switch to the Printers tab in Printers configuration window to look at the list of available machines Make sure that your machine is displayed on the list If not open Add new printer ...

Page 128: ...rinter and scanner share the same I O interface port the situation of simultaneous access of different user applications to the same port is possible To avoid possible conflicts only one of them at a time is allowed to gain control over the device The other user will encounter device busy response This usually happens when starting a scan procedure An appropriate message box appears To identify th...

Page 129: ...incorrectly Refer to Macintosh User s Guide that came with your computer for further information on Macintosh error messages ...

Page 130: ...t support dell com Select your region on the WELCOME TO DELL SUPPORT page and fill in the requested details to access help tools and information You can contact Dell electronically using the following addresses World Wide Web www dell com www dell com ap Asian Pacific countries only www dell com jp Japan only www euro dell com Europe only www dell com la Latin American and Caribbean countries www ...

Page 131: ...graphics term describing the number of bits used to represent the color of a single pixel in a bitmapped image Higher color depth gives a broader range of distinct colors As the number of bits increases the number of possible colors becomes impractically large for a color map 1 bit color is commonly called as monochrome or black and white BMP A bitmapped graphics format used internally by the Micr...

Page 132: ...S The Domain Name Server DNS is a system that stores information associated with domain names in a distributed database on networks such as the Internet Dot Matrix Printer A dot matrix printer refers to a type of computer printer with a print head that runs back and forth on the page and prints by impact striking an ink soaked cloth ribbon against the paper much like a typewriter DPI Dots Per Inch...

Page 133: ...lts the toner onto the print media It consists of a hot roller and a back up roller After toner is transferred onto the paper the fuser unit applies heat and pressure to ensure that the toner stays on the paper permanently which is why paper is warm when it comes out of a laser printer Gateway A connection between computer networks or between a computer network and a telephone line It is very popu...

Page 134: ...of representatives from national standards bodies It produces world wide industrial and commercial standards ITU T The International Telecommunication Union is an international organization established to standardize and regulate international radio and telecommunications Its main tasks include standardization allocation of the radio spectrum and organizing interconnection arrangements between dif...

Page 135: ...a mechanism that makes a virtual image for print using a laser beam emitted from a laser printer and it is usually green or gray colored and a cylinder shaped An exposing unit of a drum is slowly worn away by its usage of the printer and it should be replaced appropriately since it gets scratches from grits of a paper Originals The first example of something such as a document photograph or text e...

Page 136: ...al In User Service RADIUS is a protocol for remote user authentication and accounting RADIUS enables centralized management of authentication data such as usernames and passwords using an AAA authentication authorization and accounting concept to manage network access Resolution The sharpness of an image measured in Dots Per Inch DPI The higher the dpi the greater the resolution SMB Server Message...

Page 137: ...e capture API for Microsoft Windows and Apple Macintosh operating systems UNC Path Uniform Naming Convention UNC is a standard way to access network shares in Windows NT and other Microsoft products The format of a UNC path is servername sharename Additional directory URL Uniform Resource Locator URL is the global address of documents and resources on the Internet The first part of the address ind...

Page 138: ...all business or home users A shared key or password is configured in the wireless access point WAP and any wireless laptop or desktop devices WPA PSK generates a unique key for each session between a wireless client and the associated WAP for more advanced security ...

Reviews: