


2-12
Magellan
TM
8500Xt Scanner
Interface cables (and display cable, if applicable) should be
routed away from all highly inductive electrical devices, like
motors and conveyor belts, and even away from the unit’s
power cable if possible.
Cables should be easy to remove in the event that replace-
ment is required. A little planning now will save a lot of frus-
tration later.
4. Connect and verify all system operations.
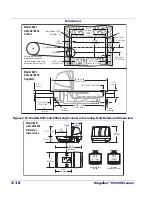
The scanner should be installed so that leading and trailing edges of the
All Weighs™ Platter are flush with the countertop to enhance smooth,
slide-through scanning (reference the insert in
Figure 2-5
). Keep in mind
that the debris chutes on both sides of the platter provide the necessary
clearance for proper scale operation if you are installing a scanning-scale
(you won’t need to provide an additional gap for that).
Summary of Contents for Magellan 8500Xt
Page 1: ...MagellanTM 8500Xt Product Reference Guide...
Page 14: ...12 MagellanTM 8500Xt Scanner NOTES...
Page 70: ...2 40 MagellanTM 8500Xt Scanner NOTES...
Page 88: ...3 18 MagellanTM 8500Xt Scanner Figure 3 6 Removing Replacing the Gasketed DLC Window a b c d...
Page 93: ...Product Reference Guide 4 5 Figure 4 1 7 Segment LED Display 7 Segment Display Models vary...
Page 102: ...4 14 MagellanTM 8500Xt Scanner NOTES...
Page 138: ...6 20 MagellanTM 8500Xt Scanner NOTES...
Page 416: ...7 278 MagellanTM 8500Xt Scanner NOTES...
Page 428: ...A 12 MagellanTM 8500Xt Scanner...
Page 448: ...D 2 MagellanTM 8500Xt Scanner NOTES...
Page 462: ...E 14 MagellanTM 8500Xt Scanner NOTES...
Page 477: ...Product Reference Guide F 15 NOTES...