background image

Retouching and restoring images

97

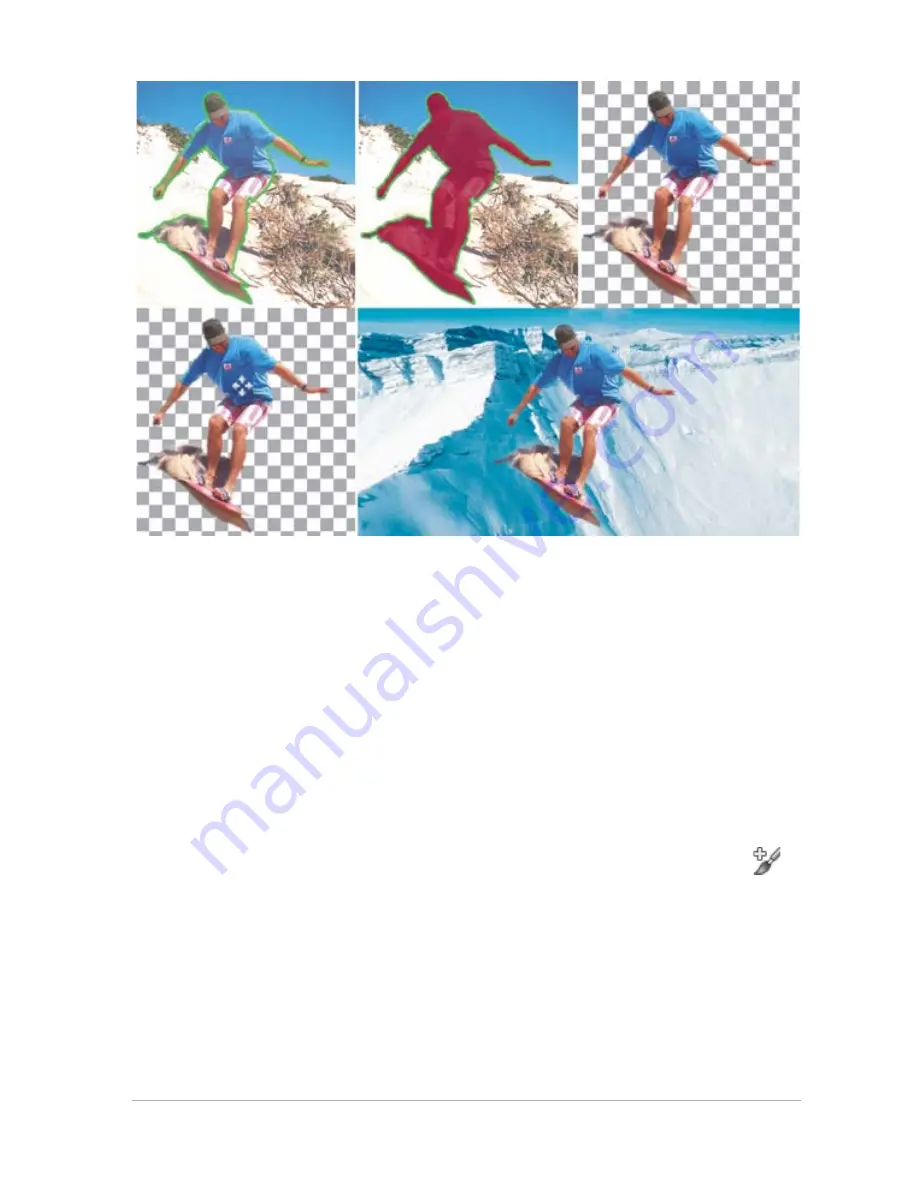
Object Extractor workflow: (1) Outline the edges of the image area; (2) add 
a fill; (3) preview the cutout, and touch it up if necessary; (4) bring the 
cutout into the image window; (5) place the cutout against a different 
background image (optional).

To cut out an image area

Edit workspace

1

On the Layers palette, click the layer that contains the image area 
that you want to cut out.

2

Choose Image 

 Object Extractor. 

The Object Extractor dialog box appears, with the Brush tool 


activated by default.

3

Adjust the brush size by moving the Brush size slider.

4

In the preview area, draw a line along the edges of the image area 
that you want to cut out. 
Ensure that the selection outline slightly overlaps the surrounding 
background and completely surrounds the area in a closed ring.

2

3

 4

5

1

Summary of Contents for PaintShop Pro X4

Page 1: ......

Page 2: ......

Page 3: ...gram 7 Corel Support Services 7 About Corel 7 The digital workflow 9 Learning how to use Corel PaintShop Pro 15 Documentation conventions 15 Using the Help system 17 Using the Learning Center palette...

Page 4: ...nage workspace 51 Capturing and applying edits to multiple photos 54 Displaying and editing photo information 56 E mailing and sharing photos from the Manage workspace 58 Using Quick Review to review...

Page 5: ...using Smart Carver 103 Merging exposures and content 107 Understanding HDR 107 Taking photos for HDR processing 108 Combining photos by using HDR Exposure Merge 109 Merging batches of photos into HDR...

Page 6: ...Renaming layers 153 Viewing layers 154 Changing the order of layers in an image 155 Setting layer opacity 155 Working with selections 157 Creating selections 157 Modifying selections 162 Inverting an...

Page 7: ...nd uninstalling Corel programs Starting and exiting the program Registering Corel products Updating the program Corel Support Services About Corel What s in this user guide This user guide contains th...

Page 8: ...more control over your results and help you take full advantage of photos taken with auto bracketing features on DSLRs Exposure Merge lets you combine photos taken with different exposure settings to...

Page 9: ...e is a classic effect that lets you bring attention to the most important part of your photo by applying a soft outer border that fades to white or black For more information see To apply a Vignette e...

Page 10: ...full range of professional level editing tools No matter which workspace you re in the Organizer palette is always there no need to go to a separate workspace or application to find more photos For m...

Page 11: ...dministrative rights To install Corel PaintShop Pro 1 Close any open applications 2 Insert the DVD in the DVD drive If the setup does not start automatically navigate to the DVD drive on your computer...

Page 12: ...g file format associations in the Help To exit Corel PaintShop Pro Choose File Exit Registering Corel products Registering Corel products is important to ensure that you receive timely access to the l...

Page 13: ...and preferences button and choose Message preferences Mark the options that you want Corel Support Services Corel Support Services can provide you with prompt and accurate information about product f...

Page 14: ...has responded with hundreds of awards for software innovation design and value Our award winning product portfolio includes some of the world s most widely recognized and popular software brands incl...

Page 15: ...etouch print or share you can use the workflow described below as a guide Bring photos into Corel PaintShop Pro Bringing photos into Corel PaintShop Pro is as simple as opening the application in the...

Page 16: ...ifying photos as early in the process as possible The Manage workspace lets you access all the tools you need to cull rate tag and prepare photos for editing or sharing Double clicking a thumbnail ope...

Page 17: ...you edit photos you can return to the Manage workspace to take advantage of multi photo editing features such as Capture editing and Apply editing Capture and Apply editing lets you copy edits made t...

Page 18: ...le composite images isolate image areas with selections and masks and access tone curves histograms and other advanced adjustment tools If you like the full control of working with RAW files you can u...

Page 19: ...and Flickr directly from the application For more information see the following topics Printing on page 171 E mailing and sharing photos on page 169 Expanded creative options for DSLR photography Many...

Page 20: ...ore information see the following topics Taking photos for HDR processing on page 108 Combining photos by using HDR Exposure Merge on page 109 Merging batches of photos into HDR images on page 116 Com...

Page 21: ...out training This section presents the following topics Documentation conventions Using the Help system Using the Learning Center palette Using the Corel Guide Using Web based resources Documentation...

Page 22: ...and press Enter A tip related to photography For best results use a tripod when taking photos for HDR processing A video is available Watch a video Smart Carver A note containing information that is...

Page 23: ...ilable the application searches the local Help system To use the Help system 1 Do one of the following Click Help Help topics 2 In the Help window click one of the following tabs Contents lets you bro...

Page 24: ...one faster The Home page of the Learning Center palette provides a task based workflow which begins with getting your photos into the program From there the workflow takes you through tasks such as or...

Page 25: ...For topics describing a tool the tool becomes active The Tool Options palette and any other relevant palettes appear For topics describing a command associated with a dialog box the dialog box appears...

Page 26: ...Customer Support page listing customer service and technical support contact information Online Support and Resources lets you access the Corel Support Services page to search for answers in the Core...

Page 27: ...tools Exploring the workspaces Corel PaintShop Pro consists of three workspaces Manage Adjust Edit Each workspace contains specific tools and controls to help you accomplish the task at hand quickly a...

Page 28: ...ts Navigation palette helps you find and organize photos You can use the Search box or click the Collection tab or Computer tab to display the folders on your computer or you can sort photos by collec...

Page 29: ...aces this palette lets you select photos as thumbnails and includes a toolbar with a range of commands and options for managing photos For more information about the Manage workspace see Reviewing org...

Page 30: ...quickly find your favorites Toolbar displays buttons for accessing common saving and viewing commands Adjust palette displays tools and controls for adjusting photos Status bar displays information a...

Page 31: ...ying effects to images Toolbars display buttons for common commands For more information see Using toolbars on page 29 Palettes display image information and help you select tools modify options manag...

Page 32: ...an accomplish your photo managing and editing tasks in the most efficient manner To switch between workplaces At the top of the application window click one of the following tabs Manage Adjust Edit Us...

Page 33: ...ustom trays within the palette to match your workflow Tool Options Displays settings and controls for the active tool Materials Lets you choose colors and materials for painting drawing filling and re...

Page 34: ...ush Variance Lets you set additional brush options when you use a paint brush or any other raster painting tool This palette is particularly useful when you use a pressure sensitive tablet or a four d...

Page 35: ...otos Script displays commands for creating and running scripts Standard appears by default toward the top of the workspace and displays the most common file management commands such as saving images u...

Page 36: ...editing In the Edit workspace some of these tools such as the Crop Move and Text tools reside in their own space on the Tools toolbar Most tools however are grouped with other tools that perform simi...

Page 37: ...and Selection Creates an irregularly shaped selection Magic Wand Makes a selection based on pixel values within a specified tolerance level Dropper Lets you choose the foreground stroke color by click...

Page 38: ...than the effects produced by the Dodge and Burn tools Dodge Lets you lighten areas of a photo by clicking or darken areas by right clicking Burn Lets you darken areas of a photo by clicking or lighten...

Page 39: ...Erases raster layer pixels to transparency Background Eraser Erases around the edges of the areas you want to keep in a photo Flood Fill Fills pixels of a similar tolerance level with the current for...

Page 40: ...Simulates drawing with chalk on an Art Media layer Pastel Simulates drawing with pastels on an Art Media layer Crayon Simulates drawing with crayon on an Art Media layer Colored Pencil Simulates drawi...

Page 41: ...copy undo and repeat For more information about performing basic actions see Getting Started with Corel PaintShop Pro in the Help This section presents the following topics Getting photos into Corel...

Page 42: ...e You can open the Navigation palette from any workspace by clicking the Show Hide Navigation button on the Organizer palette Opening and closing images You can open most image formats in Corel PaintS...

Page 43: ...click Browse More Folders on the Navigation palette and from the Browse For Folder dialog box that appears choose the folder you want The folder appears in the Folders list You can work with the file...

Page 44: ...e future The PspImage file format of Corel PaintShop Pro supports layers alpha channels and other features used in creating images It is recommended that you save and edit your images as PspImage file...

Page 45: ...o save your work by clicking the Save As button on the Standard toolbar to avoid overwriting your current file You can save in the last used file format by choosing File Preferences General Program Pr...

Page 46: ...Save As command You can also save your work by clicking the Save button on the Standard toolbar Deleting images You can delete image files by using the Organizer palette To delete an image Edit worksp...

Page 47: ...d searches Adding keyword tags to images Viewing photos by tags Using the calendar to find images Working with thumbnails in the Manage workspace Capturing and applying edits to multiple photos Displa...

Page 48: ...pecific needs you can customize the Manage workspace by choosing the Preview or Thumbnail mode resizing moving or hiding the palettes and selecting display and file preferences For more information se...

Page 49: ...llowing buttons Preview mode displays a large preview area of a single image Thumbnail mode expands and locks the Organizer palette content in the preview area To hide or show the Navigation palette a...

Page 50: ...l folders It offers an easy way to find and search for favorite photos The Computer tab displays a complete list of all folders on your hard drive and desktop When you select a folder in the Navigatio...

Page 51: ...e Browse for Folder dialog box appears 3 Navigate to the folder containing the images you want to view and then click OK The folder is added to the Folders list You can also create a folder on your co...

Page 52: ...ters designating drives tags caption text or image metadata EXIF or IPTC data For more information about the tags that you can assign to images see Adding keyword tags to images on page 47 For more in...

Page 53: ...again simply by clicking it on the Collections tab You can also edit rename or delete a saved search To run a saved search Manage workspace 1 In the Navigation palette click the Collections tab 2 Dou...

Page 54: ...tion palette click the Collections tab 2 Double click Tags to open the list 3 Right click a tag and click Delete To assign a keyword tag to one or more images Manage workspace 1 In the Navigation pale...

Page 55: ...l is not displayed select the thumbnails and then click the Image information button on the Organizer toolbar Viewing photos by tags After you assign a tag to an image you can find the image simply by...

Page 56: ...ppears Dates shown in red indicate images created on that date 3 Choose one of the following options For photos taken today click the Today button For a specific date and month click the Previous Year...

Page 57: ...and applying edits to multiple photos on page 54 In addition you can select one or more RAW file thumbnails to convert the files to another format For more information see Converting RAW photos to ano...

Page 58: ...the Organizer toolbar click the Sort by drop list 2 Choose a sorting option To select more than one thumbnail Manage workspace Do one of the following To select adjacent thumbnails hold down Shift and...

Page 59: ...nizer toolbar click one of the following buttons Rotate Right rotates thumbnails 90 degrees clockwise Rotate Left rotates thumbnails 90 degrees counterclockwise You can also right click a thumbnail an...

Page 60: ...rder and resizing options to a set of photos that you re preparing for a website After you edit a photo in the Adjust or Edit workspace a small editing icon appears on the photo s thumbnail When you r...

Page 61: ...open or closed files for the current session only When you close the program all captured edits are automatically deleted You can also capture the edits by right clicking the selected thumbnail and ch...

Page 62: ...to information The Info palette in the Manage workspace lets you view add and edit information about your photos such as the filename size and creation date as well as EXIF and IPTC metadata You can a...

Page 63: ...h Daylight Overcast Fluorescent Shade Tungsten Partial metering Auto white balance Metering Symbols Custom metering Spot metering Averaged metering Multi spot metering Center weighted metering Pattern...

Page 64: ...s Manage workspace 1 Select on or more thumbnails that have the same caption text 2 In the Info palette click the General tab 3 Highlight the text you want to delete in the Caption box 4 Press Delete...

Page 65: ...in the folder or tray that you want to review The Quick Review window opens 2 Perform a task from the following table To Do the following View the next photo Click the Next button View the previous p...

Page 66: ...older or collection that is currently selected in the Navigation palette A custom tray called My Tray is a blank tray that is created automatically For more information about trays see Working with tr...

Page 67: ...ompare this to an 8 bit JPEG photo which contains 256 brightness levels and which has already had some irreversible processing applied by the camera The Camera RAW Lab in Corel PaintShop Pro acts like...

Page 68: ...mera RAW Lab lets you develop a RAW image by saving a variety of processing settings After processing a RAW image you can leave it as a read only RAW file or open it in the Edit workspace and save it...

Page 69: ...t can help restore detail in blown out areas Drag the Threshold slider in the Reduce noise area to smooth digital noise You can preview the changes to the photo in the Preview area If you want to keep...

Page 70: ...editing features in the Adjust and Edit workspaces you need save the RAW file to a different file format such as JPEG TIFF or the native format pspimage To quickly convert the file you can use Conver...

Page 71: ...aspects of a photo or allow the program to make basic photo adjustments This section presents the following topics Rotating images Cropping images Straightening images Correcting photographic perspec...

Page 72: ...by specifying a degree of rotation or by rotating it interactively on the canvas For information about rotating an image to straighten it according to reference points within the image such as the ho...

Page 73: ...ge sizes such as 4 6 inches or 10 15 centimeters Cropping reduces the amount of hard drive memory required for storing the image In addition cropping can improve color corrections To Do the following...

Page 74: ...rkspace 1 On the Tools toolbar choose the Crop tool By default the crop rectangle appears on the image and the area outside the crop rectangle is shaded 2 Adjust the crop area size by dragging any of...

Page 75: ...yboard Double click inside the crop rectangle or press Enter Set the size of the crop rectangle on the Tool Options palette Specify the values in the Width Height and Units controls Constrain the crop...

Page 76: ...e Tool Options palette or on the floating toolbar for the Crop tool Straightening images You can easily straighten crooked images by aligning a straightening bar with an image feature Corel PaintShop...

Page 77: ...the Apply button You can also double click the image to apply the command Correcting photographic perspective When you take pictures of tall or wide objects the resulting photographs may have perspect...

Page 78: ...choose the Perspective Correction tool A bounding box with corner handles appears on the image 2 On the Tool Options palette choose settings for the following controls Grid lines lets you type or set...

Page 79: ...mand or the Smart Photo Fix command and see if you like the results The One Step Photo Fix command automatically applies a predetermined set of color balancing and sharpening corrections to your photo...

Page 80: ...e photo black gray and white which are used as sampling points The advanced options also let you modify the darkest and lightest pixels of the photo without affecting the photo s color balance For inf...

Page 81: ...asic corrections with Smart Photo Fix Edit workspace 1 Choose Adjust Smart Photo Fix The Smart Photo Fix dialog box appears In the upper portion of the dialog box the Before pane shows the original ph...

Page 82: ...oto of a clear blue sky you may see tiny specks of orange red purple green or other colors Corel PaintShop Pro gives you two fast powerful commands for removing noise from your photos One Step Noise R...

Page 83: ...oval command For more information about this command see Removing digital noise in the Help To remove digital noise quickly Edit workspace Choose Adjust One Step Noise Removal After a brief pause the...

Page 84: ...ols in the White Balance group box You can tweak the colors by adjusting values in the Temperature and Tint controls in the Enhance Color Balance group box To correct faded colors Edit workspace 1 Cho...

Page 85: ...the photo s lightest and darkest pixels Clarity lets you adjust the level of detail in the image by analyzing contrast within localized areas For more information about adjustment filters in the Brig...

Page 86: ...to A value of zero preserves the original setting 3 Type or set a value in the Clarity control A positive number increases detail a negative number decreases detail and focus A value of zero preserves...

Page 87: ...ear focus on the person You can apply the Depth of Field effect to draw attention to the subject in your photo To create an area of focus by using the Depth of Field effect Edit workspace 1 In the Edi...

Page 88: ...re shape for the blurred area Click one of the following buttons Circular Aperture Shape Hexagonal Aperture Shape Adjust the transition between the area in focus and the blurred area Move the Feather...

Page 89: ...n presents the following topics Removing red eye Applying cosmetic changes Removing scratches Removing flaws and objects Erasing image areas Cutting out image areas Recoloring image areas for a realis...

Page 90: ...advanced red eye removal method see To use advanced options for red eye removal in the Help The Red Eye tool replaces the red color in the subject s pupil with a dark gray color restoring a natural l...

Page 91: ...ng teeth by using the Toothbrush mode of the Makeover tool fixing bloodshot eyes by using the Eye Drop mode of the Makeover tool adding a suntan by using the Suntan mode of the Makeover tool thinning...

Page 92: ...ange from 1 to 100 Higher values apply more of the source material enclosed in the outer circle to the blemish area enclosed in the inner circle 5 Click directly over the blemish You can zoom in on th...

Page 93: ...ly click over the bloodshot portion of the eye To apply a suntan Edit workspace 1 On the Tools toolbar choose the Makeover tool 2 On the Tool Options palette choose the Suntan mode 3 Type or set a val...

Page 94: ...rtion of the selection box you drag 4 Position the pointer just outside the wrinkle and carefully drag over the wrinkle so that the wrinkle is enclosed in the inner rectangle The wrinkle is covered by...

Page 95: ...s or lips However if other areas in your photo are affected because they are similar in color to the skin tone you can use a selection to isolate the area you want to smooth For more information about...

Page 96: ...tches Edit workspace 1 On the Layers palette select the layer that contains the area you want to remove 2 On the Tools toolbar choose the Scratch Remover tool 3 On the Tool Options palette choose one...

Page 97: ...and objects in your images by using the Clone Brush tool or the Object Remover tool The Clone Brush tool lets you remove flaws and objects by painting over them with another part of the image The pain...

Page 98: ...tool in that it lets you identify the area to remove and then choose a background for covering that area The Object Remover tool was used to remove one boat from the water To clone a part of an image...

Page 99: ...e area 4 Drag in the image where you want to paint the cloned area When you clone an image area you must select a source area with data If your image contains a selection you must right click within t...

Page 100: ...ons palette click the Apply button 8 Choose Selections Select None to deselect the selection You can also create a selection by using any of the selection tools before you activate the Object Remover...

Page 101: ...options you want 3 Drag in the image to erase If you erase the background layer the Eraser tool erases to transparency and the layer is automatically promoted to a raster layer To erase the background...

Page 102: ...n you work on it with the Background Eraser tool Cutting out image areas You can use the Object Extractor to cut out an image area from the surrounding background You can then edit the cutout separate...

Page 103: ...space 1 On the Layers palette click the layer that contains the image area that you want to cut out 2 Choose Image Object Extractor The Object Extractor dialog box appears with the Brush tool activate...

Page 104: ...ection outline Choose the Eraser tool and drag over the selection marquee that you want to delete Refine the edge detail in the final result Move the Accuracy slider to a higher value if the object ha...

Page 105: ...e shading of the specified color The Color Changer tool detects and analyzes variations in image brightness and applies the recoloring based on that illumination It lets you adjust Tool Options palett...

Page 106: ...the Style drop list and choose a solid color If the Materials palette is not displayed choose View Palettes Materials For realistic looking colors set the Saturation value in the Material Properties d...

Page 107: ...s of changed color that you want to restore You can then merge the layers You can also Use a color from the current image Choose the Dropper tool click the color you want in the image and then choose...

Page 108: ...dd a border without flattening the image by changing the canvas size For more information see Resizing the canvas in the Help It s easy to add a border around your image To add a border to an image Ed...

Page 109: ...ets you make a photo narrower wider shorter or longer without distorting the content By automatically detecting and removing zones in the picture that have little structural detail this feature lets y...

Page 110: ...the Object Removal area you can move the Brush Size slider to the left to decrease the size of the brush or to the right to increase the size of the brush 3 Scale the photo by applying one or more of...

Page 111: ...photo height Type or set a value in the Height box Note The maximum height is double the height of the original photo Reduce the photo width by 1 pixel increments Click the Contract the image horizon...

Page 112: ...ich you have applied the Remove brush Click the Auto contract horizontally button to remove red painted areas Reduce the photo height by automatically removing the areas to which you have applied the...

Page 113: ...elements from multiple photos into one image If you have a DSLR camera you likely have features that can help you take multiple photos of the same scene This section presents the following topics Unde...

Page 114: ...e is then evenly exposed resolving details in the darkest areas without losing definition in the brightest areas And when pushed beyond the corrective boundaries HDR can produce an unreal plastic or e...

Page 115: ...a maximum of nine What exposure settings should I use Try an initial setting of 2 0 exposure value EV between photos If you are taking a greater number of photos you can set the exposure at lower incr...

Page 116: ...ocess Merge Choose your merge settings and if required apply custom editing HDR Adjustments After merging your photos you can adjust them and save the results to an editable HDR file before finalizing...

Page 117: ...R Adjustments After you merge your photos you can adjust the resulting HDR image by applying a preset customizing a preset or by creating the look you want from scratch The key is to experiment You ca...

Page 118: ...the image To choose merge options for Exposure Merge Step 1 1 In the Manage workspace select the thumbnails for the photos that you want to merge An orange outline appears around the thumbnails of sel...

Page 119: ...iew area for alignment issues and ghosting issues If you want to tweak your merge settings click Back to return to the Step 1 window HDR Exposure Merge and Photo Blend are part of the same merge utili...

Page 120: ...ep 2 HDR Adjustments window do any of the following to achieve the look you want In the Presets area click a preset thumbnail Mark the White Balance check box and click Auto or click the Dropper tool...

Page 121: ...ne window appears To manage presets in Exposure Merge In the Presets area of the Step 2 HDR Adjustments window perform a task from the following table To Do the following Save your adjustments as a pr...

Page 122: ...he rectangle to choose a preview area Merging batches of photos into HDR images If you use auto bracketing on a regular basis you may accumulate many sets of photos that can be processed as HDR high d...

Page 123: ...ck box 6 In the Group photos by drop list choose one of the following Sets lets you choose a number in the Photos per set box This option works well if you consistently shoot bracketed photos in prede...

Page 124: ...a group shot where one person blinks or looks away simply swap in a better pose from another photo Get creative by showing the same person multiple times in a single photo Photo Blend can be used to...

Page 125: ...ea and drag over the area that you want to remove Click Auto brush if you want the application to auto detect the differences between the images Leave the brushmarks as they are to remove ghosting and...

Page 126: ...und click the lock button again You can also Change the brush size Drag the Brush size slider Refine or erase brushstrokes Click Eraser and drag across a brushstroke in the preview area Remove all bru...

Page 127: ...using the Color Picker Choosing colors from an image or the desktop For more information about working with colors and materials including using gradients pattern and textures see Working with colors...

Page 128: ...e you can click to select a color At the bottom of the tab you can click to select white black or three shades of gray Swatches tab displays swatches which are materials you can save to use again Fore...

Page 129: ...ets the foreground to black and the background to white This is helpful when you use the Edit Selection command Transparent button specifies whether the foreground or background material is transparen...

Page 130: ...choosing colors The Color Picker appears when you click the Foreground Stroke Properties box the Background Fill Properties box or one of the two smaller Color boxes It also appears when you click a...

Page 131: ...cimal base 16 numbers the format of HTML color codes To choose a color by using the Color Picker Edit workspace 1 On the Materials palette do one of the following To choose a foreground color click th...

Page 132: ...by clicking a color swatch Click a color swatch in the Basic Colors panel that appears under the color wheel Choose a color by specifying its Red Green and Blue RGB values Type values in the R G and B...

Page 133: ...ther applications such as a color displayed in a word processor To choose a color from the active image Edit workspace 1 On the Tools toolbar choose the Dropper tool 2 On the Tool Options palette set...

Page 134: ...Hold down Ctrl and position your pointer over the area of the desktop that has the color you want 4 Click to select the color The selected color appears in the color or properties box that you chose...

Page 135: ...ng effects Applying Photo Effects Creating vintage style photos with the Time Machine Applying film and filter effects to photos Adding picture frames to images Using the Picture Tube tool Warping ima...

Page 136: ...er You can use the Effect Browser when you want to preview multiple effects before applying them to your image The Effect Browser displays the presets that come with Corel PaintShop Pro as well as any...

Page 137: ...fects To choose an effect from the Effects menu Edit workspace 1 From the Effects menu choose an effect category and choose an effect For example choose Effects Distortion Effects Twirl For most effec...

Page 138: ...3D Effects Artistic Effects or Photo Effects Corel PaintShop Pro scans the selected folder and creates thumbnails of the image with each effect applied to it 3 Click a thumbnail image to choose an ef...

Page 139: ...tyle photos with the Time Machine on page 139 You can also Modify the selected preset Click Modify and adjust the settings in the dialog box for the effect Note This button is unavailable for effects...

Page 140: ...late taking a photo with black and white film To modify the effect you can apply a wide range of RGB values as well as adjust image brightness and clarity Filter color adjustments in the Black and Whi...

Page 141: ...ars to be transformed into a miniature model right You can also use Selective Focus to apply a quick depth of field effect to any photo For general information about depth of field see Controlling dep...

Page 142: ...pears 2 Modify the settings you want and click OK To apply the Sepia Toning effect Edit workspace 1 Choose Effects Photo Effects Sepia Toning The Sepia Toning dialog box appears 2 Type or set a value...

Page 143: ...e of the preview area when your pointer displays the move cursor drag the area of focus to the position you want 4 Drag the rotation handle the box at the end of the short line to rotate the area of f...

Page 144: ...orkspace 1 Click Effects Photo Effects Vignette 2 In the Area of focus choose a selection tool and drag in the Before pane to set the edge for the effect 3 Drag the Dark Light slider to set an edge co...

Page 145: ...ime Machine Edit workspace 1 Choose Effects Photo Effects Time Machine 2 Click one of the thumbnails above the timeline to choose an effect 3 Move the Intensity slider to adjust the appearance of the...

Page 146: ...atic or more subtle Some Film Looks also change the contrast or softness of photos The Vibrant Foliage Film Look enhances blues and greens Creative Filters Creative Filters simulate the effect achieve...

Page 147: ...frames mats or photo edges or a variety of other styles The frame is applied on a separate layer which can be edited like any other layer You can add a frame around your image To Do the following App...

Page 148: ...os for a scrapbook and each photo is on a separate layer you can frame each photo by choosing this option The frame layer is named after the original layer with the words Picture Frame appended to the...

Page 149: ...you apply various preset images to your photos to create unique effects Picture tubes are PspTube files Each picture tube file is made up of a series of images arranged in rows and columns called cel...

Page 150: ...the desired picture tube and then paint with it or open the PspTube file in Corel PaintShop Pro 3 If necessary adjust the settings on the Tool Options palette such as Scale and Step 4 In the image win...

Page 151: ...on about warping by using a grid see To warp image areas by using a grid in the Help To warp image areas by using a brush Edit workspace 1 On the Tools toolbar choose the Warp Brush tool 2 On the Tool...

Page 152: ...applied warps 3 Specify the brush options such as size and hardness Note Unlike other brushes the size of the Warp Brush tool can be adjusted only by using the control on the Tool Options palette not...

Page 153: ...ion presents the following topics Understanding layers Using the Layers palette Creating layers Renaming layers Viewing layers Changing the order of layers in an image Setting layer opacity For more i...

Page 154: ...the image creating photo compositions adding text or applying other effects the use of layers is highly recommended Layers are like separate sheets that you combine to create a final composition The...

Page 155: ...Art Media tool from the Tools toolbar and mark the Trace check box on the Tool Options palette an Art Media layer is created automatically Use the Art Media brushes to create impressionistic effects...

Page 156: ...lette Create a panoramic photo Take a series of photos with overlapping subject matter Create an image with a canvas large enough to display a panorama and then copy each photo onto a separate layer D...

Page 157: ...ayer you must select the layer that you want to work on Changes to the image affect only the selected layer also called the active layer You can select only one layer at a time For more information ab...

Page 158: ...ally when you use the Text tool Art Media tools or vector drawing tools such the Pen tool or the Preset Shape tool To create a layer from the Layers palette Edit workspace 1 On the Layers palette clic...

Page 159: ...her color depth such as a 256 color indexed image Corel PaintShop Pro automatically converts it to 16 million colors Renaming layers As you add layers to an image you may find it convenient to rename...

Page 160: ...le button when the layer is displayed Visibility Toggle button when the layer is hidden Hiding a layer group hides all layers within that group To show one layer only right click the layer and choose...

Page 161: ...w position in the stack A gray line shows the layer s position as you drag When you drag a layer the cursor changes to a hand A cursor displaying a null symbol indicates that the selected item cannot...

Page 162: ...e If the layer is in a layer group that is set to 50 percent opacity then the pixel appears as 12 5 percent opaque To set the opacity of a layer Edit workspace 1 On the Layers palette select the layer...

Page 163: ...on marquee which is a series of black and white dashes that outlines the selection This section presents the following topics Creating selections Modifying selections Inverting and clearing selections...

Page 164: ...ate a selection of a specific shape such as a rectangle square ellipse circle or star Freehand Selection tool lets you create a selection around the edges of an object such as petals of a flower or fi...

Page 165: ...trols on the Tool Options palette and modify them if necessary Selection Type specifies the shape of the selection area Mode specifies whether to replace add or remove an existing selection Replace is...

Page 166: ...ade width 0 to 200 pixels Smoothing specifies the amount of smoothing to apply to the selection border Anti alias applies a smooth edge to a selection by making pixels semitransparent Use all layers s...

Page 167: ...llowing controls on the Tool Options palette and modify them if necessary Tolerance controls how closely the selected pixels match the pixel you click in the image At low settings only similar pixels...

Page 168: ...ixels you select by undoing the selection adjusting the Tolerance setting and making a new selection Modifying selections Selections can be modified in various ways You can modify a selection by addin...

Page 169: ...ve Inverting and clearing selections Sometimes the easiest way to make a complicated selection is to select the part of the image that you don t want and then invert the selection For example in a pic...

Page 170: ...ck into the image After clearing the selection you can resume your editing of the entire image To invert a selection Edit workspace Choose Selections Invert The selection marquee now encloses the prev...

Page 171: ...of text to your images You can apply vector text raster text and text as a selection The type of text you apply depends on the effect you want to create Vector text which is used in most instances is...

Page 172: ...on the Tool Options palette set the Stroke width control to 1 0 or greater 4 On the Tool Options palette choose one of the following text types from the Create As drop list Vector creates fully editab...

Page 173: ...colors for the text outline and fill see Using the Materials palette on page 121 You can also apply the text after you have typed it by double clicking the area outside the text object To delete text...

Page 174: ...cters you want to change by dragging over them Note You can also select the entire text by pressing Ctrl A 3 On the Tool Options palette perform a task from the following table and click the Apply but...

Page 175: ...rkspace 1 Choose File E mail and choose one of the following options Active image lets you send the photo that is currently active in the image window All open images lets you send all the photos that...

Page 176: ...application when you are connected to the Internet To upload photos to a sharing site 1 In the Organizer palette available from any workspace select the photos that you want to share If the Organizer...

Page 177: ...s many ways to print images You can print from the Manage workspace Edit workspace or Adjust workspace You can use a template or use a custom layout to meet specific size and layout requirements You c...

Page 178: ...lick Printer The Print dialog box appears 3 Choose a printer from the Name drop list and click OK 4 Click the Placement tab and type or set a value in the Number of copies control 5 In the Orientation...

Page 179: ...x in the Print Marks group box 9 Click Print To print a contact sheet Manage workspace 1 In the Organizer palette select the files that you want to print 2 On the Organizer toolbar click the Organizer...

Page 180: ...s the cells are filled with color 5 Select a template and click OK Note If you previously saved images with the template the images appear in the template cells and in the thumbnail list Cells are gra...

Page 181: ...96 98 swapping with foreground 123 Background Eraser tool 33 switching to 96 98 Batch Merge HDR 116 Black and White Film effect 136 blemishes removing 86 bold text formatting 168 borders adding to ima...

Page 182: ...and background 123 using the Color Picker 124 combining batches of HDR photos 116 images 149 photo content 118 photos with Exposure Merge 109 community sites 20 compressing images 38 constraining cro...

Page 183: ...55 capturing image editing 55 images See adjusting images Effect Browser 130 effects applying 129 browsing 132 choosing from Effects menu 131 choosing in Effect Browser 132 creating 149 modifying pres...

Page 184: ...ed edges 71 properties for 121 film effects applying 134 139 Film Looks applying 141 filter effects applying 139 filters applying effect 134 Creative 140 Film 141 finding images 45 by tag 49 Smart Col...

Page 185: ...dynamic range HDR about 107 Histogram palette 27 History palette 27 HSL color model choosing colors from values 126 displaying values 126 HTML codes specifying colors with 126 Hue Up Down tool 33 I i...

Page 186: ...tos See brightening photos lines applying through text 168 erasing straight from backgrounds 96 erasing straight 95 loading images 35 Local Tone Mapping 80 M Magic Wand tool 31 creating selections wit...

Page 187: ...tion 6 images 36 images from the Navigation palette 37 RAW photos 37 Organizer palette 27 e mailing photos from 169 organizing images 41 Overview palette 27 P Paint Brush tool 32 painting with picture...

Page 188: ...w images 22 previewing images 37 images in the Manage workspace 51 print layout templates printing images with 173 print layouts 174 printing active images 172 contact sheets 171 173 cropped images 69...

Page 189: ...image thumbnails 53 images 66 images to specified angles 67 S saturation increasing or decreasing 76 Saturation Up Down tool 33 saving effect settings 132 images 38 scaling photos with Smart Carver 10...

Page 190: ...smoothing skin tone 88 Smudge tool 32 Soften tool 32 sorting image thumbnails 52 special effects See effects spraying images 143 starting the application 6 status bar 24 stitching photos 150 straight...

Page 191: ...area 37 playing videos from 52 rotating 53 sorting 52 viewing for folders 44 zooming in and out 52 tilt shift 135 136 Time Machine effect 133 tones adjusting balance 77 correcting 148 smoothing skin 8...

Page 192: ...4 Vignette 135 138 W Warp Brush tool 34 144 warping image areas 145 images 144 Web based resources accessing 20 workflow 9 workspaces 21 Adjust 23 deleting current images 40 Edit 24 Manage 22 switchin...

Page 193: ...AL DAMAGES WHATSOEVER INCLUDING BUT NOT LIMITED TO LOSS OF REVENUE OR PROFIT LOST OR DAMAGED DATA OR OTHER COMMERCIAL OR ECONOMIC LOSS EVEN IF COREL HAS BEEN ADVISED OF THE POSSIBILITY OF SUCH DAMAGES...

Page 194: ......

Reviews: