background image

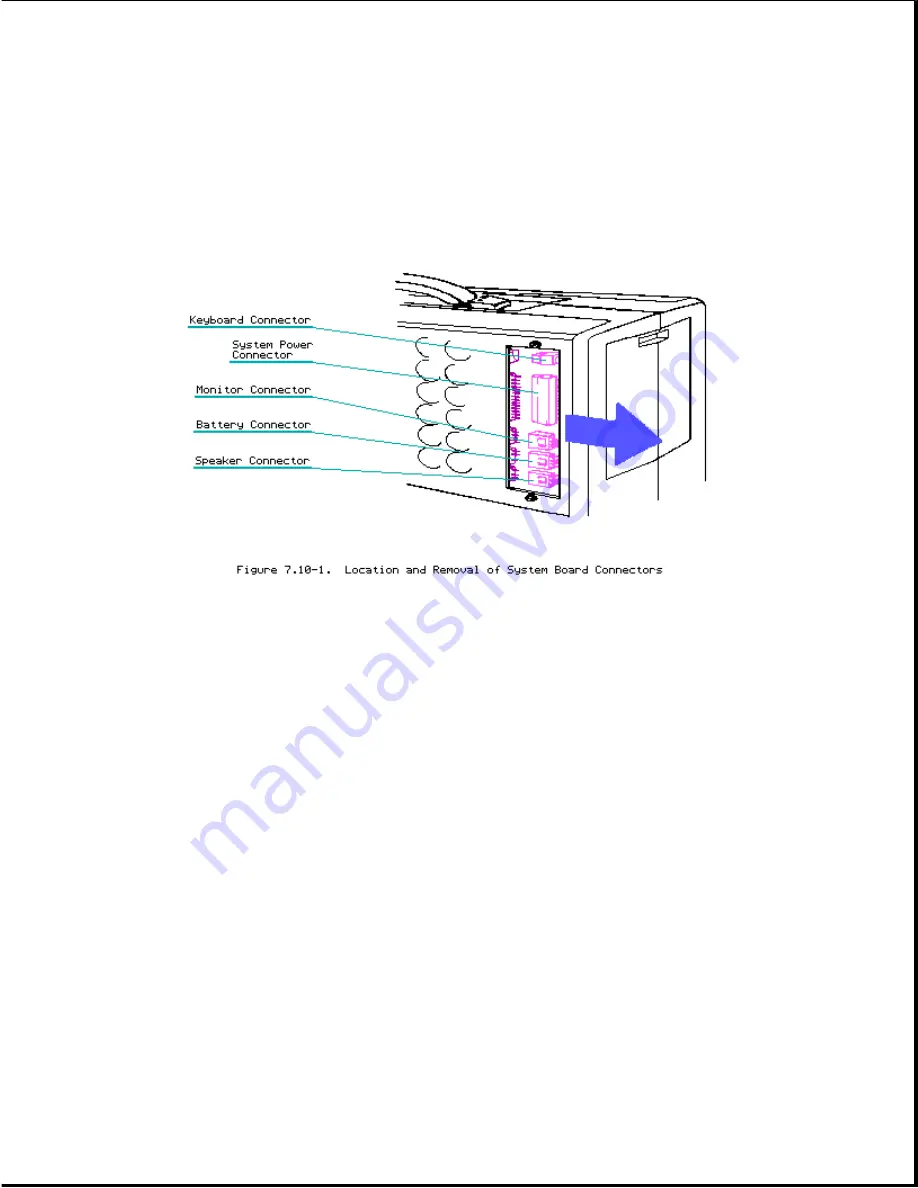
o Monitor power connector (COMPAQ PORTABLE 286 only)
o Battery connector (COMPAQ PORTABLE 286 only)
o Speaker connector

See Figure 7.10-1 for the location of each of these connectors.

NOTE:

Once the battery connector has been disconnected from the COMPAQ

PORTABLE 286 system board, reset the time function found in MS-DOS or in
SETUP.

SETUP is found on both the USER PROGRAMS Diskette and the latest

version of the DIAGNOSTICS Diskette.

5.

Locate and remove the four screws that secure the system board mounting
bracket to the system chassis (Figure 7.10-2).

Summary of Contents for Deskpro 286 - Desktop PC

Page 1: ...ark of Microsoft Corporation MAINTENANCE AND SERVICE GUIDE COMPAQ PORTABLE COMPUTER COMPAQ PLUS PERSONAL COMPUTER COMPAQ PORTABLE 286 PERSONAL COMPUTER Second Edition April 1986 Assembly Number 102901...

Page 2: ...rranty gives you specific legal rights and you may also have other rights that vary from state to state WARNING This equipment has been certified to comply with the limits for a Class B computing devi...

Page 3: ...d the COMPAQ PORTABLE 286 Personal Computer All troubleshooting and repair procedures are detailed to allow subassembly module level repair only CAUTION Because of the complexity of the individual boa...

Page 4: ...he COMPAQ PORTABLE 286 Personal Computers Chapter 8 Jumper Settings Switch Settings and Adjustments provides detailed information for setting jumpers and switches It also provides instructions for adj...

Page 5: ...PAQ computer products Associated Documentation o COMPAQ PORTABLE COMPUTER OPERATIONS GUIDE PN 100001 001 o COMPAQ PLUS PERSONAL COMPUTER OPERATIONS GUIDE PN 100633 001 o COMPAQ PORTABLE 286 PERSONAL C...

Page 6: ...PORTABLE 286 Personal Computer are o Electrical and mechanical o Environmental o Keyboard o Video display o 20 megabyte fixed disk drive o 10 megabyte tape drive o 1 2 megabyte diskette drive o 360 Kb...

Page 7: ...Display Specifications Display o Nine inch diagonal 90 degree deflection o High persistence green phosphor o Etched surface to reduce glare o 80 character by 25 line screen o 40 character by 25 line...

Page 8: ...on fuse rating VDC Output Nominal Current Current Regulation Voltage Amps Amps Tolerance VDC Minimum Maximum Percent 5 0 2 0 10 0 5 5 0 0 0 0 5 5 12 0 1 0 5 0 5 12 0 0 0 0 5 5 These values are maximum...

Page 9: ...Keyboard Cable Length 72 in 1828 8 mm Gauge 28 AWG Video Display Specifications Display o Nine inch diagonal 90 degree deflection o High persistence green phosphor o Etched surface to reduce glare o...

Page 10: ...High Density Diskettes Tracks per Inch 96 Number of Tracks 80 When formatted with MS DOS Data Transfer Rate 300 500 Kb s 360 Kbyte Diskette Drive Specifications Dimensions Height 1 60 in 4 0625 cm De...

Page 11: ...Nominal Current Current Regulation Voltage Amps Amps Tolerance VDC Minimum Maximum Percent 5 0 1 5 15 0 2 5 0 0 0 0 5 5 12 25 1 0 5 0 2 12 25 0 0 1 5 3 internal monitor 12 0 0 0 1 0 5 These values are...

Page 12: ...oller Board o Diskette Printer Controller Board o Asynchronous Communications Clock Board o System Board o Memory POST also detects the type s of mass storage device s installed in the computer When t...

Page 13: ...e latest version of the COMPAQ DIAGNOSTICS Program diskette into drive A and close the drive door 8 Place the ON OFF switch in the ON position See Chapter 4 DIAGNOSTIC Procedures for detailed informat...

Page 14: ......

Page 15: ......

Page 16: ......

Page 17: ...Chapter 3 Setup Please consult the SUPPORT SOFTWARE MAINTENANCE AND SERVICE GUIDE for current information on SETUP...

Page 18: ...Chapter 4 Diagnostic Procedures Please consult the SUPPORT SOFTWARE MAINTENANCE AND SERVICE GUIDE for current information on DIAGNOSTICS...

Page 19: ...rror message results if a problem is encountered during the Power On Self Test program This program runs automatically when the system is turned on The tables list the messages the audible beep messag...

Page 20: ...ecalibration Parity Check 2 XX000B None Expansion RAM Main Memory on COMPAQ YYZZ PORTABLE 286 Audible 1 Short Power On successful COMMON 6 MHz speed Audible 2 Short Power On successful FAST 8 MHz spee...

Page 21: ...run the DIAGNOSTICS Program Follow this procedure until the DIAGNOSTICS Program no longer detects an error condition For assistance in the removal and replacement of a particular subassembly see Chapt...

Page 22: ...ed 104 02 8259 interrupt controller slave test failed 104 03 8259 software RTC is inoperative 105 01 Port bit 6 not at zero 105 02 Port bit 5 not at zero 105 03 Port bit 3 not at zero 105 04 Port bit...

Page 23: ...aker test failed 1 Replace the speaker 2 Replace the system board Error Error Required Code Description Action Memory 2yy xx 201 01 Memory machine ID test The following steps apply to error codes 201...

Page 24: ...Code Description Action Keyboard 3yy xx 301 01 Keyboard short test 8042 The following steps apply to error self test failed codes 301 01 through 304 01 301 02 Keyboard short test 1 Replace the keyboar...

Page 25: ...de 402 02 Printer controller register 2 Check switch 2 on the failed diskette tape controller board see Chapter 8 402 03 Printer data and controller 3 Replace the printer and or the register failed pr...

Page 26: ...402 16 Printer unexpected interrupt received 403 01 Printer pattern test failed Error Error Required Code Description Action Video Display Unit VDU 5yy xx 501 01 VDU controller test failed The followi...

Page 27: ...te drive write read Chapter 8 compare 2 Replace the diskette tape controller board 604 xx Diskette drive random seek 3 Replace the diskette drive drive power and signal cables 4 Replace the diskette d...

Page 28: ...et change line Chapter 8 status 2 Replace the diskette tape controller board 610 22 Failed to clear change 3 Replace the diskette drive power and signal cables 610 23 Failed to set drive type in 4 Rep...

Page 29: ...et to interrupt 3 Error Error Required Code Description Action Serial 11yy xx 1101 11 Serial Port Test COM 2 The following steps apply to all set to interrupt 4 11yy xx related error codes 1101 12 Ser...

Page 30: ...isk drive seek test assembly 5 Replace the system board 1705 xx Fixed disk drive controller test 286 based COMPAQ Personal Computers only 1706 xx Fixed disk drive ready test 1707 xx Fixed disk drive r...

Page 31: ...through 1716 59 1716 10 Failed sector wrap test 1 Check the fixed disk drive 1716 40 Failed cylinder 0 controller board for the proper switch setting 1716 41 Drive not ready see Chapter 8 2 Replace th...

Page 32: ...ler to drive test Computers only failed 1716 58 Failed to write sector buffer 1716 59 Failed to read sector buffer 1716 60 Non COMPAQ fixed disk drive controller ROM Error Error Required Code Descript...

Page 33: ...NEC765 fatal error 1906 21 Got servo pulses 2nd time but not 1st 1906 22 Never got to EOT after servo check Chapter 5 4 Memory Error Codes This section is divided into two parts The first part contain...

Page 34: ...First determine which table to reference see COMPAQ PORTABLE 286 Memory Configuration Next determine which bank to reference and which byte high or low Finally determine the defective chip row locati...

Page 35: ...0 B 1 YY or ZZ Low High Low High 01 U5 U6 U7 U8 02 U20 U21 U22 U23 04 U25 U26 U27 U28 08 U41 U42 U43 U44 10 U47 U48 U49 U50 20 U63 U64 U65 U66 40 U70 U71 U72 U73 80 U81 U82 U83 U84 00 U88 U89 U90 U91...

Page 36: ...oards have been reinstalled in the system begin the problem isolation procedure again to verify proper operation of the CPU memory subsystem Table 5 4 4 COMPAQ Portable and COMPAQ PLUS System Board Me...

Page 37: ...U79 Replace Memory Chip 2002 201 Bank 2 Data Bit 1 U85 or U79 Replace Memory Chip 2004 201 Bank 2 Data Bit 2 U78 or U79 Replace Memory Chip 2008 201 Bank 2 Data Bit 3 U72 or U79 Replace Memory Chip 20...

Page 38: ...ss 40yy 201 256 Kbytes 48yy 201 288 Kbytes 50yy 201 320 Kbytes 58yy 201 352 Kbytes 60yy 201 384 Kbytes 68yy 201 416 Kbytes 70yy 201 448 Kbytes 78yy 201 480 Kbytes 80yy 201 512 Kbytes yy Code Failed Bi...

Page 39: ...M NUMBER A reference number for parts in the list o PART NUMBER The number to use when ordering parts from COMPAQ Computer Corporation o DESCRIPTION The name of the particular part or parts kit This s...

Page 40: ...ist Chassis Front Item Number Part Number Description 1 100025 001 Handle 2 100025 001 Handle Bushing 3 100025 001 Handle End Cap 4 101097 001 Upper Case 5 101098 001 Access Panel 6 100025 001 Screw 1...

Page 41: ...mon Chassis Front Item Number Part Number Description 1 105034 001 Monitor Assembly 2 102709 001 Screw 4 40 1 4 T 10 Torx 3 100436 002 High Voltage Access Plate 4 100330 001 Storage Device Access Plat...

Page 42: ...001 Diskette Drive Shield Half Height These parts are included in the Miscellaneous Hardware Kit PN 102709 001 These parts are included in the Cable Kit PN 100512 001 Part number no longer available...

Page 43: ...1 102709 001 Screw 4 40 x 1 4 T 10 Torx 12 100439 001 System Board Connector Access Plate These parts are included in the Miscellaneous Hardware Kit PN 102709 001 Part number no longer available For p...

Page 44: ...Personal Computers Parts List System Chassis Front Item Number Part Number Description 1 100260 001 Power Cable Harness Assembly 2 102709 001 Screw 4 40 x 1 4 T 10 Torx 3 102709 001 Screw 6 32 x 1 4...

Page 45: ...er part or parts kit numbers used to place part orders with Compaq Computer Corporation Each parts list has three columns which are o ITEM NUMBER A reference number for parts in the list o PART NUMBER...

Page 46: ...ble Table 6 2 2 COMPAQ PORTABLE 286 Personal Computer Parts List Chassis Front Item Number Part Number Description 1 100025 001 Handle 2 100025 001 Handle Bushing 3 100025 001 Handle End Cap 4 101097...

Page 47: ...86 Personal Computer Parts List Common Chassis Front A Item Number Part Number Description 1 105034 001 Monitor Assembly 2 102709 001 Screw 4 40 1 4 T 10 Torx 3 100436 002 High Voltage Access Plate 4...

Page 48: ...cluded in the Miscellaneous Hardware Kit PN 102709 001 These parts are all included in the Cable Kit PN 102933 001 Part number no longer available Table 6 2 4 COMPAQ PORTABLE 286 Personal Computer Par...

Page 49: ...e 12 101299 001 Dual Drive Enclosure 13 101488 001 Tape Drive Cartridge 14 102709 001 Security Lock Switch These parts are all included in the Miscellaneous Hardware Kit PN 102709 001 Part number no l...

Page 50: ...rew 8 32 x 3 8 T 15 Torx 10 101798 001 Power Switch Filter Assembly 11 102930 001 AC Line Fuse 12 100439 001 System Board Connector Access Plate 13 102929 001 replaced by 160272 001 Lithium Battery Th...

Page 51: ...001 Part number no longer available Table 6 2 7 COMPAQ PORTABLE 286 Personal Computer Parts List System Chassis Front Item Number Part Number Description 1 102933 001 System Power Cable 2 102709 001...

Page 52: ...001 System Chassis Assembly 10 102709 001 Tie Wrap 11 102709 001 Push Mount These parts are all included in the Miscellaneous Hardware Kit PN 102709 001 This part is included in the Cable Kit PN 1029...

Page 53: ...wer supply subsystem and the monitor enclosure When procedures differ specific instructions are given Also note that when you are instructed to cut a tie wrap for removal of an assembly you should als...

Page 54: ...ect any peripheral devices printer monitors and so on from the computer 4 Disconnect the AC power cord from its power source and from the computer Figure 7 2 2 Chapter 7 3 Access Cover Removal and Rep...

Page 55: ...ould cause severe electrical shock To remove the access cover 1 Complete the Preparation Procedure in Section 7 2 2 Place the curved end of the access cover lever in the first notch located on the edg...

Page 56: ...e computer from all AC voltage sources can cause dangerous voltages to be present on the power supply and monitor Even when the ON OFF switch is set to the OFF position any electrically conductive mat...

Page 57: ...board If the retainers are not rotated serious internal damage may result Chapter 7 5 High Voltage Access Plate Removal and Replacement To remove and replace the high voltage access plate 1 Complete t...

Page 58: ...e 7 6 1 Lift it off and set it aside To replace the mass storage device access plate reverse Steps 1 through 3 CAUTION In the COMPAQ PORTABLE 286 Personal Computer the mounting screw on the fixed disk...

Page 59: ...reverse Steps 1 through 4 Chapter 7 8 Power Supply Subsystem Removal and Replacement For COMPAQ Portable or COMPAQ PLUS Personal Computers with a serial number 1524020B0001 or above and for COMPAQ POR...

Page 60: ...se the power switch filter assembly the power supply assembly and the fan bracket assembly COMPAQ Portable AC Line Fuse Removal and Replacement To remove and replace the COMPAQ Portable AC line fuse 1...

Page 61: ...a holding area in the fuse box Figure 7 8 3 Lift out the defective fuse and replace it with the spare fuse 4 Slide the fuse box back into the case With your thumb press the cover in until you feel it...

Page 62: ...MPAQ Portable Power Switch Filter Assembly Removal and Replacement To remove the COMPAQ Portable power switch filter assembly 1 Complete the High Voltage Access Plate Removal procedure see Section 7 5...

Page 63: ...es will make the connector grip the pins tighter which will damage the connector 5 Remove the 1 4 inch hex nut that secures the power switch filter assembly ground strap and carefully lift the power s...

Page 64: ...upply Assembly Removal and Replacement To remove the COMPAQ Portable power supply assembly 1 Complete the High Voltage Access Plate Removal procedure see Section 7 5 2 Remove the power switch filter a...

Page 65: ...hexhead screw that is on the lower corner of the power supply assembly Figure 7 8 8 5 Partially close the access door panel to allow the standoffs to disengage the chassis 6 Slide the power supply ass...

Page 66: ...Be sure to securely tighten the mounting screw with the 5 16 inch box end wrench because using only the socket extension wrench may not securely tighten the mounting screw thereby causing grounding p...

Page 67: ...onnector do not pry Pulling on the wires makes the connector grip the pins tighter which will damage the connector 3 Open the access door panel 4 Remove the four screws that hold the fan bracket assem...

Page 68: ...ss hole and chassis To replace the fan bracket assembly reverse Steps 1 through 5 COMPAQ PORTABLE 286 Power Supply Subsystem Removal and Replacement also for COMPAQ Portable and COMPAQ PLUS Personal C...

Page 69: ...o remove the AC line fuse 1 Complete the Preparation Procedure see Section 7 2 2 Slide the access door panel open to expose the power switch filter assembly Figure 7 8 13 3 Insert a flat bladed screwd...

Page 70: ...8 15 Lift out the defective fuse and replace it with the spare one NOTE If the fuse has been replaced a number of times the fuse clips may lose their tension and not make good contact with the fuse Ch...

Page 71: ...rocedure see Section 7 5 2 Open the access door panel 3 Loosen DO NOT REMOVE the screw that secures the fan bracket assembly to the chassis at the rear of the monitor 4 Now remove the remaining three...

Page 72: ...N Pull only on the connector do not pry Pulling on the wires makes the connector grip the pins tighter which will damage the connector 6 Lift the fan bracket assembly up and out of the computer Figure...

Page 73: ...MPAQ PORTABLE 286 Power Supply Assembly Removal and Replacement To remove the Power Supply Assembly 1 Complete the Fan Bracket Assembly Removal procedure 2 Carefully disconnect the power switch filter...

Page 74: ...he upper or lower right corner of the power supply assembly Figure 7 8 20 4 Partially close the access door panel to allow the standoffs to disengage the chassis 5 Slide the power supply assembly towa...

Page 75: ...en the mounting screw with the 5 16 inch box end wrench because using only the socket extension wrench may not securely tighten the mounting screw thereby causing grounding problems COMPAQ PORTABLE 28...

Page 76: ...tie wrap that hold the power switch ground cable 4 Lift the power switch filter assembly out and place it on the chassis Figure 7 8 23 5 Disconnect the power switch filter assembly connector from the...

Page 77: ...oller and Expansion Board Removal and Replacement Before beginning this procedure become familiar with the locations of controller and Controller Board expansion boards and their specific signal cable...

Page 78: ...s by pulling the connectors away from the board Figure 7 9 2 CAUTION Pull only on the connector do not pry Pulling on the wire makes the connector grip the pins tighter which will damage the connector...

Page 79: ...onto each board installed in your computer If you changed to a board of a different height rotate the retainers to match the height of the board If the retainers are not rotated serious internal damag...

Page 80: ...e video display signal cable Figure 7 9 4 NOTE Controller and expansion board retaining screws may be located either inside or outside the chassis A tie wrap secures the video display signal cable Rem...

Page 81: ...ters on the system board and out of the computer Figure 7 9 5 To replace the video display controller board reverse Steps 1 through 4 NOTE Be sure that the board is in the board guide on the left Disk...

Page 82: ...available that are located on both sides of the connector Figure 7 9 6 4 Remove the retaining screw that secures the diskette tape controller board 5 Gently pull the board up and out of its socket J10...

Page 83: ...he computer Also be sure that the board is in the board guide on the left Expansion Board Removal and Replacement To remove COMPAQ memory expansion boards or any other expansion boards installed in th...

Page 84: ...remove and replace memory options in a COMPAQ Portable and COMPAQ PLUS Personal Computer without removing the system board it is not recommended because of the limited amount of space inside the chass...

Page 85: ...ctors NOTE Once the battery connector has been disconnected from the COMPAQ PORTABLE 286 system board reset the time function found in MS DOS or in SETUP SETUP is found on both the USER PROGRAMS Diske...

Page 86: ...x nylon standoffs attached to the bottom of the system board clear the mounting holes Carefully lift the system board out of the chassis Figure 7 10 3 To replace the system board reverse Steps 1 throu...

Page 87: ...sable Alter insertion carefully check that all pins are in the socket and that none are bent or are outside of the socket NOTE The system boards for the COMPAQ Portable and COMPAQ PLUS are quite diffe...

Page 88: ...2 Using the special IC removal tool remove the defective memory or ROM chip s Figure 7 10 6 3 Using the special IC insertion tool replace the defective memory or ROM chip s Figure 7 10 7...

Page 89: ...mponent run the latest version of DIAGNOSTICS to verify that the replaced component functions properly Chapter 7 11 Mass Storage Device Removal and Replacement Mass storage devices are installed in tw...

Page 90: ...diskette drive and blank panel or diskette drive and tape drive or two diskette drives o Enclosure B contains fixed disk drive ONLY Mass Storage Device Enclosure B Removal and Replacement To remove En...

Page 91: ...CAUTION Pull only on the connector do not pry Pulling on the wires makes the connector grip the pins tighter which will damage the connector 5 Raise the computer as shown in Figure 7 11 3...

Page 92: ...the computer to its flat position on the work surface 8 Remove the top mounting screw from Enclosure B Figure 7 11 4 9 Slide Enclosure B towards the rear of the system chassis lift it from the chassi...

Page 93: ...is To do this remove the hex nut at the bottom of the face plate LED assembly before removing Enclosure B To replace Enclosure B reverse Steps 1 through 10 CAUTION When removing the enclosure do not b...

Page 94: ...6 of a COMPAQ PORTABLE 286 Personal Computer CAUTION Pull only on the connector do not pry Pulling on the wires makes the connector grip the pins tighter which will damage the connector 5 Raise the co...

Page 95: ...osure A These screws are shorter than those used in Enclosure B To avoid damaging the drives return the correct screws to the correct locations when replacing the drive assemblies 7 Return the compute...

Page 96: ...8 Slide Enclosure A to the rear of the computer and lift it up and out of the computer Figure 7 11 9 CAUTION When removing the enclosure do not bend the ground strap located on the top...

Page 97: ...s to be removed This guide refers to the device closest to the monitor as 1A and the other device as 2A Figure 7 11 10 NOTE Step 9 describes removing Device 2A Step 10 describes removing Device 1A To...

Page 98: ...ce the drive insulator pad if it was removed when replacing devices in this enclosure To remove Device 1A from the enclosure 10 Remove the two mounting screws from each side of Enclosure A and slide t...

Page 99: ...uter chassis required a redesign of the monitor enclosure Figure 7 12 1 This new design of the monitor enclosure PN 105034 001 no longer available is used in COMPAQ Portable Computers with the serial...

Page 100: ...4 Using the special two piece socket power supply removal tool or box end wrench remove the two screws that secure the monitor enclosure to the wall of the power supply subsystem area Figure 7 12 2 5...

Page 101: ...omputer to its flat position on the work surface 10 Remove the last two screws that secure the monitor enclosure to the top front of the chassis Figure 7 12 4 11 Disconnect the monitor power signal co...

Page 102: ...t the monitor enclosure up and out of the chassis and rest one edge on the chassis Carefully pull the monitor power cable through the hole in the floor of the monitor assembly Lift the monitor enclosu...

Page 103: ...Pulling on the wires makes the connector grip the pins tighter which will damage the connector 3 Position the computer with the keyboard facing you Unlock the keyboard and gently pull the keyboard ca...

Page 104: ...e COMPAQ PORTABLE 286 Personal Computer ONLY The security lock switch assembly consists of the lock and a lock switch To remove the security lock switch assembly 1 Complete removal procedures for all...

Page 105: ...the keyboard from the front of the computer 5 Locate the security lock switch assembly on the Enclosure B front plate 6 Remove the security lock switch assembly by removing the speed clip that secures...

Page 106: ...attery Removal and Replacement NOTE This procedure is to be performed by Authorized COMPAQ Dealers ONLY To remove the battery 1 Complete the system board removal procedure see Section 7 10 and Figure...

Page 107: ...NOTE When the battery is disconnected rerun SETUP when the battery is replaced if CMOS memory has not retained the information entered during SETUP To replace the battery reverse Steps 1 through 3...

Page 108: ...to be changed when the system configuration is changed Any time jumpers are changed in a COMPAQ PORTABLE 286 Personal Computer the SETUP program must be run on the system to change the system configu...

Page 109: ......

Page 110: ...PLUS and COMPAQ PORTABLE 286 NOTE Jumpers J3 and J5 must both be changed at the same time or the video display controller board will malfunction Chapter 8 3 Compaq Portable 286 Fixed Disk Drive Contro...

Page 111: ...MPAQ PORTABLE 286 board For the location of the COMPAQ PORTABLE 286 system board jumpers see Figure 8 4 1 If the speed select jumper ES is changed to the 6 MHz speed pin 2 to pin 3 the system will ope...

Page 112: ...lect Primary or fast Secondary or common speed 8 MHz speed default setting EM Future Use Do not change Do not change default setting E1 E3 System Board Memory 128 Kbytes 640 Kbytes or MS 256 Kbytes or...

Page 113: ...AQ PORTABLE 286 diskette tape controller board For the locations of the COMPAQ PORTABLE 286 diskette tape controller board jumpers and switch see Figure 8 5 1 Table 8 5 COMPAQ PORTABLE 286 Diskette Ta...

Page 114: ...n Function Switch Setting J1 Serial communications open connectors COM1 Shunt Jumper on left side IRQ4 open connectors COM2 on right side IRQ3 J2 Controller address select open connectors on Shunt Jum...

Page 115: ...ettings and the banks for memory expansion Table 8 6 Memory Expansion Board 1 0 to 3 0 Megabyte Address Range Jumper Setting E1 E1 and E5 E6 Banks Installed Resulting Expansion Memory 1 512 Kbytes 1 2...

Page 116: ...either 64K x 1 RAM chips or 256K x 1 RAM chips Bank 3 also consists of nine sockets that can be populated either with 64K x 1 RAM chips or 256K x 1 RAM chips The following chart shows the possible mem...

Page 117: ...itch Position Settings Position 1 2 3 4 5 6 7 8 Description of Function OFF Not Used Always OFF default setting ON Coprocessor Always ON default setting OFF OFF Processor Board Memory Always OFF defau...

Page 118: ...2 tells the system the amount of available RAM NOTE If the ROMs installed in socket s U40 and U47 if available are Revision C or above SW2 is ignored Therefore on system boards of Revision J or above...

Page 119: ...o that pins 5 12 6 11 7 10 and 8 9 are connected To enable Alternate Banks 2 and 3 insert the shunt jumper so that pins 1 16 2 15 3 14 and 4 13 are connected The banks are selected by removing the shu...

Page 120: ...system If two boards are installed incorrect operation will result For locations of the COMPAQ Portable and COMPAQ PLUS asynchronous communications clock board jumper settings see Figure 8 8 1 See Tab...

Page 121: ...ed Chapter 8 9 Output Connector Pin The following tables provide the output connector pin assignments o Table 8 9 1 25 pin asynchronous connector o Table 8 9 2 25 pin parallel connector o Table 8 9 3...

Page 122: ...2 Receive Data RX 3 Request To Send RTS 4 Clear To Send CTS 5 Data Set Ready DSR 6 Signal Ground GND 7 Carrier Detect CD 8 Transmit current loop data 20 mA 9 5 VDC 200 mA fuse on board 10 Transmit cur...

Page 123: ...A 24 Pins 23 and 24 No connection on the full height Serial Interface Board Table 8 9 2 25 Pin Parallel Connector Signal Names and Description Pin Number Strobe 1 Data Bit 0 2 Data Bit 1 3 Data Bit 2...

Page 124: ...begin the adjustment procedure be sure to complete each step before beginning the next one To complete the adjustment procedures you need the following equipment o All tools required to service COMPAQ...

Page 125: ...A caution message similar to the following appears CAUTION DATA WILL BE DESTROYED INSERT A BLANK FORMATTED DISKETTE IN DRIVE A Press the ENTER key when ready 6 Remove the DIAGNOSTICS diskette from the...

Page 126: ...ms 2 Wait approximately 5 to 6 seconds or until you see the displayed value stabilize Remember that this is a continuously cycling test on a COMPAQ Portable or COMPAQ PLUS The values will continue to...

Page 127: ...GNOSTICS Diskette latest version o Set of standard television adjustment tools o Personal Computer Display Template PN 100686 001 No longer available Read the entire procedure carefully and completely...

Page 128: ...splay screen fall within the range specified on the adjustment template Width may change between high and low resolution mode and should be adjusted for a good compromise NOTE When making adjustments...

Page 129: ...ct the character height enough to warrant a readjustment for character height 2 If the vertical linearity control does not exist on your video display unit it is preset and controlled by the video dis...

Reviews: