


• An alarm module
• Power distribution connections and wiring.
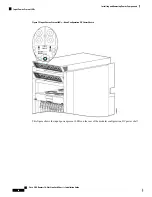
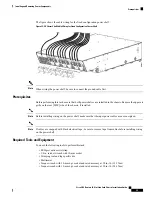
The power shelf is installed in the LCC from the front (PLIM) side. Although differences exist among the
different power shelf types (AC Wye, AC Delta, and DC), they are installed in the same manner. This figure
shows a fixed configuration AC power shelf. The fixed configuration DC power shelf is similar.
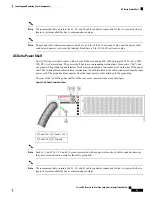
Figure 19: AC Wye Power Shelf with AC Rectifiers Installed
Power shelf captive screws
3
Lever handle captive screws
1
Power shelf I/O switch
4
Lever handle (left handle shown)
2
Prerequisites
Before performing this task, remove the upper grille on the front (PLIM) side of the chassis (if installed).
Do not install the power shelf in the chassis with DC PEMs, AC rectifiers, or alarm module installed in the
power shelf.
Note
Required Tools and Equipment
You need the following tools and part to perform this task:
• ESD-preventive wrist strap
• 1/4-in. x 6-in. long slotted screwdriver
• Fixed configuration AC or DC power shelf
• AC Delta power shelf (Cisco product number CRS-16-LCC-PS-ACD=), or
• AC Wye power shelf (Cisco product number CRS-16-LCC-PS-ACW=), or
• DC power shelf (Cisco product number CRS-16-LCC-PS-DC=)
Steps
To install a fixed configuration power shelf, perform the following steps:
Cisco CRS Routers 16-Slot Line Card Chassis Installation Guide
30
Installing and Removing Power Components
Prerequisites