


SUMMARY STEPS
1.
Use the Phillips screwdriver to remove the four screws, two on each side, that secure the inlet grille screen
to its frame assembly; then carefully set the screen aside.
2.
Install the inlet grille frame assembly by aligning the four screws, two on each side, on the frame to the
screw holes on the chassis and tightening them with the screwdriver.
3.
Attach the inlet grille screen to the frame assembly by aligning the four captive screws on the screen to
the screw holes on the frame assembly and tightening the screws with the screwdriver.
4.
Attach the inlet grille by carefully inserting the tabs on the grille into the hook hanger brackets on the
inlet grille frame.
5.
Press the grille firmly against the grille frame until it snaps onto the ball stud snaps.
DETAILED STEPS
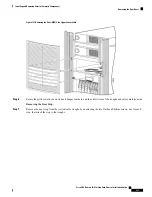
Step 1
Use the Phillips screwdriver to remove the four screws, two on each side, that secure the inlet grille screen to its frame
assembly; then carefully set the screen aside.
Figure 128: Inlet Grille Screen and the Frame Assembly
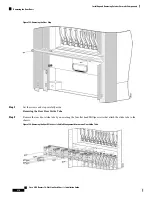
Step 2
Install the inlet grille frame assembly by aligning the four screws, two on each side, on the frame to the screw holes on
the chassis and tightening them with the screwdriver.
Step 3
Attach the inlet grille screen to the frame assembly by aligning the four captive screws on the screen to the screw holes
on the frame assembly and tightening the screws with the screwdriver.
Cisco CRS Routers 16-Slot Line Card Chassis Installation Guide
221
Upgrading Chassis Components
Steps


